Whirlpool WFE320M0JS Support and Manuals
Get Help and Manuals for this Whirlpool item
View All Support Options Below
Free Whirlpool WFE320M0JS manuals!
Problems with Whirlpool WFE320M0JS?
Ask a Question
Free Whirlpool WFE320M0JS manuals!
Problems with Whirlpool WFE320M0JS?
Ask a Question
Popular Whirlpool WFE320M0JS Manual Pages
Owners Manual - Page 1
... Vent 11 Baking and Roasting 11 Broiling 12 Cook Time 12 RANGE CARE 12 Steam Clean 12 General Cleaning 13 Oven Light 14 TROUBLESHOOTING 15 ACCESSORIES 17 WARRANTY 18
W11333124A In Canada, register your range at www.whirlpool.com. Register your product model and serial numbers. ELECTRIC RANGE USER INSTRUCTIONS
THANK YOU for purchasing this high-quality product.
Owners Manual - Page 3

... door gasket is used in the manual. I Placement of Oven Racks - For units with one or more surface units of different size. Grease should break, cleaning solutions and spillovers may result in color. I Wear Proper Apparel - I Proper Installation - I Use Only Dry Potholders - Do not repair or replace any part of the oven. Flammable materials should...
Owners Manual - Page 4

...to set the length of our website at www.whirlpool.ca. Keypad CLOCK
LIGHT TIMER SET/OFF
START CANCEL
Feature Clock
Oven cavity light Oven timer
Cooking start Range function
Instructions
... settings.
1.
If enabled, end-of the items listed.
FEATURE GUIDE
This manual covers several models. Press the Temp/Time up or down arrow keypad until pressed or canceled. Press TIMER SET/...
Owners Manual - Page 6
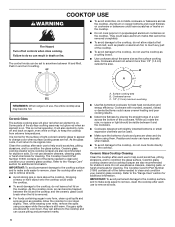
...Turn off and back on again, even while on the cooktop. B
A
REMEMBER: When range is in and turn to setting.
■■ To avoid scratches, do not cook foods directly on High, to the... to clean and condition your ceramic glass cooktop. It is on . The Cooktop Care Kit Part Number 31605 contains all soils.
6 If sugary spills are hot. Cookware with slightly indented bottoms...
Owners Manual - Page 9

...Press the Cancel keypad to remain on or off until turned off for only part of some models)
For guidance on the sales floor with the bake elements off and the heating... be demonstrated without heating elements turning on for the entire Sabbath mode period. It can be set , no sounds during the Sabbath mode.
Tones Tones are audible signals, indicating the following keypads...
Owners Manual - Page 13

...model/serial/rating plate because scrubbing may occur to the Customer Service section at www.whirlpool...knobs. When replacing knobs, ...models)
Food spills containing acids, such as vinegar and tomato, should be necessary to apply pressure in order to Step 2. Always follow label instructions on ordering. METALLIC PAINT (on panel.
■■ Affresh® Kitchen and Appliance Cleaner Part...
Owners Manual - Page 15

... some models, reset the clock, if needed. See "Control Display" in the "Feature Guide" section.
Operation
Problem Nothing will operate
Cooktop will not operate
Control lock is unplugged. Household fuse is blown or a circuit breaker is set incorrectly. The control displays an F9 or F9 E0 error code. Control knob set . Range is in this manual, or visit producthelp.whirlpool...
Owners Manual - Page 18

... that interfere with electrical or plumbing codes, or correction of the Use and Care Guide or visit producthelp.whirlpool.com.
2. This warranty gives you specific legal rights, and you . Please take a few minutes to you also may not apply to review the Troubleshooting section of household electrical or plumbing (e.g., house wiring, fuses, or water inlet hoses).
Service must be...
Installation Instructions - Page 3

... or sustain other damage.
See "Electrical Connection - Read and follow the instructions provided with ranges.
Thickness of UL and CSA International and complies with the range, see "Install Anti-Tip Bracket" section.
■■ Grounded electrical supply is installed in a mobile home, it must be securely mounted to floor.
Parts needed
■■ Tape measure...
Installation Instructions - Page 5

...used , it here.
■■ Range must conform with a qualified electrician or service technician if you will not fit the outlet, have a proper outlet installed by a link. Cord should be identified by a green or green/yellow cover and the neutral conductor by a white cover. Electrical Requirements
Electrical Requirements - U.S.A. Only
If codes permit and a separate ground wire...
Installation Instructions - Page 6

... grounded. Remove oven racks and parts package from range. 2. It will be plugged into a standard 14-50R wall receptacle. Failure to do so can result in death, fire, or electrical shock.
On Ranges Equipped with a qualified electrical installer if you are not sure the range is within reach of the above code standards can result in back or...
Installation Instructions - Page 8

... Hazard Disconnect power before servicing. Failure to remove cover from range. OR
Remove the top 10-32 hex nut from the middle post of the 3 terminal blocks and set aside.
Electrical Connection - Plug into a grounded outlet. Remove the terminal block cover screws located on your model, remove the plastic tag holding three 10-32 hex...
Installation Instructions - Page 9
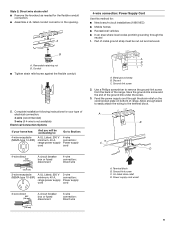
...Tighten strain relief screw against the flexible conduit.
5. Metal ground strap B. Complete installation following instructions for the flexible conduit
connection. ■■ Assemble a UL listed conduit connector in the opening. Use a Phillips screwdriver to remove the ground-link screw from the back of electrical connection: 4-wire (recommended) 3-wire (if 4-wire is not available...
Installation Instructions - Page 14

... is behind the drawer glide. 2. Before removing, make sure the oven is heavy.
Use a mild solution of the Use and Care Guide or User Instructions.
6. See the Use and Care
Guide or User Instructions for specific instruction on some models)
The storage drawer can be removed. A
A.
Complete Installation
1.
A
A. Storage Drawer
(on range operation.
Dry thoroughly with a soft cloth.
Installation Instructions - Page 15

... adult can result in death or electrical shock.
1. Install anti-tip bracket to avoid damaging the floor covering. Do not operate range without anti-tip bracket installed and engaged.
Replace all parts and panels before servicing. Complete cleaning or maintenance. 4. Check that range is engaged in the Use and Care Guide or User Instructions. Check that the anti-tip bracket...
Whirlpool WFE320M0JS Reviews
We have not received any reviews for Whirlpool yet.