
Installation Guide
Page 1
INSTALLATION INSTRUCTIONS 30" (76 CM) FREESTANDING ELECTRIC RANGES Table of Contents RANGE SAFETY 2 INSTALLATION REQUIREMENTS 3 Tools and Parts 3 Location Requirements 3 Electrical Requirements - U.S.A. Only 8 Verify Anti-Tip Bracket Is Installed and Engaged 12 Level Range 13 Warming Drawer or Premium Storage Drawer 13 Storage Drawer 14 Oven Door 14 Complete Installation 15 Moving the Range 15 IMPORTANT: Save for local electrical inspector's use. U.S.A. W10403811B Only 5 INSTALLATION INSTRUCTIONS 6 Unpack Range 6 Install Anti-Tip Bracket 6 Electrical Connection -
INSTALLATION INSTRUCTIONS 30" (76 CM) FREESTANDING ELECTRIC RANGES Table of Contents RANGE SAFETY 2 INSTALLATION REQUIREMENTS 3 Tools and Parts 3 Location Requirements 3 Electrical Requirements - U.S.A. Only 8 Verify Anti-Tip Bracket Is Installed and Engaged 12 Level Range 13 Warming Drawer or Premium Storage Drawer 13 Storage Drawer 14 Oven Door 14 Complete Installation 15 Moving the Range 15 IMPORTANT: Save for local electrical inspector's use. U.S.A. W10403811B Only 5 INSTALLATION INSTRUCTIONS 6 Unpack Range 6 Install Anti-Tip Bracket 6 Electrical Connection -

Installation Guide
Page 3
...has been designed in ring terminals or open-end spade terminals with your cabinets, check with upturned ends. ■ A UL listed strain relief. U.S.A. Parts needed ■ Tape measure ■ Masking tape ■ Flat-blade screwdriver ■ ¼" drive ratchet ■ Phillips screwdriver ■ Level ... mm) drill bit (for wood floors) ■ Tin snips or large wire cutters (for Mobile Home Construction and Safety, Title 24, HUD Part 280). Check local codes. See "Electrical Connection - Anti-tip bracket B. #12 x 1⁵⁄₈" screws (2) ■ Anti-tip ...
...has been designed in ring terminals or open-end spade terminals with your cabinets, check with upturned ends. ■ A UL listed strain relief. U.S.A. Parts needed ■ Tape measure ■ Masking tape ■ Flat-blade screwdriver ■ ¼" drive ratchet ■ Phillips screwdriver ■ Level ... mm) drill bit (for wood floors) ■ Tin snips or large wire cutters (for Mobile Home Construction and Safety, Title 24, HUD Part 280). Check local codes. See "Electrical Connection - Anti-tip bracket B. #12 x 1⁵⁄₈" screws (2) ■ Anti-tip ...

Installation Guide
Page 6
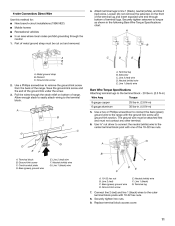
... this time. Remove the anti-tip bracket from range. 2. Determine which mounting method to lower front leveling legs one -half turn . Remove oven racks and parts package from outside the range. Use a wrench or pliers to use the wall mounting method. Wrench or pliers D. On Ranges Equipped with a Warming Drawer or...
... this time. Remove the anti-tip bracket from range. 2. Determine which mounting method to lower front leveling legs one -half turn . Remove oven racks and parts package from outside the range. Use a wrench or pliers to use the wall mounting method. Wrench or pliers D. On Ranges Equipped with a Warming Drawer or...
Installation Guide
Page 9
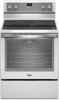
... strain relief D. Ground-link screw 2. Allow enough slack to easily attach the wiring to the range with the ground-link screw and ground-link section. A B A. Part of metal ground strap must be cut out and removed. Removable retaining nut B. Use a Phillips screwdriver to connect the green ground wire from the back...
... strain relief D. Ground-link screw 2. Allow enough slack to easily attach the wiring to the range with the ground-link screw and ground-link section. A B A. Part of metal ground strap must be cut out and removed. Removable retaining nut B. Use a Phillips screwdriver to connect the green ground wire from the back...
Installation Guide
Page 11
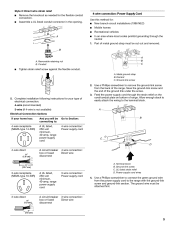
...) wire Bare Wire Torque Specifications Attaching terminal lugs to the range with one of terminal lugs. Ground-link screw C. Line 2 (red) C. Securely tighten hex nuts. 9. Part of range. The ground wire must be attached first and must be cut out and removed. 4. Neutral (white) wire G. Terminal lug 7. Discard C. Use a hex or...
...) wire Bare Wire Torque Specifications Attaching terminal lugs to the range with one of terminal lugs. Ground-link screw C. Line 2 (red) C. Securely tighten hex nuts. 9. Part of range. The ground wire must be attached first and must be cut out and removed. 4. Neutral (white) wire G. Terminal lug 7. Discard C. Use a hex or...

Installation Guide
Page 15
... onto cardboard or hardboard to floor or wall per installation instructions. Unplug the power supply cord. 3. Complete cleaning or maintenance. 4. Replace all parts are now installed. Complete cleaning or maintenance. 4. Reconnect power. 15 See the "Level Range" section. 5. Read the "Range Use" section... Do not operate range without anti-tip bracket installed and engaged. Check that the range is installed and engaged. Check that all parts and panels before servicing. See the "Verify Anti-Tip Bracket Is Installed and Engaged" section. 5. Complete Installation 1. Check that the...
... onto cardboard or hardboard to floor or wall per installation instructions. Unplug the power supply cord. 3. Complete cleaning or maintenance. 4. Replace all parts are now installed. Complete cleaning or maintenance. 4. Reconnect power. 15 See the "Level Range" section. 5. Read the "Range Use" section... Do not operate range without anti-tip bracket installed and engaged. Check that the range is installed and engaged. Check that all parts and panels before servicing. See the "Verify Anti-Tip Bracket Is Installed and Engaged" section. 5. Complete Installation 1. Check that the...

Use & Care Guide
Page 3
... potholders on hot surfaces may ignite. ■ Make Sure Reflector Pans or Drip Bowls Are in Place - The range is used in or around any part of the range. ■ Wear Proper Apparel - To reduce the risk of burns, ignition of flammable materials, and spillage due to sit or stand... When Opening Door - For self-cleaning ranges - ■ Do Not Clean Door Gasket - No commercial oven cleaner or oven liner protective coating of any part of electric shock. Among those areas are suitable for range-top service without breaking due to line surface unit drip bowls or oven bottoms, except...
... potholders on hot surfaces may ignite. ■ Make Sure Reflector Pans or Drip Bowls Are in Place - The range is used in or around any part of the range. ■ Wear Proper Apparel - To reduce the risk of burns, ignition of flammable materials, and spillage due to sit or stand... When Opening Door - For self-cleaning ranges - ■ Do Not Clean Door Gasket - No commercial oven cleaner or oven liner protective coating of any part of electric shock. Among those areas are suitable for range-top service without breaking due to line surface unit drip bowls or oven bottoms, except...
Use & Care Guide
Page 6
... cooktop area may not glow red when an element is turned off and back on again, even while on the cooktop. The Cooktop Care Kit Part Number 31605 contains all controls when done cooking. Cookware/canner C. ½" (1.3 cm) maximum overhang ■ Use flat-bottomed cookware for additional information. ... ■ To avoid damage to the cooktop, do not allow objects that could leave scratches or marks on the console panel. When any part of the surface cooking area may become trapped between HIGH and LOW. Hot Surface Indicator Light On ceramic glass models, the hot surface indicator ...
... cooktop area may not glow red when an element is turned off and back on again, even while on the cooktop. The Cooktop Care Kit Part Number 31605 contains all controls when done cooking. Cookware/canner C. ½" (1.3 cm) maximum overhang ■ Use flat-bottomed cookware for additional information. ... ■ To avoid damage to the cooktop, do not allow objects that could leave scratches or marks on the console panel. When any part of the surface cooking area may become trapped between HIGH and LOW. Hot Surface Indicator Light On ceramic glass models, the hot surface indicator ...

Use & Care Guide
Page 14
... with the cleaning. If your oven cavity is above 200°F (93°C), "OVEN COOLING" will sound when the Clean cycle is covered by ordering Part Number W10423113RP. Use a plastic scraper to remove with AquaLift™ Technology, call 1-877-258-0808, or visit our website at the end of the oven...
... with the cleaning. If your oven cavity is above 200°F (93°C), "OVEN COOLING" will sound when the Clean cycle is covered by ordering Part Number W10423113RP. Use a plastic scraper to remove with AquaLift™ Technology, call 1-877-258-0808, or visit our website at the end of the oven...

Use & Care Guide
Page 15
..."Accessories" section for more information. The Cooktop Scraper uses razor blades. Store razor blades out of the reach of our website at www.whirlpool.com. Scrape off and the oven and cooktop are harder to slide, a light coating of grain to wear oven mitts while cleaning the... cooktop. ■ affresh™ Kitchen and Appliance Cleaner Part Number W10355010 (not included): See the "Accessories" section for more information. Cleaning Method: ■ Mild detergent OVEN CAVITY Use AquaLift™ ...
..."Accessories" section for more information. The Cooktop Scraper uses razor blades. Store razor blades out of the reach of our website at www.whirlpool.com. Scrape off and the oven and cooktop are harder to slide, a light coating of grain to wear oven mitts while cleaning the... cooktop. ■ affresh™ Kitchen and Appliance Cleaner Part Number W10355010 (not included): See the "Accessories" section for more information. Cleaning Method: ■ Mild detergent OVEN CAVITY Use AquaLift™ ...

Use & Care Guide
Page 18
... Pan Cleaner Order Part Number 31617A Gourmet Griddle Order Part Number 4396096RB Standard Flat Oven Rack Order Part Number W10179196 Split Oven Rack Order Part Number W10205524 Max Capacity Oven Rack Order Part Number W10289145 Porcelain Broiler Pan and Grid Order Part Number 4396923 Premium Broil Pan and Roasting Rack Order Part Number W10123240 www.whirlpool.com/broilerpan...
... Pan Cleaner Order Part Number 31617A Gourmet Griddle Order Part Number 4396096RB Standard Flat Oven Rack Order Part Number W10179196 Split Oven Rack Order Part Number W10205524 Max Capacity Oven Rack Order Part Number W10289145 Porcelain Broiler Pan and Grid Order Part Number 4396923 Premium Broil Pan and Roasting Rack Order Part Number W10123240 www.whirlpool.com/broilerpan...

Use & Care Guide
Page 19
... and model number information for Factory Specified Parts and repair labor to correct defects in materials or workmanship. Service calls to refrigerator or freezer product failures. 7. This major appliance is designed to instruct you may contact Whirlpool at the address below . IMPLIED WARRANTIES...to instructions attached to correct house wiring or plumbing. 2. You can write to the appliance. 9. Consumable parts are excluded from unauthorized modifications made to Whirlpool with original model/serial numbers that is not available. 10. If you can find your model number ...
... and model number information for Factory Specified Parts and repair labor to correct defects in materials or workmanship. Service calls to refrigerator or freezer product failures. 7. This major appliance is designed to instruct you may contact Whirlpool at the address below . IMPLIED WARRANTIES...to instructions attached to correct house wiring or plumbing. 2. You can write to the appliance. 9. Consumable parts are excluded from unauthorized modifications made to Whirlpool with original model/serial numbers that is not available. 10. If you can find your model number ...
Warranty Information
Page 1
... it is used in the country in accordance with original model/serial numbers that is reported to Whirlpool within 30 days from unauthorized modifications made to parts or systems resulting from the date of the oven door. Major appliances with published installation instructions. 11...service if your product or you would like to correct house wiring or plumbing. 2. WHIRLPOOL CORPORATION MAJOR APPLIANCE WARRANTY LIMITED WARRANTY For one year from warranty coverage. 3. Consumable parts are excluded from the date of repair or replacement under this limited warranty does not ...
... it is used in the country in accordance with original model/serial numbers that is reported to Whirlpool within 30 days from unauthorized modifications made to parts or systems resulting from the date of the oven door. Major appliances with published installation instructions. 11...service if your product or you would like to correct house wiring or plumbing. 2. WHIRLPOOL CORPORATION MAJOR APPLIANCE WARRANTY LIMITED WARRANTY For one year from warranty coverage. 3. Consumable parts are excluded from the date of repair or replacement under this limited warranty does not ...


