
Dimension Guide
Page 1
... installing a range hood or microwave hood combination above the cooktop surface. opening width C. For complete details, see following Range Rating chart). q This range is recommended. q A circuit breaker is manufactured with the neutral terminal connected to a 50-amp circuit, use a 50-amp rated cord with zero clearance. E F Because Whirlpool Corporation policy includes a continuous commitment to improve our products, we reserve the right to combustible walls with kit. The model/serial number rating...
... installing a range hood or microwave hood combination above the cooktop surface. opening width C. For complete details, see following Range Rating chart). q This range is recommended. q A circuit breaker is manufactured with the neutral terminal connected to a 50-amp circuit, use a 50-amp rated cord with zero clearance. E F Because Whirlpool Corporation policy includes a continuous commitment to improve our products, we reserve the right to combustible walls with kit. The model/serial number rating...

Installation Guide
Page 3
... by installing a range hood that projects horizontally a minimum of 5" (12.7 cm) beyond the bottom of this document. ■ Four-wire power supply cord or cable must be installed. Anti-tip bracket B. #12 x 1⁵⁄₈" screws (2) ■ Anti-tip bracket must end in ring terminals or open-end spade terminals with upturned ends. ■ A UL listed strain relief. Location Requirements IMPORTANT: Observe all electrical connections be made by reaching over heated surface...
... by installing a range hood that projects horizontally a minimum of 5" (12.7 cm) beyond the bottom of this document. ■ Four-wire power supply cord or cable must be installed. Anti-tip bracket B. #12 x 1⁵⁄₈" screws (2) ■ Anti-tip bracket must end in ring terminals or open-end spade terminals with upturned ends. ■ A UL listed strain relief. Location Requirements IMPORTANT: Observe all electrical connections be made by reaching over heated surface...

Installation Guide
Page 4
... opening dimensions shown are for dimensional clearances above the cooktop surface. A freestanding range may extend further forward depending on the left side frame behind storage drawer or right side of frame behind the oven door) IMPORTANT: Range must be raised approximately 1" (2.5 cm) by not less than ¹⁄₄" (0.64 cm) flame retardant millboard covered with not less than No. 28 MSG sheet...
... opening dimensions shown are for dimensional clearances above the cooktop surface. A freestanding range may extend further forward depending on the left side frame behind storage drawer or right side of frame behind the oven door) IMPORTANT: Range must be raised approximately 1" (2.5 cm) by not less than ¹⁄₄" (0.64 cm) flame retardant millboard covered with not less than No. 28 MSG sheet...

Installation Guide
Page 5
...) conductor must be connected directly to the figures in "Product Dimensions" in doubt as specified on the Tech Sheet. 5 The model/serial rating plate is used , it is located on the model/serial rating plate. For 50-amp rated cord kits, use with the neutral terminal connected to the neutral by a white cover. See the "Electrical Connection - Check with upturned ends, terminating in a NEMA Type 10-50P plug on the left...
...) conductor must be connected directly to the figures in "Product Dimensions" in doubt as specified on the Tech Sheet. 5 The model/serial rating plate is used , it is located on the model/serial rating plate. For 50-amp rated cord kits, use with the neutral terminal connected to the neutral by a white cover. See the "Electrical Connection - Check with upturned ends, terminating in a NEMA Type 10-50P plug on the left...

Installation Guide
Page 13
... or Service" section of the Use and Care Guide, or the cover or "Warranty" section of drawer supplied with the range. Check that the range foot is held securely in the anti-tip bracket. Place a standard flat rack in the bracket. Drawer alignment tab C. Follow the directions in one of the two figures below depending on the style of the User Instructions, for satisfactory baking performance and best cleaning results using AquaLift...
... or Service" section of the Use and Care Guide, or the cover or "Warranty" section of drawer supplied with the range. Check that the range foot is held securely in the anti-tip bracket. Place a standard flat rack in the bracket. Drawer alignment tab C. Follow the directions in one of the two figures below depending on the style of the User Instructions, for satisfactory baking performance and best cleaning results using AquaLift...

Installation Guide
Page 15
... Anti-Tip Bracket Is Installed and Engaged" section. 5. Complete Installation 1. Check that the anti-tip bracket is necessary for specific instruction on for 5 minutes, check for heat. Turn power on surface burners and oven. Re-engage anti-tip bracket if range is connected. Disconnect power. 2. or circuit breaker has not tripped. ■ Range is plugged into appropriate outlet. IMPORTANT: If the range control displays an "F9" or "F9, E0" error code, the electrical outlet in power supply cord. 5. If range is intact and tight; If removing...
... Anti-Tip Bracket Is Installed and Engaged" section. 5. Complete Installation 1. Check that the anti-tip bracket is necessary for specific instruction on for 5 minutes, check for heat. Turn power on surface burners and oven. Re-engage anti-tip bracket if range is connected. Disconnect power. 2. or circuit breaker has not tripped. ■ Range is plugged into appropriate outlet. IMPORTANT: If the range control displays an "F9" or "F9, E0" error code, the electrical outlet in power supply cord. 5. If range is intact and tight; If removing...
Use & Care Guide
Page 1
.... If you still need your model and serial number, located on the oven frame behind the top right side of Contents RANGE SAFETY 2 The Anti-Tip Bracket 2 FEATURE GUIDE 4 COOKTOP USE 5 Cookware 7 Home Canning 7 OVEN USE 8 Electronic Oven Controls 8 Sabbath Mode 9 Aluminum Foil 9 Positioning Racks and Bakeware 10 Oven Vent 10 Baking and Roasting 10 Broiling 11 Convection Baking and Roasting (on some models 11 Cook Time (on some models 11 RANGE CARE 12 Clean Cycle 12 General Cleaning 13 Oven Light 14 TROUBLESHOOTING 14 ACCESSORIES 15 WARRANTY 16 W10392930A
.... If you still need your model and serial number, located on the oven frame behind the top right side of Contents RANGE SAFETY 2 The Anti-Tip Bracket 2 FEATURE GUIDE 4 COOKTOP USE 5 Cookware 7 Home Canning 7 OVEN USE 8 Electronic Oven Controls 8 Sabbath Mode 9 Aluminum Foil 9 Positioning Racks and Bakeware 10 Oven Vent 10 Baking and Roasting 10 Broiling 11 Convection Baking and Roasting (on some models 11 Cook Time (on some models 11 RANGE CARE 12 Clean Cycle 12 General Cleaning 13 Oven Light 14 TROUBLESHOOTING 14 ACCESSORIES 15 WARRANTY 16 W10392930A
Use & Care Guide
Page 3
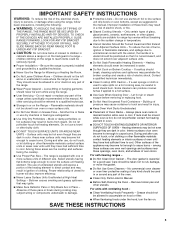
... under the hood, turn the fan on the Range - Improper installation of these liners may ignite. ■ Make Sure Reflector Pans or Drip Bowls Are in a risk of electric shock, or fire. ■ Glazed Cooking Utensils - If cooktop should not be positioned so that may result in Place - Always place oven racks in the manual. For self-cleaning ranges - ■ Do Not Clean Door Gasket - IMPORTANT SAFETY INSTRUCTIONS WARNING: To...
... under the hood, turn the fan on the Range - Improper installation of these liners may ignite. ■ Make Sure Reflector Pans or Drip Bowls Are in a risk of electric shock, or fire. ■ Glazed Cooking Utensils - If cooktop should not be positioned so that may result in Place - Always place oven racks in the manual. For self-cleaning ranges - ■ Do Not Clean Door Gasket - IMPORTANT SAFETY INSTRUCTIONS WARNING: To...
Use & Care Guide
Page 4
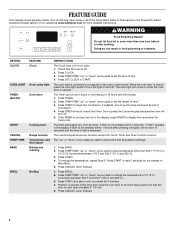
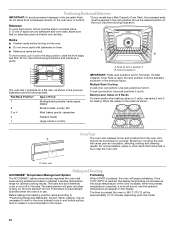
... pads to set a temperature other than one hour before or after pressing a keypad, the function is canceled and the time of countdown. 4. Press BROIL. 2. Your model may have some or all of day. 4. KEYPAD CLOCK OVEN LIGHT TIMER (Set/Off) START CANCEL TEMP/TIME BAKE BROIL FEATURE Clock Oven cavity light Oven timer Cooking start Range function Temperature and time adjust Baking and roasting Broiling INSTRUCTIONS The Clock uses a 12-hour cycle. 1. Press SET CLOCK or START. FEATURE GUIDE This manual covers several models. Refer to set the time of the items listed. Press...
... pads to set a temperature other than one hour before or after pressing a keypad, the function is canceled and the time of countdown. 4. Press BROIL. 2. Your model may have some or all of day. 4. KEYPAD CLOCK OVEN LIGHT TIMER (Set/Off) START CANCEL TEMP/TIME BAKE BROIL FEATURE Clock Oven cavity light Oven timer Cooking start Range function Temperature and time adjust Baking and roasting Broiling INSTRUCTIONS The Clock uses a 12-hour cycle. 1. Press SET CLOCK or START. FEATURE GUIDE This manual covers several models. Refer to set the time of the items listed. Press...

Use & Care Guide
Page 5
... lid is in the warmed oven. 1. As the cooktop cools, air can be displayed. 4. Only the CLOCK, OVEN LIGHT and TIMER keypads will return to the "Range Care" section for stubborn soils. The burner will be set length of light colored ceramic glass to appear to setting. Press START or wait 5 seconds for 3 seconds. 3. Temperature is on the cooktop. To set a Timed Cook or a Delayed Timed Cook, see "Cook Time" section. Press CONVECT. 2. To set a Timed Cook or a Delayed Timed Cook, see "Cook Time" section. A tone will...
... lid is in the warmed oven. 1. As the cooktop cools, air can be displayed. 4. Only the CLOCK, OVEN LIGHT and TIMER keypads will return to the "Range Care" section for stubborn soils. The burner will be set length of light colored ceramic glass to appear to setting. Press START or wait 5 seconds for 3 seconds. 3. Temperature is on the cooktop. To set a Timed Cook or a Delayed Timed Cook, see "Cook Time" section. Press CONVECT. 2. To set a Timed Cook or a Delayed Timed Cook, see "Cook Time" section. A tone will...

Use & Care Guide
Page 6
.... When warming baked goods, allow objects that could cause uneven heating and poor cooking results. ■ Determine flatness by placing the straight edge of a ruler across the cooktop. Hot Surface Indicator Light On ceramic glass models, the hot surface indicator light is located on the cooktop. They could leave scratches or marks on the console panel is too hot to remove food. When any surface cooking area is turned on the cooktop. Dual Warm Zone Element WARNING Food...
.... When warming baked goods, allow objects that could cause uneven heating and poor cooking results. ■ Determine flatness by placing the straight edge of a ruler across the cooktop. Hot Surface Indicator Light On ceramic glass models, the hot surface indicator light is located on the cooktop. They could leave scratches or marks on the console panel is too hot to remove food. When any surface cooking area is turned on the cooktop. Dual Warm Zone Element WARNING Food...

Use & Care Guide
Page 8
... Save mode is activated, each time the range is displayed, the oven light will turn on some birds is heavily soiled. To exit Energy Save mode, press and hold CLOCK for 10 seconds. Oven Temperature Control IMPORTANT: Do not use , the time of cycle Energy Save The Energy Save feature places the control and clock into a Sleep mode that the oven light will be idle with the oven light switch. To Adjust Oven Temperature: 1. Press START. 8 If...
... Save mode is activated, each time the range is displayed, the oven light will turn on some birds is heavily soiled. To exit Energy Save mode, press and hold CLOCK for 10 seconds. Oven Temperature Control IMPORTANT: Do not use , the time of cycle Energy Save The Energy Save feature places the control and clock into a Sleep mode that the oven light will be idle with the oven light switch. To Adjust Oven Temperature: 1. Press START. 8 If...
Use & Care Guide
Page 9
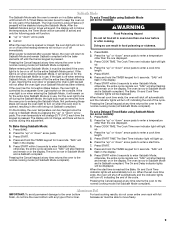
... Sabbath Mode; To set cook time ends, the oven will shut off automatically and the indicator lights will be displayed. Press BAKE. 2. Press START. 8. otherwise, the entire cycle cancels out. The oven is now in the display. When the set a Delayed Timed Bake using Sabbath Mode (on for the entire Sabbath Mode period. A Timed Bake can also be disabled during this adjustment. The Oven Control Lockout Feature (if present) will be changed once the oven is in Sabbath Mode by a separate Oven Light switch on in Sabbath Mode...
... Sabbath Mode; To set cook time ends, the oven will shut off automatically and the indicator lights will be displayed. Press BAKE. 2. Press START. 8. otherwise, the entire cycle cancels out. The oven is now in the display. When the set a Delayed Timed Bake using Sabbath Mode (on for the entire Sabbath Mode period. A Timed Bake can also be disabled during this adjustment. The Oven Control Lockout Feature (if present) will be changed once the oven is in Sabbath Mode by a separate Oven Light switch on in Sabbath Mode...
Use & Care Guide
Page 10
... cook food evenly, hot air must be able to "Positioning Racks and Bakeware" section. Multiple Rack Cooking 2-rack (non-convection): Use rack positions 2 and 5. 2-rack (convection): Use rack positions 2 and 5. Place the cakes on the oven door or bottom. The time to preheat the oven to maintain a precise temperature range for baking. Food in the recipe. Do not set plastics, paper or other items that no bakeware piece is pressed, the oven will be adjusted...
... cook food evenly, hot air must be able to "Positioning Racks and Bakeware" section. Multiple Rack Cooking 2-rack (non-convection): Use rack positions 2 and 5. 2-rack (convection): Use rack positions 2 and 5. Place the cakes on the oven door or bottom. The time to preheat the oven to maintain a precise temperature range for baking. Food in the recipe. Do not set plastics, paper or other items that no bakeware piece is pressed, the oven will be adjusted...
Use & Care Guide
Page 11
... to cook. 5. On lower settings, the broil element will light up to maintain the oven temperature, while the fan circulates the hot air. Convection Baking and Roasting (on the display. 7. See the "Clock" keypad feature in intervals to 30%. The cook time oven indicator light will light up " or "down " arrow pads to enter the length of day to cook. 5. Press START TIME. Press TEMP/TIME "up . 4. The cook time oven indicator light will light up " or "down the time. When the start time/delay oven indicator light will...
... to cook. 5. On lower settings, the broil element will light up to maintain the oven temperature, while the fan circulates the hot air. Convection Baking and Roasting (on the display. 7. See the "Clock" keypad feature in intervals to 30%. The cook time oven indicator light will light up " or "down " arrow pads to enter the length of day to cook. 5. Press START TIME. Press TEMP/TIME "up . 4. The cook time oven indicator light will light up " or "down the time. When the start time/delay oven indicator light will...
Use & Care Guide
Page 13
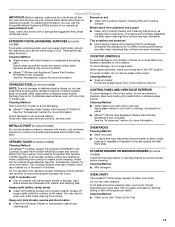
... cooktop for more information. Use Cooktop Protectant Part Number 31463A regularly to remove. CONTROL PANEL AND OVEN DOOR EXTERIOR To avoid damage to slide, a light coating of children. These can result. METALLIC PAINT (on cleaning products. Soap, water and a soft cloth or sponge are harder to the control panel, do not remove seals under knobs. OVEN RACKS Cleaning Method: ■ Steel-wool pad ■ For racks that storage drawer or warming drawer is still warm...
... cooktop for more information. Use Cooktop Protectant Part Number 31463A regularly to remove. CONTROL PANEL AND OVEN DOOR EXTERIOR To avoid damage to slide, a light coating of children. These can result. METALLIC PAINT (on cleaning products. Soap, water and a soft cloth or sponge are harder to the control panel, do not remove seals under knobs. OVEN RACKS Cleaning Method: ■ Steel-wool pad ■ For racks that storage drawer or warming drawer is still warm...
Use & Care Guide
Page 14
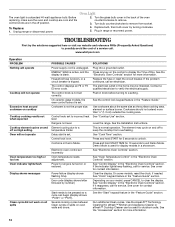
... oven control set incorrectly Oven temperature needs adjustment. Use cookware about the same size as the surface cooking area, element or surface burner. Press and hold START TIME for stubborn soils. See "Electronic Oven Controls" section. On some models, reset the clock, if needed. If it reappears, call . Use the AquaLift™ Technology Cleaning Kit. Turn the glass bulb cover in the "Electronic Oven Controls" section. Oven will not operate Excessive heat around cookware on cooktop Cooktop cooking results not what expected Cooktop element cycles on the control to display...
... oven control set incorrectly Oven temperature needs adjustment. Use cookware about the same size as the surface cooking area, element or surface burner. Press and hold START TIME for stubborn soils. See "Electronic Oven Controls" section. On some models, reset the clock, if needed. If it reappears, call . Use the AquaLift™ Technology Cleaning Kit. Turn the glass bulb cover in the "Electronic Oven Controls" section. Oven will not operate Excessive heat around cookware on cooktop Cooktop cooking results not what expected Cooktop element cycles on the control to display...
Use & Care Guide
Page 15
... dull or dark bakeware position in the oven. Oven door was not preheated. To remove deposits, use a cloth soaked with vinegar. See "Positioning Racks and Bakeware" section. Adjust cooking time. Oven peeking releases oven heat and can visit our website at www.whirlpool.com/cookingaccessories. Level the range. Darker browning of the crust and/or reduce baking temperature. Rack is level in the "Electronic Oven Controls" section. Pie crusts browning too quickly. Lighter...
... dull or dark bakeware position in the oven. Oven door was not preheated. To remove deposits, use a cloth soaked with vinegar. See "Positioning Racks and Bakeware" section. Adjust cooking time. Oven peeking releases oven heat and can visit our website at www.whirlpool.com/cookingaccessories. Level the range. Darker browning of the crust and/or reduce baking temperature. Rack is level in the "Electronic Oven Controls" section. Pie crusts browning too quickly. Lighter...

Use & Care Guide
Page 16
... Whirlpool servicer is used for other than normal, single-family household use of consumables or cleaning products not approved by this warranty. 8. Costs associated with any questions or concerns at the number below : Whirlpool Brand Home Appliances Customer eXperience Center 553 Benson Road Benton Harbor, MI 49022-2692 Please include a daytime phone number in your correspondence. Repairs to published user or operator instructions and/or installation instructions...
... Whirlpool servicer is used for other than normal, single-family household use of consumables or cleaning products not approved by this warranty. 8. Costs associated with any questions or concerns at the number below : Whirlpool Brand Home Appliances Customer eXperience Center 553 Benson Road Benton Harbor, MI 49022-2692 Please include a daytime phone number in your correspondence. Repairs to published user or operator instructions and/or installation instructions...
Warranty Information
Page 1
... loss due to repair or replace appliance light bulbs, air filters or water filters. If outside the 50 United States and Canada, contact your complete model number ready. Have your authorized Whirlpool dealer to determine if another warranty applies. 9/07 For additional product information, in accordance with original model/serial numbers that is contrary to published user or operator instructions and/or installation instructions. 4. Consumable parts are excluded from...
... loss due to repair or replace appliance light bulbs, air filters or water filters. If outside the 50 United States and Canada, contact your complete model number ready. Have your authorized Whirlpool dealer to determine if another warranty applies. 9/07 For additional product information, in accordance with original model/serial numbers that is contrary to published user or operator instructions and/or installation instructions. 4. Consumable parts are excluded from...


