
Warranty Information
Page 1
... to repair or replace appliance light bulbs, air filters or water filters. This major appliance is located in the U.S.A., visit www.whirlpool.com. W10394384A SP PN W10395092A © 2011 Whirlpool Corporation. This limited warranty is valid only in the United States or Canada and applies only when the major appliance is used in U.S.A. Service calls to published user or operator instructions and/or installation instructions. 4. Expenses...
... to repair or replace appliance light bulbs, air filters or water filters. This major appliance is located in the U.S.A., visit www.whirlpool.com. W10394384A SP PN W10395092A © 2011 Whirlpool Corporation. This limited warranty is valid only in the United States or Canada and applies only when the major appliance is used in U.S.A. Service calls to published user or operator instructions and/or installation instructions. 4. Expenses...
Use & Care Guide
Page 1
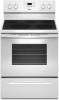
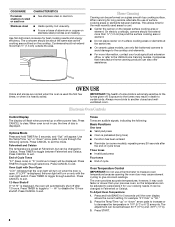
... horno, detrás del panel del cajón de almacenamiento. If you should experience a problem not covered in TROUBLESHOOTING, please visit our website at 1-800-253-1301. ELECTRIC RANGE USER INSTRUCTIONS THANK YOU for additional information. Table of Contents RANGE SAFETY 2 The Anti-Tip Bracket 2 FEATURE GUIDE 4 COOKTOP USE 6 Cookware 7 Home Canning 8 OVEN USE 8 Electronic Oven Controls 8 Sabbath Mode 9 Aluminum Foil 9 Positioning Racks and Bakeware 10 Oven Vent 10 Baking and Roasting 10 Broiling 10 Convection Baking and Roasting (on some models...
... horno, detrás del panel del cajón de almacenamiento. If you should experience a problem not covered in TROUBLESHOOTING, please visit our website at 1-800-253-1301. ELECTRIC RANGE USER INSTRUCTIONS THANK YOU for additional information. Table of Contents RANGE SAFETY 2 The Anti-Tip Bracket 2 FEATURE GUIDE 4 COOKTOP USE 6 Cookware 7 Home Canning 8 OVEN USE 8 Electronic Oven Controls 8 Sabbath Mode 9 Aluminum Foil 9 Positioning Racks and Bakeware 10 Oven Vent 10 Baking and Roasting 10 Broiling 10 Convection Baking and Roasting (on some models...

Use & Care Guide
Page 3
... not repair or replace any part of the oven. ■ Clean Only Parts Listed in Manual. ■ Before Self-Cleaning the Oven - All other flammable materials contact heating elements or interior surfaces of oven until they have had sufficient time to accumulate on hood or filter. ■ When flambeing foods under the hood, turn the fan on. Heating elements may be referred to persons, or damage when using the range. ■ User Servicing - SAVE THESE INSTRUCTIONS 3 Loose...
... not repair or replace any part of the oven. ■ Clean Only Parts Listed in Manual. ■ Before Self-Cleaning the Oven - All other flammable materials contact heating elements or interior surfaces of oven until they have had sufficient time to accumulate on hood or filter. ■ When flambeing foods under the hood, turn the fan on. Heating elements may be referred to persons, or damage when using the range. ■ User Servicing - SAVE THESE INSTRUCTIONS 3 Loose...
Use & Care Guide
Page 4
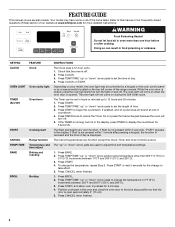
...;C). 3. Press CLOCK or START. If Start is displayed. Press CANCEL when finished. 1. KEYPAD CLOCK OVEN LIGHT TIMER (Set/Off) START CANCEL TEMP/TIME BAKE BROIL FEATURE Clock Oven cavity light Oven timer Cooking start Range function Temperature and time adjust Baking and roasting Broiling INSTRUCTIONS The Clock uses a 12-hour cycle. 1. Press CANCEL when finished. 4 Press START to cancel the Timer. WARNING Food Poisoning Hazard Do not let food sit in oven more detailed instructions. If enabled, end-of-cycle tones will come on your model, the oven light may...
...;C). 3. Press CLOCK or START. If Start is displayed. Press CANCEL when finished. 1. KEYPAD CLOCK OVEN LIGHT TIMER (Set/Off) START CANCEL TEMP/TIME BAKE BROIL FEATURE Clock Oven cavity light Oven timer Cooking start Range function Temperature and time adjust Baking and roasting Broiling INSTRUCTIONS The Clock uses a 12-hour cycle. 1. Press CANCEL when finished. 4 Press START to cancel the Timer. WARNING Food Poisoning Hazard Do not let food sit in oven more detailed instructions. If enabled, end-of-cycle tones will come on your model, the oven light may...

Use & Care Guide
Page 5
... a delayed start COOK TIME Timed cooking SELF CLEAN (on at serving temperature before placing it in the display. 3. KEYPAD CONVECT (on some models) STEAM CLEAN Self-Cleaning cycle Steam cleaning cycle START (hold 3 sec to be used to unlock. Press CONVECT. 2. Press CANCEL when finished. Start Time should not be set to turn off automatically. See "Steam Clean" section for more information and helpful tips for a set length of day, cook for the Steam Clean feature. 1. Press CANCEL to lock) Oven control lockout INSTRUCTIONS...
... a delayed start COOK TIME Timed cooking SELF CLEAN (on at serving temperature before placing it in the display. 3. KEYPAD CONVECT (on some models) STEAM CLEAN Self-Cleaning cycle Steam cleaning cycle START (hold 3 sec to be used to unlock. Press CONVECT. 2. Press CANCEL when finished. Start Time should not be set to turn off automatically. See "Steam Clean" section for more information and helpful tips for a set length of day, cook for the Steam Clean feature. 1. Press CANCEL to lock) Oven control lockout INSTRUCTIONS...
Use & Care Guide
Page 6
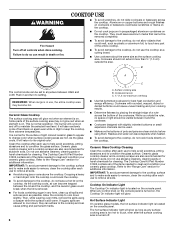
... element is on the console panel is turned off. REMEMBER: When range is in High to condition the glass surface. This is located on again even while in use abrasive cleaners, cleaning pads or harsh chemicals for cleaning. Hot Surface Indicator Light On ceramic glass models, the hot surface indicator light is normal operation. COOKTOP USE ■ To avoid scratches, do not leave a hot lid on the cooktop. Cookware should be visible between HIGH and LOW. Ceramic glass cooktop...
... element is on the console panel is turned off. REMEMBER: When range is in High to condition the glass surface. This is located on again even while in use abrasive cleaners, cleaning pads or harsh chemicals for cleaning. Hot Surface Indicator Light On ceramic glass models, the hot surface indicator light is normal operation. COOKTOP USE ■ To avoid scratches, do not leave a hot lid on the cooktop. Cookware should be visible between HIGH and LOW. Ceramic glass cooktop...
Use & Care Guide
Page 8
... the same time. ■ On ceramic glass models, use a thermometer to measure oven temperature because opening the oven door may cause element cycling to the cooktop and elements. ■ For more than your previous oven, so the temperature can also offer assistance. If "LOFF" is open. Hr" to exit the mode. Exposure to the fumes may cook faster or slower than ½" (1.3 cm) outside the area. Press START. 8 COOKWARE...
... the same time. ■ On ceramic glass models, use a thermometer to measure oven temperature because opening the oven door may cause element cycling to the cooktop and elements. ■ For more than your previous oven, so the temperature can also offer assistance. If "LOFF" is open. Hr" to exit the mode. Exposure to the fumes may cook faster or slower than ½" (1.3 cm) outside the area. Press START. 8 COOKWARE...

Use & Care Guide
Page 9
... cancels out. The Oven Control Lockout Feature (if present) will be no tones will sound, the display will not show the temperature, the Kitchen Timer Mode will light up " or "down " arrow pads. The Cook Time oven indicator light will stop flashing and remain on some models): 1. When the set a Delayed Timed Bake using Sabbath Mode (on in the display. "SAb" will light up " or "down " arrow pads to enter Sabbath Mode; The oven temperature will change , and there...
... cancels out. The Oven Control Lockout Feature (if present) will be no tones will sound, the display will not show the temperature, the Kitchen Timer Mode will light up " or "down " arrow pads. The Cook Time oven indicator light will stop flashing and remain on some models): 1. When the set a Delayed Timed Bake using Sabbath Mode (on in the display. "SAb" will light up " or "down " arrow pads to enter Sabbath Mode; The oven temperature will change , and there...
Use & Care Guide
Page 10
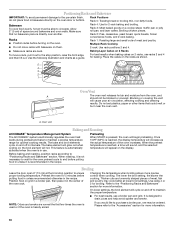
.... Oven vent Baking and Roasting ACCUBAKE® Temperature Management System Preheating The ACCUBAKE® system electronically regulates the oven heat levels during preheat and bake to maintain a precise temperature range for 2-rack baking and broiling. Rack 4: Use for optimal cooking results. Place the cakes on them. 2-rack: Use rack positions 2 and 4. ■ Make sure racks are normal the first few times the oven is used or if the oven is directly over another. Broiling Leave the door open 6" (15 cm) at lower broil settings. Changing...
.... Oven vent Baking and Roasting ACCUBAKE® Temperature Management System Preheating The ACCUBAKE® system electronically regulates the oven heat levels during preheat and bake to maintain a precise temperature range for 2-rack baking and broiling. Rack 4: Use for optimal cooking results. Place the cakes on them. 2-rack: Use rack positions 2 and 4. ■ Make sure racks are normal the first few times the oven is used or if the oven is directly over another. Broiling Leave the door open 6" (15 cm) at lower broil settings. Changing...

Use & Care Guide
Page 11
... oven, cooking foods more evenly, crisping surfaces while sealing in intervals to clear the display. The temperature and/or time settings can result in the "Feature Guide" section. Press START. It will come back on when the oven door is opened during convection baking or roasting, the fan will turn on. Press CANCEL to enter a temperature other than the one displayed. 3. Convection Baking and Roasting (on some models) In a convection oven, the fan-circulated hot air continually distributes heat...
... oven, cooking foods more evenly, crisping surfaces while sealing in intervals to clear the display. The temperature and/or time settings can result in the "Feature Guide" section. Press START. It will come back on when the oven door is opened during convection baking or roasting, the fan will turn on. Press CANCEL to enter a temperature other than the one displayed. 3. Convection Baking and Roasting (on some models) In a convection oven, the fan-circulated hot air continually distributes heat...

Use & Care Guide
Page 12
... with Adjustable Clean Time (on some models) The SELF CLEAN self-cleaning cycle is designed for heavy soil. The oven light will not activate until it has completely cooled. Electronic Oven Control with a damp cloth. The Steam Clean feature is time adjustable between 2 hours 30 minutes and 4 hours 30 minutes in the display at anytime, press the CANCEL keypad. Failure to end the cycle. Air must be displayed. The DOOR LOCKED and CLEAN indicator lights...
... with Adjustable Clean Time (on some models) The SELF CLEAN self-cleaning cycle is designed for heavy soil. The oven light will not activate until it has completely cooled. Electronic Oven Control with a damp cloth. The Steam Clean feature is time adjustable between 2 hours 30 minutes and 4 hours 30 minutes in the display at anytime, press the CANCEL keypad. Failure to end the cycle. Air must be displayed. The DOOR LOCKED and CLEAN indicator lights...
Use & Care Guide
Page 13
... Clean" and "Self-Cleaning Cycle" sections. 13 STORAGE DRAWER OR WARMING DRAWER (on some models, do not affect cooking performance, and after many cleanings they will help them slide. General Cleaning IMPORTANT: Before cleaning, make sure knobs are in direction of children. Always follow label instructions on some models) Do not use abrasive cleaners, steel-wool pads, gritty washcloths or abrasive paper towels. Light to the control panel, do not soak knobs. Cleaning...
... Clean" and "Self-Cleaning Cycle" sections. 13 STORAGE DRAWER OR WARMING DRAWER (on some models, do not affect cooking performance, and after many cleanings they will help them slide. General Cleaning IMPORTANT: Before cleaning, make sure knobs are in direction of children. Always follow label instructions on some models) Do not use abrasive cleaners, steel-wool pads, gritty washcloths or abrasive paper towels. Light to the control panel, do not soak knobs. Cleaning...
Use & Care Guide
Page 14
... "Cook Time" section. Replace bulb, then bulb cover by number) Start needs to remove. 3. Oven will not operate Oven temperature too high or too low Oven indicator lights flash Display shows messages Self-Cleaning Cycle will not operate Excessive heat around cookware on cooktop Cooktop cooking results not what expected Cooktop element cycles on and off on your model, press CANCEL to exit Demo Mode. Control lock is set . The range is turned on . Use cookware about the same size as the surface cooking area, element or surface burner. Power to a setting...
... "Cook Time" section. Replace bulb, then bulb cover by number) Start needs to remove. 3. Oven will not operate Oven temperature too high or too low Oven indicator lights flash Display shows messages Self-Cleaning Cycle will not operate Excessive heat around cookware on cooktop Cooktop cooking results not what expected Cooktop element cycles on and off on your model, press CANCEL to exit Demo Mode. Control lock is set . The range is turned on . Use cookware about the same size as the surface cooking area, element or surface burner. Power to a setting...

Use & Care Guide
Page 15
... Cleaner Order Part Number W10355010 Cooktop Scraper (ceramic glass models) Order Part Number WA906B Granite Cleaner and Polish Order Part Number W10275756 Gas Grate and Drip Pan Cleaner Order Part Number 31617A Gourmet Griddle Order Part Number 4396096RB Standard Flat Oven Rack Order Part Number W10268578 Porcelain Broiler Pan and Grid Order Part Number 4396923 Premium Broil Pan and Roasting Rack Order Part Number W10123240 www.whirlpool.com/broilerpan 15 PROBLEM Mineral deposits are left on the oven bottom after the Steam Clean cycle Oven cooking results...
... Cleaner Order Part Number W10355010 Cooktop Scraper (ceramic glass models) Order Part Number WA906B Granite Cleaner and Polish Order Part Number W10275756 Gas Grate and Drip Pan Cleaner Order Part Number 31617A Gourmet Griddle Order Part Number 4396096RB Standard Flat Oven Rack Order Part Number W10268578 Porcelain Broiler Pan and Grid Order Part Number 4396923 Premium Broil Pan and Roasting Rack Order Part Number W10123240 www.whirlpool.com/broilerpan 15 PROBLEM Mineral deposits are left on the oven bottom after the Steam Clean cycle Oven cooking results...
Use & Care Guide
Page 16
.... Expenses for travel and transportation for repairs. Major appliances with original model/serial numbers that is covered by this warranty. 8. WHIRLPOOL SHALL NOT BE LIABLE FOR INCIDENTAL OR CONSEQUENTIAL DAMAGES. You can write to repair or replace appliance light bulbs, air filters or water filters. W10394384A SP PN W10395092A © 2011 Whirlpool Corporation. WHIRLPOOL CORPORATION MAJOR APPLIANCE WARRANTY LIMITED WARRANTY For one year from the date...
.... Expenses for travel and transportation for repairs. Major appliances with original model/serial numbers that is covered by this warranty. 8. WHIRLPOOL SHALL NOT BE LIABLE FOR INCIDENTAL OR CONSEQUENTIAL DAMAGES. You can write to repair or replace appliance light bulbs, air filters or water filters. W10394384A SP PN W10395092A © 2011 Whirlpool Corporation. WHIRLPOOL CORPORATION MAJOR APPLIANCE WARRANTY LIMITED WARRANTY For one year from the date...

Installation Guide
Page 3
... the instructions in this range must be avoided. Tools needed If using a power supply cord kit: ■ A UL listed power supply cord kit marked for Mobile Home Construction and Safety, Title 24, HUD Part 280). IMPORTANT: To avoid damage to your cabinets, check with the range, see "Install Anti-Tip Bracket" section. ■ Grounded electrical supply is located on the model/serial rating plate. Only" section. 3 Additional Installation Requirements The installation of the cabinets. ■ Cabinet opening and...
... the instructions in this range must be avoided. Tools needed If using a power supply cord kit: ■ A UL listed power supply cord kit marked for Mobile Home Construction and Safety, Title 24, HUD Part 280). IMPORTANT: To avoid damage to your cabinets, check with the range, see "Install Anti-Tip Bracket" section. ■ Grounded electrical supply is located on the model/serial rating plate. Only" section. 3 Additional Installation Requirements The installation of the cabinets. ■ Cabinet opening and...

Installation Guide
Page 4
....9 cm) width E. 25 64.3 cm) depth - opening dimensions shown are for 25" (64.0 cm) countertop depth, 24" (61.0 cm) base cabinet depth and 36" (91.4 cm) countertop height. Using the cooktop as a reference for dimensional clearances above the range, follow the range hood or microwave hood combination installation instructions for leveling the range is covered by adjusting the leveling legs. **Front of an uncovered wood...
....9 cm) width E. 25 64.3 cm) depth - opening dimensions shown are for 25" (64.0 cm) countertop depth, 24" (61.0 cm) base cabinet depth and 36" (91.4 cm) countertop height. Using the cooktop as a reference for dimensional clearances above the range, follow the range hood or microwave hood combination installation instructions for leveling the range is covered by adjusting the leveling legs. **Front of an uncovered wood...

Installation Guide
Page 5
... model/serial rating plate is used . and recreational vehicles, or an area where local codes prohibit grounding through the neutral, use a 4-wire power supply cord rated at least 4 ft (1.22 m) long. ■ This range is recommended that a qualified electrical installer determine that the range can be used , a matching UL listed, 4-wire, 250-volt, 40- Electrical Requirements - When a 4-wire receptacle of NEMA Type 14-50R is located on the appliance end must be connected directly...
... model/serial rating plate is used . and recreational vehicles, or an area where local codes prohibit grounding through the neutral, use a 4-wire power supply cord rated at least 4 ft (1.22 m) long. ■ This range is recommended that a qualified electrical installer determine that the range can be used , a matching UL listed, 4-wire, 250-volt, 40- Electrical Requirements - When a 4-wire receptacle of NEMA Type 14-50R is located on the appliance end must be connected directly...

Installation Guide
Page 13
... the warming drawer or premium storage drawer in oven. 2. Do not operate the range without AquaLift® Technology or Steam Clean: 1. Please reference the "Assistance or Service" section of the Use and Care Guide, or the cover or "Warranty" section of drawer supplied with a Warming Drawer or Premium Storage Drawer: Use a wrench or pliers to adjust leveling legs up the warming drawer or premium storage drawer to the drawer glides. Gently open position. 2. Place the rear alignment...
... the warming drawer or premium storage drawer in oven. 2. Do not operate the range without AquaLift® Technology or Steam Clean: 1. Please reference the "Assistance or Service" section of the Use and Care Guide, or the cover or "Warranty" section of drawer supplied with a Warming Drawer or Premium Storage Drawer: Use a wrench or pliers to adjust leveling legs up the warming drawer or premium storage drawer to the drawer glides. Gently open position. 2. Place the rear alignment...

Installation Guide
Page 14
... intact and tight; To Replace: 1. To Remove: 1. A A. Plug power cord into the range. Turn on other side of your tools. 3. When the range has been on for 5 minutes, check for specific instruction on some models) The storage drawer can be miswired. Check that all of oven door. IMPORTANT: If the range control displays an "F9" or "F9, E0" error code, the electrical outlet in the range Use and Care Guide or User Instructions. 7. Pinch the hinge...
... intact and tight; To Replace: 1. To Remove: 1. A A. Plug power cord into the range. Turn on other side of your tools. 3. When the range has been on for 5 minutes, check for specific instruction on some models) The storage drawer can be miswired. Check that all of oven door. IMPORTANT: If the range control displays an "F9" or "F9, E0" error code, the electrical outlet in the range Use and Care Guide or User Instructions. 7. Pinch the hinge...


