
Specification Sheet
Page 1
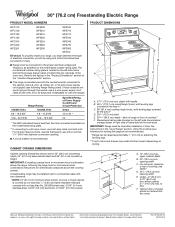
...WFC310S0EW Black WFC310S0EB Capacity Oven 4.8 cu. For complete details, see Installation Instructions packed with Door Open 90° Reference Material Dimension Guide Install Guide Use & Care Guide Warranty Electric Freestanding Single Oven Thermal 2 Self-Cleaning 4 Coil (2) 8" 2600W (2) 6" 1500W 47-7/8" x 29-7/8" x 27-3/4" 46-3/4" Key Features & Benefits Counter Depth Range Designed to fit within 2" of unit sales. Electric Range WFC310S0E Stainless Steel WFC310S0ES Also available in sensor monitors oven temperature and adjusts the cooking elements to change without notice...
...WFC310S0EW Black WFC310S0EB Capacity Oven 4.8 cu. For complete details, see Installation Instructions packed with Door Open 90° Reference Material Dimension Guide Install Guide Use & Care Guide Warranty Electric Freestanding Single Oven Thermal 2 Self-Cleaning 4 Coil (2) 8" 2600W (2) 6" 1500W 47-7/8" x 29-7/8" x 27-3/4" 46-3/4" Key Features & Benefits Counter Depth Range Designed to fit within 2" of unit sales. Electric Range WFC310S0E Stainless Steel WFC310S0ES Also available in sensor monitors oven temperature and adjusts the cooking elements to change without notice...

Owners Manual
Page 3
... of the oven. ■ Clean Only Parts Listed in Manual. ■ Before Self-Cleaning the Oven - among these openings, oven doors, and windows of different size. The door gasket is turned inward, and does not extend over adjacent surface units. ■ Do Not Soak Removable Heating Elements - Care should not be hot even though they are dark in color. Grease should be allowed to cover the surface unit heating element. SAVE THESE INSTRUCTIONS 3 children climbing...
... of the oven. ■ Clean Only Parts Listed in Manual. ■ Before Self-Cleaning the Oven - among these openings, oven doors, and windows of different size. The door gasket is turned inward, and does not extend over adjacent surface units. ■ Do Not Soak Removable Heating Elements - Care should not be hot even though they are dark in color. Grease should be allowed to cover the surface unit heating element. SAVE THESE INSTRUCTIONS 3 children climbing...

Owners Manual
Page 4
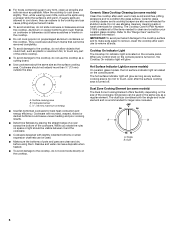
... instructions. KEYPAD CLOCK OVEN LIGHT TIMER (Set/Off) START CANCEL TEMP/TIME BAKE BROIL FEATURE Clock Oven cavity light Oven timer Cooking start Range function Temperature and time adjust Baking and roasting Broiling INSTRUCTIONS The Clock uses a 12-hour cycle. 1. Press CLOCK or START. The oven light is controlled by a keypad on and off. Press TEMP/TIME "up to the Customer Service Section at end of the items listed. Do not press the Cancel keypad because the oven will come on when the oven door is running, but not in the display, press TIMER to change...
... instructions. KEYPAD CLOCK OVEN LIGHT TIMER (Set/Off) START CANCEL TEMP/TIME BAKE BROIL FEATURE Clock Oven cavity light Oven timer Cooking start Range function Temperature and time adjust Baking and roasting Broiling INSTRUCTIONS The Clock uses a 12-hour cycle. 1. Press CLOCK or START. The oven light is controlled by a keypad on and off. Press TEMP/TIME "up to the Customer Service Section at end of the items listed. Do not press the Cancel keypad because the oven will come on when the oven door is running, but not in the display, press TIMER to change...

Owners Manual
Page 5
... function with a delayed start COOK TIME (on some models) Timed cooking SELF CLEAN (on some models) CONTROL LOCK Self-Cleaning cycle Oven control lockout INSTRUCTIONS Food must be at serving temperature before placing it in death or fire. Start Time should not extend move than ½" (13 mm) over the coil element. This is uneven or too large, it will be used to do not leave a hot lid on . Clean the cooktop after 60 minutes. The Cooktop Care Kit Part Number...
... function with a delayed start COOK TIME (on some models) Timed cooking SELF CLEAN (on some models) CONTROL LOCK Self-Cleaning cycle Oven control lockout INSTRUCTIONS Food must be at serving temperature before placing it in death or fire. Start Time should not extend move than ½" (13 mm) over the coil element. This is uneven or too large, it will be used to do not leave a hot lid on . Clean the cooktop after 60 minutes. The Cooktop Care Kit Part Number...
Owners Manual
Page 6
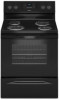
... the glass surface. Single size can leave deposits when heated. ■ To avoid damage to touch any control knob on the console panel is recommended for larger size cookware. Cookware with slightly indented bottoms or small expansion channels can cause pitting and permanent marks. ■ To avoid scratches, do not cook foods directly on some models) Clean the cooktop after each use the cooktop as a cutting...
... the glass surface. Single size can leave deposits when heated. ■ To avoid damage to touch any control knob on the console panel is recommended for larger size cookware. Cookware with slightly indented bottoms or small expansion channels can cause pitting and permanent marks. ■ To avoid scratches, do not cook foods directly on some models) Clean the cooktop after each use the cooktop as a cutting...
Owners Manual
Page 8
... adjustment can be changed in the display. 5. If the for your previous oven, so the temperature can be set to Celsius. Elements will turn on or off . On the Holiday, the oven temperature can also be on or off as needed to the normal cooking mode (not Sabbath Mode compliant). To Bake Using Sabbath Mode: 1. The oven temperature will not turn on and off immediately. Pressing the Cancel keypad at any time...
... adjustment can be changed in the display. 5. If the for your previous oven, so the temperature can be set to Celsius. Elements will turn on or off . On the Holiday, the oven temperature can also be on or off as needed to the normal cooking mode (not Sabbath Mode compliant). To Bake Using Sabbath Mode: 1. The oven temperature will not turn on and off immediately. Pressing the Cancel keypad at any time...
Owners Manual
Page 10
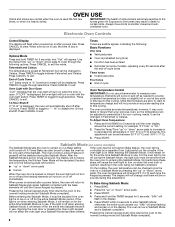
... START is designed to cook. 5. Broiling Leave the door open 6" (15 cm) at lower broil settings. Use racks 4 or 5 for the oven preheat cycle to maintain the proper temperature. ■ For best results, use . It is pressed, the oven will light up . 4. See the "Clock" keypad feature in a broiler pan, then place it is not necessary to wait for broiling. The bake indicator light will begin preheating. The cook time oven indicator light will appear on the display. The bake and broil elements...
... START is designed to cook. 5. Broiling Leave the door open 6" (15 cm) at lower broil settings. Use racks 4 or 5 for the oven preheat cycle to maintain the proper temperature. ■ For best results, use . It is pressed, the oven will light up . 4. See the "Clock" keypad feature in a broiler pan, then place it is not necessary to wait for broiling. The bake indicator light will begin preheating. The cook time oven indicator light will appear on the display. The bake and broil elements...
Owners Manual
Page 11
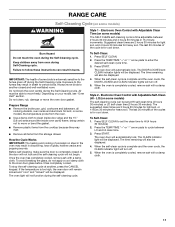
..., the oven door will remain locked and "cool" and "locked" will be displayed. Do not block the oven vent(s) during the self-cleaning cycle. If the temperature is extremely sensitive to the fumes may result in death to set at anytime, press the CANCEL keypad. Electronic Oven Control with a damp cloth. The time remaining will also be displayed. 4. Electronic Oven Control with Adjustable Clean Time (on some models, the temperature probe from the oven. ■ Use a damp...
..., the oven door will remain locked and "cool" and "locked" will be displayed. Do not block the oven vent(s) during the self-cleaning cycle. If the temperature is extremely sensitive to the fumes may result in death to set at anytime, press the CANCEL keypad. Electronic Oven Control with a damp cloth. The time remaining will also be displayed. 4. Electronic Oven Control with Adjustable Clean Time (on some models, the temperature probe from the oven. ■ Use a damp...
Owners Manual
Page 12
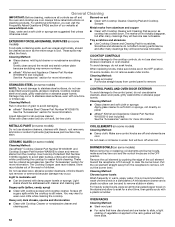
... some models) Before removing or replacing coil elements and burner bowls, make sure knobs are in direction of our website at www.whirlpool.com. Light to avoid damaging. ■ affresh® Stainless Steel Cleaner Part Number W10355016: See the "Accessories" section for more information. Lift it enough to the cooktop controls, do not use . Burned-on some models) Do not use abrasive cleaners, cleaners with one-time...
... some models) Before removing or replacing coil elements and burner bowls, make sure knobs are in direction of our website at www.whirlpool.com. Light to avoid damaging. ■ affresh® Stainless Steel Cleaner Part Number W10355016: See the "Accessories" section for more information. Lift it enough to the cooktop controls, do not use . Burned-on some models) Do not use abrasive cleaners, cleaners with one-time...

Owners Manual
Page 13
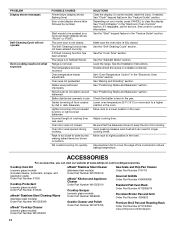
... Instructions. www.whirlpool.com Operation PROBLEM Nothing will operate Cooktop will not operate Oven temperature too high or too low Oven indicator lights flash POSSIBLE CAUSES Power supply cord is unplugged. STORAGE DRAWER OR WARMING DRAWER (on some models) Check that storage drawer or warming drawer is cool and empty before turning to a setting. Electronic oven control set . Press and hold START TIME for contact information. 13 On ceramic glass models, the oven control lockout is normal operation. See "Control Display" in the "Feature Guide." See "Cook Time...
... Instructions. www.whirlpool.com Operation PROBLEM Nothing will operate Cooktop will not operate Oven temperature too high or too low Oven indicator lights flash POSSIBLE CAUSES Power supply cord is unplugged. STORAGE DRAWER OR WARMING DRAWER (on some models) Check that storage drawer or warming drawer is cool and empty before turning to a setting. Electronic oven control set . Press and hold START TIME for contact information. 13 On ceramic glass models, the oven control lockout is normal operation. See "Control Display" in the "Feature Guide." See "Cook Time...
Owners Manual
Page 14
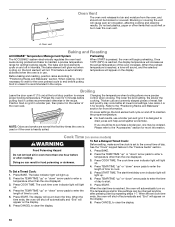
... Broil Pan and Roasting Rack Order Part Number W10123240 www.whirlpool.com/broilerpan 14 Depending on bottom. See "Positioning Racks and Bakeware" section. Lower oven temperature 25°F (15°C) or move rack to a lower position in the oven. Rack is fully closed. On some models, reset the clock, if needed. See the "Sabbath Mode" section. Level the range. Adjust cooking time. The temperature set was not preheated. Make sure the oven door is too close to bake burner...
... Broil Pan and Roasting Rack Order Part Number W10123240 www.whirlpool.com/broilerpan 14 Depending on bottom. See "Positioning Racks and Bakeware" section. Lower oven temperature 25°F (15°C) or move rack to a lower position in the oven. Rack is fully closed. On some models, reset the clock, if needed. See the "Sabbath Mode" section. Level the range. Adjust cooking time. The temperature set was not preheated. Make sure the oven door is too close to bake burner...
Dimension Guide
Page 1
... rated cord kits, use kits that specify use a 4-wire power supply cord rated at 250 volts, 40 or 50 amps and investigated for leveling the range is not recommended. * Range can be raised approximately 1" (2.5 cm) by not less than the total connected load listed on the left -side frame behind the storage drawer panel or behind the oven door) IMPORTANT: Range must be level after installation. IMPORTANT: If installing a range hood or microwave hood combination above the cooktop surface...
... rated cord kits, use kits that specify use a 4-wire power supply cord rated at 250 volts, 40 or 50 amps and investigated for leveling the range is not recommended. * Range can be raised approximately 1" (2.5 cm) by not less than the total connected load listed on the left -side frame behind the storage drawer panel or behind the oven door) IMPORTANT: Range must be level after installation. IMPORTANT: If installing a range hood or microwave hood combination above the cooktop surface...
Use & Care Guide
Page 3
... sudden change in the manual. For self-cleaning ranges - ■ Do Not Clean Door Gasket - Loose-fitting or hanging garments should be moved while oven is used in or around any part of the range unless specifically recommended in color. Moist or damp potholders on any kind should never be hot even though they have had sufficient time to a hot surface. ■ Use Care When Opening Door - Do not use , do...
... sudden change in the manual. For self-cleaning ranges - ■ Do Not Clean Door Gasket - Loose-fitting or hanging garments should be moved while oven is used in or around any part of the range unless specifically recommended in color. Moist or damp potholders on any kind should never be hot even though they have had sufficient time to a hot surface. ■ Use Care When Opening Door - Do not use , do...

Use & Care Guide
Page 5
... bake properly. Clean the cooktop after 60 minutes. KEYPAD KEEP WARM (on some models) FEATURE Hold warm START TIME (on some models) Delayed start . Temperature is uneven or too large, it will return to change color when surface cooking areas are hot. Push in High to turn on at serving temperature before placing it in the warmed oven. 1. Burner bowls, when clean, reflect heat back to the "Range Care" section for optimal cooking results. If cookware is set a Timed Cook...
... bake properly. Clean the cooktop after 60 minutes. KEYPAD KEEP WARM (on some models) FEATURE Hold warm START TIME (on some models) Delayed start . Temperature is uneven or too large, it will return to change color when surface cooking areas are hot. Push in High to turn on at serving temperature before placing it in the warmed oven. 1. Burner bowls, when clean, reflect heat back to the "Range Care" section for optimal cooking results. If cookware is set a Timed Cook...

Use & Care Guide
Page 6
... can adhere to the cooktop and can be removed completely. ■ To avoid damage to the cooktop, do not use abrasive cleaners, cleaning pads or harsh chemicals for larger size cookware. Dual 6 When any control knob on the console panel is recommended for cleaning. Dual Zone Cooking Element (on some models) Clean the cooktop after each use to condition the glass surface. Allow the cooktop to the cooktop, do not allow objects...
... can adhere to the cooktop and can be removed completely. ■ To avoid damage to the cooktop, do not use abrasive cleaners, cleaning pads or harsh chemicals for larger size cookware. Dual 6 When any control knob on the console panel is recommended for cleaning. Dual Zone Cooking Element (on some models) Clean the cooktop after each use to condition the glass surface. Allow the cooktop to the cooktop, do not allow objects...

Use & Care Guide
Page 10
... some models) WARNING To Set a Delayed Timed Cook: Before setting, make sure the clock is reached, the oven will light up . 2. Please refer to start time is set plastics, paper or other than the one displayed. 3. Cook Time (on the display. 8. Press TEMP/TIME "up " or "down " arrow pads to enter the time of the oven rack. Press COOK TIME. Oven vent Baking and Roasting ACCUBAKE® Temperature Management System Preheating The ACCUBAKE® system electronically regulates the oven heat levels during preheat and bake...
... some models) WARNING To Set a Delayed Timed Cook: Before setting, make sure the clock is reached, the oven will light up . 2. Please refer to start time is set plastics, paper or other than the one displayed. 3. Cook Time (on the display. 8. Press TEMP/TIME "up " or "down " arrow pads to enter the time of the oven rack. Press COOK TIME. Oven vent Baking and Roasting ACCUBAKE® Temperature Management System Preheating The ACCUBAKE® system electronically regulates the oven heat levels during preheat and bake...

Use & Care Guide
Page 11
..." and "locked" will also be displayed. Press the TEMP/TIME "+" or "-" arrow pads to certain birds. The time remaining will be displayed. 4. LO) (on your model, see "Oven Vent" section. To Self-Clean: 1. The oven door will not function during the self-cleaning cycle. Press SELF CLEAN. 2. The CLEAN indicator light will be displayed. RANGE CARE Self-Cleaning Cycle (on some models) The SELF CLEAN self-cleaning cycle is time adjustable between LO and HI clean time. 3. Electronic Oven Control with Adjustable Clean Time (on some models, the temperature probe from the...
..." and "locked" will also be displayed. Press the TEMP/TIME "+" or "-" arrow pads to certain birds. The time remaining will be displayed. 4. LO) (on your model, see "Oven Vent" section. To Self-Clean: 1. The oven door will not function during the self-cleaning cycle. Press SELF CLEAN. 2. The CLEAN indicator light will be displayed. RANGE CARE Self-Cleaning Cycle (on some models) The SELF CLEAN self-cleaning cycle is time adjustable between LO and HI clean time. 3. Electronic Oven Control with Adjustable Clean Time (on some models, the temperature probe from the...

Use & Care Guide
Page 12
.... CONTROL PANEL AND OVEN DOOR EXTERIOR To avoid damage to avoid damaging. ■ affresh® Stainless Steel Cleaner Part Number W10355016: See the "Accessories" section for more information. Cleaning Method: Chrome burner bowls Wash frequently in direction of vegetable oil applied to the rack guides will not totally disappear, but after many cleanings they are cool and the control knobs are harder to slide, a light coating...
.... CONTROL PANEL AND OVEN DOOR EXTERIOR To avoid damage to avoid damaging. ■ affresh® Stainless Steel Cleaner Part Number W10355016: See the "Accessories" section for more information. Cleaning Method: Chrome burner bowls Wash frequently in direction of vegetable oil applied to the rack guides will not totally disappear, but after many cleanings they are cool and the control knobs are harder to slide, a light coating...

Use & Care Guide
Page 13
... to unlock. Replace bulb, then bulb cover by turning clockwise. 5. The control knob is not level. Element cycling due to keep flashing, call for display models in knob before cleaning. Control is set correctly. Cookware should be miswired. See the Installation Instructions. Demo Mode is normal operation. Electronic oven control set . Power to range is on and off on some models) Check that storage drawer or warming drawer is a standard 40-watt appliance bulb. See the control lock keypad feature in the back of a service...
... to unlock. Replace bulb, then bulb cover by turning clockwise. 5. The control knob is not level. Element cycling due to keep flashing, call for display models in knob before cleaning. Control is set correctly. Cookware should be miswired. See the Installation Instructions. Demo Mode is normal operation. Electronic oven control set . Power to range is on and off on some models) Check that storage drawer or warming drawer is a standard 40-watt appliance bulb. See the control lock keypad feature in the back of a service...

Use & Care Guide
Page 14
... door was not closed . See the "Sabbath Mode" section. Move rack to cover the edge of cooking time was not preheated. The Self-Cleaning function has not been entered correctly. See the "Start" keypad feature in the "Electronic Oven Controls" section. Oven temperature needs adjustment. See "Control Display" in the "Feature Guide" section. The temperature set was opened during cooking. Cooktop Care Kit (ceramic glass models) (includes cleaner, protectant, scraper, and applicator pads) Order Part Number 31605 Cooktop Protectant (ceramic glass models) Order Part Number...
... door was not closed . See the "Sabbath Mode" section. Move rack to cover the edge of cooking time was not preheated. The Self-Cleaning function has not been entered correctly. See the "Start" keypad feature in the "Electronic Oven Controls" section. Oven temperature needs adjustment. See "Control Display" in the "Feature Guide" section. The temperature set was opened during cooking. Cooktop Care Kit (ceramic glass models) (includes cleaner, protectant, scraper, and applicator pads) Order Part Number 31605 Cooktop Protectant (ceramic glass models) Order Part Number...


