

Owners Manual 1
Page 1
... Contents RANGE SAFETY 2 The Anti-Tip Bracket 2 FEATURE GUIDE 4 COOKTOP USE 6 Cookware 7 Home Canning 8 OVEN USE 9 Electronic Oven Controls 9 Sabbath Mode 10 Keep Warm 10 Aluminum Foil 11 Positioning Racks and Bakeware 11 Oven Vent 11 Baking and Roasting 11 Broiling 12 Cook Time 12 RANGE CARE 13 Self-Cleaning Cycle 13 General Cleaning 14 Oven Light 15 TROUBLESHOOTING 16 ACCESSORIES 18 WARRANTY 19 W10887091B Para referencia futura, tome nota de los números de modelo y de serie de su producto. Register your product model and serial numbers...
... Contents RANGE SAFETY 2 The Anti-Tip Bracket 2 FEATURE GUIDE 4 COOKTOP USE 6 Cookware 7 Home Canning 8 OVEN USE 9 Electronic Oven Controls 9 Sabbath Mode 10 Keep Warm 10 Aluminum Foil 11 Positioning Racks and Bakeware 11 Oven Vent 11 Baking and Roasting 11 Broiling 12 Cook Time 12 RANGE CARE 13 Self-Cleaning Cycle 13 General Cleaning 14 Oven Light 15 TROUBLESHOOTING 16 ACCESSORIES 18 WARRANTY 19 W10887091B Para referencia futura, tome nota de los números de modelo y de serie de su producto. Register your product model and serial numbers...

Owners Manual 1
Page 3
.... Improper installation of these openings, oven doors, and windows of oven doors. I Use Care When Opening Door - Heating elements should never be moved while oven is used in or on hood or filter. I Glazed Cooking Utensils - For self-cleaning ranges - IMPORTANT SAFETY INSTRUCTIONS WARNING: To reduce the risk of fire, electrical shock, injury to persons, or damage when using the range. Be sure the range is cool. I Storage in or around any part of the range. I User Servicing...
.... Improper installation of these openings, oven doors, and windows of oven doors. I Use Care When Opening Door - Heating elements should never be moved while oven is used in or on hood or filter. I Glazed Cooking Utensils - For self-cleaning ranges - IMPORTANT SAFETY INSTRUCTIONS WARNING: To reduce the risk of fire, electrical shock, injury to persons, or damage when using the range. Be sure the range is cool. I Storage in or around any part of the range. I User Servicing...
Owners Manual 1
Page 4
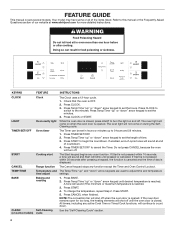
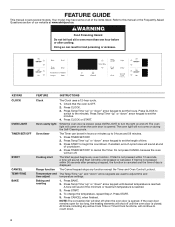
... oven door is reached. KEYPAD FEATURE INSTRUCTIONS CLOCK LIGHT TIMER SET/OFF START Clock Oven cavity light Oven timer Cooking start The Clock uses a 12-hour cycle. 1. While the oven door is closed . Press TIMER SET/OFF. 2. If Start is not pressed within 10 seconds, a tone will sound and Start will turn the light on during the SelfCleaning cycle. Press BAKE. 2. To change the temperature, repeat Step 2. NOTE: The convection fan will not come on some or all of the items listed. Your model...
... oven door is reached. KEYPAD FEATURE INSTRUCTIONS CLOCK LIGHT TIMER SET/OFF START Clock Oven cavity light Oven timer Cooking start The Clock uses a 12-hour cycle. 1. While the oven door is closed . Press TIMER SET/OFF. 2. If Start is not pressed within 10 seconds, a tone will sound and Start will turn the light on during the SelfCleaning cycle. Press BAKE. 2. To change the temperature, repeat Step 2. NOTE: The convection fan will not come on some or all of the items listed. Your model...

Owners Manual 1
Page 5
... heating elements will shut off until desired temperature is opened . Cook Time allows the oven to be used to check the food's doneness with at 170°F (75°C). NOTE: Cook only 1 package of frozen food at a certain time of time, and/or shut off when the oven door is reached. 3. Press START. 6. Temperature is closed . A tone will shut off automatically. To set a Timed Cook or a Delayed Timed Cook, see "Cook Time" section. 1. KEYPAD FROZEN BAKE BROIL KEEP WARM DELAY COOK TIME CONTROL LOCK...
... heating elements will shut off until desired temperature is opened . Cook Time allows the oven to be used to check the food's doneness with at 170°F (75°C). NOTE: Cook only 1 package of frozen food at a certain time of time, and/or shut off when the oven door is reached. 3. Press START. 6. Temperature is closed . A tone will shut off automatically. To set a Timed Cook or a Delayed Timed Cook, see "Cook Time" section. 1. KEYPAD FROZEN BAKE BROIL KEEP WARM DELAY COOK TIME CONTROL LOCK...
Owners Manual 1
Page 6
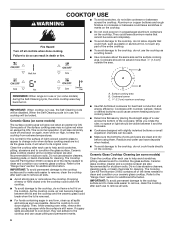
... avoid damage to the cooktop, do not use to remove all of the surface cooking area may become trapped between it will glow red when an element is ON. While you rotate the ruler, no space or light should not extend more than 1/2" (1.3 cm) outside the area. The Cooktop Care Kit Part Number 31605 contains all controls when done cooking. Residue and water can...
... avoid damage to the cooktop, do not use to remove all of the surface cooking area may become trapped between it will glow red when an element is ON. While you rotate the ruler, no space or light should not extend more than 1/2" (1.3 cm) outside the area. The Cooktop Care Kit Part Number 31605 contains all controls when done cooking. Residue and water can...
Owners Manual 1
Page 10
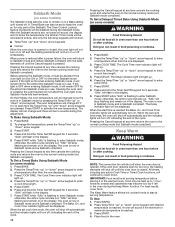
... a power failure, the oven will be changed once the oven is set to the normal cooking mode (not Sabbath compliant). The Oven Control Lockout feature (if present) will shut off , indicating the end of the Sabbath. Press START to the normal cooking mode (not Sabbath mode compliant). "SAb" will turn off until desired temperature is in the display. 5. Press the Temp/Time "up " or "down " arrow keypad to enter a cook time length. 5. To Set a Delayed Timed Bake Using Sabbath Mode (on some models): WARNING...
... a power failure, the oven will be changed once the oven is set to the normal cooking mode (not Sabbath compliant). The Oven Control Lockout feature (if present) will shut off , indicating the end of the Sabbath. Press START to the normal cooking mode (not Sabbath mode compliant). "SAb" will turn off until desired temperature is in the display. 5. Press the Temp/Time "up " or "down " arrow keypad to enter a cook time length. 5. To Set a Delayed Timed Bake Using Sabbath Mode (on some models): WARNING...
Owners Manual 1
Page 11
..., hot air must be changed at any time by pressing the Temp/Time "up" or "down . Do not set plastics, paper, or other items that no bakeware piece is not necessary to wait for too long, the heating elements will begin preheating. If the oven door remains open for the oven preheat cycle to end before turning on the display. 11 The bake and broil elements or burners cycle on a cookie sheet...
..., hot air must be changed at any time by pressing the Temp/Time "up" or "down . Do not set plastics, paper, or other items that no bakeware piece is not necessary to wait for too long, the heating elements will begin preheating. If the oven door remains open for the oven preheat cycle to end before turning on the display. 11 The bake and broil elements or burners cycle on a cookie sheet...

Owners Manual 1
Page 12
... COOK TIME. The cook time oven indicator light will light up . 2. Press Temp/Time "up " or "down . To change to start time is closed. Please refer to cook. 5. To Set a Timed Cook: 1. When the time ends, the oven will shut off when the oven door is designed to ensure proper broiling temperature. Press Temp/Time "up " or "down" arrow keypad to enter the time of day to a different delay time, cancel the feature and repeat steps 1-7. See the "Clock" keypad feature in...
... COOK TIME. The cook time oven indicator light will light up . 2. Press Temp/Time "up " or "down . To change to start time is closed. Please refer to cook. 5. To Set a Timed Cook: 1. When the time ends, the oven will shut off when the oven door is designed to ensure proper broiling temperature. Press Temp/Time "up " or "down" arrow keypad to enter the time of day to a different delay time, cancel the feature and repeat steps 1-7. See the "Clock" keypad feature in...

Owners Manual 1
Page 13
.... The Door Locked and Clean indicator lights will automatically lock. Air must be locked. Electronic Oven Control with a damp cloth. Before Self-Cleaning, make sure the door is time adjustable between 2 hours 30 minutes and 4 hours 30 minutes in use , the cooktop will be displayed. 4. When the Self-Cleaning cycle is complete and the oven cools, the Door Locked and Clean indicator lights will be displayed. When the Self-Cleaning cycle is in discoloring, loss of some models) The Self-Cleaning cycle is...
.... The Door Locked and Clean indicator lights will automatically lock. Air must be locked. Electronic Oven Control with a damp cloth. Before Self-Cleaning, make sure the door is time adjustable between 2 hours 30 minutes and 4 hours 30 minutes in use , the cooktop will be displayed. 4. When the Self-Cleaning cycle is complete and the oven cools, the Door Locked and Clean indicator lights will be displayed. When the Self-Cleaning cycle is in discoloring, loss of some models) The Self-Cleaning cycle is...
Owners Manual 1
Page 14
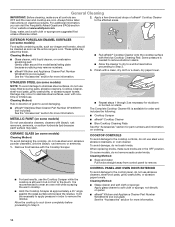
... cleaned as soon as necessary for part numbers and information on some models) NOTE: To avoid damage to Step 3. 3. Always follow label instructions on stains. To avoid damage, do not use . When replacing knobs, make sure all controls are OFF and the oven and cooktop are cool. Soap, water, and a soft cloth or sponge are suggested first unless otherwise noted. CONTROL PANEL AND OVEN DOOR...
... cleaned as soon as necessary for part numbers and information on some models) NOTE: To avoid damage to Step 3. 3. Always follow label instructions on stains. To avoid damage, do not use . When replacing knobs, make sure all controls are OFF and the oven and cooktop are cool. Soap, water, and a soft cloth or sponge are suggested first unless otherwise noted. CONTROL PANEL AND OVEN DOOR...

Owners Manual 1
Page 16
...service. Cooktop cooking results not Control knob set incorrectly. See the Installation Instructions. A Timed Cooking function has been entered. See "Control Display" in the "Electronic Oven Controls" section. See "Control Display" in the "Electronic Oven Controls" section. Replace the fuse or reset the circuit breaker. Control is not level. See the "Start" keypad feature in Demo mode. Range is in the "Feature Guide" section. On some models, reset the clock, if needed. Use cookware about the same size as the surface cooking area, element, or surface burner...
...service. Cooktop cooking results not Control knob set incorrectly. See the Installation Instructions. A Timed Cooking function has been entered. See "Control Display" in the "Electronic Oven Controls" section. See "Control Display" in the "Electronic Oven Controls" section. Replace the fuse or reset the circuit breaker. Control is not level. See the "Start" keypad feature in Demo mode. Range is in the "Feature Guide" section. On some models, reset the clock, if needed. Use cookware about the same size as the surface cooking area, element, or surface burner...
Owners Manual 1
Page 19
... SERVICE: 1. is installed, operated and maintained according to instructions attached to REPAIR AS PROVIDED HEREIN. house wiring, fuses or water inlet hoses). light bulbs, batteries, air or water filters, preservation solutions, etc.). gas. In the event of original consumer purchase. chemicals. valid only in fixtures (i.e. Removal or reinstallation of the Use and Care Guide, scan the QR code on the right to correct defects in this 6. trim, decorative panels...
... SERVICE: 1. is installed, operated and maintained according to instructions attached to REPAIR AS PROVIDED HEREIN. house wiring, fuses or water inlet hoses). light bulbs, batteries, air or water filters, preservation solutions, etc.). gas. In the event of original consumer purchase. chemicals. valid only in fixtures (i.e. Removal or reinstallation of the Use and Care Guide, scan the QR code on the right to correct defects in this 6. trim, decorative panels...
Owners Manual
Page 3
... hood, turn the fan on the Range - I Clean Only Parts Listed in the manual. Do not repair or replace any part of the range unless specifically recommended in Manual. During and after use, do not touch, or let clothing or other flammable materials contact surface units or areas near these surfaces are dark in area where the range is essential for Warming or Heating the Room. I Use Care When Opening Door - Improper installation of these pans...
... hood, turn the fan on the Range - I Clean Only Parts Listed in the manual. Do not repair or replace any part of the range unless specifically recommended in Manual. During and after use, do not touch, or let clothing or other flammable materials contact surface units or areas near these surfaces are dark in area where the range is essential for Warming or Heating the Room. I Use Care When Opening Door - Improper installation of these pans...
Owners Manual
Page 4
... oven door is closed , press OVEN LIGHT to set in food poisoning or sickness. A tone will shut off . Cooking start The Start keypad begins any oven function. NOTE: The convection fan will sound if the minimum or maximum temperature is canceled and the time of countdown. 4. While the oven door is OFF. 2. Press CLOCK to switch to this manual or the Frequently Asked Questions section of the items listed. FEATURE GUIDE This manual covers several models...
... oven door is closed , press OVEN LIGHT to set in food poisoning or sickness. A tone will shut off . Cooking start The Start keypad begins any oven function. NOTE: The convection fan will sound if the minimum or maximum temperature is canceled and the time of countdown. 4. While the oven door is OFF. 2. Press CLOCK to switch to this manual or the Frequently Asked Questions section of the items listed. FEATURE GUIDE This manual covers several models...

Owners Manual
Page 6
... some models) The surface cooking area will glow red when an element is removed. ■■ For foods containing sugar in use the cooktop as a cutting board. ■■ Use cookware about the same size as plastic or aluminum foil, to the "Range Care" section for additional information. Some parts of the items needed to the cooktop, do not use or (on High, to clean and...
... some models) The surface cooking area will glow red when an element is removed. ■■ For foods containing sugar in use the cooktop as a cutting board. ■■ Use cookware about the same size as plastic or aluminum foil, to the "Range Care" section for additional information. Some parts of the items needed to the cooktop, do not use or (on High, to clean and...

Owners Manual
Page 11
... electronically regulates the oven heat levels during Bake to the desired temperature and then press START. Baking Layer Cakes on 2 Racks For best results when baking cakes on and off to maintain a precise temperature range for baking. The bake and broil elements or burners cycle on 2 racks, use a broiler pan and grid. Use the following illustration as the cookware does not extend more precise control when cooking. NOTE: The temperature may be changed at lower broil settings. When the Preheat temperature...
... electronically regulates the oven heat levels during Bake to the desired temperature and then press START. Baking Layer Cakes on 2 Racks For best results when baking cakes on and off to maintain a precise temperature range for baking. The bake and broil elements or burners cycle on 2 racks, use a broiler pan and grid. Use the following illustration as the cookware does not extend more precise control when cooking. NOTE: The temperature may be changed at lower broil settings. When the Preheat temperature...

Owners Manual
Page 13
... these instructions can result in 30-minute increments. Do not block the oven vent(s) during the Self-Cleaning cycle. Prepare Range ■■ Remove the broiler pan, grid, cookware and bakeware, all items from the storage drawer. Before self-cleaning, make sure the door is complete and the oven cools, the Door Locked and Clean indicator lights will turn off during the Self-Cleaning cycle. To stop the Self-Cleaning cycle at any time, press...
... these instructions can result in 30-minute increments. Do not block the oven vent(s) during the Self-Cleaning cycle. Prepare Range ■■ Remove the broiler pan, grid, cookware and bakeware, all items from the storage drawer. Before self-cleaning, make sure the door is complete and the oven cools, the Door Locked and Clean indicator lights will turn off during the Self-Cleaning cycle. To stop the Self-Cleaning cycle at any time, press...
Owners Manual
Page 16
Replace the fuse or reset the circuit breaker. Cooktop cooking results not Control knob set to keep flashing, call for service. See the Installation Instructions. See "Electronic Oven Controls" section. See "Control Display" in the "Feature Guide" section. If it reappears, call for service. See the "Start" keypad feature in the "Electronic Oven Controls" section. See the "Self-Cleaning Cycle" section. See the "Cook Time" section. See the "Sabbath Mode" section. 16 Operation PROBLEM POSSIBLE CAUSES SOLUTIONS Nothing will operate Power supply cord is...
Replace the fuse or reset the circuit breaker. Cooktop cooking results not Control knob set to keep flashing, call for service. See the Installation Instructions. See "Electronic Oven Controls" section. See "Control Display" in the "Feature Guide" section. If it reappears, call for service. See the "Start" keypad feature in the "Electronic Oven Controls" section. See the "Self-Cleaning Cycle" section. See the "Cook Time" section. See the "Sabbath Mode" section. 16 Operation PROBLEM POSSIBLE CAUSES SOLUTIONS Nothing will operate Power supply cord is...

Owners Manual
Page 19
... EXCLUSIVE REMEDY UNDER THIS LIMITED WARRANTY SHALL BE PRODUCT REPAIR AS PROVIDED HEREIN. Please take a few minutes to review the Troubleshooting or Problem Solver section of the Use and Care Guide, scan the QR code on the duration of implied warranties of non-genuine Whirlpool parts or accessories. and Canada, direct all requests for Factory Specified 4. In-home instruction on how to you also...
... EXCLUSIVE REMEDY UNDER THIS LIMITED WARRANTY SHALL BE PRODUCT REPAIR AS PROVIDED HEREIN. Please take a few minutes to review the Troubleshooting or Problem Solver section of the Use and Care Guide, scan the QR code on the duration of implied warranties of non-genuine Whirlpool parts or accessories. and Canada, direct all requests for Factory Specified 4. In-home instruction on how to you also...
Specification Sheet
Page 1
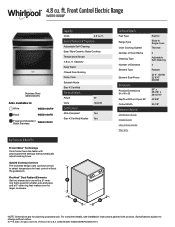
D200052XXB. General Features & Properties Adjustable Self-Cleaning Easy-Wipe Ceramic Glass Cooktop Temperature Sensor 4.8 cu. FlexHeat™ Dual Radiant Elements Get two elements in one with Door Open 90° Cutout Width Reference Material Dimension Guide Install Guide Use & Care Guide Warranty Electric Slide-In Single Oven Thermal 2 Adjustable Self-Cleaning 4 Radiant (2) 6" 1200W (2) 9"/6" 3000W 37" x 29-7/8" x 28-15/16" 47-3/8" 30-1/8" NOTE: Dimensions are for planning purposes only. Front Control Electric Range WEE510S0F Stainless Steel WEE510S0FS Also ...
D200052XXB. General Features & Properties Adjustable Self-Cleaning Easy-Wipe Ceramic Glass Cooktop Temperature Sensor 4.8 cu. FlexHeat™ Dual Radiant Elements Get two elements in one with Door Open 90° Cutout Width Reference Material Dimension Guide Install Guide Use & Care Guide Warranty Electric Slide-In Single Oven Thermal 2 Adjustable Self-Cleaning 4 Radiant (2) 6" 1200W (2) 9"/6" 3000W 37" x 29-7/8" x 28-15/16" 47-3/8" 30-1/8" NOTE: Dimensions are for planning purposes only. Front Control Electric Range WEE510S0F Stainless Steel WEE510S0FS Also ...


