

Installation Instructions
Page 1
...the safety alert symbol. ONLY Para una versión de estas instrucciones en español, visite www.Whirlpool.com TABLE OF CONTENTS DRYER SAFETY 1 INSTALLATION REQUIREMENTS 2 Tools and Parts 2 Optional Equipment 3 Location Requirements 3 ELECTRIC... DRYER POWER HOOKUP 5 Electrical Requirements 5 Electrical Connection 6 VENTING 11 Venting Requirements 11 Plan Vent System 12 Install Vent System 13 INSTALL LEVELING LEGS 13 CONNECT VENT 14 CONNECT INLET HOSE (STEAM MODELS 14 LEVEL DRYER 15 COMPLETE INSTALLATION 15 ...
...the safety alert symbol. ONLY Para una versión de estas instrucciones en español, visite www.Whirlpool.com TABLE OF CONTENTS DRYER SAFETY 1 INSTALLATION REQUIREMENTS 2 Tools and Parts 2 Optional Equipment 3 Location Requirements 3 ELECTRIC... DRYER POWER HOOKUP 5 Electrical Requirements 5 Electrical Connection 6 VENTING 11 Venting Requirements 11 Plan Vent System 12 Install Vent System 13 INSTALL LEVELING LEGS 13 CONNECT VENT 14 CONNECT INLET HOSE (STEAM MODELS 14 LEVEL DRYER 15 COMPLETE INSTALLATION 15 ...

Installation Instructions
Page 2
... package from whom you purchased your Use and Care Guide. 2 Mobile home installations require metal exhaust system hardware available for installing new exhaust vent) ■ Tin snips (new vent installations) ■ ¼" nut driver (recommended) ■ Tape measure ■ Pliers Parts supplied Non-Steam Models Steam Models A B C D E A.... 1" (25 mm) or hex-head socket wrench (for adjusting dryer feet) ■ Level ■ Wire stripper (direct wire installations) ■ Vent clamps ■ Caulking gun and compound (for purchase from the dealer from dryer drum.
... package from whom you purchased your Use and Care Guide. 2 Mobile home installations require metal exhaust system hardware available for installing new exhaust vent) ■ Tin snips (new vent installations) ■ ¼" nut driver (recommended) ■ Tape measure ■ Pliers Parts supplied Non-Steam Models Steam Models A B C D E A.... 1" (25 mm) or hex-head socket wrench (for adjusting dryer feet) ■ Level ■ Wire stripper (direct wire installations) ■ Vent clamps ■ Caulking gun and compound (for purchase from the dealer from dryer drum.

Installation Instructions
Page 3
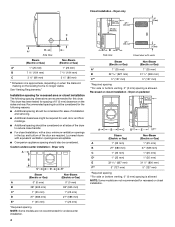
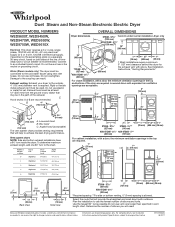
..., mobile homes, or sleeping quarters. This can result in an area where it will need to place the dryer at temperatures below 45ºF (7ºC). Venting Dimensions C A* B Back View Steam (Electric or Gas) Non-Steam (Electric or Gas) A* 1" (25 mm) 1" (25 mm) B 14" (356 mm) 14...; A location that allows for proper exhaust installation. Optional Equipment Refer to your Use and Care guide for information about the accessories available for the exhaust vent with a maximum slope of an automatic sensor cycle. Steam (Electric or Gas) A 38" (965 mm) B 32 9/16" (827 mm) C...
..., mobile homes, or sleeping quarters. This can result in an area where it will need to place the dryer at temperatures below 45ºF (7ºC). Venting Dimensions C A* B Back View Steam (Electric or Gas) Non-Steam (Electric or Gas) A* 1" (25 mm) 1" (25 mm) B 14" (356 mm) 14...; A location that allows for proper exhaust installation. Optional Equipment Refer to your Use and Care guide for information about the accessories available for the exhaust vent with a maximum slope of an automatic sensor cycle. Steam (Electric or Gas) A 38" (965 mm) B 32 9/16" (827 mm) C...
Installation Instructions
Page 4
... 32 9/16" (827 mm) 31 1/2" (800 mm) C** 5" (127 mm) 5" (127 mm) *Required spacing **For side or bottom venting, 0" (0 mm) spacing is allowed NOTE: Some models are recommended for recessed or closet installation. Custom undercounter installation - Dryer on the leveling foot ...mm) E 32 9/16" (827 mm) 31 1/2" (800 mm) F** 5" (127 mm) 5" (127 mm) *Required spacing **For side or bottom venting, 0" (0 mm) spacing is allowed. Recommended spacing should be considered for the following spacing dimensions are not recommended for this dryer. Installation spacing for recessed area...
... 32 9/16" (827 mm) 31 1/2" (800 mm) C** 5" (127 mm) 5" (127 mm) *Required spacing **For side or bottom venting, 0" (0 mm) spacing is allowed NOTE: Some models are recommended for recessed or closet installation. Custom undercounter installation - Dryer on the leveling foot ...mm) E 32 9/16" (827 mm) 31 1/2" (800 mm) F** 5" (127 mm) 5" (127 mm) *Required spacing **For side or bottom venting, 0" (0 mm) spacing is allowed. Recommended spacing should be considered for the following spacing dimensions are not recommended for this dryer. Installation spacing for recessed area...

Installation Instructions
Page 5
... mm) F* 1" (25 mm) 1" (25 mm) G 1" (25 mm) 1" (25 mm) H 27" (686 mm) 27" (686 mm) I 1" (25 mm) 1" (25 mm) *Required spacing **For side or bottom venting, 0" (0 mm) spacing is suitable for Mobile Home Construction and Safety, Title 24, HUD Part 280) or Standard CAN/CSA-Z240 MH.
... mm) F* 1" (25 mm) 1" (25 mm) G 1" (25 mm) 1" (25 mm) H 27" (686 mm) 27" (686 mm) I 1" (25 mm) 1" (25 mm) *Required spacing **For side or bottom venting, 0" (0 mm) spacing is suitable for Mobile Home Construction and Safety, Title 24, HUD Part 280) or Standard CAN/CSA-Z240 MH.

Installation Instructions
Page 9
... the center screw of power supply cable C. ¾" (19 mm) UL listed strain relief D. Center, silver-colored terminal block screw E. Tighten screw. Now go to "Venting Requirements." 4-wire connection: Direct wire IMPORTANT: A 4-wire connection is required for mobile homes and where local codes do not permit the use of NEUTRAL ground...
... the center screw of power supply cable C. ¾" (19 mm) UL listed strain relief D. Center, silver-colored terminal block screw E. Tighten screw. Now go to "Venting Requirements." 4-wire connection: Direct wire IMPORTANT: A 4-wire connection is required for mobile homes and where local codes do not permit the use of NEUTRAL ground...

Installation Instructions
Page 10
... listed strain relief F. Neutral ground wire C. Secure cover with hold -down screw. 6. Ring terminals G. Now go to "Venting Requirements." 3-wire connection: Power supply cord Use where local codes permit connecting cabinet-ground conductor to "Venting Requirements." Center, silver-colored terminal block screw D. 5. Insert tab of terminal block cover into slot of the...
... listed strain relief F. Neutral ground wire C. Secure cover with hold -down screw. 6. Ring terminals G. Now go to "Venting Requirements." 3-wire connection: Power supply cord Use where local codes permit connecting cabinet-ground conductor to "Venting Requirements." Center, silver-colored terminal block screw D. 5. Insert tab of terminal block cover into slot of the...

Installation Instructions
Page 11
... completed your dealer or by a qualified electrician 3. Remove center, silver-colored terminal block screw. 2. Grounding path determined by calling Whirlpool Service. Failure to achieve the best drying performance. Do not use a plastic vent. B A C D E F A. The dryer exhaust must be used . 4. Insert tab of dryer rear panel. Center, silver-colored terminal block screw C. Secure...
... completed your dealer or by a qualified electrician 3. Remove center, silver-colored terminal block screw. 2. Grounding path determined by calling Whirlpool Service. Failure to achieve the best drying performance. Do not use a plastic vent. B A C D E F A. The dryer exhaust must be used . 4. Insert tab of dryer rear panel. Center, silver-colored terminal block screw C. Secure...
Installation Instructions
Page 12
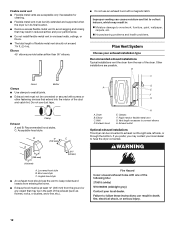
...outlet Optional exhaust installations This dryer can cause moisture and lint to collect indoors, which may result in the path of flexible metal vent should cap the vent to keep rodents and insects from entering the home. ■ Exhaust hood must be at least 12" (305 mm) from... secured with a magnetic latch. Louvered hood style B. Dryer B. Elbow C. Other installations are acceptable only if accessible for cleaning. ■ Flexible metal vent must not be in : Moisture damage to have the dryer converted. 12 Do not use an exhaust hood with screws or other fastening devices that...
...outlet Optional exhaust installations This dryer can cause moisture and lint to collect indoors, which may result in the path of flexible metal vent should cap the vent to keep rodents and insects from entering the home. ■ Exhaust hood must be at least 12" (305 mm) from... secured with a magnetic latch. Louvered hood style B. Dryer B. Elbow C. Other installations are acceptable only if accessible for cleaning. ■ Flexible metal vent must not be in : Moisture damage to have the dryer converted. 12 Do not use an exhaust hood with screws or other fastening devices that...
Installation Instructions
Page 13
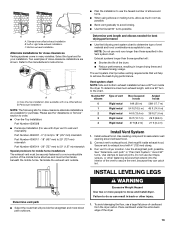
... inside exhaust hood. Over-the-top installation (also available with 4" (102 mm) clamp. 3. Connect vent to achieve the best drying performance. See "Determine vent path" in many varieties. Use clamps to seal exterior wall opening around exhaust hood. 2. Left or right...screws, or other injury. 1. Standard rear offset exhaust installation B. Bottom exhaust installation Alternate installations for mobile home installations The exhaust vent must not terminate beneath the mobile home. Please see the "Assistance or Service" section to 50" (1.27 m) mismatch Special ...
... inside exhaust hood. Over-the-top installation (also available with 4" (102 mm) clamp. 3. Connect vent to achieve the best drying performance. See "Determine vent path" in many varieties. Use clamps to seal exterior wall opening around exhaust hood. 2. Left or right...screws, or other injury. 1. Standard rear offset exhaust installation B. Bottom exhaust installation Alternate installations for mobile home installations The exhaust vent must not terminate beneath the mobile home. Please see the "Assistance or Service" section to 50" (1.27 m) mismatch Special ...
Installation Instructions
Page 14
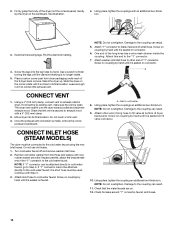
.... Continue with an additional two-thirds turn. 3. Using pliers, tighten the coupling an additional two-thirds turn . Once the exhaust vent connection is clean. Do not use old hoses. 1. Screw the legs into its final location. Damage to exhaust hood with new rubber...to its final location. Find the diamond marking. 4. If connecting to brass male end of "Y" connector. Attach "Y" connector to existing vent, make sure the vent is made, remove the corner posts and cardboard. 2. See illustration. 4. NOTE: Do not overtighten. Turn cold water faucet off and...
.... Continue with an additional two-thirds turn. 3. Using pliers, tighten the coupling an additional two-thirds turn . Once the exhaust vent connection is clean. Do not use old hoses. 1. Screw the legs into its final location. Damage to exhaust hood with new rubber...to its final location. Find the diamond marking. 4. If connecting to brass male end of "Y" connector. Attach "Y" connector to existing vent, make sure the vent is made, remove the corner posts and cardboard. 2. See illustration. 4. NOTE: Do not overtighten. Turn cold water faucet off and...

Installation Instructions
Page 15
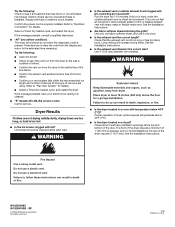
... problem continues, call an electrician. ■ Is the correct power supply available? Use a wrench to the estimated time remaining. 15 COMPLETE INSTALLATION 1. Be sure the vent is still no line voltage condition): The drum will not run when this diagnostic code is closed. Be sure the water faucets are on . Check...
... problem continues, call an electrician. ■ Is the correct power supply available? Use a wrench to the estimated time remaining. 15 COMPLETE INSTALLATION 1. Be sure the vent is still no line voltage condition): The drum will not run when this diagnostic code is closed. Be sure the water faucets are on . Check...
Installation Instructions
Page 16
... minimum of 1" (25 mm) of airspace, and, for the type of the door. Do not use a metal foil vent. Failure to check air movement. SP © 2009 Whirlpool Corporation. Select a Timed Dry heated cycle, and restart the dryer. If the message persists, have ventilation openings at the top ...and bottom of vent you do not feel air movement, clean exhaust system of lint and debris. ■ Confirm the exterior vent exhaust hood is ...
... minimum of 1" (25 mm) of airspace, and, for the type of the door. Do not use a metal foil vent. Failure to check air movement. SP © 2009 Whirlpool Corporation. Select a Timed Dry heated cycle, and restart the dryer. If the message persists, have ventilation openings at the top ...and bottom of vent you do not feel air movement, clean exhaust system of lint and debris. ■ Confirm the exterior vent exhaust hood is ...

Owners Manual
Page 10
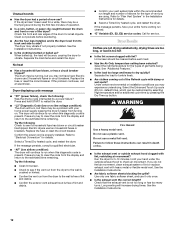
... cause overheating and damage to clean the lint screen before your dryer during removal, check the exhaust hood and remove the lint. See "Venting Requirements." The screen is probably clogged if lint falls off while the screen is completely dry. Cleaning the Dryer Interior To clean dryer drum... 1. These stains are away. 10 From the Exhaust Vent Lint should be removed every 2 years, or more often, depending on dryer usage. If storing or moving your load is in dryer. ...
... cause overheating and damage to clean the lint screen before your dryer during removal, check the exhaust hood and remove the lint. See "Venting Requirements." The screen is probably clogged if lint falls off while the screen is completely dry. Cleaning the Dryer Interior To clean dryer drum... 1. These stains are away. 10 From the Exhaust Vent Lint should be removed every 2 years, or more often, depending on dryer usage. If storing or moving your load is in dryer. ...
Owners Manual
Page 12
... from the dryer to restart the dryer. ■ "L2" Diagnostic Code (low or no line voltage condition): The drum will increase drying times. Hold your vent system falls within the recommended run cleaned. ■ "E" Variable (E1, E2, E3) service codes: Call for details. ■ Select a Timed Dry heated ...you may be cleaned before laundering. ■ Are the four legs installed, and is free of lint and debris. ■ Confirm the exterior vent exhaust hood is the dryer level front to back and side to check air movement. Press any key to clear the code from turning on...
... from the dryer to restart the dryer. ■ "L2" Diagnostic Code (low or no line voltage condition): The drum will increase drying times. Hold your vent system falls within the recommended run cleaned. ■ "E" Variable (E1, E2, E3) service codes: Call for details. ■ Select a Timed Dry heated ...you may be cleaned before laundering. ■ Are the four legs installed, and is free of lint and debris. ■ Confirm the exterior vent exhaust hood is the dryer level front to back and side to check air movement. Press any key to clear the code from turning on...
Owners Manual
Page 13
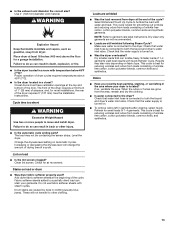
...? Proper operation of drying time in a room with steam cycles. Loads are caused by dyes in back or other clothing. Use 4" (102 mm) diameter vent material. ■ Is the dryer located in a cycle. Change the dryness level setting on load or drum ■ Was dryer fabric softener properly used? ...of dryer cycles requires temperatures above 45ºF (7ºC). ■ Is the dryer located in the area where your garments. ■ Is the exhaust vent diameter the correct size? Check that the water supply is connected to a partially dried load can tumble freely.
...? Proper operation of drying time in a room with steam cycles. Loads are caused by dyes in back or other clothing. Use 4" (102 mm) diameter vent material. ■ Is the dryer located in a cycle. Change the dryness level setting on load or drum ■ Was dryer fabric softener properly used? ...of dryer cycles requires temperatures above 45ºF (7ºC). ■ Is the dryer located in the area where your garments. ■ Is the exhaust vent diameter the correct size? Check that the water supply is connected to a partially dried load can tumble freely.
Dimension Guide
Page 1
...3 Type of elbows and turns. Plan the installation to change without notice. Because Whirlpool Corporation policy includes a continuous commitment to improve our products, we reserve the right to use vent runs longer than specified in the neutral or grounding circuit. Dimensions are required. ...and most direct path outdoors. Determine the number of the line. Louvered hood 4" (102 mm) B. Box hood C. See Installation Instructions, "Venting Requirements." Louvered doors with equivalent air ventilation openings are acceptable. 48 in.2 * (310 cm2) 3" (76 mm) 14" max. (...
...3 Type of elbows and turns. Plan the installation to change without notice. Because Whirlpool Corporation policy includes a continuous commitment to improve our products, we reserve the right to use vent runs longer than specified in the neutral or grounding circuit. Dimensions are required. ...and most direct path outdoors. Determine the number of the line. Louvered hood 4" (102 mm) B. Box hood C. See Installation Instructions, "Venting Requirements." Louvered doors with equivalent air ventilation openings are acceptable. 48 in.2 * (310 cm2) 3" (76 mm) 14" max. (...
