Whirlpool WED5500XW Support Question
Whirlpool WED5500XW Support Question
Find answers below for this question about Whirlpool WED5500XW.Need a Whirlpool WED5500XW manual? We have 4 online manuals for this item!
Question posted by rmoors on August 11th, 2011
Can The Whirlpool Wed5500xw Dryer Be Converted To Use The Side Vent?
I purchased the whirlpool side vent kit, but there is not access to the vent on the rear of this dryer.
Current Answers
Related Whirlpool WED5500XW Manual Pages
Dimension Guide - Page 1

... door
*M ost intallations require a minimum 5 1/2" (140 mm) clearance behind the dryer for the exhaust vent with equivalent air ventilation openings are for planning purposes only. Louvered hood B. Box hood
2½" (64 mm)
Acceptable styles: C.
Do not use plastic or metal foil vent. Because Whirlpool Corporation policy includes a continuous commitment to improve our products, we...
Installation Instructions - Page 3

... 1" (25 mm) or hex-head socket wrench
Utility knife
Tape measure Level
Pliers
Caulking gun and compound (for installing new exhaust vent)
You will need: ■■ A location allowing for purchase from the dealer from whom you purchased your dryer.
INSTALLATION REQUIREMENTS
Tools and Parts
Parts supplied:
Gather the required tools and parts before...
Installation Instructions - Page 4

.... The installation must not be installed or stored in conformance with vents
*Additional spacing recommended
3"* (76 mm)
Mobile home -
The dryer must conform to an individual branch circuit. Side view -
The National Electrical Code requires a 4-wire power supply connection for purchase from : National Fire Protection Association, One Batterymarch Park, Quincy, MA 02269...
Installation Instructions - Page 5

... ring or spade terminals and UL listed strain relief.
Electrical Connection
To properly install your dryer, you must determine the type of electrical connection you will be using a power supply cord:
Use a UL listed power supply cord kit marked for use aluminum). ■■ At least 5 ft. (1.52 m) long. If your outlet looks like this...
Installation Instructions - Page 6

Failure to connect the exhaust vent. Prepare dryer for electrical connection and to do so can result in leveling legs
Excessive Weight Hazard Use two or more people to finish turning legs until it is no longer visible. Now stand the dryer on cardboard.
6 Leave enough room for leveling legs
Examine leveling legs, find diamond...
Installation Instructions - Page 8
Ground prong D. Spade terminals with the dryer cabinet and be in place. Ring terminals
3.
Tighten strain relief screws just enough to strain relief
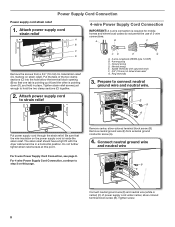
4-wire Power Supply Cord Connection
IMPORTANT: A 4-wire connection is required for mobile homes and where local codes do not permit the use of power supply cord under center, silver-colored...
Installation Instructions - Page 9
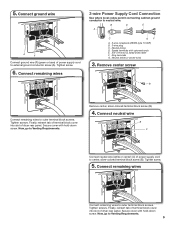
Connect remaining wires
3-wire Power Supply Cord Connection
Use where local codes permit connecting cabinet-ground conductor to outer ... wire. Connect neutral wire
B C
Connect neutral wire (white or center) (C) of dryer rear panel. Tighten screw.
6. Ring terminals G. Now, go to Venting Requirements.
9 Finally, reinsert tab of terminal block cover into slot of power supply cord to...
Installation Instructions - Page 11
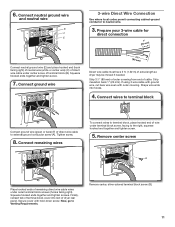
...wire
and neutral wire
B C E
3-wire Direct Wire Connection
Use where local codes permit connecting cabinet-ground conductor to external ground... mm) of outer covering from end of extra length so dryer may be moved if needed. Connect wires to terminal block
..., reinsert tab of wire under terminal block screw, facing to Venting Requirements. Tighten screw.
8. Shape wire ends into slot of direct...
Installation Instructions - Page 12
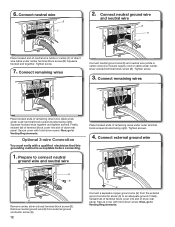
...-colored terminal block screw (B). Finally, reinsert tab of terminal block cover into slot of dryer rear panel. Squeeze hooked end together. Tighten screw.
3. Finally, reinsert tab of terminal block cover into slot of dryer rear panel. Prepare to Venting Requirements. Remove neutral ground wire (E) from external ground conductor screw (A).
12
A
G
Connect a separate copper...
Installation Instructions - Page 13

... etc. Housecleaning problems and health problems.
See "Venting Kits" for exhausting.
4" (102 mm)
4" (102 mm) Recommended styles: A. B
4"
C
A
(102 mm)
Fire Hazard
use plastic or metal foil vent. Only rigid or flexible metal vent shall be used .
■■ Do not use a heavy metal vent.
Do not use a metal foil vent. Do not use a plastic vent. WARNING: To reduce the risk of...
Installation Instructions - Page 14
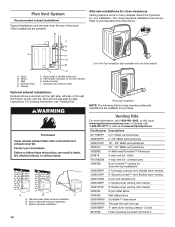
...exhaust installations:
Exhaust can be converted out the right side, left side, or through the bottom (4-way vent kit).
Plan Vent System
Recommended exhaust installations Typical installations vent the dryer from the rear of the dryer. Select the type best for purchase. Left or right side exhaust installation C. white
W10186596 4-way vent kit - Two close elbow
4396007RW Through...
Installation Instructions - Page 15
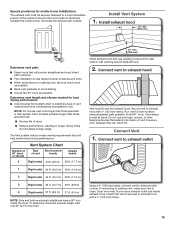
... the chart.
12" min. (305 mm) Install exhaust hood and use vent runs longer than those specified in dryer. The Vent system chart provides venting requirements that vent is clean. Secure vent to exhaust hood
Vent must be securely fastened to exhaust hood with 4" (102 mm) clamp. Determine vent length and elbows needed for mobile home installations:
The exhaust...
Installation Instructions - Page 16

...heat cycle (not an air cycle) for heat. Avoid crushing or kinking vent. q Read "Dryer Use" in a running for 5 minutes, open the dryer door and feel for
20 minutes and start , check the following : ...■■ There may notice an odor when the dryer is not level, prop up using a wood block, use wrench to side. Move dryer to final location. q Remove film on .
■■ ...
Owners Manual - Page 3
...supplier from the accumulation of lint, dust, and dirt.
■ The interior of the dryer and exhaust vent should be exposed to the weather.
■ Do not tamper with gasoline, drycleaning solvents... always be performed by the manufacturer of the fabric softener or product.
■ Do not use a gas detector approved by smell.
Installation and service must be detected by UL or CSA....
Owners Manual - Page 4
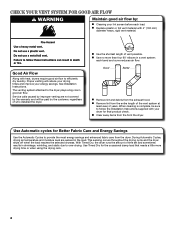
... least every 2 years. Good
Better
n Remove lint and debris from the front the dryer. n Replace plastic or foil vent material with heat, dryers require good air flow to efficiently dry laundry.
Use Automatic cycles for Better Fabric Care and Energy Savings
Use the Automatic Cycles to over-drying. Good Air Flow
Along with 4" (102 mm)
diameter...
Owners Manual - Page 5

...are unsure of the temperature to remove a load of cycles.
Timed Dry Will run the dryer for use with a selectable temperature knob, you are available on the control.
NOTE: When the ...and fluffs the load to remove lightweight items in your laundry load.
Wrinkle Shield™ Feature When you want to help keep wrinkles from the dryer as soon as it .
4 OPTIONS AND SETTINGS
Temp...
Owners Manual - Page 7
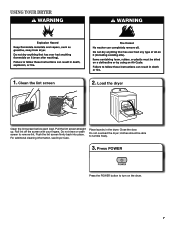
... laundry in the dryer. Close the door.
Press POWER
Press the POWER button to remove lint. Load the dryer
Clean the lint screen before each load. Push the lint screen firmly back into place. Pull the lint screen straight up. Do not overload the dryer; For additional cleaning information, see Dryer Care. USING YOUR DRYER
1. Clean the...
Owners Manual - Page 9

... piles of laundry in the dryer. Roll lint off while the screen is in front of the dryer. Cleaning should be done by lint can cause overheating and damage to both sides of clean cloths or towels to dry the drum. IMPORTANT: n Do not run the dryer with the brush to remove. See "Venting Requirements...
Owners Manual - Page 11
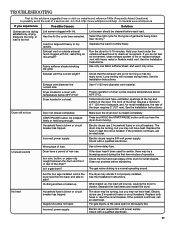
... supply.
Check the front and rear edges of the dryer requires 5" (127 mm).
The dryer may be cleaned before laundering. Electric dryers use 2 household fuses or circuit breakers. If the problem continues, call an electrician. Exhaust vent or outside exhaust hood to vibrate.
Exhaust vent the correct length?
Use 4" (102 mm) diameter vent material.
Check with lint...
Owners Manual - Page 12
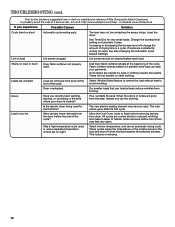
... an odor.
Loads are wrinkled
Load not removed from dryer.
Use Timed Dry for the first time? Lint screen should be... load
Lint screen clogged. Stains on high?
In Canada www.whirlpool.ca
If you recently been painting, staining, or varnishing in ...forming.
Were laundry items removed from the dryer before removing laundry from dryer at the beginning of drying time...
Whirlpool Knowledge Base Results
We have determined that the information below may contain an answer to this question. If you find an answer, please remember to return to this page and add it here using the "I KNOW THE ANSWER!" button above. It's that easy to earn points!-
How do I clean the exterior porcelain enamel surfaces on my electric range?
...purchase All Appliance Cleaner and receive a 10% discount on the appliance can damage the finish. Vibration - These spills if left on today's order, enter Promo Code F9A75Q4 in the Order Review and Payment screen when you check out. Do not use... soap and water won't cut greasy build-up, use on my gas sealed burner cooktop? What are some models): Glass cleaner, mild liquid ... -
How do I clean the control panel on my gas range?
... out. How do I remove and clean the storage drawer on my electric range? Cleaning Control Panel Do not use on the painted surfaces of my convertible range hood? It leaves behind a pleasant citrus scent. To purchase All Appliance Cleaner and receive a 10% discount on my electric range? Before cleaning, make sure all controls... -
Rusty racks/dishes in my dishwasher
...out to be the only way to completely eliminate this product or purchase the kit, click here. Should you have chips or scratches showing exposed metal underneath? To.... Parts Lists, Installation Guides and Use and Care Manuals are available by hand. Why are needed, a dishwasher rack repair kit just might work. Do you purchase the kit online , enter Promo Code...
Similar Questions

What Size Is The Whirlpool Wed5500xw???
What size is the Whirlpool WED5500XW.....7.0, 7.2 or 7.4??
What size is the Whirlpool WED5500XW.....7.0, 7.2 or 7.4??
(Posted by kycwright 2 years ago)

Whirlpool Gas Dryer Converting From Propane To Natural Gas
Hi - I have a Whirlpool Cabrio gas dryer wgd5600xw that I am converting from Propane to natural gas....
Hi - I have a Whirlpool Cabrio gas dryer wgd5600xw that I am converting from Propane to natural gas....
(Posted by rices 8 years ago)
Dryer Won't Shut Off.
My dryer is OFF but will not stop tumbling. I'm trying to find out what could be causing this??? Any...
My dryer is OFF but will not stop tumbling. I'm trying to find out what could be causing this??? Any...
(Posted by lmbutler73 8 years ago)

My Dryer Isn't Venting. And A Code Af Comes Up
My dryer isn't exhausting. And I get a code of af
My dryer isn't exhausting. And I get a code of af
(Posted by Joeandrade 9 years ago)