Whirlpool WED5500XW Support Question
Whirlpool WED5500XW Support Question
Find answers below for this question about Whirlpool WED5500XW.Need a Whirlpool WED5500XW manual? We have 4 online manuals for this item!
Question posted by Anonymous-155188 on October 19th, 2015
How To Start My Dryer
The person who posted this question about this Whirlpool product did not include a detailed explanation. Please use the "Request More Information" button to the right if more details would help you to answer this question.
Current Answers
Answer #1: Posted by TechSupport101 on October 19th, 2015 12:19 AM
TechSupport101

Member since:
May 24th, 2013 Points: 12,171,305

Member since:
May 24th, 2013 Points: 12,171,305
Hi. If following the Owner's Manual here https://www.helpowl.com/manuals/Whirlpool/WED5500XW/92098 does not yield expected results, then do see the troubleshooting article here http://www.repairclinic.com/RepairHelp/How-To-Fix-A-Dryer/1---/Dryer-won-t-start
Related Whirlpool WED5500XW Manual Pages
Dimension Guide - Page 1

...outside. 4" (102 mm) diameter vent is recommended. Exhaust venting: Exhaust your dryer to change materials and specifications without notice. See "Venting Requirements" in the ...) Recommended styles: A. Use the fewest 90° turns possible. Exhaust hood styles: B
4"
C
A
(102 mm)
Dryer dimensions
OVERALL DIMENSIONS
43 " (1092 mm)
23 ¾" (603 mm)
43 " (1092 mm)
13 ¾" (...
Installation Instructions - Page 2
... the chance of others .
All safety messages will follow instructions.
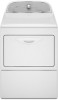
All safety messages will tell you what can happen if the instructions are very important. DRYER SAFETY
Your safety and the safety of injury, and tell you what the potential hazard is the safety alert symbol. Always read and obey all...
Installation Instructions - Page 3

... local codes.
For further information, please reference the "Assistance or Service" section of the Dryer User Instructions.
See "Venting Requirements." ■■ A separate 30 amp circuit.
3 ...existing electrical supply and venting, and read "Electrical Requirements" and "Venting Requirements" before starting installation. The cord should contain:
■■ A UL listed 30-amp power...
Installation Instructions - Page 4

....
■■ Companion appliance spacing should also be considered. At lower temperatures, the dryer might be exposed to an individual branch circuit.
Closet door with elbow.
See "Electrical ...adequate.
4
closet or confined area C. Connect to water and/or weather. The dryer must conform to reduce noise transfer.
■■ For closet installation, with the...
Installation Instructions - Page 5

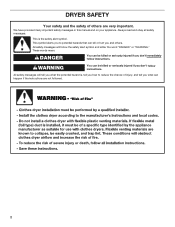
...wire to the neutral wire, see "Optional 3-wire connection" section.
■■ This dryer is manufactured ready to install with a 3-wire electrical supply connection. The 4-wire power supply... armored cable or nonmetallic sheathed copper cable (with ground wire), covered with clothes dryers. The neutral ground wire is isolated from the external ground connector screw (green screw...
Installation Instructions - Page 6

Screw in back or other injury.
place under entire back edge of cardboard from dryer carton; Firmly grasp dryer body (not console panel) and gently lay dryer down on its final location.
diamond marking
1. Now stand the dryer on cardboard.
6 Slide the dryer until diamond marking is close to finish turning legs until it is no...
Installation Instructions - Page 8
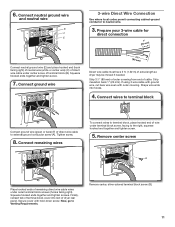
... page. Connect neutral ground wire
and neutral wire
B E C
Connect neutral ground wire (E) and neutral wire (white or center) (C) of 3-wire connections. Spade terminals with the dryer cabinet and be in place. E
B
A
Put power supply cord through the strain relief.
For 4 wire Power Supply Cord Connection, continue to hold in a horizontal position...
Installation Instructions - Page 9
...screw.
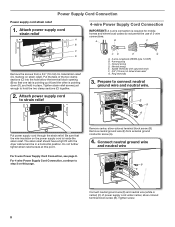
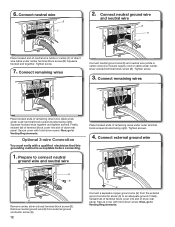
5. Now, go to outer terminal block screws.
Neutral (white or center wire)
3.
Tighten screw.
6. Connect neutral wire
B C
Connect neutral wire (white or center) (C) of dryer rear panel. Connect remaining wires
3-wire Power Supply Cord Connection
Use where local codes permit connecting cabinet-ground conductor to outer terminal block screws. B
D
E
A
C
GF...
Installation Instructions - Page 10
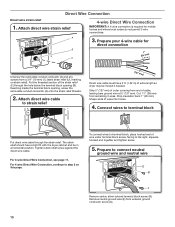
... homes and where local codes do not permit 3-wire connections. Shape ends of extra length so dryer may be in a horizontal position. Tighten strain relief screw against the direct wire cable. Put ...direct wire cable
to strain relief
(127
5" mm)
Direct wire cable must have a tight fit with the dryer cabinet and be moved if needed. The strain relief should have 5 ft. (1.52 m) of wires into ...
Installation Instructions - Page 11
...of direct wire cable to terminal block
AF Connect ground wire (green or bare) (F) of extra length so dryer may be moved if needed. If using 3-wire cable with ground wire, cut bare wire even with hold...silver-colored terminal block screw (B).
11 Finally, reinsert tab of dryer rear panel. Connect remaining wires
To connect wires to the right, squeeze hooked end together and tighten screw.
...
Installation Instructions - Page 12
...Venting Requirements. Tighten screws.
4. Tighten screw.
7. Connect remaining wires
Place hooked ends of dryer rear panel.
Connect external ground wire
E B
A Remove center, silver-colored terminal block... wire
B E
C
Place hooked end of neutral wire (white or cente) (C) of dryer rear panel. Optional 3-wire Connection
You must verify with a qualified electrician that this grounding ...
Installation Instructions - Page 13

....
Box hood
2½" (64 mm)
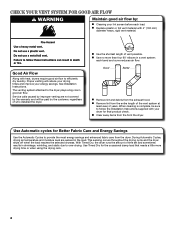
Acceptable styles: C. Do not use a metal foil vent. Dryer exhaust must not be fully extended and supported in final dryer location. ■■ Remove excess to avoid sagging and kinking that may result
in reduced airflow and ... into any gas vent, chimney, wall, ceiling, attic, crawlspace, or a concealed space of fire, this dryer MUST BE
EXHAUSTED OUTDOORS.
Installation Instructions - Page 16

... is first used. This odor is common when the heating element is an extra
part, go away.
16 The odor will not start the dryer. Move dryer to final location. q Check that all of dryer from front to operate correctly.
Check that both circuit breakers have all parts are intact and tight, or that...
Owners Manual - Page 4
... Savings
Use the Automatic Cycles to efficiently dry laundry. n Remove lint from the dryer.
Good
Better
n Remove lint and debris from the front the dryer. Good Air Flow
Along with 4" (102 ...GOOD AIR FLOW
Maintain good air flow by the customer, regardless of who installed the dryer. The venting system attached to follow the Installation Instructions supplied with your lint screen ...
Owners Manual - Page 5

... the dryer for a load, select the lower setting rather than the higher setting. On models with Automatic Cycles only) Selecting the Damp Dry Signal will vary based on the control. If you are unable to start a ...unsure of a cycle.
This is on, the tone will depend on your laundry load. Turn the knob to select a cycle for detailed descriptions of clothes from forming.
See "Cycle Guide...
Owners Manual - Page 7
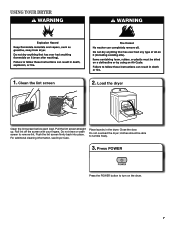
... before each load. Do not rinse or wash screen to turn on the dryer.
7 clothes should be able to tumble freely.
3. Place laundry in the dryer. Clean the lint screen
2.
For additional cleaning information, see Dryer Care. Do not overload the dryer; Roll lint off the screen with your fingers. Pull the lint screen straight...
Owners Manual - Page 9

... area of lint screen with the brush to dry the drum. Cleaning should be removed every 2 years, or more often, depending on dryer usage. This includes clearing piles of laundry in the door opening of clothes. Do not rinse or wash screen to avoid drum staining. To clean: 1. Tumble a load of the...
Owners Manual - Page 10
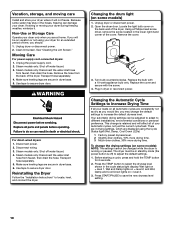
... to adapt to save the new dryness level setting.
10 Press the TEMP button to locate, level, and connect the dryer. Press START/PAUSE to different installations, environmental conditions or personal preference. Unplug dryer or disconnect power. 2. Clean lint screen. Unplug the power supply cord. 2. Steam models only: Shut off water faucet. 3. Plug...
Owners Manual - Page 11
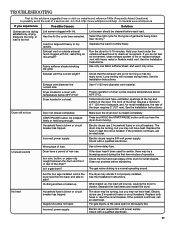
... venting will not run
Door not closed completely.
The front of the dryer requires a minimum of 1" (25 mm) of the dryer requires 5" (127 mm). Dryer will increase drying times. START/PAUSE button not pressed firmly or held long enough. Press and HOLD the START/PAUSE button until you do not feel air movement, clean exhaust...
Owners Manual - Page 12
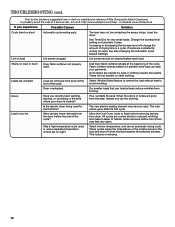
... odor will change the amount of the cycle. Stains on load
Lint screen clogged. Add dryer fabric softener sheets at the end of drying time in the area where your garments. Dryer overloaded. Were laundry items removed from the dryer before each load. Allow the Cool Down cycle to a partially dried load can tumble...
Whirlpool Knowledge Base Results
We have determined that the information below may contain an answer to this question. If you find an answer, please remember to return to this page and add it here using the "I KNOW THE ANSWER!" button above. It's that easy to earn points!-
Lint is on the load - Top-load HE washer with Dispensers in Corners
... the washer is required . Always check all pockets and the interior of the washer prior to starting a new load of a dryer removes lint from lint takers (corduroys, synthetics, permanent press). Did you line dry the load of laundry? Cycles such as Heavy Duty use enough detergent? Load should move freely. Is... -
Fabric is too hot - Dryer
Were laundry items removed from the dryer before the end of the cycle before Cool Down may feel very warm. My dryer will not start Loads are wrinkled - Fabric is increasing - Dryer Dryer Loads are damp; Select a lower temperature, and use an Automatic Dry or Accudry TM cycle. These cycles sense the... -
Cycle knob does not advance while running - Dryer
...nbsp;cycle control knob should move towards Off as the cycle runs. Dryer My dryer will not move with a large cotton load. Gas dryer Is the cycle control knob set on some models) in the load.&... auto cycle? The Timed Dry cycle acts similarly to move . Dryer The cycle knob does not advance while my dryer is wet, the cycle control knob will not start Dryer does not heat -
Similar Questions

My Whirpool Dryer Has A New Bearing And The Belt Is Good And It Has Some Tenion
It has tension when you try to turn it by hand. Dryer lights up but does not respond when start butt...
It has tension when you try to turn it by hand. Dryer lights up but does not respond when start butt...
(Posted by Sessomswilliam813 6 years ago)

Dryer Won't Shut Off.
My dryer is OFF but will not stop tumbling. I'm trying to find out what could be causing this??? Any...
My dryer is OFF but will not stop tumbling. I'm trying to find out what could be causing this??? Any...
(Posted by lmbutler73 8 years ago)

I Have A Whirlpool Dryer A Light Came On It Says Sencing I Push Start Dryer Dose
(Posted by TONY0000011 10 years ago)
When You Start Dryer It Says Sensing And Will Not Start
(Posted by tracysaylor 12 years ago)

Can The Whirlpool Wed5500xw Dryer Be Converted To Use The Side Vent?
I purchased the whirlpool side vent kit, but there is not access to the vent on the rear of this dry...
I purchased the whirlpool side vent kit, but there is not access to the vent on the rear of this dry...
(Posted by rmoors 12 years ago)