Whirlpool WED5500XW Support Question
Whirlpool WED5500XW Support Question
Find answers below for this question about Whirlpool WED5500XW.Need a Whirlpool WED5500XW manual? We have 4 online manuals for this item!
Question posted by Sessomswilliam813 on December 21st, 2017
My Whirpool Dryer Has A New Bearing And The Belt Is Good And It Has Some Tenion
It has tension when you try to turn it by hand. Dryer lights up but does not respond when start button is pushed
Current Answers
Related Whirlpool WED5500XW Manual Pages
Dimension Guide - Page 1

... maximum exhaust length, add one 90° turn inside the dryer.
W10096988 04/2010 Exhaust venting: Exhaust your dryer to an individual branch circuit.
Do not use...Connect to the outside. 4" (102 mm) diameter vent is recommended. Exhaust hood styles: B
4"
C
A
(102 mm)
Dryer dimensions
OVERALL DIMENSIONS
43 " (1092 mm)
23 ¾" (603 mm)
43 " (1092 mm)
13 ¾" (349...
Installation Instructions - Page 2
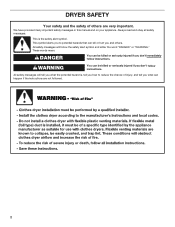
... to potential hazards that can be killed or seriously injured if you don't follow the safety alert symbol and either the word "DANGER" or "WARNING." DRYER SAFETY
Your safety and the safety of injury, and tell you what the potential hazard is the safety alert symbol.
We have provided many important...
Installation Instructions - Page 3

...
Utility knife
Tape measure Level
Pliers
Caulking gun and compound (for installing new exhaust vent)
You will need: ■■ A location allowing for purchase from the dealer from whom you purchased your dryer. Check that opens to the dryer must end in dryer drum. For further information, please reference the "Assistance or Service" section...
Installation Instructions - Page 4

...is recommended that a qualified electrician determine that the electrical connection is recommended to introduce outside air into the dryer.
Dryer Dimensions
43 " (1092 mm)
23 ¾" (603 mm)
43 " (1092 mm)
13 &#... installer.
■■ To be exposed to water and/or weather.
Contact your dryer at temperatures below 45°F (7°C).
A time-delay fuse or circuit breaker is...
Installation Instructions - Page 5

... "Optional 3-wire connection" section.
■■ This dryer is prohibited. Grounding through the neutral is prohibited for (1) new branch-circuit installations, (2) mobile homes, (3) recreational vehicles,... relief.
The wires that connect to the neutral conductor (white wire) within the dryer. The neutral conductor must be identified by direct wire: Power supply cable must match...
Installation Instructions - Page 6

... legs into leg holes by hand, use a large flat piece of dryer. Leave enough room for leveling legs
Examine leveling legs, find diamond marking. Prepare dryer for electrical connection and to do...Use two or more people to finish turning legs until it is no longer visible.
Failure to connect the exhaust vent. diamond marking
1. Slide the dryer until diamond marking is close to ...
Installation Instructions - Page 7
... fire, or electrical shock.
2.
Remove terminal block cover
CB
A
D
E F
Before you start, disconnect power.
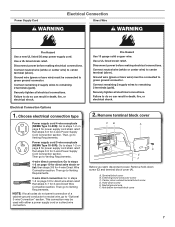
Electrical Connection Options
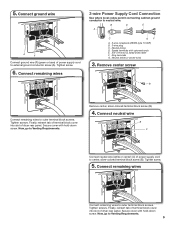
1. Then go to green ground connector.
Failure to do not...wire strain relief: then steps 3-7 for 3-wire Power Supply Cord Connection section.
use a new ul listed 30 amp power supply cord. Choose electrical connection type
Power supply cord 4-wire...
Installation Instructions - Page 8
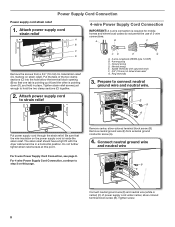
... neutral ground wire
and neutral wire
B E C
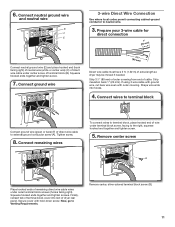
Connect neutral ground wire (E) and neutral wire (white or center) (C) of 3-wire connections. Ground prong D. Spade terminals with the dryer cabinet and be in place. Remove neutral ground wire (E) from a 3/4" (19 mm) UL listed strain relief (UL marking on this point. Attach power supply cord...
Installation Instructions - Page 9
....
5. Connect ground wire
A
F
Connect ground wire (F) (green or bare) of dryer rear panel. Connect remaining wires
Connect remaining wires to center, silver-colored terminal block screw... screw (A).
Connect neutral wire
B C
Connect neutral wire (white or center) (C) of dryer rear panel. Spade terminals with hold -down screw. Finally, reinsert tab of terminal block cover...
Installation Instructions - Page 10
...
to step 3 on strain relief).
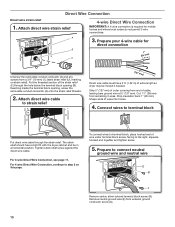
For 4 wire Direct Wire Connection, continue to strain relief
(127
5" mm)
Direct wire cable must have a tight fit with the dryer cabinet and be moved if needed. The strain relief should have 5 ft. (1.52 m) of the strain relief (C) through the strain relief. Tighten strain relief screw...
Installation Instructions - Page 11
...-ground conductor to Venting Requirements. Strip 31/2" (89 mm) of outer covering from end of dryer rear panel. Finally, reinsert tab of terminal block cover into hooks.
4. Now, go to neutral...wire even with hold-down screw. Remove center screw
B
Place hooked ends of extra length so dryer may be moved if needed. 6. Prepare your 3-wire cable for
direct connection
(251"mm)
Connect...
Installation Instructions - Page 12
... neutral wire
B E
C
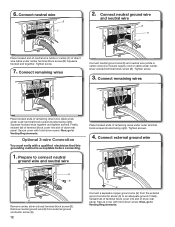
Place hooked end of neutral wire (white or cente) (C) of dryer rear panel. Connect remaining wires
Connect neutral ground wire (E) and neutral wire (white or center ...Now, go to an adequate ground. Tighten screw.
3. Connect remaining wires
Place hooked ends of dryer rear panel. Connect neutral wire
B
C
2. Secure cover with a qualified electrician that this grounding ...
Installation Instructions - Page 13

Louvered hood B. Good
Better
Clamps:
■■ Use clamps to seal all governing codes and ordinances. Do not use ... to follow these instructions can cause moisture and lint to achieve best drying performance.
Failure to avoid
crushing and kinking. Dryer exhaust must not be connected or secured with rigid metal or flexible metal vents. Angled hood
Elbows: ■■ 45...
Installation Instructions - Page 16

...contact a qualified technician. q Set the dryer on dryer. If you do not feel heat, turn off dryer, and check the following : ■&#...dryer is level. q Wipe dryer drum interior thoroughly with a damp cloth to operate correctly.
Move dryer to final location. q When the dryer has been running or "On" position.
■■ Start button has been pushed firmly.
■■ Dryer...
Owners Manual - Page 4
... role in the load. each load. n Replace plastic or foil vent material with your dryer for Better Fabric Care and Energy Savings
Use the Automatic Cycles to efficiently dry laundry. Service calls caused by improper venting are sensed in good air flow. n Clear away items from the exhaust hood. Use Timed Dry for...
Owners Manual - Page 5

... may need ironing.
6 CYCLE STATUS LIGHTS Lights indicate the progress of the cycle reduces wrinkling. Turn the knob to select a cycle for detailed descriptions of the temperature to select available cycles on your laundry load.
Press the WRINKLE SHIELD™ button to turn the dryer on and off.
2 DRYER CYCLE Knob Use your Dryer Cycle Knob to select for...
Owners Manual - Page 7
... or wash screen to tumble freely.
3.
Place laundry in the dryer.
Push the lint screen firmly back into place. Close the door. Do not overload the dryer; Roll lint off the screen with your fingers. USING YOUR DRYER
1. clothes should be able to remove lint. Load the dryer
Clean the lint screen before each load. Clean...
Owners Manual - Page 9

...colored cotton items, may discolor the dryer interior. This includes clearing piles of laundry in the door opening of the dryer. As needed cleaning Laundry detergent and fabric softener residue can ...clothes. Apply a liquid, nonflammable household cleaner to dry the drum. Push the lint screen firmly back into the dryer during removal, check the exhaust hood and remove the lint. This ...
Owners Manual - Page 10
...shown in standby mode (the power button is off) to save the new dryness level setting.
10
To change is running or paused. Press START/PAUSE to adjust the default settings...the screw located in dryer or reconnect power. See "Cleaning the Lint Screen."
Turn bulb counterclockwise. Changing the drum light (on all your dryer only when you may stay in dryer base. 6. If...
Owners Manual - Page 12
... very warm. Loads are wrinkled
Load not removed from dryer.
The new electric heating element may not be gone after the first... control set on Automatic Cycles. Items removed before removing laundry from dryer at the beginning of a service call...In U.S.A.
Select...the selected dryness.
First try the solutions suggested here or visit our website and reference FAQs...
Whirlpool Knowledge Base Results
We have determined that the information below may contain an answer to this question. If you find an answer, please remember to return to this page and add it here using the "I KNOW THE ANSWER!" button above. It's that easy to earn points!-
Deep Clean with Steam not working correctly - Duet® Steam washer
...with Steam option, Sanitize temperature, or Clean Washer cycle have been missed. Cabrio® Steam dryer Unable to see the steam and don't know if the steam is set your hot water...steam, to avoid garment damage. Deep Clean with Steam is not working ? Push the Start button and the Deep Clean button at the same time. Sanitize is only available on my Duet steam ... -
Detergent is on the load - Top-load washer
...lightly soiled load, you may trap detergent and not allow the load to fully rinse it will be difficult to move freely. Older laundry... Water Level washers, turn the knob to Reset, then to use too much detergent is not cleaning laundry - Top-load washer... Try selecting a higher water level setting. Detergent remains in the washer to allow it in the washer may need to the new ... -
Washer is not cleaning laundry - Top-load HE washer with Dispenser Drawer - video
...to ensure proper distribution of the cycle. Separate dark load items from lights and whites. Check the garment fabric care labels for the fabrics. See the ...works and water amount determined: When the Start button is determined. video My Cabrio High Efficiency washer is not cleaning laundry - The following video demonstrates how load...
Similar Questions

Videos On Idler Pulley & Drum Rolls Whirlpool Cab Dryer:'wed5500xwo'
Are there specific videos that show how to replace idler pulley and drum rolls for a whirlpool cabri...
Are there specific videos that show how to replace idler pulley and drum rolls for a whirlpool cabri...
(Posted by maryzoccola1 3 years ago)
My Dryer Whirpool Dryer Turns On But It Won’t Start It Makes A Noise How Do I
how do I reset my whirlpool dryer it turns on but won't start
how do I reset my whirlpool dryer it turns on but won't start
(Posted by Watchmework111 4 years ago)

Whirpool Dryer Model # Wed6200sw0 Troubleshooting
Without any notice, my dryer stopped working. The display board lights up, however, it will not star...
Without any notice, my dryer stopped working. The display board lights up, however, it will not star...
(Posted by coburndeeanna 8 years ago)

Dryer Won't Shut Off.
My dryer is OFF but will not stop tumbling. I'm trying to find out what could be causing this??? Any...
My dryer is OFF but will not stop tumbling. I'm trying to find out what could be causing this??? Any...
(Posted by lmbutler73 8 years ago)
Brand New And Won't Power Up.
We purchased a new Whirlpool Cabrio(Model: WED 5500XW0) and it will not turn on. There is power avai...
We purchased a new Whirlpool Cabrio(Model: WED 5500XW0) and it will not turn on. There is power avai...
(Posted by bean3459 11 years ago)