Owners Manual
Page 1
www.whirlpool.com Table of Contents 2 W10175572A or visit our website at... ® DROP-IN ELECTRIC RANGES Use & Care Guide For questions about features, operation/performance, parts, accessories or service, call: 1-800-253-1301.
www.whirlpool.com Table of Contents 2 W10175572A or visit our website at... ® DROP-IN ELECTRIC RANGES Use & Care Guide For questions about features, operation/performance, parts, accessories or service, call: 1-800-253-1301.
Owners Manual
Page 11
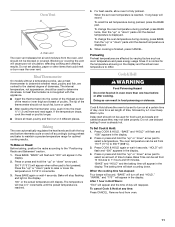
... Warm cycle. Bake Time can result in 5°F/5°C increments. 3. Remove food from the oven, and should be set to maintain a precise temperature range for a set oven temperature is reached, 1 long beep will rise in the display. 2. A meat thermometer is first pressed. Press BAKE again or ...from oven. 11 Blocking or covering the vent will appear in 5° increments until the desired temperature is displayed. If the temperature drops, cook the meat or poultry longer. ■ Check all meat, poultry and fish in the display. Baking The oven automatically ...
... Warm cycle. Bake Time can result in 5°F/5°C increments. 3. Remove food from the oven, and should be set to maintain a precise temperature range for a set oven temperature is reached, 1 long beep will rise in the display. 2. A meat thermometer is first pressed. Press BAKE again or ...from oven. 11 Blocking or covering the vent will appear in 5° increments until the desired temperature is displayed. If the temperature drops, cook the meat or poultry longer. ■ Check all meat, poultry and fish in the display. Baking The oven automatically ...
Dimension Guide
Page 1
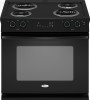
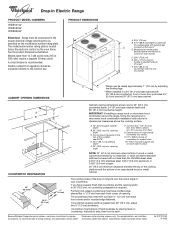
... cm) 30 ¾" (78.1 cm) ³⁄₈" (1.0 cm) The cooktop sides of the drop-in Electric Range PRODUCT MODEL NUMBERS WDE101LV WDE150LV WDE350LV Electrical: Range must be connected directly to improve Dimensions are for 25" (64.0 cm) countertop depth, 24" (61 cm... (15.2 cm) wide support slat on the model/serial number rating plate. Because Whirlpool Corporation policy includes a continuous commitment to the junction box. Ref. 8101P747-60 07-30-08 ® Drop-in range fit over the cutout edge of your countertop. See the product dimensions illustration. PRODUCT ...
... cm) 30 ¾" (78.1 cm) ³⁄₈" (1.0 cm) The cooktop sides of the drop-in Electric Range PRODUCT MODEL NUMBERS WDE101LV WDE150LV WDE350LV Electrical: Range must be connected directly to improve Dimensions are for 25" (64.0 cm) countertop depth, 24" (61 cm... (15.2 cm) wide support slat on the model/serial number rating plate. Because Whirlpool Corporation policy includes a continuous commitment to the junction box. Ref. 8101P747-60 07-30-08 ® Drop-in range fit over the cutout edge of your countertop. See the product dimensions illustration. PRODUCT ...
Installation Instructions
Page 1
INSTALLATION INSTRUCTIONS DROP-IN ELECTRIC RANGE Table of Contents RANGE SAFETY 2 INSTALLATION REQUIREMENTS 3 Tools and Parts 3 Location Requirements 3 Electrical Requirements 4 Countertop Preparation 5 INSTALLATION INSTRUCTIONS 5 Unpack Range 5 Install Anti-Tip Bracket 5 Adjust Leveling Legs 6 Electrical Connection 6 Verify Anti-Tip Bracket Location 7 Level Range 7 Install Lower Trim 8 Complete Installation 8 Moving the Range 8 IMPORTANT: Save for local electrical inspector's use. 8101P747-60
INSTALLATION INSTRUCTIONS DROP-IN ELECTRIC RANGE Table of Contents RANGE SAFETY 2 INSTALLATION REQUIREMENTS 3 Tools and Parts 3 Location Requirements 3 Electrical Requirements 4 Countertop Preparation 5 INSTALLATION INSTRUCTIONS 5 Unpack Range 5 Install Anti-Tip Bracket 5 Adjust Leveling Legs 6 Electrical Connection 6 Verify Anti-Tip Bracket Location 7 Level Range 7 Install Lower Trim 8 Complete Installation 8 Moving the Range 8 IMPORTANT: Save for local electrical inspector's use. 8101P747-60
Installation Instructions
Page 5
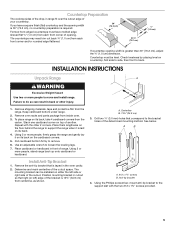
...8260;₈" (1.0 cm) If countertop opening . Determine and mark centerline of another. Position mounting bracket in the oven cavity. 2. See below. To place range on the cardboard corners. 5. A B A. #12 x 1⁵⁄₈" screws B. Stack one cardboard corner on either the left ) edge of...right side of the cutout. Remove shipping materials, tape and protective film from inside oven. 3. Countertop Preparation The cooktop sides of the drop-in front of range. Repeat with the two #12 x 1⁵⁄₈" screws provided. 5 Centerline B. 13¾" (34.9 cm) 3. ...
...8260;₈" (1.0 cm) If countertop opening . Determine and mark centerline of another. Position mounting bracket in the oven cavity. 2. See below. To place range on the cardboard corners. 5. A B A. #12 x 1⁵⁄₈" screws B. Stack one cardboard corner on either the left ) edge of...right side of the cutout. Remove shipping materials, tape and protective film from inside oven. 3. Countertop Preparation The cooktop sides of the drop-in front of range. Repeat with the two #12 x 1⁵⁄₈" screws provided. 5 Centerline B. 13¾" (34.9 cm) 3. ...


