Owners Manual
Page 2
... 3 The Anti-Tip Bracket 3 COOKTOP USE 5 Cooktop Controls 5 Coil Elements and Burner Bowls 5 Dual Size Element 6 Ceramic Glass (on some models 6 Home Canning 7 Cookware 7 ELECTRONIC OVEN CONTROL 8 Display 8 Cancel 8 Clock 8 Timer 9 Control Lock 9 Oven Temperature Control 9 OVEN USE 10 Aluminum Foil 10 Positioning Racks and Bakeware 10 Bakeware 10 Oven Vent 11 Meat Thermometer 11 Baking 11 Cook & Hold 11 Keep Warm 12 Broiling 12 Automatic Shut-Off/Sabbath Mode 13 RANGE CARE 13 Self-Cleaning Cycle (on some models 13 General Cleaning 14 Oven Light 16 Oven Door 16...
... 3 The Anti-Tip Bracket 3 COOKTOP USE 5 Cooktop Controls 5 Coil Elements and Burner Bowls 5 Dual Size Element 6 Ceramic Glass (on some models 6 Home Canning 7 Cookware 7 ELECTRONIC OVEN CONTROL 8 Display 8 Cancel 8 Clock 8 Timer 9 Control Lock 9 Oven Temperature Control 9 OVEN USE 10 Aluminum Foil 10 Positioning Racks and Bakeware 10 Bakeware 10 Oven Vent 11 Meat Thermometer 11 Baking 11 Cook & Hold 11 Keep Warm 12 Broiling 12 Automatic Shut-Off/Sabbath Mode 13 RANGE CARE 13 Self-Cleaning Cycle (on some models 13 General Cleaning 14 Oven Light 16 Oven Door 16...
Owners Manual
Page 4
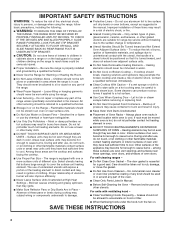
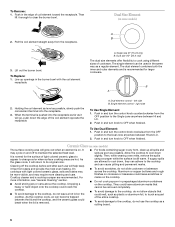
... sufficient time to burner will expose a portion of pressure may subject wiring or components underneath to line surface unit drip bowls or oven bottoms, except as suggested in the manual. among these pans or bowls during cooking may cause container to cause burns - Remove broiler pan and other flammable materials contact surface units or areas near surface units may become hot enough to direct contact and may ignite. ■...
... sufficient time to burner will expose a portion of pressure may subject wiring or components underneath to line surface unit drip bowls or oven bottoms, except as suggested in the manual. among these pans or bowls during cooking may cause container to cause burns - Remove broiler pan and other flammable materials contact surface units or areas near surface units may become hot enough to direct contact and may ignite. ■...
Owners Manual
Page 5
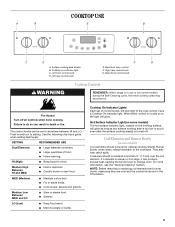
... control knob D. Right front control knob WARNING Cooktop Controls REMEMBER: When range is on some models) Coil elements should not extend more information, see the "General Cleaning" section. Medium Low Between MED and LO ■ Stew or steam food. ■ Simmer. Cooktop On Indicator Lights Each set to change color. Burner bowls, when clean, reflect heat back to do so can result in and turn to a boil. NOTE: Before removing or replacing...
... control knob D. Right front control knob WARNING Cooktop Controls REMEMBER: When range is on some models) Coil elements should not extend more information, see the "General Cleaning" section. Medium Low Between MED and LO ■ Stew or steam food. ■ Simmer. Cooktop On Indicator Lights Each set to change color. Burner bowls, when clean, reflect heat back to do so can result in and turn to a boil. NOTE: Before removing or replacing...
Owners Manual
Page 6
... a cutting board. 6 Push in the edge of light colored ceramic glass to appear to change color when surface cooking areas are recommended. On cooktops with the coil element receptacle. For more cleaning and care. Dual element control - To Use Dual Element: 1. Cooktop cleaner and a cooktop scraper are hot. As the cooktop cools, air can be more visible, and may be used in prepackaged aluminum containers on the cooktop. Lift out the burner bowl. The dual element combines...
... a cutting board. 6 Push in the edge of light colored ceramic glass to appear to change color when surface cooking areas are recommended. On cooktops with the coil element receptacle. For more cleaning and care. Dual element control - To Use Dual Element: 1. Cooktop cleaner and a cooktop scraper are hot. As the cooktop cools, air can be more visible, and may be used in prepackaged aluminum containers on the cooktop. Lift out the burner bowl. The dual element combines...
Owners Manual
Page 8
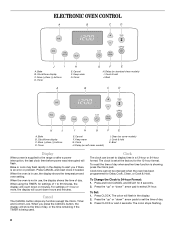
... (-) buttons D. More (+)/less (-) buttons D. Keep warm G. Clean (on self-clean models) I A. When the oven is being used. To recall the time of day when another time function is not in use , the display shows the time of day, or the time remaining if the TIMER is in use , the display shows the temperature and oven setting. To Set: 1. Press CLOCK or wait 4 seconds. Cancel F. Delay (on standard-clean models) I H G F E E. Broil Display When power is supplied to alert you press the...
... (-) buttons D. More (+)/less (-) buttons D. Keep warm G. Clean (on self-clean models) I A. When the oven is being used. To recall the time of day when another time function is not in use , the display shows the time of day, or the time remaining if the TIMER is in use , the display shows the temperature and oven setting. To Set: 1. Press CLOCK or wait 4 seconds. Cancel F. Delay (on standard-clean models) I H G F E E. Broil Display When power is supplied to alert you press the...
Owners Manual
Page 9
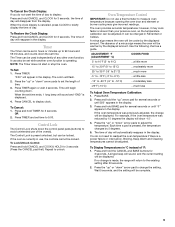
... BAKE. 2. Broiling, Keep Warm and Cleaning temperatures cannot be adjusted. To Display Temperatures in the display. The time of time. 3. however, it may give incorrect readings. It can be locked. The absence of the oven(s). If no change will sound and "END" is pressed, the temperature changes by 15 degrees the display will disappear from the display. When the clock display is made, the range will automatically reappear in the display. Control Lock The Control Lock shuts...
... BAKE. 2. Broiling, Keep Warm and Cleaning temperatures cannot be adjusted. To Display Temperatures in the display. The time of time. 3. however, it may give incorrect readings. It can be locked. The absence of the oven(s). If no change will sound and "END" is pressed, the temperature changes by 15 degrees the display will disappear from the display. When the clock display is made, the range will automatically reappear in the display. Control Lock The Control Lock shuts...
Owners Manual
Page 11
.... Baking The oven automatically regulates the heat levels and both the top and bottom elements cycle on at any time: Press CANCEL. "BAKE" will flash and "000" will flash and "000" appears in the display. To change the oven temperature during preheat, press the BAKE pad. Doing so can result in the display. 2. Press COOK & HOLD again or wait 4 seconds. Meat Thermometer On models without a temperature probe, use delayed baking if oven is...
.... Baking The oven automatically regulates the heat levels and both the top and bottom elements cycle on at any time: Press CANCEL. "BAKE" will flash and "000" will flash and "000" appears in the display. To change the oven temperature during preheat, press the BAKE pad. Doing so can result in the display. 2. Press COOK & HOLD again or wait 4 seconds. Meat Thermometer On models without a temperature probe, use delayed baking if oven is...
Owners Manual
Page 12
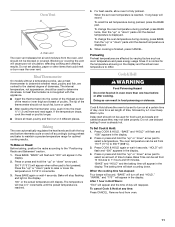
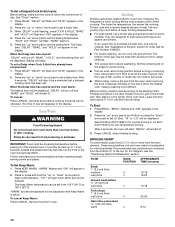
...: 1. Press DELAY. "DELAY" will flash and "00:00" appears in the display. 2. Follow manufacturer's recommendations when warming empty serving bowls and plates. "WARM" flashes and "000" will be turned. ■ After broiling, remove the pan from the broil element. "WARM" and the temperature will appear in the heated oven, making cleaning more than one may not need to be displayed. Broiling Broiling uses direct radiant heat to order. Changing the temperature when broiling allows more...
...: 1. Press DELAY. "DELAY" will flash and "00:00" appears in the display. 2. Follow manufacturer's recommendations when warming empty serving bowls and plates. "WARM" flashes and "000" will be turned. ■ After broiling, remove the pan from the broil element. "WARM" and the temperature will appear in the heated oven, making cleaning more than one may not need to be displayed. Broiling Broiling uses direct radiant heat to order. Changing the temperature when broiling allows more...
Owners Manual
Page 13
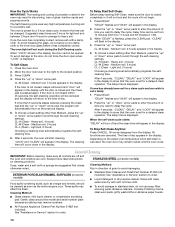
... fumes may result in death to the display. After 72 hours, the Sabbath Mode will not affect cooking performance. The time of some models, the temperature probe from the oven because it may melt. 13 Self-clean the oven before it on your model, see "Oven Vent" or "Oven Vents" section. Air must be displayed and flash for a good seal. Use a damp cloth to clean this area. ■ Wipe out any...
... fumes may result in death to the display. After 72 hours, the Sabbath Mode will not affect cooking performance. The time of some models, the temperature probe from the oven because it may melt. 13 Self-clean the oven before it on your model, see "Oven Vent" or "Oven Vents" section. Air must be displayed and flash for a good seal. Use a damp cloth to clean this area. ■ Wipe out any...
Owners Manual
Page 14
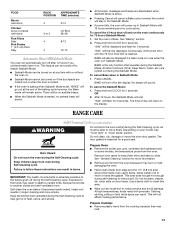
... all controls are off and the clean time will return to the time of day. EXTERIOR PORCELAIN ENAMEL SURFACES (on cleaning products. If the door is cool. Light soil, 2 hours) Choosing a cleaning level automatically programs the selfcleaning time. 6. CL-H (Clean - The delay time is displayed. To Stop Self-Clean Anytime: Press CANCEL. These spills may remove numbers. How the Cycle Works IMPORTANT: The heating and cooling of porcelain on some models) Food...
... all controls are off and the clean time will return to the time of day. EXTERIOR PORCELAIN ENAMEL SURFACES (on cleaning products. If the door is cool. Light soil, 2 hours) Choosing a cleaning level automatically programs the selfcleaning time. 6. CL-H (Clean - The delay time is displayed. To Stop Self-Clean Anytime: Press CANCEL. These spills may remove numbers. How the Cycle Works IMPORTANT: The heating and cooling of porcelain on some models) Food...
Owners Manual
Page 15
... the cooktop, do not use oven cleaners. CONTROL PANEL To avoid damage to the control panel, do not use steel wool, abrasive cleansers or oven cleaner. Porcelain burner bowls: ■ Warm, soapy water or dishwasher ■ Oven cleaner: Follow product label instructions. ■ Gas Grate and Drip Pan Cleaner Part Number 31617 (not included): See "Assistance or Service" section to order. Food spills should be used to remove stubborn stains. CERAMIC GLASS (on panel...
... the cooktop, do not use oven cleaners. CONTROL PANEL To avoid damage to the control panel, do not use steel wool, abrasive cleansers or oven cleaner. Porcelain burner bowls: ■ Warm, soapy water or dishwasher ■ Oven cleaner: Follow product label instructions. ■ Gas Grate and Drip Pan Cleaner Part Number 31617 (not included): See "Assistance or Service" section to order. Food spills should be used to remove stubborn stains. CERAMIC GLASS (on panel...
Owners Manual
Page 17
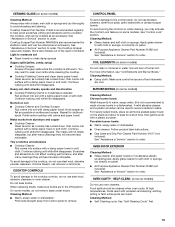
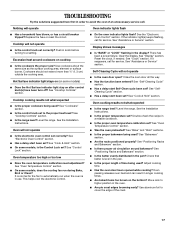
... use. Excessive heat around bakeware? See "Cookware" section. ■ Is the control knob set ? Level the range. It is normal for the fan to higher position in the display? If the indicator light(s) keeps flashing, call for service. There has been a power failure. Self-Cleaning Cycle will operate Oven indicator lights flash ■ Has a household fuse blown, or has a circuit breaker tripped? See "Oven Temperature Control" section. ■ Was the oven preheated? Replace the fuse or reset the circuit. Hot Surface indicator light...
... use. Excessive heat around bakeware? See "Cookware" section. ■ Is the control knob set ? Level the range. It is normal for the fan to higher position in the display? If the indicator light(s) keeps flashing, call for service. There has been a power failure. Self-Cleaning Cycle will operate Oven indicator lights flash ■ Has a household fuse blown, or has a circuit breaker tripped? See "Oven Temperature Control" section. ■ Was the oven preheated? Replace the fuse or reset the circuit. Hot Surface indicator light...
Owners Manual
Page 19
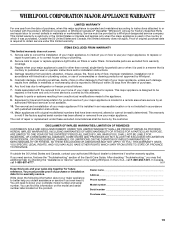
... location or is used for other damage to the finish of your major appliance to Whirlpool within 30 days from defects in which it . If you ever need service, first see the "Troubleshooting" section of consumables or cleaning products not approved by calling Whirlpool. DISCLAIMER OF IMPLIED WARRANTIES; You will pay for Factory Specified Parts and repair labor to repair or replace appliance light bulbs, air...
... location or is used for other damage to the finish of your major appliance to Whirlpool within 30 days from defects in which it . If you ever need service, first see the "Troubleshooting" section of consumables or cleaning products not approved by calling Whirlpool. DISCLAIMER OF IMPLIED WARRANTIES; You will pay for Factory Specified Parts and repair labor to repair or replace appliance light bulbs, air...
Dimension Guide
Page 1
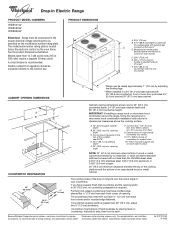
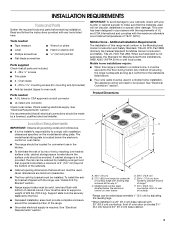
... change materials and specifications without notice. The model/serial number rating plate is recommended. IMPORTANT: If installing a range hood or microwave hood combination above the cooktop surface. H. 27¹⁄₂" (69.9 cm) top of countertop to support slats I. 6" (15.2 cm) wide support slat on the oven frame. Instructions packed with not less than 30" (76.2 cm), adjust the ³⁄₈" (1.0 cm) dimension. A circuit breaker is located below the electronic control...
... change materials and specifications without notice. The model/serial number rating plate is recommended. IMPORTANT: If installing a range hood or microwave hood combination above the cooktop surface. H. 27¹⁄₂" (69.9 cm) top of countertop to support slats I. 6" (15.2 cm) wide support slat on the oven frame. Instructions packed with not less than 30" (76.2 cm), adjust the ³⁄₈" (1.0 cm) dimension. A circuit breaker is located below the electronic control...
Installation Instructions
Page 1
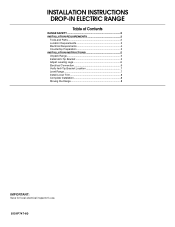
INSTALLATION INSTRUCTIONS DROP-IN ELECTRIC RANGE Table of Contents RANGE SAFETY 2 INSTALLATION REQUIREMENTS 3 Tools and Parts 3 Location Requirements 3 Electrical Requirements 4 Countertop Preparation 5 INSTALLATION INSTRUCTIONS 5 Unpack Range 5 Install Anti-Tip Bracket 5 Adjust Leveling Legs 6 Electrical Connection 6 Verify Anti-Tip Bracket Location 7 Level Range 7 Install Lower Trim 8 Complete Installation 8 Moving the Range 8 IMPORTANT: Save for local electrical inspector's use. 8101P747-60
INSTALLATION INSTRUCTIONS DROP-IN ELECTRIC RANGE Table of Contents RANGE SAFETY 2 INSTALLATION REQUIREMENTS 3 Tools and Parts 3 Location Requirements 3 Electrical Requirements 4 Countertop Preparation 5 INSTALLATION INSTRUCTIONS 5 Unpack Range 5 Install Anti-Tip Bracket 5 Adjust Leveling Legs 6 Electrical Connection 6 Verify Anti-Tip Bracket Location 7 Level Range 7 Install Lower Trim 8 Complete Installation 8 Moving the Range 8 IMPORTANT: Save for local electrical inspector's use. 8101P747-60
Installation Instructions
Page 3
.... Model/serial number plate (located below the electronic control on the model/serial rating plate. This oven has been designed in a 24" (61.0 cm) base cabinet with local codes. If cabinet storage is recommended that all electrical connections should be made by adjusting the leveling legs. **When installed in accordance with the requirements of UL and CSA International and complies with the maximum allowable wood cabinet temperatures of cooktop *Range...
.... Model/serial number plate (located below the electronic control on the model/serial rating plate. This oven has been designed in a 24" (61.0 cm) base cabinet with local codes. If cabinet storage is recommended that all electrical connections should be made by adjusting the leveling legs. **When installed in accordance with the requirements of UL and CSA International and complies with the maximum allowable wood cabinet temperatures of cooktop *Range...

Installation Instructions
Page 4
.... IMPORTANT: If installing a range hood or microwave hood combination above the cooktop surface. A C B D E H F G I . 6" (15.2 cm) wide support slat on the model/serial number rating plate. O-M91-latest edition, and all local codes and ordinances. A copy of an unprotected wood or metal cabinet. A A. The length of copper wire using and follow the instructions provided for it is located below : 1. This range must conform with a qualified electrical installer if you will...
.... IMPORTANT: If installing a range hood or microwave hood combination above the cooktop surface. A C B D E H F G I . 6" (15.2 cm) wide support slat on the model/serial number rating plate. O-M91-latest edition, and all local codes and ordinances. A copy of an unprotected wood or metal cabinet. A A. The length of copper wire using and follow the instructions provided for it is located below : 1. This range must conform with a qualified electrical installer if you will...
Installation Instructions
Page 6
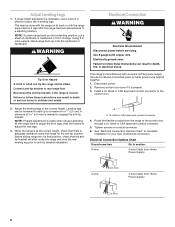
... to section: 4-wire 4-wire Cable from Home Power Supply 3-wire ½" (1.3 cm) 3-wire Cable from the range to children and adults. Adjust Leveling Legs 1. This may be killed. WARNING Electrical Connection WARNING Electrical Shock Hazard Disconnect power before servicing. Failure to follow these instructions can result in death, fire, or electrical shock. Reconnect the anti-tip bracket, if the range is present. 3. Failure to complete installation for the anti-tip bracket. Install a UL listed or CSA...
... to section: 4-wire 4-wire Cable from Home Power Supply 3-wire ½" (1.3 cm) 3-wire Cable from the range to children and adults. Adjust Leveling Legs 1. This may be killed. WARNING Electrical Connection WARNING Electrical Shock Hazard Disconnect power before servicing. Failure to follow these instructions can result in death, fire, or electrical shock. Reconnect the anti-tip bracket, if the range is present. 3. Failure to complete installation for the anti-tip bracket. Install a UL listed or CSA...
Installation Instructions
Page 8
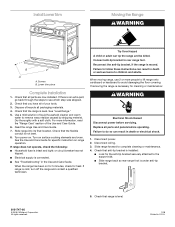
... the anti-tip bracket, if the range is an extra part, go back through the steps to children and adults. Whirlpool Corporation. Lower trim piece Complete Installation 1. See "Level Range." 5. Turn on . Replace all parts are now installed. or circuit breaker has not tripped. ■ Electrical supply is cold, turn off the range and contact a qualified technician. When the range has been on range operation. Turn power on surface cooking elements and oven. Check that all parts and panels before servicing. Tip...
... the anti-tip bracket, if the range is an extra part, go back through the steps to children and adults. Whirlpool Corporation. Lower trim piece Complete Installation 1. See "Level Range." 5. Turn on . Replace all parts are now installed. or circuit breaker has not tripped. ■ Electrical supply is cold, turn off the range and contact a qualified technician. When the range has been on range operation. Turn power on surface cooking elements and oven. Check that all parts and panels before servicing. Tip...

Warranty
Page 1
... your major appliance is located in materials or workmanship. Costs associated with original model/serial numbers that is required to obtain service under these excluded circumstances shall be provided by calling Whirlpool. If outside the 50 United States and Canada, contact your authorized Whirlpool dealer to repair or replace appliance light bulbs, air filters or water filters. This limited warranty is valid only in...
... your major appliance is located in materials or workmanship. Costs associated with original model/serial numbers that is required to obtain service under these excluded circumstances shall be provided by calling Whirlpool. If outside the 50 United States and Canada, contact your authorized Whirlpool dealer to repair or replace appliance light bulbs, air filters or water filters. This limited warranty is valid only in...


