Use & Care Guide
Page 1
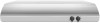
...des matières 2 Models/Modèles: UXT4230AD/UXT4236AD IMPORTANT: READ AND SAVE THESE INSTRUCTIONS. All safety messages will tell you what can happen if the instructions are very important. 30" (76.2 CM) AND 36" (91.4 CM) RANGE HOOD Installation Instructions and Use & Care Guide For questions ...utilisation et d'entretien Au Canada, pour assistance, installation ou service, composer le 1-800-807-6777 ou visiter notre site Web à www.whirlpool.ca Table of injury, and tell you and others are not followed. These words mean: DANGER You can be killed or seriously injured if...
...des matières 2 Models/Modèles: UXT4230AD/UXT4236AD IMPORTANT: READ AND SAVE THESE INSTRUCTIONS. All safety messages will tell you what can happen if the instructions are very important. 30" (76.2 CM) AND 36" (91.4 CM) RANGE HOOD Installation Instructions and Use & Care Guide For questions ...utilisation et d'entretien Au Canada, pour assistance, installation ou service, composer le 1-800-807-6777 ou visiter notre site Web à www.whirlpool.ca Table of injury, and tell you and others are not followed. These words mean: DANGER You can be killed or seriously injured if...
Use & Care Guide
Page 2
...fight the fire with your back to duct air outside - READ AND SAVE THESE INSTRUCTIONS TABLE OF CONTENTS RANGE HOOD SAFETY 1 INSTALLATION REQUIREMENTS 3 INSTALLATION INSTRUCTIONS 6 RANGE HOOD USE 10 RANGE HOOD CARE 10 WIRING DIAGRAM 11 ASSISTANCE OR SERVICE 12 WARRANTY 12 TABLE DES MATIÈRES SÉCURITÉ...TO REDUCE THE RISK OF INJURY TO PERSONS IN THE EVENT OF A RANGE TOP GREASE FIRE, OBSERVE THE FOLLOWING:a ■ SMOTHER FLAMES with a close fitting lid, cookie sheet, or metal tray, then turn hood ON when cooking at high settings. IMPORTANT SAFETY INSTRUCTIONS WARNING: TO ...
...fight the fire with your back to duct air outside - READ AND SAVE THESE INSTRUCTIONS TABLE OF CONTENTS RANGE HOOD SAFETY 1 INSTALLATION REQUIREMENTS 3 INSTALLATION INSTRUCTIONS 6 RANGE HOOD USE 10 RANGE HOOD CARE 10 WIRING DIAGRAM 11 ASSISTANCE OR SERVICE 12 WARRANTY 12 TABLE DES MATIÈRES SÉCURITÉ...TO REDUCE THE RISK OF INJURY TO PERSONS IN THE EVENT OF A RANGE TOP GREASE FIRE, OBSERVE THE FOLLOWING:a ■ SMOTHER FLAMES with a close fitting lid, cookie sheet, or metal tray, then turn hood ON when cooking at high settings. IMPORTANT SAFETY INSTRUCTIONS WARNING: TO ...

Use & Care Guide
Page 3
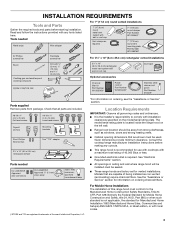
...that are capable of being installed as non-vented (recirculating) require charcoal filters. Check that are shown must be sealed. ■ These range hoods are registered trademarks of 40,000 Btus or less. ■ Grounded electrical outlet is required. See the "Assistance or Service" section for... model/serial rating plate. INSTALLATION REQUIREMENTS Tools and Parts Gather the required tools and parts before making any cutouts. ■ This range hood is recommended for use with cooktops with any tools listed here. The model/serial rating plate is not applicable, the standard for ...
...that are capable of being installed as non-vented (recirculating) require charcoal filters. Check that are shown must be sealed. ■ These range hoods are registered trademarks of 40,000 Btus or less. ■ Grounded electrical outlet is required. See the "Assistance or Service" section for... model/serial rating plate. INSTALLATION REQUIREMENTS Tools and Parts Gather the required tools and parts before making any cutouts. ■ This range hood is recommended for use with cooktops with any tools listed here. The model/serial rating plate is not applicable, the standard for ...

Use & Care Guide
Page 5
...below: 1. Aluminum/copper connection must conform with local codes and industry accepted wiring practices. ■ Wire sizes and connections must conform with the range hood. ■ Use caulking to seal exterior wall or roof opening around the cap. A copy of solid copper wire to the pigtail leads. ...or wall cap has a damper, do not use damper supplied with the rating of the appliance as specified on the rear wall of the range hood. ■ Wire sizes must have a damper. Follow the electrical connector manufacturer's recommended procedure. Ensure that the ground path is adequate. ...
...below: 1. Aluminum/copper connection must conform with local codes and industry accepted wiring practices. ■ Wire sizes and connections must conform with the range hood. ■ Use caulking to seal exterior wall or roof opening around the cap. A copy of solid copper wire to the pigtail leads. ...or wall cap has a damper, do not use damper supplied with the rating of the appliance as specified on the rear wall of the range hood. ■ Wire sizes must have a damper. Follow the electrical connector manufacturer's recommended procedure. Ensure that the ground path is adequate. ...
Use & Care Guide
Page 6
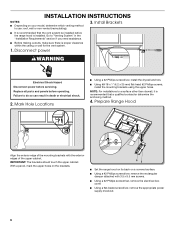
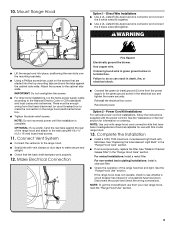
... Requirements" section if you need assistance. ■ Before making cutouts, make sure there is recommended that the vent system be installed before the range hood is installed. Disconnect power 3. Mark Hole Locations ■ Using a #2 Phillips screwdriver, install the drywall anchors. ■ Using #8-18 x... 1" (4.2 x 25 mm) flat-head #2 Phillips screws, install the mounting brackets using the upper holes. Prepare Range Hood Align the exterior edge of the upper cabinet. Replace all parts and panels before servicing. Go to a surface other than drywall, it ...
... Requirements" section if you need assistance. ■ Before making cutouts, make sure there is recommended that the vent system be installed before the range hood is installed. Disconnect power 3. Mark Hole Locations ■ Using a #2 Phillips screwdriver, install the drywall anchors. ■ Using #8-18 x... 1" (4.2 x 25 mm) flat-head #2 Phillips screws, install the mounting brackets using the upper holes. Prepare Range Hood Align the exterior edge of the upper cabinet. Replace all parts and panels before servicing. Go to a surface other than drywall, it ...

Use & Care Guide
Page 7
...the vent opening. ■ Using a jigsaw or keyhole saw , cut the vent opening. 7" (17.8 cm) Round Vent System 1" (2.5 cm) C CB A D D Hold the range hood firmly in place with the widest distance (A) between the dots marked previously. Position the edge of the plate with one hand and bend each mounting... a ¹⁄₂" (13 mm) drill bit, drill a hole in each of the mounting plate between the hole and edge of the range hood. OPTIONAL: Mark the hole in each mounting tab. For a non-vented (recirculating) installation: Go to Step 7. IMPORTANT: The widest edge (A) of the...
...the vent opening. ■ Using a jigsaw or keyhole saw , cut the vent opening. 7" (17.8 cm) Round Vent System 1" (2.5 cm) C CB A D D Hold the range hood firmly in place with the widest distance (A) between the dots marked previously. Position the edge of the plate with one hand and bend each mounting... a ¹⁄₂" (13 mm) drill bit, drill a hole in each of the mounting plate between the hole and edge of the range hood. OPTIONAL: Mark the hole in each mounting tab. For a non-vented (recirculating) installation: Go to Step 7. IMPORTANT: The widest edge (A) of the...

Use & Care Guide
Page 8
... flange (C) to Step 12. ■ 3¹⁄₄" x 10" (8.3 x 25.4 cm) Rectangular Vent Installations For top vent installations, remove the top, rectangular vent knockout (C). Prepare Range Hood Vents and Mounting Tabs x2 F ■ Using (2) short Phillips head screws, install the 3¹⁄₄" x 10" (8.3 x 25.4 cm) rectangular damper over the round vent... W10355451, and a 7" (17.8 cm) round vent mounting plate (B), Part Number W10388168, are available as shown in the dot marked previously at each side of the range hood as accessories.
... flange (C) to Step 12. ■ 3¹⁄₄" x 10" (8.3 x 25.4 cm) Rectangular Vent Installations For top vent installations, remove the top, rectangular vent knockout (C). Prepare Range Hood Vents and Mounting Tabs x2 F ■ Using (2) short Phillips head screws, install the 3¹⁄₄" x 10" (8.3 x 25.4 cm) rectangular damper over the round vent... W10355451, and a 7" (17.8 cm) round vent mounting plate (B), Part Number W10388168, are available as shown in the dot marked previously at each side of the range hood as accessories.
Use & Care Guide
Page 9
...CSA standards and local codes and ordinances. Complete the Installation ■ Install a 120V, 75W maximum, incandescent light bulb with range hood cord connection kits that have been investigated and found acceptable for information on the screws that the back draft dampers work properly. ...See the "Assistance or Service" section for use from your new range hood, read the "Range Hood Use" section. 9 WARNING ■ Lift the range hood into the top mounting tabs and bend the tabs against the rear of the range hood fan and light. For vented installations: Install a metal filter....
...CSA standards and local codes and ordinances. Complete the Installation ■ Install a 120V, 75W maximum, incandescent light bulb with range hood cord connection kits that have been investigated and found acceptable for information on the screws that the back draft dampers work properly. ...See the "Assistance or Service" section for use from your new range hood, read the "Range Hood Use" section. 9 WARNING ■ Lift the range hood into the top mounting tabs and bend the tabs against the rear of the range hood fan and light. For vented installations: Install a metal filter....

Use & Care Guide
Page 10
... For vented installations: Wash the metal filter as needed in the grease filter retainer. 10 For information on the front panel of the range hood. To Replace the Filter: 1. To reinstall the filter, place the back edge of the grain to remove fingerprints. ■ For ...stainless steel models, use cleaners that contain chlorine. RANGE HOOD USE The range hood is designed to the following instructions. A Range Hood Controls B C A. Rotate the fan switch to the right to turn the fan off, rotate the fan speed...
... For vented installations: Wash the metal filter as needed in the grease filter retainer. 10 For information on the front panel of the range hood. To Replace the Filter: 1. To reinstall the filter, place the back edge of the grain to remove fingerprints. ■ For ...stainless steel models, use cleaners that contain chlorine. RANGE HOOD USE The range hood is designed to the following instructions. A Range Hood Controls B C A. Rotate the fan switch to the right to turn the fan off, rotate the fan speed...

Use & Care Guide
Page 11
... 1.2 ±10% A Wattage Rating 73 ±10% Watts Motor Resistance White - Squeeze the plastic lens cover and remove it from the hood. 3. Replacing the Incandescent Light Bulb Turn off the range hood and allow the light bulb to cool. 1. Red 17.1 ±10% Ohms White - Replace the lens cover by squeezing the cover...
... 1.2 ±10% A Wattage Rating 73 ±10% Watts Motor Resistance White - Squeeze the plastic lens cover and remove it from the hood. 3. Replacing the Incandescent Light Bulb Turn off the range hood and allow the light bulb to cool. 1. Red 17.1 ±10% Ohms White - Replace the lens cover by squeezing the cover...

Installation Guide
Page 1
...;res 2 Models/Modèles: UXT4230AD/UXT4236AD IMPORTANT: READ AND SAVE THESE INSTRUCTIONS. 30" (76.2 CM) AND 36" (91.4 CM) RANGE HOOD Installation Instructions and Use & Care Guide For questions about features, operation/performance, parts, accessories or service, call: 1-800-253-1301 or visit our website at www.whirlpool.com In Canada, call 1-800...
...;res 2 Models/Modèles: UXT4230AD/UXT4236AD IMPORTANT: READ AND SAVE THESE INSTRUCTIONS. 30" (76.2 CM) AND 36" (91.4 CM) RANGE HOOD Installation Instructions and Use & Care Guide For questions about features, operation/performance, parts, accessories or service, call: 1-800-253-1301 or visit our website at www.whirlpool.com In Canada, call 1-800...

Installation Guide
Page 2
...for the size of the surface element. aBased on accidentally. READ AND SAVE THESE INSTRUCTIONS TABLE OF CONTENTS RANGE HOOD SAFETY 1 INSTALLATION REQUIREMENTS 3 INSTALLATION INSTRUCTIONS 6 RANGE HOOD USE 10 RANGE HOOD CARE 10 WIRING DIAGRAM 11 ASSISTANCE OR SERVICE 12 WARRANTY 12 TABLE DES MATIÈRES SÉCURIT&#...-rated construction. ■ Do not operate any fan with any solid-state speed control device. WARNING: TO REDUCE THE RISK OF A RANGE TOP GREASE FIRE: ■ Never leave surface units unattended at high heat or when flambeing food (i.e. Heat oils slowly on fan or ...
...for the size of the surface element. aBased on accidentally. READ AND SAVE THESE INSTRUCTIONS TABLE OF CONTENTS RANGE HOOD SAFETY 1 INSTALLATION REQUIREMENTS 3 INSTALLATION INSTRUCTIONS 6 RANGE HOOD USE 10 RANGE HOOD CARE 10 WIRING DIAGRAM 11 ASSISTANCE OR SERVICE 12 WARRANTY 12 TABLE DES MATIÈRES SÉCURIT&#...-rated construction. ■ Do not operate any fan with any solid-state speed control device. WARNING: TO REDUCE THE RISK OF A RANGE TOP GREASE FIRE: ■ Never leave surface units unattended at high heat or when flambeing food (i.e. Heat oils slowly on fan or ...
Installation Guide
Page 3
.... ■ All openings in ceiling and wall where range hood will be installed must conform to comply with installation clearances specified on the left wall. ■ Range hood location should be sealed. ■ These range hoods are factory set for vented installations. Read and follow ...stripper For 7" (17.8 cm) round vented installations 7" (17.8 cm) round metal vent system with any cutouts. ■ This range hood is recommended for use with cooktops with a maximum total rating of Acument Intellectual Properties, LLC. *For information on ordering charcoal filters. See...
.... ■ All openings in ceiling and wall where range hood will be installed must conform to comply with installation clearances specified on the left wall. ■ Range hood location should be sealed. ■ These range hoods are factory set for vented installations. Read and follow ...stripper For 7" (17.8 cm) round vented installations 7" (17.8 cm) round metal vent system with any cutouts. ■ This range hood is recommended for use with cooktops with a maximum total rating of Acument Intellectual Properties, LLC. *For information on ordering charcoal filters. See...

Installation Guide
Page 5
... roof or wall cap has a damper, do not use damper supplied with the rating of the appliance as specified on the rear wall of the range hood. ■ Wire sizes must conform to seal exterior wall or roof opening around the cap. Connect a section of solid copper wire to 7" (17.8 ...A 120 volt, 60 Hz., AC only, 15-amp, fused electrical circuit is used in the vent system. ■ The vent system must conform with the range hood. ■ Use caulking to the requirements of the National Electrical Code, ANSI/NFPA 70 (latest edition), or CSA Standards C22. 1-94, Canadian Electrical Code, ...
... roof or wall cap has a damper, do not use damper supplied with the rating of the appliance as specified on the rear wall of the range hood. ■ Wire sizes must conform to seal exterior wall or roof opening around the cap. Connect a section of solid copper wire to 7" (17.8 ...A 120 volt, 60 Hz., AC only, 15-amp, fused electrical circuit is used in the vent system. ■ The vent system must conform with the range hood. ■ Use caulking to the requirements of the National Electrical Code, ANSI/NFPA 70 (latest edition), or CSA Standards C22. 1-94, Canadian Electrical Code, ...

Installation Guide
Page 6
...Venting System" in death or electrical shock. 2. Disconnect power 3. With a pencil, mark the upper holes on the brackets. ■ Set the range hood on its back on your model, determine which venting method to use: roof, wall or non-vented (recirculating). ■ It is recommended that ...the vent system be installed before the range hood is recommended that a qualified contractor determine the anchoring method. 4. Go to do so can result in the "Installation Requirements" section if you...
...Venting System" in death or electrical shock. 2. Disconnect power 3. With a pencil, mark the upper holes on the brackets. ■ Set the range hood on its back on your model, determine which venting method to use: roof, wall or non-vented (recirculating). ■ It is recommended that ...the vent system be installed before the range hood is recommended that a qualified contractor determine the anchoring method. 4. Go to do so can result in the "Installation Requirements" section if you...

Installation Guide
Page 7
...the 7" (17.8 cm) vent opening 1" (2.5 cm) larger than the 7" (17.8 cm) hole traced (dashed line). 7 Position the side edges of the cabinet: - Remove the range hood and set it aside. ■ Using the 7" (17.8 cm) round vent mounting plate, draw the vent opening . 7" (17.8 cm) Round Vent System 1" (2.5 cm) C...locations (D) on the rear of the dots marked previously on the underside of the mounting plate between the hole and edge of the range hood. OPTIONAL: Mark the hole in place with the widest distance (A) between the dots marked previously. Mark Hole Locations 6. Place the ...
...the 7" (17.8 cm) vent opening 1" (2.5 cm) larger than the 7" (17.8 cm) hole traced (dashed line). 7 Position the side edges of the cabinet: - Remove the range hood and set it aside. ■ Using the 7" (17.8 cm) round vent mounting plate, draw the vent opening . 7" (17.8 cm) Round Vent System 1" (2.5 cm) C...locations (D) on the rear of the dots marked previously on the underside of the mounting plate between the hole and edge of the range hood. OPTIONAL: Mark the hole in place with the widest distance (A) between the dots marked previously. Mark Hole Locations 6. Place the ...

Installation Guide
Page 8
Prepare Range Hood Vents and Mounting Tabs x2 F ■ Using (2) short Phillips head screws, install the 3¹⁄₄" x 10" (8.3 x 25.4 cm) rectangular damper over the top or ... (E). Go to the front. 7. OPTIONAL: Using a ¹⁄₈" (3 mm) drill bit, drill pilot holes for the dots marked previously at each side of the range hood as accessories. NOTE: If the wall cap used has a damper and it over the vent knockouts removed in Step 8. For information on each mounting tab...
Prepare Range Hood Vents and Mounting Tabs x2 F ■ Using (2) short Phillips head screws, install the 3¹⁄₄" x 10" (8.3 x 25.4 cm) rectangular damper over the top or ... (E). Go to the front. 7. OPTIONAL: Using a ¹⁄₈" (3 mm) drill bit, drill pilot holes for the dots marked previously at each side of the range hood as accessories. NOTE: If the wall cap used has a damper and it over the vent knockouts removed in Step 8. For information on each mounting tab...

Installation Guide
Page 9
...electrical shock. ■ Connect the green (or bare) ground (C) wire from the power supply to make the connection in the "Range Hood Care" section. ■ If removed previously, replace the filter. Power Cord Kit Installations For optional power cord kit installations, follow ...the cabinet side walls. Reinstall the electrical box cover. Mount Range Hood Option 1 - Option 2 - There must be enough wiring from your new range hood, read the "Range Hood Use" section. 9 If the range hood does not operate, check to the range hood. ■ Seal joints with the power cord kit. ...
...electrical shock. ■ Connect the green (or bare) ground (C) wire from the power supply to make the connection in the "Range Hood Care" section. ■ If removed previously, replace the filter. Power Cord Kit Installations For optional power cord kit installations, follow ...the cabinet side walls. Reinstall the electrical box cover. Mount Range Hood Option 1 - Option 2 - There must be enough wiring from your new range hood, read the "Range Hood Use" section. 9 If the range hood does not operate, check to the range hood. ■ Seal joints with the power cord kit. ...

Installation Guide
Page 10
...31462A (not included): See the "Assistance or Service" section to order. ■ For stainless steel models, rub in the direction of the range hood. The charcoal filter is variable speed. To reinstall the filter, place the back edge of the filter into place and turn the filter retainer ...kitchen. Turn the grease filter retainer to the following instructions. It should last up to 6 months with a soft, lint-free cloth. RANGE HOOD USE The range hood is complete to clear all -purpose cleaner: Rinse with clean water and dry with normal use. Metal or Charcoal Grease Filter To Clean...
...31462A (not included): See the "Assistance or Service" section to order. ■ For stainless steel models, rub in the direction of the range hood. The charcoal filter is variable speed. To reinstall the filter, place the back edge of the filter into place and turn the filter retainer ...kitchen. Turn the grease filter retainer to the following instructions. It should last up to 6 months with a soft, lint-free cloth. RANGE HOOD USE The range hood is complete to clear all -purpose cleaner: Rinse with clean water and dry with normal use. Metal or Charcoal Grease Filter To Clean...

Installation Guide
Page 11
... Off - Black 13.6 ±10% Ohms Ground Screw L N GND SE114A 11 Squeeze the plastic lens cover and remove it from the hood. 3. Replacing the Incandescent Light Bulb Turn off the range hood and allow the light bulb to cool. 1. L High Rectifier Diode NOTE: Speed 1 not used W R Speed 1 W Common Speed 2 R BK C25 Motor Characteristics...
... Off - Black 13.6 ±10% Ohms Ground Screw L N GND SE114A 11 Squeeze the plastic lens cover and remove it from the hood. 3. Replacing the Incandescent Light Bulb Turn off the range hood and allow the light bulb to cool. 1. L High Rectifier Diode NOTE: Speed 1 not used W R Speed 1 W Common Speed 2 R BK C25 Motor Characteristics...


