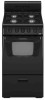
Use and Care Guide
Page 2
...;n y del horno 18 Quemadores de superficie 19 Enlatado casero 19 Utensilios de cocina 19 USO DEL HORNO 20 Precalentamiento 20 Control del horno 20 Papel de aluminio 20 Posición de las parrillas y los utensilios para hornear 20 Utensilios para hornear 21 Ducto de escape del horno 21 Cómo hornear y asar 21 Cómo...
...;n y del horno 18 Quemadores de superficie 19 Enlatado casero 19 Utensilios de cocina 19 USO DEL HORNO 20 Precalentamiento 20 Control del horno 20 Papel de aluminio 20 Posición de las parrillas y los utensilios para hornear 20 Utensilios para hornear 21 Ducto de escape del horno 21 Cómo hornear y asar 21 Cómo...
Installation Instructions
Page 5
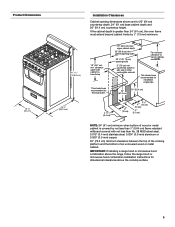
... cooking platform and the bottom of cooktop, see NOTE. clearance upper side cabinet to top of an uncovered wood or metal cabinet. upper cabinet depth 20" (50.8 cm) min. This shaded area recommended for electrical outlet. 13" (33.0 cm) max. IMPORTANT: If installing a range hood or microwave hood combination above the...
... cooking platform and the bottom of cooktop, see NOTE. clearance upper side cabinet to top of an uncovered wood or metal cabinet. upper cabinet depth 20" (50.8 cm) min. This shaded area recommended for electrical outlet. 13" (33.0 cm) max. IMPORTANT: If installing a range hood or microwave hood combination above the...
Installation Instructions
Page 11
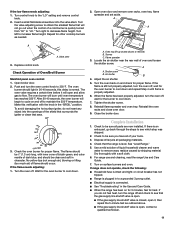
... 1. Insert a small flat-blade screwdriver into the openings of a cold burner is open and allow gas to maintain the 350°F temperature. After 20-40 seconds, the oven burner will not go back through the steps to a grounded 3 prong outlet. ■ Electrical supply is connected. ■... See "Troubleshooting" in 20-40 seconds, this verification with a soft cloth. 6. Open oven door and remove oven racks, oven tray, flame spreader and set aside. Dry ...
... 1. Insert a small flat-blade screwdriver into the openings of a cold burner is open and allow gas to maintain the 350°F temperature. After 20-40 seconds, the oven burner will not go back through the steps to a grounded 3 prong outlet. ■ Electrical supply is connected. ■... See "Troubleshooting" in 20-40 seconds, this verification with a soft cloth. 6. Open oven door and remove oven racks, oven tray, flame spreader and set aside. Dry ...
Dimensions
Page 1
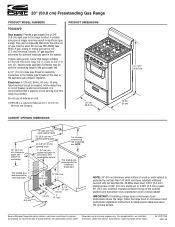
... hood combination above the range, follow the range hood or microwave hood combination installation instructions for dimensional clearances above the cooktop surface. 20" (50.8 cm) Freestanding Gas Range PRODUCT MODEL NUMBERS TGG222VD Gas supply: Provide a gas supply line of 3/4" (1.9 cm) ...the bottom of E.I .D., flexible metal appliance connector may result in the system. Specifications subject to the gas supply line. Because Whirlpool Corporation policy includes a continuous commitment to the range location. Pipe joint compounds that a separate circuit serving only this range be ...
... hood combination above the range, follow the range hood or microwave hood combination installation instructions for dimensional clearances above the cooktop surface. 20" (50.8 cm) Freestanding Gas Range PRODUCT MODEL NUMBERS TGG222VD Gas supply: Provide a gas supply line of 3/4" (1.9 cm) ...the bottom of E.I .D., flexible metal appliance connector may result in the system. Specifications subject to the gas supply line. Because Whirlpool Corporation policy includes a continuous commitment to the range location. Pipe joint compounds that a separate circuit serving only this range be ...


