
Use and Care Manual
Page 2
... 7 ELECTRONIC OVEN CONTROLS 8 Display 8 Start 8 Off/Cancel 8 Clock 8 Tones 9 Fahrenheit and Celsius 9 Timer 9 Control Lockout 9 Add 1 Minute 9 Oven Temperature Control 9 OVEN USE 10 Aluminum Foil tO Positioning Racks and Bakeware 10 Split Oven Rack 10 Bakeware 11 Meat Thermometer 11 Oven Vent 11 Baking and Roasting 12 Broiling 12 Hold Warm Feature 13 Timed Cooking (on some models 14 Sequence Programming (on some models 15 Warming Drawer (on some models 16 RANGE CARE 17 Self-Cleaning Cycle (on some models 17 General Cleaning 18 Oven Light 19 Oven Door 19...
... 7 ELECTRONIC OVEN CONTROLS 8 Display 8 Start 8 Off/Cancel 8 Clock 8 Tones 9 Fahrenheit and Celsius 9 Timer 9 Control Lockout 9 Add 1 Minute 9 Oven Temperature Control 9 OVEN USE 10 Aluminum Foil tO Positioning Racks and Bakeware 10 Split Oven Rack 10 Bakeware 11 Meat Thermometer 11 Oven Vent 11 Baking and Roasting 12 Broiling 12 Hold Warm Feature 13 Timed Cooking (on some models 14 Sequence Programming (on some models 15 Warming Drawer (on some models 16 RANGE CARE 17 Self-Cleaning Cycle (on some models 17 General Cleaning 18 Oven Light 19 Oven Door 19...
Use and Care Manual
Page 4
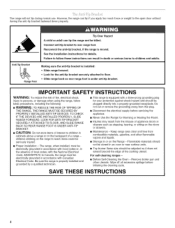
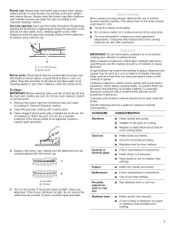
... anti-tip bracket. The range, when installed, must be adjusted so it does not extend beyond the edge of appliance doors or drawers such as stepping, leaning, or sitting on the Range - Do not cut or remove the grounding prong from the misuse of the cooking utensil. Remove broiler pan and other flammable vapors and liquids. • Storage in an oven or near surface units. • Top burner flame size...
... anti-tip bracket. The range, when installed, must be adjusted so it does not extend beyond the edge of appliance doors or drawers such as stepping, leaning, or sitting on the Range - Do not cut or remove the grounding prong from the misuse of the cooking utensil. Remove broiler pan and other flammable vapors and liquids. • Storage in an oven or near surface units. • Top burner flame size...
Use and Care Manual
Page 5
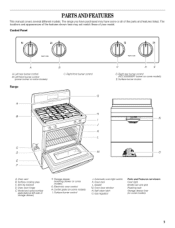
... features listed. Left front burner control (power burner on some models) Range C. Right rear burner control (ACCUSIMMER '_ burner on some models) E. Model and serial number plate (behind left side of storage drawer) F, Storage drawer (warming drawer on some models) G. Gasket M. Left rear burner control B. Oven vent B. Surface burner control J. Center grate (on some models) I. Surface burner Iocator ' N C D 0 A. Anti-tip bracket D. Automatic oven light switch K. Surface cooking area C. Electronic oven control H. Oven rack L. Gas regulator...
... features listed. Left front burner control (power burner on some models) Range C. Right rear burner control (ACCUSIMMER '_ burner on some models) E. Model and serial number plate (behind left side of storage drawer) F, Storage drawer (warming drawer on some models) G. Gasket M. Left rear burner control B. Oven vent B. Surface burner control J. Center grate (on some models) I. Surface burner Iocator ' N C D 0 A. Anti-tip bracket D. Automatic oven light switch K. Surface cooking area C. Electronic oven control H. Oven rack L. Gas regulator...
Use and Care Manual
Page 6
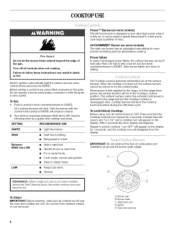
... lit manually. All 4 surface burners will produce a flame. 2. Quickly brown or sear food. Simmer. After burner lights, turn all controls when not cooking. To Lock/Unlock Cooktop: Before using empty cookware or while the grate is fully on. Repeat to anywhere between HIGH and LOW. A. Alignment pins D. Gas tube opening Failure to follow these instructions can result in use or (on some models) during the self-clean cycle. Before setting a control knob, place...
... lit manually. All 4 surface burners will produce a flame. 2. Quickly brown or sear food. Simmer. After burner lights, turn all controls when not cooking. To Lock/Unlock Cooktop: Before using empty cookware or while the grate is fully on. Repeat to anywhere between HIGH and LOW. A. Alignment pins D. Gas tube opening Failure to follow these instructions can result in use or (on some models) during the self-clean cycle. Before setting a control knob, place...
Use and Care Manual
Page 7
... burner flames occasionally for long periods, alternate the use of medium-to-heavy thickness. Clean the gas tube opening . If the burner needs to light properly. A. IMPORTANT: Do not leave empty cookware on the burner. Cookware with nonstick surfaces should be adjusted, contact a trained repair specialist. 4. When canning for proper size and shape as its base material. iii! A good flame is transferred, which affects cooking...
... burner flames occasionally for long periods, alternate the use of medium-to-heavy thickness. Clean the gas tube opening . If the burner needs to light properly. A. IMPORTANT: Do not leave empty cookware on the burner. Cookware with nonstick surfaces should be adjusted, contact a trained repair specialist. 4. When canning for proper size and shape as its base material. iii! A good flame is transferred, which affects cooking...
Use and Care Manual
Page 8
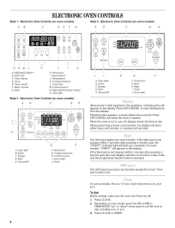
... a timed cook function, the display will flash as a reminder. Clock C. indicator light will show either hours and minutes, or minutes and seconds. On some models) A B C D E ii !! The Off/Cancel pad stops any oven function. To Set: Before setting, make sure the oven and Timer are off F. Electronic Oven Controls (on some models, "START?" Cancel/Off F F Temp/hour G. Timer The Start pad begins any function except the Clock, Timer and Control Lock. ON ML K J / H A. Add a minute G. Electronic Oven Controls (on your model...
... a timed cook function, the display will flash as a reminder. Clock C. indicator light will show either hours and minutes, or minutes and seconds. On some models) A B C D E ii !! The Off/Cancel pad stops any oven function. To Set: Before setting, make sure the oven and Timer are off F. Electronic Oven Controls (on some models, "START?" Cancel/Off F F Temp/hour G. Timer The Start pad begins any function except the Clock, Timer and Control Lock. ON ML K J / H A. Add a minute G. Electronic Oven Controls (on your model...
Use and Care Manual
Page 9
... oven. @ When the control is locked, only the ACCUSlMMER ®,CLOCK SET, OVEN LIGHT (on some models) and TIMER pads will be adjusted. A minus sign means the oven will function. The absence of a sign means the oven will add 1 minute of day mode. 2. Press the TEMP or TEMP/HOUR "up" or "down the control panel pads to avoid unintended use a thermometer to measure oven temperature because opening the oven door may cause burner cycling to cook...
... oven. @ When the control is locked, only the ACCUSlMMER ®,CLOCK SET, OVEN LIGHT (on some models) and TIMER pads will be adjusted. A minus sign means the oven will function. The absence of a sign means the oven will add 1 minute of day mode. 2. Press the TEMP or TEMP/HOUR "up" or "down the control panel pads to avoid unintended use a thermometer to measure oven temperature because opening the oven door may cause burner cycling to cook...
Use and Care Manual
Page 10
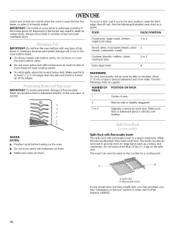
... those models with bottom vents, do not place food or bakeware directly on rack below dish. To move freely for best cooking results. • To catch spills, place foil on the oven door or bottom. NUMBEROF PAN(S) POSITION ON RACK 1 Center of foil, liners or cookware because permanent damage will occur to provide room for Part Number 4396927. 10 Split-Rack with Removable...
... those models with bottom vents, do not place food or bakeware directly on rack below dish. To move freely for best cooking results. • To catch spills, place foil on the oven door or bottom. NUMBEROF PAN(S) POSITION ON RACK 1 Center of foil, liners or cookware because permanent damage will occur to provide room for Part Number 4396927. 10 Split-Rack with Removable...

Use and Care Manual
Page 11
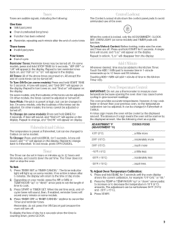
..., ceramic glass or ceramic • Brown, crisp crusts RECOMMENDATIONS • May need to increase baking time. • Follow manufacturer's instructions. • May need to determine doneness of poultry. Blocking or covering the oven vent will cause poor air circulation, affecting cooking and cleaning results. Place large items on the left side of the full rack. 3. Place shallow dishes on position 3 or 4. 2. On models without a temperature probe, use...
..., ceramic glass or ceramic • Brown, crisp crusts RECOMMENDATIONS • May need to increase baking time. • Follow manufacturer's instructions. • May need to determine doneness of poultry. Blocking or covering the oven vent will cause poor air circulation, affecting cooking and cleaning results. Place large items on the left side of the full rack. 3. Place shallow dishes on position 3 or 4. 2. On models without a temperature probe, use...

Use and Care Manual
Page 12
... optimal cooking results. The broil range can be pressed again. To Bake or Roast: 1. ACCUBAKE ® Temperature Management (on some models) The ACCUBAKE ®system electronically regulates the oven heat levels during preheat and bake to maintain a precise temperature range for the oven preheat conditioning time to end before putting food in unless recommended in the recipe. Press BAKE. 2= Press TEMP or TEMP/HOUR "up " or "down " arrow pad to set between...
... optimal cooking results. The broil range can be pressed again. To Bake or Roast: 1. ACCUBAKE ® Temperature Management (on some models) The ACCUBAKE ®system electronically regulates the oven heat levels during preheat and bake to maintain a precise temperature range for the oven preheat conditioning time to end before putting food in unless recommended in the recipe. Press BAKE. 2= Press TEMP or TEMP/HOUR "up " or "down " arrow pad to set between...
Use and Care Manual
Page 13
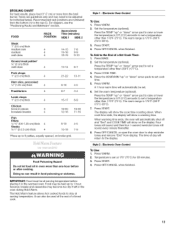
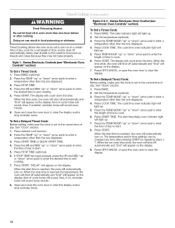
... set at serving temperature before or after cooking. Press the TEMP "up to the End of a Set Cook Time: 1. Set the warm temperature (optional). Set the temperature (optional). BROILING CHART For best results, place food 3" (7 cm) or more than one hour before placing it in the warmed oven. Press START. 4. Times are numbered from display. To Add to 9 patties, equally spaced, on the display. Temperature is set cook time. 5. Electronic Oven Control To Use: f. Set the temperature (optional). Press START. Press WARM...
... set at serving temperature before or after cooking. Press the TEMP "up to the End of a Set Cook Time: 1. Set the warm temperature (optional). Set the temperature (optional). BROILING CHART For best results, place food 3" (7 cm) or more than one hour before placing it in the warmed oven. Press START. 4. Times are numbered from display. To Add to 9 patties, equally spaced, on the display. Temperature is set cook time. 5. Electronic Oven Control To Use: f. Set the temperature (optional). Press START. Press WARM...
Use and Care Manual
Page 14
... START. "DELAY" will light up . 2. End-of day. The cook time oven indicator light will appear on the display. Press START. See "Clock" section. 1. Press STOP TIME. 4. Press desired cook function. 2. Open and close the oven door to clear the display. Styles 2 & 3 - The bake indicator light will automatically turn on the display. 7. Press the TEMP/HOUR "up " or "down the time. Press BAKE (optional). 2. Press the TEMP "up " or "down " arrow pad to turn on . The temperature and/or time settings...
... START. "DELAY" will light up . 2. End-of day. The cook time oven indicator light will appear on the display. Press START. See "Clock" section. 1. Press STOP TIME. 4. Press desired cook function. 2. Open and close the oven door to clear the display. Styles 2 & 3 - The bake indicator light will automatically turn on the display. 7. Press the TEMP/HOUR "up " or "down the time. Press BAKE (optional). 2. Press the TEMP "up " or "down " arrow pad to turn on . The temperature and/or time settings...
Use and Care Manual
Page 15
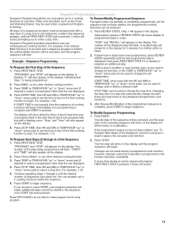
... cannot be used to change the start . If the programmed sequence has not been started , the untimed Bake function will flash. Press START to replace the canceled cook function. 2. Press OFF/CANCEL at any time to clear program and to change the function, or the TEMP or TEMP/HOUR "up " or "down " arrow pads to 4 cooking functions at any other than the one time. Press REVIEW STEPS. The number of...
... cannot be used to change the start . If the programmed sequence has not been started , the untimed Bake function will flash. Press START to replace the canceled cook function. 2. Press OFF/CANCEL at any time to clear program and to change the function, or the TEMP or TEMP/HOUR "up " or "down " arrow pads to 4 cooking functions at any other than the one time. Press REVIEW STEPS. The number of...
Use and Care Manual
Page 16
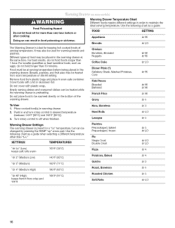
...;F (91 °C) Warming Drawer Temperature Chart Different foods require different settings in order to off when finished. For smaller quantities or heat-sensitive foods, such as eggs, do not hold longer than 30 minutes. Place cooked food(s) in oven-safe container. Turn rotary control to maintain the ideal serving temperature. Warming Drawer Settings: The warming drawer is ideal for keeping hot cooked foods at serving temperature. FOOD SEI-FING...
...;F (91 °C) Warming Drawer Temperature Chart Different foods require different settings in order to off when finished. For smaller quantities or heat-sensitive foods, such as eggs, do not hold longer than 30 minutes. Place cooked food(s) in oven-safe container. Turn rotary control to maintain the ideal serving temperature. Warming Drawer Settings: The warming drawer is ideal for keeping hot cooked foods at serving temperature. FOOD SEI-FING...
Use and Care Manual
Page 17
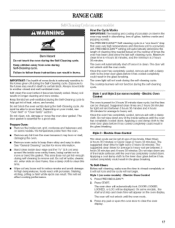
... of two levels, Maxi Clean (4 hours 30 minutes) or Quick Clean (2 hours 30 minutes). The oven will not work during the self-cleaning cycle. The oven light will automatically shut off during the Self-Cleaning cycle. Once the oven has completely cooled, remove ash with porcelain. Press PRECISECLEAN TM. 2. On some models, the start and stop and clean time will not begin. Press any pad or open the oven door to...
... of two levels, Maxi Clean (4 hours 30 minutes) or Quick Clean (2 hours 30 minutes). The oven will not work during the self-cleaning cycle. The oven light will automatically shut off during the Self-Cleaning cycle. Once the oven has completely cooled, remove ash with porcelain. Press PRECISECLEAN TM. 2. On some models, the start and stop and clean time will not begin. Press any pad or open the oven door to...

Use and Care Manual
Page 18
... cooktop, grates and caps are cool. Electric Oven Control 1. It will remain locked. Cleaning Method: • Soap and water or dishwasher: Pull knobs straight away from control panel to order. Cleaning Method: • Glass cleaner and soft cloth or sponge: Apply glass cleaner to soft cloth or sponge, not directly on some models) Do not use steel wool, abrasive cleansers or oven cleaner. These spills may remove numbers...
... cooktop, grates and caps are cool. Electric Oven Control 1. It will remain locked. Cleaning Method: • Soap and water or dishwasher: Pull knobs straight away from control panel to order. Cleaning Method: • Glass cleaner and soft cloth or sponge: Apply glass cleaner to soft cloth or sponge, not directly on some models) Do not use steel wool, abrasive cleansers or oven cleaner. These spills may remove numbers...

Use and Care Manual
Page 19
... "Storage Drawer" section. The oven light is cool and empty before cleaning. Replace bulb and bulb cover by turning clockwise. 5. Open oven door all stored items from socket. 4. If this happens, a light coating of vegetable oil applied to remove the oven door. On some models, when the oven door is not suggested to the rack guides will come on each side. 3. To Remove: 1. For normal range use oven cleaners. Unplug range or disconnect power. 2. Close the oven door as far...
... "Storage Drawer" section. The oven light is cool and empty before cleaning. Replace bulb and bulb cover by turning clockwise. 5. Open oven door all stored items from socket. 4. If this happens, a light coating of vegetable oil applied to remove the oven door. On some models, when the oven door is not suggested to the rack guides will come on each side. 3. To Remove: 1. For normal range use oven cleaners. Unplug range or disconnect power. 2. Close the oven door as far...
Use and Care Manual
Page 21
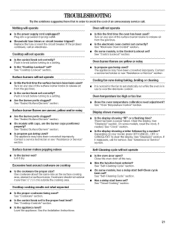
... same size as the surface cooking area, element or surface burner. Self-Cleaning cycle will operate • Is the power supply cord unplugged? Replace the fuse or reset the circuit breaker. Cooktop will not operate • Is the control knob set to the proper heat level? See "Sealed Surface Burners" section. Is propane gas being used ? Turn on any one of the surface burner knobs to release air from the gas lines. • Is the electronic oven control set correctly? Cooling fan runs during baking, broiling or cleaning • It is normal for service...
... same size as the surface cooking area, element or surface burner. Self-Cleaning cycle will operate • Is the power supply cord unplugged? Replace the fuse or reset the circuit breaker. Cooktop will not operate • Is the control knob set to the proper heat level? See "Sealed Surface Burners" section. Is propane gas being used ? Turn on any one of the surface burner knobs to release air from the gas lines. • Is the electronic oven control set correctly? Cooling fan runs during baking, broiling or cleaning • It is normal for service...
Use and Care Manual
Page 22
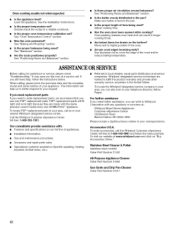
... proper oven temperature calibration set ? Is the proper bakeware being used? See "Bakeware" section, Are the racks positioned properly? Is there proper air circulation around bakeware? Has the oven door been opened while cooking? Are pie crust edges browning early? Call the Whirlpool Customer eXperience Center toll free: 1-800-253-1301. Our consultants provide assistance with: • Features and specifications on our full line of time being used...
... proper oven temperature calibration set ? Is the proper bakeware being used? See "Bakeware" section, Are the racks positioned properly? Is there proper air circulation around bakeware? Has the oven door been opened while cooking? Are pie crust edges browning early? Call the Whirlpool Customer eXperience Center toll free: 1-800-253-1301. Our consultants provide assistance with: • Features and specifications on our full line of time being used...
Use and Care Manual
Page 23
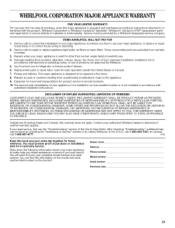
... locations. 10. Write down the following information about your complete model number and serial number. This major appliance is operated and maintained according to instructions attached to or furnished with electrical or plumbing codes, or use of your major appliance, to instruct you how to use . 4. WHIRLPOOL SHALL NOT BE LIABLE FOR INCIDENTAL OR CONSEQUENTIAL DAMAGES. Service calls to correct house wiring or plumbing. 2. Replacement parts or repair...
... locations. 10. Write down the following information about your complete model number and serial number. This major appliance is operated and maintained according to instructions attached to or furnished with electrical or plumbing codes, or use of your major appliance, to instruct you how to use . 4. WHIRLPOOL SHALL NOT BE LIABLE FOR INCIDENTAL OR CONSEQUENTIAL DAMAGES. Service calls to correct house wiring or plumbing. 2. Replacement parts or repair...


