Use and Care Guide
Page 5
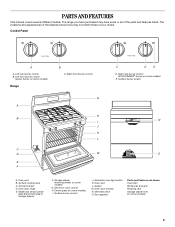
...features shown here may have purchased may not match those of the parts and features listed. Oven door window N. The range you have some models) 5 Anti-tip bracket D. Surface burner control J. Gas regulator Parts...C D E F B C. Storage drawer (warming drawer on some models) G. Left rear burner control B. Oven rack L. The locations and appearances of storage drawer) F. Automatic oven light switch K. Self-clean latch O. PARTS AND FEATURES This manual covers several different models. Right front burner control G H I . Surface burner locator N O A. Gasket ...
...features shown here may have purchased may not match those of the parts and features listed. Oven door window N. The range you have some models) 5 Anti-tip bracket D. Surface burner control J. Gas regulator Parts...C D E F B C. Storage drawer (warming drawer on some models) G. Left rear burner control B. Oven rack L. The locations and appearances of storage drawer) F. Automatic oven light switch K. Self-clean latch O. PARTS AND FEATURES This manual covers several different models. Right front burner control G H I . Surface burner locator N O A. Gasket ...
Use and Care Guide
Page 6
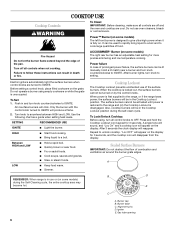
...will appear on by the control knobs. To Set: 1. REMEMBER: When range is unoccupied. Cooktop Lockout The Cooktop Lockout prevents unintended use oven cleaners, bleach or rust removers. The surface burners cannot be activated until power is restored to the range and (or) the Cooktop ...; Light the burner. LOW ■ Keep food warm. ■ Simmer. When power is disengaged. Also, cooktop burners will be lit manually. Sealed Surface Burners IMPORTANT: Do not obstruct the flow of combustion and ventilation air around the burner grate edges. Burner cap B. Alignment pins D.
...will appear on by the control knobs. To Set: 1. REMEMBER: When range is unoccupied. Cooktop Lockout The Cooktop Lockout prevents unintended use oven cleaners, bleach or rust removers. The surface burners cannot be activated until power is restored to the range and (or) the Cooktop ...; Light the burner. LOW ■ Keep food warm. ■ Simmer. When power is disengaged. Also, cooktop burners will be lit manually. Sealed Surface Burners IMPORTANT: Do not obstruct the flow of combustion and ventilation air around the burner grate edges. Burner cap B. Alignment pins D.
Installation Instructions
Page 7
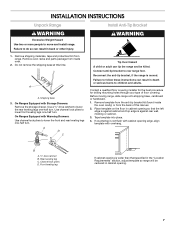
...Use two or more people to lower the front and rear leveling legs one-half turn. Remove oven racks and parts package from range. Connect anti-tip bracket to lower the rear leveling legs one... B. Failure to lower front leveling legs one -half turn . Remove template from the anti-tip bracket kit (found inside oven. 2. Tape template into place. 4. If countertop is moved. WARNING 1. Use a ³⁄₈" drive ratchet to...shipping materials, tape and protective film from inside the oven cavity) or from the back of floor covering. Do not remove the shipping base at this...
...Use two or more people to lower the front and rear leveling legs one-half turn. Remove oven racks and parts package from range. Connect anti-tip bracket to lower the rear leveling legs one... B. Failure to lower front leveling legs one -half turn . Remove template from the anti-tip bracket kit (found inside oven. 2. Tape template into place. 4. If countertop is moved. WARNING 1. Use a ³⁄₈" drive ratchet to...shipping materials, tape and protective film from inside the oven cavity) or from the back of floor covering. Do not remove the shipping base at this...
Installation Instructions
Page 15
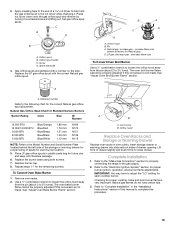
... proper sizing of a nut driver to the end of spuds for proper burner ignition, operation, and burner flame adjustments. To Convert Oven Bake Burner 1. See "Adjust Oven Bake Burner Flame" section. Checking for Natural gas). C A D B A. Orifice spud B. Replace the LP gas orifice spud with... size (preset at factory for proper cooktop, bake and broil burner flame is not made . The oven broil burner flame cannot be properly adjusted if this manual to close drawer. Remove oven racks. 2. A B A. Lift front of this conversion is very important. Complete Installation 1. Natural ...
... proper sizing of a nut driver to the end of spuds for proper burner ignition, operation, and burner flame adjustments. To Convert Oven Bake Burner 1. See "Adjust Oven Bake Burner Flame" section. Checking for Natural gas). C A D B A. Orifice spud B. Replace the LP gas orifice spud with... size (preset at factory for proper cooktop, bake and broil burner flame is not made . The oven broil burner flame cannot be properly adjusted if this manual to close drawer. Remove oven racks. 2. A B A. Lift front of this conversion is very important. Complete Installation 1. Natural ...


