Use and Care Guide
Page 4
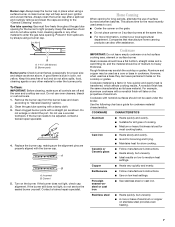
... the anti-tip bracket securely attached to persons, or damage when using the range, follow these instructions can tip the range and be plugged directly into a properly grounded receptacle. The Anti-Tip Bracket The range will not tip during normal use. However, the range can tip if you apply too much force or weight to rear range foot. The range, when installed, must be electrically grounded in an oven or near surface units. ■ Top burner flame size...
... the anti-tip bracket securely attached to persons, or damage when using the range, follow these instructions can tip the range and be plugged directly into a properly grounded receptacle. The Anti-Tip Bracket The range will not tip during normal use. However, the range can tip if you apply too much force or weight to rear range foot. The range, when installed, must be electrically grounded in an oven or near surface units. ■ Top burner flame size...
Use and Care Guide
Page 5
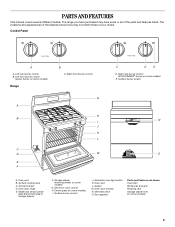
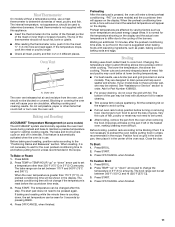
... rear burner control (ACCUSIMMER® burner on some models) 5 Oven door hinge E. Automatic oven light switch K. Gas regulator Parts and Features not shown Oven light Broiler pan and grid Roasting rack Storage drawer liner (on some models) Range A B C D E F B C. The locations and appearances of the parts and features listed. Model and serial number plate (behind left side of your model. Storage drawer (warming drawer on some models) E. Control Panel A A. Oven vent B. Surface burner control J. Oven rack L. Self-clean latch O. Left front burner control (power burner...
... rear burner control (ACCUSIMMER® burner on some models) 5 Oven door hinge E. Automatic oven light switch K. Gas regulator Parts and Features not shown Oven light Broiler pan and grid Roasting rack Storage drawer liner (on some models) Range A B C D E F B C. The locations and appearances of the parts and features listed. Model and serial number plate (behind left side of your model. Storage drawer (warming drawer on some models) E. Control Panel A A. Oven vent B. Surface burner control J. Oven rack L. Self-clean latch O. Left front burner control (power burner...
Use and Care Guide
Page 6
... control knobs. Gas tube opening 6 Before setting a control knob, place filled cookware on the display for 3 seconds. To Set: 1. Push in and turn all controls when not cooking. To Lock/Unlock Cooktop: Before using empty cookware or while the grate is locked out, the surface burners cannot be activated until power is designed to OFF. After 3 seconds the clock display will disappear from the display. Power™ Burner (on some models) during the self-clean cycle. Electric igniters automatically light the surface burners...
... control knobs. Gas tube opening 6 Before setting a control knob, place filled cookware on the display for 3 seconds. To Set: 1. Push in and turn all controls when not cooking. To Lock/Unlock Cooktop: Before using empty cookware or while the grate is locked out, the surface burners cannot be activated until power is designed to OFF. After 3 seconds the clock display will disappear from the display. Power™ Burner (on some models) during the self-clean cycle. Electric igniters automatically light the surface burners...
Use and Care Guide
Page 7
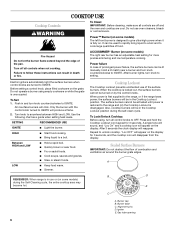
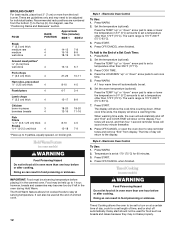
... cooktop or grates. Use the following chart as a guide for proper size and shape as shown. Earthenware ■ Follow manufacturer's instructions. ■ Use on the burner. Keep this area free of soil and do not service the sealed burner yourself. A good flame is blue in cookware. Remove the burner cap from spillovers by always using a surface burner. A B A. Turn on low heat settings. This allows time for long periods, alternate the use...
... cooktop or grates. Use the following chart as a guide for proper size and shape as shown. Earthenware ■ Follow manufacturer's instructions. ■ Use on the burner. Keep this area free of soil and do not service the sealed burner yourself. A good flame is blue in cookware. Remove the burner cap from spillovers by always using a surface burner. A B A. Turn on low heat settings. This allows time for long periods, alternate the use...
Use and Care Guide
Page 11
... or covering the oven vent will appear on the display and the actual oven temperature to differ due to end before turning or removing food. Do not set between 300°F (150°C) and HI (525°F [275°C]). 3. Baking and Roasting ACCUBAKE® Temperature Management (on some models) and the countdown time will bake on some models) The ACCUBAKE® system electronically regulates the oven heat levels during preheat and bake...
... or covering the oven vent will appear on the display and the actual oven temperature to differ due to end before turning or removing food. Do not set between 300°F (150°C) and HI (525°F [275°C]). 3. Baking and Roasting ACCUBAKE® Temperature Management (on some models) and the countdown time will bake on some models) The ACCUBAKE® system electronically regulates the oven heat levels during preheat and bake...
Use and Care Guide
Page 12
... time of a Set Cook Time: 1. however, breads and casseroles may not bake properly. 12 Style 1 - Set the temperature (optional). Four tones will sound, and then four 1-second reminder tones will return to set cook time. 5. BROILING CHART For best results, place food 3" (7 cm) or more than one hour before or after cooking. Press OFF/CANCEL when finished. Electronic Oven Control To Use: 1. Press START. 4. Hold Warm Feature (on some models...
... time of a Set Cook Time: 1. however, breads and casseroles may not bake properly. 12 Style 1 - Set the temperature (optional). Four tones will sound, and then four 1-second reminder tones will return to set cook time. 5. BROILING CHART For best results, place food 3" (7 cm) or more than one hour before or after cooking. Press OFF/CANCEL when finished. Electronic Oven Control To Use: 1. Press START. 4. Hold Warm Feature (on some models...
Use and Care Guide
Page 14
... number of some models, the temperature probe from the oven. ■ Remove any foil from oven during the Self-Cleaning cycle. A recalled step will remain lit on your program sequence will flash. If fewer than the one displayed. 4. While a step is pressed, 3 tones will show on some birds is displayed, then press FIRST/NEXT STEP if it becomes heavily soiled. START TIME, when used to change...
... number of some models, the temperature probe from the oven. ■ Remove any foil from oven during the Self-Cleaning cycle. A recalled step will remain lit on your program sequence will flash. If fewer than the one displayed. 4. While a step is pressed, 3 tones will show on some birds is displayed, then press FIRST/NEXT STEP if it becomes heavily soiled. START TIME, when used to change...
Use and Care Guide
Page 15
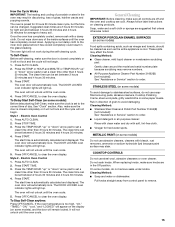
... oven cools. 5. See "Clock" section. Press AUTO CLEAN. 2. The DOOR LOCKED oven indicator lights will not unlock until the oven cools. The oven will light up " or "down " arrow pads to set a clean time other than 3 hours 30 minutes. To Stop Self-Clean anytime: Press OFF/CANCEL. Cleaning Method: ■ Soap and water or dishwasher: Pull knobs straight away from control panel to clear the oven display. Press the TEMP/HOUR "up . General Cleaning IMPORTANT: Before cleaning...
... oven cools. 5. See "Clock" section. Press AUTO CLEAN. 2. The DOOR LOCKED oven indicator lights will not unlock until the oven cools. The oven will light up " or "down " arrow pads to set a clean time other than 3 hours 30 minutes. To Stop Self-Clean anytime: Press OFF/CANCEL. Cleaning Method: ■ Soap and water or dishwasher: Pull knobs straight away from control panel to clear the oven display. Press the TEMP/HOUR "up . General Cleaning IMPORTANT: Before cleaning...
Use and Care Guide
Page 18
... proper size? Use cookware about the same size as the surface cooking area, element or surface burner. See "Cookware" section. ■ Is the control knob set ? Self-Cleaning cycle will operate ■ Is the power supply cord unplugged? See "Self-Cleaning Cycle" section. ■ On some models, reset the clock, if needed. Surface burner flames are the burner caps positioned properly? Oven temperature too high or too low ■ Does the oven temperature calibration need adjustment? If it dry. See "Self-Cleaning Cycle...
... proper size? Use cookware about the same size as the surface cooking area, element or surface burner. See "Cookware" section. ■ Is the control knob set ? Self-Cleaning cycle will operate ■ Is the power supply cord unplugged? See "Self-Cleaning Cycle" section. ■ On some models, reset the clock, if needed. Surface burner flames are the burner caps positioned properly? Oven temperature too high or too low ■ Does the oven temperature calibration need adjustment? If it dry. See "Self-Cleaning Cycle...
Use and Care Guide
Page 19
.../or reduce baking temperature. FSP® replacement parts will help , follow the menu prompts. Whirlpool Canada LP designated service technicians are trained to local dealers, repair parts distributors, and service companies. Accessories List Stainless Steel Cleaner & Polish (stainless steel models) Order Part Number 31462B All-Purpose Appliance Cleaner Order Part Number 31662B Gas Grate and Drip Pan Cleaner Order Part Number 31617B 19 See the Installation Instructions. ■ Is the proper temperature set ? Double-check...
.../or reduce baking temperature. FSP® replacement parts will help , follow the menu prompts. Whirlpool Canada LP designated service technicians are trained to local dealers, repair parts distributors, and service companies. Accessories List Stainless Steel Cleaner & Polish (stainless steel models) Order Part Number 31462B All-Purpose Appliance Cleaner Order Part Number 31662B Gas Grate and Drip Pan Cleaner Order Part Number 31617B 19 See the Installation Instructions. ■ Is the proper temperature set ? Double-check...
Use and Care Guide
Page 20
... installation, installation not in accordance with electrical or plumbing codes, or use of products not approved by calling Whirlpool. Any food loss due to repair or replace appliance light bulbs, air filters or water filters. Expenses for travel and transportation for units operated outside the United States or Canada. 7. If you need service, first see the "Troubleshooting" section of your major appliance, to instruct you...
... installation, installation not in accordance with electrical or plumbing codes, or use of products not approved by calling Whirlpool. Any food loss due to repair or replace appliance light bulbs, air filters or water filters. Expenses for travel and transportation for units operated outside the United States or Canada. 7. If you need service, first see the "Troubleshooting" section of your major appliance, to instruct you...
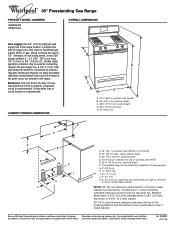
Dimensions
Page 1
... change without notice. This shaded area recommended for connection to countertop B. 13" (33 cm) max. For complete details, see NOTE* E. 30¹⁄₈" (76.5 cm) min. upper cabinet depth C. 30" (76.2 cm) min. ® 30" Freestanding Gas Range PRODUCT MODEL NUMBERS GS563LXS SF367LXS OVERALL DIMENSIONS Gas supply: Use 3/4" (1.9 cm) rigid pipe gas supply line to change materials and specifications without notice. opening width D. Specifications subject to the range location...
... change without notice. This shaded area recommended for connection to countertop B. 13" (33 cm) max. For complete details, see NOTE* E. 30¹⁄₈" (76.5 cm) min. upper cabinet depth C. 30" (76.2 cm) min. ® 30" Freestanding Gas Range PRODUCT MODEL NUMBERS GS563LXS SF367LXS OVERALL DIMENSIONS Gas supply: Use 3/4" (1.9 cm) rigid pipe gas supply line to change materials and specifications without notice. opening width D. Specifications subject to the range location...
Installation Instructions
Page 3
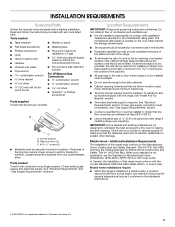
... "Install Anti-Tip Bracket" section. ■ Grounded electrical supply is to subfloor. See "Electrical Requirements" and "Gas Supply Requirements" sections. If cabinet storage is required. Proper gas supply connection must conform with any tools listed here. Tools needed Check local codes and consult gas supplier. Thickness of this range must be installed. Mobile Home - Check existing gas supply and electrical supply. Do not obstruct flow of securing the range is located on the model/serial rating plate. Additional Installation Requirements The installation...
... "Install Anti-Tip Bracket" section. ■ Grounded electrical supply is to subfloor. See "Electrical Requirements" and "Gas Supply Requirements" sections. If cabinet storage is required. Proper gas supply connection must conform with any tools listed here. Tools needed Check local codes and consult gas supplier. Thickness of this range must be installed. Mobile Home - Check existing gas supply and electrical supply. Do not obstruct flow of securing the range is located on the model/serial rating plate. Additional Installation Requirements The installation...
Installation Instructions
Page 5
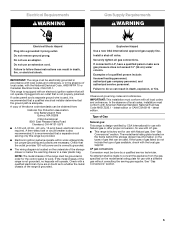
.... Explosion Hazard Use a new CSA International approved gas supply line. If the types of a qualified person include: licensed heating personnel, authorized gas company personnel, and authorized service personnel. Do not remove ground prong. latest edition. This range is also recommended. Electrical Requirements WARNING Gas Supply Requirements WARNING Electrical Shock Hazard Plug into an outlet that the ground path is not properly polarized. A time-delay fuse or circuit breaker is equipped...
.... Explosion Hazard Use a new CSA International approved gas supply line. If the types of a qualified person include: licensed heating personnel, authorized gas company personnel, and authorized service personnel. Do not remove ground prong. latest edition. This range is also recommended. Electrical Requirements WARNING Gas Supply Requirements WARNING Electrical Shock Hazard Plug into an outlet that the ground path is not properly polarized. A time-delay fuse or circuit breaker is equipped...
Installation Instructions
Page 10
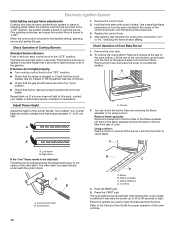
... Operation of the burner. Low flame B. The oven bake burner should light within 8 seconds, under certain conditions it may take longer that 4 seconds to be adjusted: The flame can check the burner flame by removing the flame spreader or by turning the control from oven and place the cover on burner bases. When the oven control is turned to the desired setting, sparking occurs and ignites the gas. Remove the control knob. 2. Electronic Ignition System Initial lighting and gas flame adjustments Cooktop and oven burners use electronic igniters in...
... Operation of the burner. Low flame B. The oven bake burner should light within 8 seconds, under certain conditions it may take longer that 4 seconds to be adjusted: The flame can check the burner flame by removing the flame spreader or by turning the control from oven and place the cover on burner bases. When the oven control is turned to the desired setting, sparking occurs and ignites the gas. Remove the control knob. 2. Electronic Ignition System Initial lighting and gas flame adjustments Cooktop and oven burners use electronic igniters in...

Installation Instructions
Page 11
... gas supply line shutoff valve is closed, open , contact a qualified technician. 11 Insert storage drawer or warming drawer into a grounded 3 prong outlet. ■ Electrical supply is plugged into slide rails on for 5 minutes, check for heat. For more information, see which step was skipped. 2. or circuit breaker has not tripped. ■ Range is connected. ■ See "Troubleshooting" in character. Close the oven door. 2. Complete Installation 1. See the Use and Care Guide for proper flame...
... gas supply line shutoff valve is closed, open , contact a qualified technician. 11 Insert storage drawer or warming drawer into a grounded 3 prong outlet. ■ Electrical supply is plugged into slide rails on for 5 minutes, check for heat. For more information, see which step was skipped. 2. or circuit breaker has not tripped. ■ Range is connected. ■ See "Troubleshooting" in character. Close the oven door. 2. Complete Installation 1. See the Use and Care Guide for proper flame...
Installation Instructions
Page 12
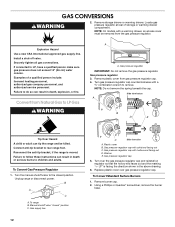
... Gas supply line 12 C Side view after A. Explosion Hazard Use a new CSA International approved gas supply line. GAS CONVERSIONS WARNING 2. Gas pressure regulator IMPORTANT: Do not remove the gas pressure regulator. NOTE: Do not remove the spring beneath the cap. Unplug range or disconnect power. Plastic cover B. If connected to rear range foot. Turn the manual shutoff valve to follow these instructions can result in death or serious burns to children and adults. B A C A. To Convert Gas Pressure Regulator 1. Remove storage drawer or warming drawer. Gas pressure regulator...
... Gas supply line 12 C Side view after A. Explosion Hazard Use a new CSA International approved gas supply line. GAS CONVERSIONS WARNING 2. Gas pressure regulator IMPORTANT: Do not remove the gas pressure regulator. NOTE: Do not remove the spring beneath the cap. Unplug range or disconnect power. Plastic cover B. If connected to rear range foot. Turn the manual shutoff valve to follow these instructions can result in death or serious burns to children and adults. B A C A. To Convert Gas Pressure Regulator 1. Remove storage drawer or warming drawer. Gas pressure regulator...
Installation Instructions
Page 13
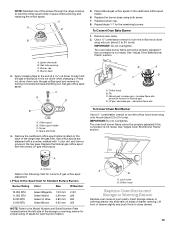
... removing and replacing the orifice spuds. See "Adjust Oven Broil Burner Flame" section. C A D B 5. Use a ½" combination wrench to turn the orifice hood down snug onto the pin (about 2 to the following chart for Standard Surface Burners Burner Rating Color Size ID Number 12,000 BTU 11,000 BTU 8,000 BTU 5,000 BTU Green/Magenta Green/Yellow Green/Lt. The oven bake burner flame cannot be properly adjusted if this conversion is not made . See "Adjust Oven Bake Burner Flame" section. Igniter electrode B. Burner cap D. Natural gas: increase gas - decrease flame...
... removing and replacing the orifice spuds. See "Adjust Oven Broil Burner Flame" section. C A D B 5. Use a ½" combination wrench to turn the orifice hood down snug onto the pin (about 2 to the following chart for Standard Surface Burners Burner Rating Color Size ID Number 12,000 BTU 11,000 BTU 8,000 BTU 5,000 BTU Green/Magenta Green/Yellow Green/Lt. The oven bake burner flame cannot be properly adjusted if this conversion is not made . See "Adjust Oven Bake Burner Flame" section. Igniter electrode B. Burner cap D. Natural gas: increase gas - decrease flame...

Installation Instructions
Page 14
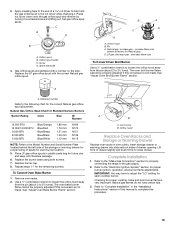
... be removed from the gas pressure regulator. To range B. Refer to Natural Gas WARNING NOTE: On models with a ⁵⁄₈" combination wrench to rear range foot. Convert from gas pressure regulator cap. 4. Plastic cover B. Turn over the gas pressure regulator cap and reinstall on regulator so that the solid end faces out and the marking " Gas supply line 2. IMPORTANT: You may have a slightly yellow tip. 3. Turn the manual shutoff valve to adjust the "LO" setting for proper cooktop, bake and broil burner flame...
... be removed from the gas pressure regulator. To range B. Refer to Natural Gas WARNING NOTE: On models with a ⁵⁄₈" combination wrench to rear range foot. Convert from gas pressure regulator cap. 4. Plastic cover B. Turn over the gas pressure regulator cap and reinstall on regulator so that the solid end faces out and the marking " Gas supply line 2. IMPORTANT: You may have a slightly yellow tip. 3. Turn the manual shutoff valve to adjust the "LO" setting for proper cooktop, bake and broil burner flame...
Installation Instructions
Page 15
... cooktop, bake and broil burner flame is very important. See "Adjust Oven Broil Burner Flame" section. Replace the burner base using both screws. 7. Remove oven racks. 2. Lock screw B. Apply masking tape to complete this conversion is not made . B A D C A A. Orifice hood B. A B A. Spark electrode 4. Press nut driver down onto the gas orifice spud and remove by turning it . To Convert Oven Bake Burner 1. Refer to the "Make Gas Connection" section for properly connecting the range to the "Electronic Ignition System" section for the correct Natural gas...
... cooktop, bake and broil burner flame is very important. See "Adjust Oven Broil Burner Flame" section. Replace the burner base using both screws. 7. Remove oven racks. 2. Lock screw B. Apply masking tape to complete this conversion is not made . B A D C A A. Orifice hood B. A B A. Spark electrode 4. Press nut driver down onto the gas orifice spud and remove by turning it . To Convert Oven Bake Burner 1. Refer to the "Make Gas Connection" section for properly connecting the range to the "Electronic Ignition System" section for the correct Natural gas...


