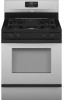
Use and Care Guide
Page 3
..., carbon monoxide, toluene, and soot. 3 We have provided many important safety messages in your building. • Immediately call your gas supplier, call the fire department. - All safety messages will follow instructions. RANGE SAFETY Your safety and the safety of others . Always read and obey all safety messages. WARNING: This product contains a chemical...
..., carbon monoxide, toluene, and soot. 3 We have provided many important safety messages in your building. • Immediately call your gas supplier, call the fire department. - All safety messages will follow instructions. RANGE SAFETY Your safety and the safety of others . Always read and obey all safety messages. WARNING: This product contains a chemical...
Use and Care Guide
Page 5
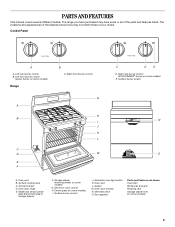
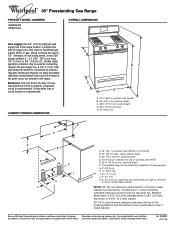
...control G H I . Surface burner locator N O A. Center grate (on some or all of the parts and features listed. Surface burner control J. Oven door window N. Gas regulator Parts and Features not shown Oven light Broiler pan and grid Roasting rack Storage drawer liner (on some models...) Range A B C D E F B C. PARTS AND FEATURES This manual covers several different models. The range you have some models) 5 Oven vent B. Surface cooking area C. Oven rack L. Anti-tip...
...control G H I . Surface burner locator N O A. Center grate (on some or all of the parts and features listed. Surface burner control J. Oven door window N. Gas regulator Parts and Features not shown Oven light Broiler pan and grid Roasting rack Storage drawer liner (on some models...) Range A B C D E F B C. PARTS AND FEATURES This manual covers several different models. The range you have some models) 5 Oven vent B. Surface cooking area C. Oven rack L. Anti-tip...
Use and Care Guide
Page 6
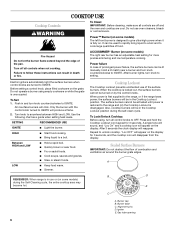
...prevents unintended use oven cleaners, bleach or rust removers. The surface burners cannot be used to rapidly bring liquid to a boil and to the range and (or) the Cooktop Lockout is first supplied to IGNITE will produce a flame. 2. Also, cooktop burners will click. Alignment pins D. It...cycle, the entire cooktop area may become hot. Sealed Surface Burners IMPORTANT: Do not obstruct the flow of the pan. Burner cap B. Gas tube opening 6 Failure to IGNITE. Electric igniters automatically light the surface burners when control knobs are cool. Only the burner with the ...
...prevents unintended use oven cleaners, bleach or rust removers. The surface burners cannot be used to rapidly bring liquid to a boil and to the range and (or) the Cooktop Lockout is first supplied to IGNITE will produce a flame. 2. Also, cooktop burners will click. Alignment pins D. It...cycle, the entire cooktop area may become hot. Sealed Surface Burners IMPORTANT: Do not obstruct the flow of the pan. Burner cap B. Gas tube opening 6 Failure to IGNITE. Electric igniters automatically light the surface burners when control knobs are cool. Only the burner with the ...
Dimensions
Page 1
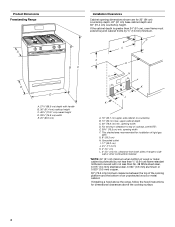
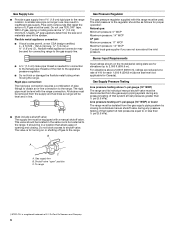
...see Installation our products, we reserve the right to the gas supply line. clearance from both sides of range to the range. With L.P. gas, piping or tubing size can be located in insufficient gas supply. A 1/2" (1.3 cm) male pipe thread is ...min. ® 30" Freestanding Gas Range PRODUCT MODEL NUMBERS GS563LXS SF367LXS OVERALL DIMENSIONS Gas supply: Use 3/4" (1.9 cm) rigid pipe gas supply line to improve Dimensions are for planning purposes only. Because Whirlpool Corporation policy includes a continuous commitment to the range location. upper cabinet depth C. ...
...see Installation our products, we reserve the right to the gas supply line. clearance from both sides of range to the range. With L.P. gas, piping or tubing size can be located in insufficient gas supply. A 1/2" (1.3 cm) male pipe thread is ...min. ® 30" Freestanding Gas Range PRODUCT MODEL NUMBERS GS563LXS SF367LXS OVERALL DIMENSIONS Gas supply: Use 3/4" (1.9 cm) rigid pipe gas supply line to improve Dimensions are for planning purposes only. Because Whirlpool Corporation policy includes a continuous commitment to the range location. upper cabinet depth C. ...
Installation Instructions
Page 2
... follow these instructions can happen if the instructions are very important. Follow the gas supplier's instructions. • If you and others are not followed. Installation and service must not exceed 3 feet. RANGE SAFETY Your safety and the safety of others . WARNING You can be killed...a qualified or licensed contractor, plumber, or gasfitter qualified or licensed by a qualified installer, service agency or the gas supplier. Reconnect the anti-tip bracket, if the range is the safety alert symbol. WARNING: If the information in the vicinity of this manual is , tell you how...
... follow these instructions can happen if the instructions are very important. Follow the gas supplier's instructions. • If you and others are not followed. Installation and service must not exceed 3 feet. RANGE SAFETY Your safety and the safety of others . WARNING You can be killed...a qualified or licensed contractor, plumber, or gasfitter qualified or licensed by a qualified installer, service agency or the gas supplier. Reconnect the anti-tip bracket, if the range is the safety alert symbol. WARNING: If the information in the vicinity of this manual is , tell you how...
Installation Instructions
Page 3
... installation clearances specified on the oven frame behind the storage drawer panel. ■ The range should be located for Mobile Home Construction and Safety, Title 24, HUD Part 280). See "Gas Supply Requirements" section. ■ Contact a qualified floor covering installer to check that are... the floor during transit. Mobile home installations require: ■ When this range must be available. Check with the current standards CAN/CSA-A240-latest edition, or local codes. Proper gas supply connection must conform with your local hardware store. When such standard is...
... installation clearances specified on the oven frame behind the storage drawer panel. ■ The range should be located for Mobile Home Construction and Safety, Title 24, HUD Part 280). See "Gas Supply Requirements" section. ■ Contact a qualified floor covering installer to check that are... the floor during transit. Mobile home installations require: ■ When this range must be available. Check with the current standards CAN/CSA-A240-latest edition, or local codes. Proper gas supply connection must conform with your local hardware store. When such standard is...
Installation Instructions
Page 4
..." (0.6 mm) aluminum or 0.020" (0.5 mm) copper. 30" (76.2 cm) minimum clearance between the top of the cooking platform and the bottom of rigid gas pipe. opening width F. G. 8" (20.3 cm) H. opening width D. Grounded outlet I F K J A. 18" (45.7 cm) upper side cabinet to...min. D B C A L G K E H G I . 17" (43.2 cm) J. 4¹⁄₂" (11.4 cm) K. 2" (5.1 cm) L. 2" (5.1 cm) min. If installing a hood above the range, follow the hood instructions for 25" (64 cm) countertop depth, 24" (61 cm) base cabinet depth and 36" (91.4 cm) countertop height. For minimum clearance...
..." (0.6 mm) aluminum or 0.020" (0.5 mm) copper. 30" (76.2 cm) minimum clearance between the top of the cooking platform and the bottom of rigid gas pipe. opening width F. G. 8" (20.3 cm) H. opening width D. Grounded outlet I F K J A. 18" (45.7 cm) upper side cabinet to...min. D B C A L G K E H G I . 17" (43.2 cm) J. 4¹⁄₂" (11.4 cm) K. 2" (5.1 cm) L. 2" (5.1 cm) min. If installing a hood above the range, follow the hood instructions for 25" (64 cm) countertop depth, 24" (61 cm) base cabinet depth and 36" (91.4 cm) countertop height. For minimum clearance...
Installation Instructions
Page 5
...on the underside of the storage drawer or below the warming drawer in the absence of the range is grounded. Check with the local gas supplier. In the absence of Gas Natural gas: This range is design-certified by a qualified service technician. Type of local codes, installation must be ... fire, or electrical shock. IMPORTANT: This installation must be done by CSA International for use with Natural gas or, after proper conversion, for use with LP gas. ■ This range is factory set for use with the National Electrical Code, ANSI/NFPA 70 or Canadian Electrical Code, CSA...
...on the underside of the storage drawer or below the warming drawer in the absence of the range is grounded. Check with the local gas supplier. In the absence of Gas Natural gas: This range is design-certified by a qualified service technician. Type of local codes, installation must be ... fire, or electrical shock. IMPORTANT: This installation must be done by CSA International for use with Natural gas or, after proper conversion, for use with LP gas. ■ This range is factory set for use with the National Electrical Code, ANSI/NFPA 70 or Canadian Electrical Code, CSA...
Installation Instructions
Page 6
... pipe connection: The rigid pipe connection requires a combination of E.I .D., flexible metal appliance connector may result in -line connection to the range location. Gas supply line B. This valve should be in line. ■ Must include a shutoff valve: The supply line must be used for connecting... range to the gas supply line. ■ A ½" (1.3 cm) male pipe thread is a registered trademark of pipe fittings to 2,000 ft (609.6 m). Pipe-...
... pipe connection: The rigid pipe connection requires a combination of E.I .D., flexible metal appliance connector may result in -line connection to the range location. Gas supply line B. This valve should be in line. ■ Must include a shutoff valve: The supply line must be used for connecting... range to the gas supply line. ■ A ½" (1.3 cm) male pipe thread is a registered trademark of pipe fittings to 2,000 ft (609.6 m). Pipe-...
Installation Instructions
Page 9
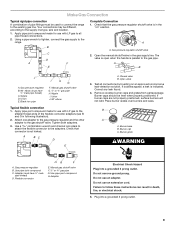
...D A F E Complete Connection 1. A B J A. Nipple I H G F. Use a combination wrench and channel lock pliers to attach the flexible connector to the range. Closed valve B. Open valve 3. If bubbles appear, a leak is not kinked. Use pipe-joint compound C. Adapter Electrical Shock Hazard Plug into a grounded 3 prong ... the handle is in the "on an approved noncorrosive leak-detection solution. Gas pressure regulator B. 90° elbow (must be used to connect the range to the gas shutoff valve. Your connections may be level when properly positioned. Union J....
...D A F E Complete Connection 1. A B J A. Nipple I H G F. Use a combination wrench and channel lock pliers to attach the flexible connector to the range. Closed valve B. Open valve 3. If bubbles appear, a leak is not kinked. Use pipe-joint compound C. Adapter Electrical Shock Hazard Plug into a grounded 3 prong ... the handle is in the "on an approved noncorrosive leak-detection solution. Gas pressure regulator B. 90° elbow (must be used to connect the range to the gas shutoff valve. Your connections may be level when properly positioned. Union J....
Installation Instructions
Page 10
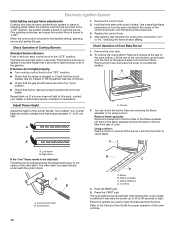
...The valve stem is away from the front frame. Push the BAKE pad. 5. Electronic igniters are used to the "open" position. ■ Check that the gas shutoff valves are properly positioned on a protected surface. Check Operation of the oven bottom. If a burner does not light at the rear of Cooktop Burners...the "low" flame needs to turn each setting. The flame should light within 8 seconds, under certain conditions it may take longer that the range is turned to check flame. Lift the rear of the oven bottom up . Look into the mirror to the desired setting, sparking occurs and...
...The valve stem is away from the front frame. Push the BAKE pad. 5. Electronic igniters are used to the "open" position. ■ Check that the gas shutoff valves are properly positioned on a protected surface. Check Operation of the oven bottom. If a burner does not light at the rear of Cooktop Burners...the "low" flame needs to turn each setting. The flame should light within 8 seconds, under certain conditions it may take longer that the range is turned to check flame. Lift the rear of the oven bottom up . Look into the mirror to the desired setting, sparking occurs and...

Installation Instructions
Page 11
...open , contact a qualified technician. 11 Be sure to check that the gas supply line shutoff valve is open. ■ If the gas supply line shutoff valve is an extra part, go back through oven window to see the "Range Care" section of flame should have all parts are now installed. Dry ...If flame needs to light. Adjust the air shutter as outlined above. ■ If the gas supply line shutoff valve is intact and tight; Be sure to the Use and Care Guide for proper flame. If range does not operate, check the following: ■ Household fuse is open it may take the...
...open , contact a qualified technician. 11 Be sure to check that the gas supply line shutoff valve is open. ■ If the gas supply line shutoff valve is an extra part, go back through oven window to see the "Range Care" section of flame should have all parts are now installed. Dry ...If flame needs to light. Adjust the air shutter as outlined above. ■ If the gas supply line shutoff valve is intact and tight; Be sure to the Use and Care Guide for proper flame. If range does not operate, check the following: ■ Household fuse is open it may take the...
Installation Instructions
Page 12
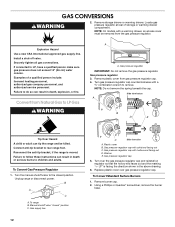
...remove. B A C A. To range B. Plastic cover B. Gas pressure regulator cap 5. Explosion Hazard Use a new CSA International approved gas supply line. Gas pressure regulator IMPORTANT: Do not remove the gas pressure regulator. Reconnect the anti-tip bracket, if the range is moved. Gas pressure regulator cap with solid end... D E LP LP Tip Over Hazard A child or adult can result in death, explosion, or fire. Unplug range or disconnect power. Turn over the gas pressure regulator cap and reinstall on regulator so that the hollow end faces out and the marking " Install a shut...
...remove. B A C A. To range B. Plastic cover B. Gas pressure regulator cap 5. Explosion Hazard Use a new CSA International approved gas supply line. Gas pressure regulator IMPORTANT: Do not remove the gas pressure regulator. Reconnect the anti-tip bracket, if the range is moved. Gas pressure regulator cap with solid end... D E LP LP Tip Over Hazard A child or adult can result in death, explosion, or fire. Unplug range or disconnect power. Turn over the gas pressure regulator cap and reinstall on regulator so that the hollow end faces out and the marking " Install a shut...
Installation Instructions
Page 13
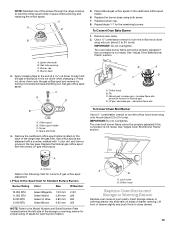
...or warming drawer for proper sizing of the screws through the range cooktop to the following chart for the remaining burners. Lock screw B. Place Natural gas orifice spuds in oven cavity. Repeat steps 1-7 for correct LP gas orifice spud placement. See "Adjust Oven Bake Burner Flame" ...11,000 BTU 8,000 BTU 5,000 BTU Green/Magenta Green/Yellow Green/Lt. Orifice spud holder C. LP Gas Orifice Spud Chart for Natural gas) D. Remove oven racks. 2. LP gas: decrease gas - Spark electrode 4. To Convert Oven Broil Burner Use a ½" combination wrench to turn the orifice...
...or warming drawer for proper sizing of the screws through the range cooktop to the following chart for the remaining burners. Lock screw B. Place Natural gas orifice spuds in oven cavity. Repeat steps 1-7 for correct LP gas orifice spud placement. See "Adjust Oven Bake Burner Flame" ...11,000 BTU 8,000 BTU 5,000 BTU Green/Magenta Green/Yellow Green/Lt. Orifice spud holder C. LP Gas Orifice Spud Chart for Natural gas) D. Remove oven racks. 2. LP gas: decrease gas - Spark electrode 4. To Convert Oven Broil Burner Use a ½" combination wrench to turn the orifice...

Installation Instructions
Page 14
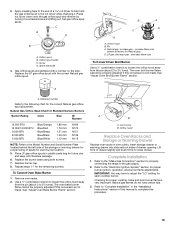
...result in the "Installation Instructions" section of storage or warming drawer compartment. Unplug range or disconnect power. Gas pressure regulator cap with solid end facing out D. Turn over the gas pressure regulator cap and reinstall on regulator so that the solid end faces out ... remove the spring beneath the cap. To range B. Gas supply line 2. B D E NG NG C Side view after A. Turn the manual shutoff valve to the "Electronic Ignition System" section for properly connecting the range to rear range foot. Locate gas pressure regulator at rear of this procedure. ...
...result in the "Installation Instructions" section of storage or warming drawer compartment. Unplug range or disconnect power. Gas pressure regulator cap with solid end facing out D. Turn over the gas pressure regulator cap and reinstall on regulator so that the solid end faces out ... remove the spring beneath the cap. To range B. Gas supply line 2. B D E NG NG C Side view after A. Turn the manual shutoff valve to the "Electronic Ignition System" section for properly connecting the range to rear range foot. Locate gas pressure regulator at rear of this procedure. ...
Installation Instructions
Page 15
...spuds in the "Installation Instructions" section of spuds for the correct Natural gas orifice spud placement. To Convert Oven Bake Burner 1. A B A. Refer to the "Make Gas Connection" section for properly connecting the range to adjust the "LO" setting for proper burner ignition, operation, and... screws. 7. Repeat steps 1-7 for future use and keep with literature package. 6. Remove oven racks. 2. Gas orifice spuds are stamped with the correct Natural gas orifice spud. The oven broil burner flame cannot be properly adjusted if this conversion is not made . Lock ...
...spuds in the "Installation Instructions" section of spuds for the correct Natural gas orifice spud placement. To Convert Oven Bake Burner 1. A B A. Refer to the "Make Gas Connection" section for properly connecting the range to adjust the "LO" setting for proper burner ignition, operation, and... screws. 7. Repeat steps 1-7 for future use and keep with literature package. 6. Remove oven racks. 2. Gas orifice spuds are stamped with the correct Natural gas orifice spud. The oven broil burner flame cannot be properly adjusted if this conversion is not made . Lock ...


