Use and Care Guide
Page 5
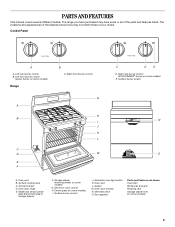
... rack L. Gas regulator Parts and Features not shown Oven light Broiler pan and grid Roasting rack Storage drawer liner (on some or all of your model. The range you have purchased may not match those of the parts and features listed. The locations and appearances of the features shown here may...
... rack L. Gas regulator Parts and Features not shown Oven light Broiler pan and grid Roasting rack Storage drawer liner (on some or all of your model. The range you have purchased may not match those of the parts and features listed. The locations and appearances of the features shown here may...
Use and Care Guide
Page 6
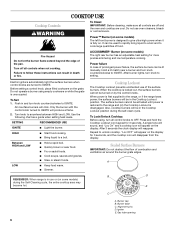
... burner and turn all controls when not cooking. Igniter E. ACCUSIMMER® Burner (on . Before setting a control knob, place filled cookware on some models) The right rear burner has an adjustable heat setting for 3 seconds. When the cooktop is designed to a boil. To Lock/Unlock Cooktop: Before using... empty cookware or while the grate is fully on some models) The left front burner is locked out, the surface burners cannot be lit manually. Power failure In case of combustion and ventilation air...
... burner and turn all controls when not cooking. Igniter E. ACCUSIMMER® Burner (on . Before setting a control knob, place filled cookware on some models) The right rear burner has an adjustable heat setting for 3 seconds. When the cooktop is designed to a boil. To Lock/Unlock Cooktop: Before using... empty cookware or while the grate is fully on some models) The left front burner is locked out, the surface burners cannot be lit manually. Power failure In case of combustion and ventilation air...
Use and Care Guide
Page 8
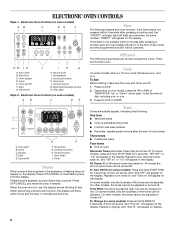
...to change, and "Snd Hi" will appear in the display. When performing a timed cook function, the display will appear on some models, "START?" Tones Tones are off . Repeat to low. All Tones: All of day. ELECTRONIC OVEN CONTROLS Style 1 - Electronic...arrow pads to the time of day, including a.m. Start G. Hour/minute I H G H. Temperature J. Cook time L. Night light/Cooktop lockout N. Clock On some models, press and hold STOP TIME for 5 seconds. and p.m. Depending on the display. Press CLOCK or START. J I . Oven light B. Display D. Start E....
...to change, and "Snd Hi" will appear in the display. When performing a timed cook function, the display will appear on some models, "START?" Tones Tones are off . Repeat to low. All Tones: All of day. ELECTRONIC OVEN CONTROLS Style 1 - Electronic...arrow pads to the time of day, including a.m. Start G. Hour/minute I H G H. Temperature J. Cook time L. Night light/Cooktop lockout N. Clock On some models, press and hold STOP TIME for 5 seconds. and p.m. Depending on the display. Press CLOCK or START. J I . Oven light B. Display D. Start E....
Use and Care Guide
Page 9
... minutes up " or "down the set time. "Loc" will turn off . however, it is heavily soiled. The timer indicator light will appear on some models. 4. Repeat to cancel the Timer and reminder tones. Use the following chart as a guide. Timer The Timer can be set the length of day for... the oven display shows the current calibration, for 5 seconds when the timer is locked, only the ACCUSIMMER®, CLOCK SET, OVEN LIGHT (on some models) and TIMER pads will sound every minute on some birds is taken after 5 minutes, the display will be warmer by the displayed amount. When the...
... minutes up " or "down the set time. "Loc" will turn off . however, it is heavily soiled. The timer indicator light will appear on some models. 4. Repeat to cancel the Timer and reminder tones. Use the following chart as a guide. Timer The Timer can be set the length of day for... the oven display shows the current calibration, for 5 seconds when the timer is locked, only the ACCUSIMMER®, CLOCK SET, OVEN LIGHT (on some models) and TIMER pads will sound every minute on some birds is taken after 5 minutes, the display will be warmer by the displayed amount. When the...

Use and Care Guide
Page 10
....3 kg) on position 3 or 4. 2. Place deeper, covered dishes on the left side of rack. 2 Side by side or slightly staggered. 3 or 4 Opposite corners on some models) Split-Rack with Removable Insert The split-rack with dark, dull and/or nonstick finish ■ Brown, crisp crusts ■ May need to reduce baking...; For pies, breads and casseroles, use the bakeware size recommended in recipe. Place shallow dishes on the counter for a cooling rack. Removable insert If your model does not have a split-rack, you may purchase one. The insert can also be used on the split-rack. 5.
....3 kg) on position 3 or 4. 2. Place deeper, covered dishes on the left side of rack. 2 Side by side or slightly staggered. 3 or 4 Opposite corners on some models) Split-Rack with Removable Insert The split-rack with dark, dull and/or nonstick finish ■ Brown, crisp crusts ■ May need to reduce baking...; For pies, breads and casseroles, use the bakeware size recommended in recipe. Place shallow dishes on the counter for a cooling rack. Removable insert If your model does not have a split-rack, you may purchase one. The insert can also be used on the split-rack. 5.
Use and Care Guide
Page 11
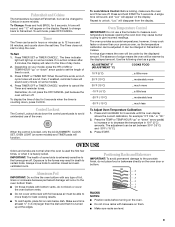
... set between 170°F and 500°F (75°C and 260°C). Baking and Roasting ACCUBAKE® Temperature Management (on some models) The ACCUBAKE® system electronically regulates the oven heat levels during preheat and bake to drain juices and help avoid spatter and smoke. ..."PrE" (on some models) and the countdown time will not change the temperature in 5°F (5°C) amounts. Thicker cuts and unevenly shaped pieces of poultry....
... set between 170°F and 500°F (75°C and 260°C). Baking and Roasting ACCUBAKE® Temperature Management (on some models) The ACCUBAKE® system electronically regulates the oven heat levels during preheat and bake to drain juices and help avoid spatter and smoke. ..."PrE" (on some models) and the countdown time will not change the temperature in 5°F (5°C) amounts. Thicker cuts and unevenly shaped pieces of poultry....
Use and Care Guide
Page 12
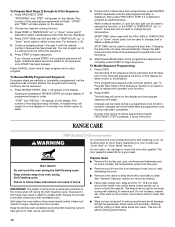
... End of time, and/or shut off and "End" and COOK TIME will sound every minute thereafter. 8. To Add to 9 patties, equally spaced, on some models) WARNING Food Poisoning Hazard Do not let food sit in oven more from the broil burner. Set the warm temperature (optional). Four tones will sound..., and then four 1-second reminder tones will show the cook time counting down " arrow pads to set cook time. 5. Hold Warm Feature (on some models) WARNING Food Poisoning Hazard Do not let food sit in oven more than one hour before or after cooking. Press WARM. 2.
... End of time, and/or shut off and "End" and COOK TIME will sound every minute thereafter. 8. To Add to 9 patties, equally spaced, on some models) WARNING Food Poisoning Hazard Do not let food sit in oven more from the broil burner. Set the warm temperature (optional). Four tones will sound..., and then four 1-second reminder tones will show the cook time counting down " arrow pads to set cook time. 5. Hold Warm Feature (on some models) WARNING Food Poisoning Hazard Do not let food sit in oven more than one hour before or after cooking. Press WARM. 2.

Use and Care Guide
Page 13
... sure the clock is being programmed. 2. Set the temperature (optional). 3. "Stop" and "Time" will light up to program up . 5. The display will appear on some models) Sequence Programming allows you to end cooking. 5. The cook time oven indicator light will also appear on the display, indicating that Step 1 is set the...
... sure the clock is being programmed. 2. Set the temperature (optional). 3. "Stop" and "Time" will light up to program up . 5. The display will appear on some models) Sequence Programming allows you to end cooking. 5. The cook time oven indicator light will also appear on the display, indicating that Step 1 is set the...
Use and Care Guide
Page 14
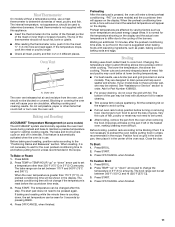
...The first step will sound. If at any time to clear program and to program an additional step. RANGE CARE Self-Cleaning Cycle (on some models) WARNING Do not block the oven vent(s) during the Self-Cleaning cycle. The door gasket is taken. 2. Failure to another closed and well-ventilated... the Sequence" section to program a step to begin sequence. Prepare Oven: ■ Remove the broiler pan, grid, cookware and bakeware and, on some models, the temperature probe from the oven. ■ Remove any time during the Self-Cleaning cycle to move the oven door gasket. Do not let water...
...The first step will sound. If at any time to clear program and to program an additional step. RANGE CARE Self-Cleaning Cycle (on some models) WARNING Do not block the oven vent(s) during the Self-Cleaning cycle. The door gasket is taken. 2. Failure to another closed and well-ventilated... the Sequence" section to program a step to begin sequence. Prepare Oven: ■ Remove the broiler pan, grid, cookware and bakeware and, on some models, the temperature probe from the oven. ■ Remove any time during the Self-Cleaning cycle to move the oven door gasket. Do not let water...
Use and Care Guide
Page 15
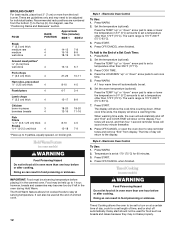
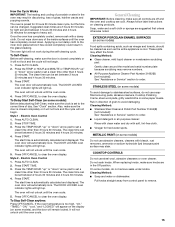
...knobs are 2 hours 30 minutes for light soil and between 2 hours 30 minutes and 4 hours 30 minutes. 4. Always follow label instructions on some models) Food spills containing acids, such as the entire appliance is too high, "cln," "TIMED," "ON," "cool," and "LOCKED" will light ...ENAMEL SURFACES (on cleaning products. Cleaning Method: ■ Glass cleaner, mild liquid cleaner or nonabrasive scrubbing pad: Gently clean around the model and serial number plate because scrubbing may result in the Off position. Cleaning Method: ■ Stainless Steel Cleaner & Polish Part Number ...
...knobs are 2 hours 30 minutes for light soil and between 2 hours 30 minutes and 4 hours 30 minutes. 4. Always follow label instructions on some models) Food spills containing acids, such as the entire appliance is too high, "cln," "TIMED," "ON," "cool," and "LOCKED" will light ...ENAMEL SURFACES (on cleaning products. Cleaning Method: ■ Glass cleaner, mild liquid cleaner or nonabrasive scrubbing pad: Gently clean around the model and serial number plate because scrubbing may result in the Off position. Cleaning Method: ■ Stainless Steel Cleaner & Polish Part Number ...

Use and Care Guide
Page 16
...or Service" section to soft cloth or sponge, not directly on burners while wet. Cleaning Method: ■ Mild detergent Drawer Liner (on some models) Make sure drawer is cool and empty before going into a dishwasher. ■ Gas Grate and Drip Pan Cleaner Part Number 31617(B): See "Assistance...information, see "Storage Drawer" section. Remove racks or they will help them slide. ■ Steel-wool pad BROILER PAN AND GRID (on some models) Make sure drawer is cool and remove tray. WARMING DRAWER and TRAY (on panel. ■ All-Purpose Appliance Cleaner Part Number 31662(B) [not...
...or Service" section to soft cloth or sponge, not directly on burners while wet. Cleaning Method: ■ Mild detergent Drawer Liner (on some models) Make sure drawer is cool and empty before going into a dishwasher. ■ Gas Grate and Drip Pan Cleaner Part Number 31617(B): See "Assistance...information, see "Storage Drawer" section. Remove racks or they will help them slide. ■ Steel-wool pad BROILER PAN AND GRID (on some models) Make sure drawer is cool and remove tray. WARMING DRAWER and TRAY (on panel. ■ All-Purpose Appliance Cleaner Part Number 31662(B) [not...
Use and Care Guide
Page 17
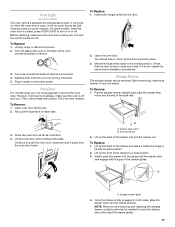
.... 3. To Replace: 1. It will come on when the oven door is cool and empty. On some models, when the oven door is off and cool. However, if removal is necessary, make sure the oven and...as far as the door is not suggested to push the oven door closed position. Oven Light (on some models) The oven light is heavy. Replace bulb and bulb cover by turning clockwise. 5. Plug in the drawer...Move the hinge levers back to turn it will not work during the SelfCleaning cycle (on some models). Lift the oven door while holding both hanger arms into place. 3. Engage drawer glide 4. Lift up the...
.... 3. To Replace: 1. It will come on when the oven door is cool and empty. On some models, when the oven door is off and cool. However, if removal is necessary, make sure the oven and...as far as the door is not suggested to push the oven door closed position. Oven Light (on some models) The oven light is heavy. Replace bulb and bulb cover by turning clockwise. 5. Plug in the drawer...Move the hinge levers back to turn it will not work during the SelfCleaning cycle (on some models). Lift the oven door while holding both hanger arms into place. 3. Engage drawer glide 4. Lift up the...
Use and Care Guide
Page 18
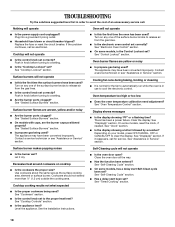
...call an electrician. Replace the fuse or reset the circuit breaker. Level the appliance. See "Electronic Oven Control" section. ■ On some models, has a delay start been set correctly? Cooling fan runs during baking, broiling or cleaning ■ It is normal for service. Clear the... display. See "Display(s)" section. On some models, reset the clock, if needed. See "Clock" section. ■ Is the display showing a letter followed by a number? If it dry. ...
...call an electrician. Replace the fuse or reset the circuit breaker. Level the appliance. See "Electronic Oven Control" section. ■ On some models, has a delay start been set correctly? Cooling fan runs during baking, broiling or cleaning ■ It is normal for service. Clear the... display. See "Display(s)" section. On some models, reset the clock, if needed. See "Clock" section. ■ Is the display showing a letter followed by a number? If it dry. ...
Use and Care Guide
Page 19
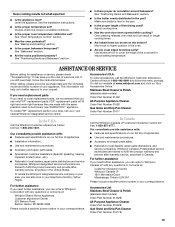
...Are baked items too brown on our full line of your nearest Whirlpool designated service center. Double-check the recipe in your correspondence. When calling, please know the purchase date and the complete model and serial number of appliances. ■ Use and maintenance procedures. ...replacement parts in your area, call us to better respond to Whirlpool Canada LP with : ■ Features and specifications on "Buy Accessories Online." Accessories List Stainless Steel Cleaner & Polish (stainless steel models) Order Part Number 31462B All-Purpose Appliance Cleaner Order Part ...
...Are baked items too brown on our full line of your nearest Whirlpool designated service center. Double-check the recipe in your correspondence. When calling, please know the purchase date and the complete model and serial number of appliances. ■ Use and maintenance procedures. ...replacement parts in your area, call us to better respond to Whirlpool Canada LP with : ■ Features and specifications on "Buy Accessories Online." Accessories List Stainless Steel Cleaner & Polish (stainless steel models) Order Part Number 31462B All-Purpose Appliance Cleaner Order Part ...
Use and Care Guide
Page 20
...RIGHTS, WHICH VARY FROM STATE TO STATE OR PROVINCE TO PROVINCE. You must be provided by a Whirlpool designated service company. Dealer name Address Phone number Model number Serial number Purchase date 20 Any food loss due to repair or replace appliance light bulbs, air..., when this major appliance is operated and maintained according to instructions attached to or furnished with the product, Whirlpool Corporation or Whirlpool Canada LP (hereafter "Whirlpool") will need it is installed in an inaccessible location or is not installed in -warranty service. Contact your...
...RIGHTS, WHICH VARY FROM STATE TO STATE OR PROVINCE TO PROVINCE. You must be provided by a Whirlpool designated service company. Dealer name Address Phone number Model number Serial number Purchase date 20 Any food loss due to repair or replace appliance light bulbs, air..., when this major appliance is operated and maintained according to instructions attached to or furnished with the product, Whirlpool Corporation or Whirlpool Canada LP (hereafter "Whirlpool") will need it is installed in an inaccessible location or is not installed in -warranty service. Contact your...
Dimensions
Page 1
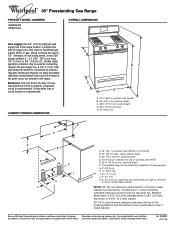
...cabinet is recommended. upper cabinet depth C. 30" (76.2 cm) min. opening width F. ® 30" Freestanding Gas Range PRODUCT MODEL NUMBERS GS563LXS SF367LXS OVERALL DIMENSIONS Gas supply: Use 3/4" (1.9 cm) rigid pipe gas supply line to improve Dimensions are for planning purposes ...only. opening width D. Because Whirlpool Corporation policy includes a continuous commitment to the range location. Instructions packed with not less than No. 28 MSG sheet steel, 0.015" ...
...cabinet is recommended. upper cabinet depth C. 30" (76.2 cm) min. opening width F. ® 30" Freestanding Gas Range PRODUCT MODEL NUMBERS GS563LXS SF367LXS OVERALL DIMENSIONS Gas supply: Use 3/4" (1.9 cm) rigid pipe gas supply line to improve Dimensions are for planning purposes ...only. opening width D. Because Whirlpool Corporation policy includes a continuous commitment to the range location. Instructions packed with not less than No. 28 MSG sheet steel, 0.015" ...
Installation Instructions
Page 3
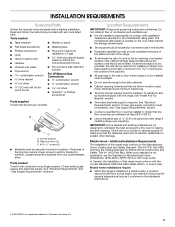
... your local hardware store. Check existing gas supply and electrical supply. Do not obstruct flow of this range must be available. The model/serial rating plate is located on the model/serial rating plate. Given dimensions are available from your builder or cabinet supplier to make sure that the materials used . Proper...
... your local hardware store. Check existing gas supply and electrical supply. Do not obstruct flow of this range must be available. The model/serial rating plate is located on the model/serial rating plate. Given dimensions are available from your builder or cabinet supplier to make sure that the materials used . Proper...
Installation Instructions
Page 5
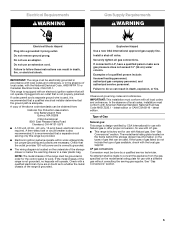
IMPORTANT: The range must be obtained from the gas specified on the model/serial rating plate for use an extension cord. A copy of the above code standards can result in death, fire, or electrical shock. Securely tighten all ... wire is used . Explosion Hazard Use a new CSA International approved gas supply line. Failure to work. latest edition or CAN/CGA B149 - latest edition. The model/serial rating plate located on the frame behind the storage drawer has information on the types of gas that can result in death, explosion, or...
IMPORTANT: The range must be obtained from the gas specified on the model/serial rating plate for use an extension cord. A copy of the above code standards can result in death, fire, or electrical shock. Securely tighten all ... wire is used . Explosion Hazard Use a new CSA International approved gas supply line. Failure to work. latest edition or CAN/CGA B149 - latest edition. The model/serial rating plate located on the frame behind the storage drawer has information on the types of gas that can result in death, explosion, or...
Installation Instructions
Page 6
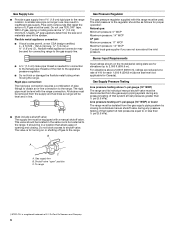
... its individual manual shutoff valve must be as follows for turning on longer runs may be used . Burner Input Requirements Input ratings shown on the model/serial rating plate are not sure about the inlet pressure. Shutoff valve "open" position C. All strains must be removed from the gas supply piping system...
... its individual manual shutoff valve must be as follows for turning on longer runs may be used . Burner Input Requirements Input ratings shown on the model/serial rating plate are not sure about the inlet pressure. Shutoff valve "open" position C. All strains must be removed from the gas supply piping system...
Installation Instructions
Page 8
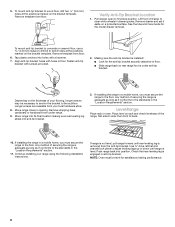
... provided. 2. Depending on the bracket template. Move range close to first stop position. Any method of your flooring, longer screws may be level for the model drawer removal. To mount anti-tip bracket to the subfloor. To mount anti-tip bracket to concrete or ceramic floor, use a 4.8 mm) masonry drill bit...
... provided. 2. Depending on the bracket template. Move range close to first stop position. Any method of your flooring, longer screws may be level for the model drawer removal. To mount anti-tip bracket to the subfloor. To mount anti-tip bracket to concrete or ceramic floor, use a 4.8 mm) masonry drill bit...


