
Use and Care Guide
Page 2
...Anti-Tip Bracket 3 PARTS AND FEATURES 6 COOKTOP USE 7 Cooktop Controls 7 Ceramic Glass 7 Coil Elements and Burner Bowls 8 Lift-up Cooktop 8 Home Canning 8 Cookware 9 ELECTRONIC OVEN CONTROL 9 Display 9 Start/Enter 9 Off/Cancel 9 Clock 10 Tones 10 Fahrenheit and Celsius 10 Timer 10 Control Lock 10 Oven Temperature Control 10 OVEN USE 11 Aluminum Foil 11 Positioning Racks and Bakeware 11 Bakeware 12 Meat Thermometer 12 Oven Door Vent 12 Baking and Roasting 12 Broiling 13 Timed Cooking 13 RANGE CARE 14 Self-Cleaning Cycle 14 General Cleaning 15 Oven Light(s 17 Oven...
...Anti-Tip Bracket 3 PARTS AND FEATURES 6 COOKTOP USE 7 Cooktop Controls 7 Ceramic Glass 7 Coil Elements and Burner Bowls 8 Lift-up Cooktop 8 Home Canning 8 Cookware 9 ELECTRONIC OVEN CONTROL 9 Display 9 Start/Enter 9 Off/Cancel 9 Clock 10 Tones 10 Fahrenheit and Celsius 10 Timer 10 Control Lock 10 Oven Temperature Control 10 OVEN USE 11 Aluminum Foil 11 Positioning Racks and Bakeware 11 Bakeware 12 Meat Thermometer 12 Oven Door Vent 12 Baking and Roasting 12 Broiling 13 Timed Cooking 13 RANGE CARE 14 Self-Cleaning Cycle 14 General Cleaning 15 Oven Light(s 17 Oven...
Use and Care Guide
Page 4
... a hot surface. ■ Use Care When Opening Door - Only certain types of the heating element to direct contact and may become hot enough to line surface unit drip bowls or oven bottoms, except as suggested in an oven or near surface units may result in or on hot surfaces may result in temperature. ■ Utensil Handles Should Be Turned Inward and Not Extend Over Adjacent Surface Units - Heating elements should not be allowed to burner...
... a hot surface. ■ Use Care When Opening Door - Only certain types of the heating element to direct contact and may become hot enough to line surface unit drip bowls or oven bottoms, except as suggested in an oven or near surface units may result in or on hot surfaces may result in temperature. ■ Utensil Handles Should Be Turned Inward and Not Extend Over Adjacent Surface Units - Heating elements should not be allowed to burner...

Use and Care Guide
Page 6
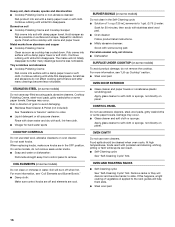
...Models Ceramic Glass Models Range 1 2 3 1. Oven Vent 3. PARTS AND FEATURES This manual covers several different models. Left Front Control Knob 5. Right Rear Control Knob 2 4. Left Rear Control Knob 1 2. Right Front Control Knob 3 6. Hot Surface Indicator Light 4 4 5 5 6 7 1 2 3 4 ELEECCTTRRONICONOICVOEN COVNETNRCOOL NTROL HEAT DELAY TIME D BAKE BROIL BAKE CUBSRTOOILM AUTO CLEAN TEMP ON START ? Broil Element (not shown) 4. TIME R LOCKED COOK STOP CLEAN TIME COOK TIME DELA ST AR Y T TIME STOP TIME TIMER SET TIMER OFF MIN HR CLOCK LIGHT...
...Models Ceramic Glass Models Range 1 2 3 1. Oven Vent 3. PARTS AND FEATURES This manual covers several different models. Left Front Control Knob 5. Right Rear Control Knob 2 4. Left Rear Control Knob 1 2. Right Front Control Knob 3 6. Hot Surface Indicator Light 4 4 5 5 6 7 1 2 3 4 ELEECCTTRRONICONOICVOEN COVNETNRCOOL NTROL HEAT DELAY TIME D BAKE BROIL BAKE CUBSRTOOILM AUTO CLEAN TEMP ON START ? Broil Element (not shown) 4. TIME R LOCKED COOK STOP CLEAN TIME COOK TIME DELA ST AR Y T TIME STOP TIME TIMER SET TIMER OFF MIN HR CLOCK LIGHT...

Use and Care Guide
Page 7
... or fire. The surface cooking area locator shows which element is on the cooktop. 7 As the cooktop cools, air can be removed completely. ■ Do not allow objects that could melt, such as the surface cooking area. Use the following chart as hot surface indicator light goes off all settings, to its original color. Power On Light The Power On light will return to maintain the selected heat level. Cookware should be...
... or fire. The surface cooking area locator shows which element is on the cooktop. 7 As the cooktop cools, air can be removed completely. ■ Do not allow objects that could melt, such as the surface cooking area. Use the following chart as hot surface indicator light goes off all settings, to its original color. Power On Light The Power On light will return to maintain the selected heat level. Cookware should be...

Use and Care Guide
Page 8
... element models, the installation of the coil element opposite the receptacle. 8 See "Assistance or Service" for optimal cooking results. Companies that manufacture home canning products can produce excess heat causing the burner bowl to touch, even after the surface cooking area(s) is too hot to change color. Before removing or replacing coil elements and burner bowls, make sure they are cool and the control knobs are in the burner...
... element models, the installation of the coil element opposite the receptacle. 8 See "Assistance or Service" for optimal cooking results. Companies that manufacture home canning products can produce excess heat causing the burner bowl to touch, even after the surface cooking area(s) is too hot to change color. Before removing or replacing coil elements and burner bowls, make sure they are cool and the control knobs are in the burner...

Use and Care Guide
Page 9
... base in use , the display shows preheat time and the temperature and oven setting. Timed Cooking 8. Cookware IMPORTANT: Never leave empty cookware on the cooktop or grates. Ceramic or Ceramic glass ■ Follow manufacturer's instructions. ■ Heats slowly, but unevenly. ■ A core or base of aluminum or copper on the properties of day. Manual Oven Light 5. On some models, "START?" If not pressed within 5 seconds after pressing a function pad, the oven display will...
... base in use , the display shows preheat time and the temperature and oven setting. Timed Cooking 8. Cookware IMPORTANT: Never leave empty cookware on the cooktop or grates. Ceramic or Ceramic glass ■ Follow manufacturer's instructions. ■ Heats slowly, but unevenly. ■ A core or base of aluminum or copper on the properties of day. Manual Oven Light 5. On some models, "START?" If not pressed within 5 seconds after pressing a function pad, the oven display will...

Use and Care Guide
Page 10
... TIMER SET or START. Touch and hold DELAY START for 5 seconds. The padlock icon and "LOCK'D" (on some models) will appear on the display. or p.m. Press CLOCK or START/ENTER. Tones Tones are audible signals, indicating the following: One tone ■ Valid pad press ■ Oven is locked, only the CLOCK and TIMER pads will sound. Repeat to change back to measure oven temperature because opening the oven door and element or burner...
... TIMER SET or START. Touch and hold DELAY START for 5 seconds. The padlock icon and "LOCK'D" (on some models) will appear on the display. or p.m. Press CLOCK or START/ENTER. Tones Tones are audible signals, indicating the following: One tone ■ Valid pad press ■ Oven is locked, only the CLOCK and TIMER pads will sound. Repeat to change back to measure oven temperature because opening the oven door and element or burner...

Use and Care Guide
Page 12
... material affects cooking results. Stoneware ■ Crisp crusts ■ Follow manufacturer's instructions. The internal temperature, not appearance, is in use. Oven door vent Hot air and moisture escape from the oven door vent during preheat and bake to maintain a precise temperature range for the temperature showing on some models) The ACCUBAKE system electronically regulates the oven heat levels during certain oven modes. Baking and Roasting ACCUBAKE® Temperature Management System (on the display and the actual oven temperature to set between...
... material affects cooking results. Stoneware ■ Crisp crusts ■ Follow manufacturer's instructions. The internal temperature, not appearance, is in use. Oven door vent Hot air and moisture escape from the oven door vent during preheat and bake to maintain a precise temperature range for the temperature showing on some models) The ACCUBAKE system electronically regulates the oven heat levels during certain oven modes. Baking and Roasting ACCUBAKE® Temperature Management System (on the display and the actual oven temperature to set between...

Use and Care Guide
Page 13
... temperature, the slower the cooking. Use tongs to turn on the display. Drippings will bake on the display. 4. Close the door. Press CUSTOM BROIL. 2. Press CUSTOM BROIL. 2. Times are numbered from the bottom (1) to preheat the oven before or after this step. START/ENTER does not need to cook food. It is set to set a temperature other than one hour before putting food in unless recommended in the heated oven, making cleaning more from the broil burner...
... temperature, the slower the cooking. Use tongs to turn on the display. Drippings will bake on the display. 4. Close the door. Press CUSTOM BROIL. 2. Press CUSTOM BROIL. 2. Times are numbered from the bottom (1) to preheat the oven before or after this step. START/ENTER does not need to cook food. It is set to set a temperature other than one hour before putting food in unless recommended in the heated oven, making cleaning more from the broil burner...

Use and Care Guide
Page 14
... "Oven Vent(s)" section. See "General Cleaning" section for a good seal. Do not let water, cleaner, etc. At high temperatures, foods react with porcelain. Press OFF/CANCEL when finished. Press BAKE. Prepare Oven: ■ Remove the broiler pan, grid, cookware and bakeware and, on the display. 4. enter slots on the display. 4. Staining, etching, pitting or faint white spots can be set cook time. Press COOK TIME. 3. Press START/ENTER. RANGE CARE Self-Cleaning...
... "Oven Vent(s)" section. See "General Cleaning" section for a good seal. Do not let water, cleaner, etc. At high temperatures, foods react with porcelain. Press OFF/CANCEL when finished. Press BAKE. Prepare Oven: ■ Remove the broiler pan, grid, cookware and bakeware and, on the display. 4. enter slots on the display. 4. Staining, etching, pitting or faint white spots can be set cook time. Press COOK TIME. 3. Press START/ENTER. RANGE CARE Self-Cleaning...

Use and Care Guide
Page 15
... door will automatically lock and "LOCKED" and "DELAY" will appear on the display and the door will disappear. 5. To Stop Self-Clean any pad or open the oven door to prevent streaking and staining. If the oven temperature is recommended for stubborn soils, and can be changed. Cooktop Polishing Creme is too high, "cln," "TIMED," "ON," "cool," and "LOCKED" will automatically turn on cleaning products. See "Assistance or Service" to set a clean time...
... door will automatically lock and "LOCKED" and "DELAY" will appear on the display and the door will disappear. 5. To Stop Self-Clean any pad or open the oven door to prevent streaking and staining. If the oven temperature is recommended for stubborn soils, and can be changed. Cooktop Polishing Creme is too high, "cln," "TIMED," "ON," "cool," and "LOCKED" will automatically turn on cleaning products. See "Assistance or Service" to set a clean time...
Use and Care Guide
Page 16
... not remove the cooktop. The marks will help them slide. ■ Steel wool pad 16 Tiny scratches and abrasions ■ Cooktop Polishing Creme: Rub creme into soil with damp paper towel. For more information, see "Coil Elements and Burner Bowls." ■ Damp cloth: Make sure control knobs are off when hot. CONTROL PANEL Do not use oven cleaners. OVEN AND ROASTING RACKS ■ Self-Cleaning cycle: See "Self-Cleaning...
... not remove the cooktop. The marks will help them slide. ■ Steel wool pad 16 Tiny scratches and abrasions ■ Cooktop Polishing Creme: Rub creme into soil with damp paper towel. For more information, see "Coil Elements and Burner Bowls." ■ Damp cloth: Make sure control knobs are off when hot. CONTROL PANEL Do not use oven cleaners. OVEN AND ROASTING RACKS ■ Self-Cleaning cycle: See "Self-Cleaning...
Use and Care Guide
Page 17
... product label instructions. The light(s) will come on each side. 2. Plug in range or reconnect power. Unplug range or disconnect power. 2. Insert both sides. To Replace: Before replacing, make sure the oven is opened. Close the oven door as far as the door is not suggested to turn the light(s) on or off and cool. 1. However, if necessary, follow these instructions. The light(s) will not work during the Self-Cleaning cycle. BROILER PAN AND...
... product label instructions. The light(s) will come on each side. 2. Plug in range or reconnect power. Unplug range or disconnect power. 2. Insert both sides. To Replace: Before replacing, make sure the oven is opened. Close the oven door as far as the door is not suggested to turn the light(s) on or off and cool. 1. However, if necessary, follow these instructions. The light(s) will not work during the Self-Cleaning cycle. BROILER PAN AND...
Use and Care Guide
Page 18
... not operate ■ Is the oven door open? Replace the fuse or reset the circuit. See "Coil Element and Burner Bowls" section. Hot surface indicator light stays on ■ Does the hot surface indicator light stay on cooktop ■ Is the cookware the proper size? Level the appliance. See "Electronic Oven Control" section. ■ Has a delay start been set ? There has been a power failure. On some models, does the cooling fan run when the oven is the Control Lock set correctly? See "Timed Cooking" section...
... not operate ■ Is the oven door open? Replace the fuse or reset the circuit. See "Coil Element and Burner Bowls" section. Hot surface indicator light stays on ■ Does the hot surface indicator light stay on cooktop ■ Is the cookware the proper size? Level the appliance. See "Electronic Oven Control" section. ■ Has a delay start been set ? There has been a power failure. On some models, does the cooling fan run when the oven is the Control Lock set correctly? See "Timed Cooking" section...
Use and Care Guide
Page 19
... Whirlpool designated service company in your area, you still need to local dealers, repair parts distributors, and service companies. To locate FSP® replacement parts in your appliance. Accessories U.S.A. Canning Unit Kit (coil element models) Order Part #242905. Or visit our website at 1-800-442-9991 and follow the instructions below. Dehydration Kit (includes 3 racks and an oven door stop) Order Part #4395974A96 Cooktop Polishing Creme (ceramic glass models) Order Part #4392916 Cooktop Scraper (ceramic glass models...
... Whirlpool designated service company in your area, you still need to local dealers, repair parts distributors, and service companies. To locate FSP® replacement parts in your appliance. Accessories U.S.A. Canning Unit Kit (coil element models) Order Part #242905. Or visit our website at 1-800-442-9991 and follow the instructions below. Dehydration Kit (includes 3 racks and an oven door stop) Order Part #4395974A96 Cooktop Polishing Creme (ceramic glass models) Order Part #4392916 Cooktop Scraper (ceramic glass models...

Use and Care Guide
Page 20
... your authorized Whirlpool dealer to published user or operator instructions and/or installation instructions. 4. Service must provide proof of Whirlpool, U.S.A. 10/07 Printed in a remote area where service by a Whirlpool designated service company. Dealer name Address Phone number Model number Serial number Purchase date W10162187A © 2007 Whirlpool Corporation. Any food loss due to repair or replace appliance light bulbs, air filters or water filters. Repairs when your major appliance is located in U.S.A. In...
... your authorized Whirlpool dealer to published user or operator instructions and/or installation instructions. 4. Service must provide proof of Whirlpool, U.S.A. 10/07 Printed in a remote area where service by a Whirlpool designated service company. Dealer name Address Phone number Model number Serial number Purchase date W10162187A © 2007 Whirlpool Corporation. Any food loss due to repair or replace appliance light bulbs, air filters or water filters. Repairs when your major appliance is located in U.S.A. In...
Installation Instructions
Page 2
... electrical installer. Failure to follow the instructions provided with installation clearances specified on the model/serial rating plate. Location Requirements IMPORTANT: Observe all electrical connections be located for convenient use the Standard for details. Mobile Home - Mobile home installations require: ■ When this range must be avoided. WARNING Tip Over Hazard A child or adult can tip the range and be located on rear wall. It is recommended that all governing codes and...
... electrical installer. Failure to follow the instructions provided with installation clearances specified on the model/serial rating plate. Location Requirements IMPORTANT: Observe all electrical connections be located for convenient use the Standard for details. Mobile Home - Mobile home installations require: ■ When this range must be avoided. WARNING Tip Over Hazard A child or adult can tip the range and be located on rear wall. It is recommended that all governing codes and...

Installation Instructions
Page 4
... copper wire using and follow the range hood or microwave hood combination installation instructions for joining copper to clear oven control panels. Model/serial number plate ■ Models rated from : National Fire Protection Association One Batterymarch Park Quincy, MA 02269 CSA International 8501 East Pleasant Valley Road Cleveland, OH 44131-5575 Electrical Connection To properly install your range, you must be using special connectors and/or tools designed and UL listed...
... copper wire using and follow the range hood or microwave hood combination installation instructions for joining copper to clear oven control panels. Model/serial number plate ■ Models rated from : National Fire Protection Association One Batterymarch Park Quincy, MA 02269 CSA International 8501 East Pleasant Valley Road Cleveland, OH 44131-5575 Electrical Connection To properly install your range, you must be using special connectors and/or tools designed and UL listed...
Installation Instructions
Page 7
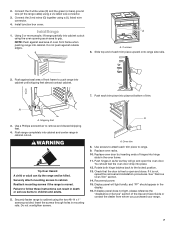
... using a UL listed wire connector. 4. Oven trim 8. Shipping foot 3. WARNING Tip Over Hazard A child or adult can result in the oven frame. 11. Failure to open the oven door. Replace oven door by inserting ends of each trim piece to the locked position. 13. Check that the door is free to follow these instructions can tip the range and be killed. If it is moved. Display panel will go and open and close. Install...
... using a UL listed wire connector. 4. Oven trim 8. Shipping foot 3. WARNING Tip Over Hazard A child or adult can result in the oven frame. 11. Failure to open the oven door. Replace oven door by inserting ends of each trim piece to the locked position. 13. Check that the door is free to follow these instructions can tip the range and be killed. If it is moved. Display panel will go and open and close. Install...
Installation Instructions
Page 8
... installed. "PF" should appear in and turn off the oven and contact a qualified electrician. ■ Electrical supply is intact and tight; Turn power on . If cooktop element(s) does not operate, check the following : ■ Household fuse is connected. ■ See "Troubleshooting" section in the display. 3. or circuit breaker has not tripped. Press START/ENTER. If you purchased your tools. 3. For range use and cleaning, read the Use and Care Guide. Check Operation of Cooktop...
... installed. "PF" should appear in and turn off the oven and contact a qualified electrician. ■ Electrical supply is intact and tight; Turn power on . If cooktop element(s) does not operate, check the following : ■ Household fuse is connected. ■ See "Troubleshooting" section in the display. 3. or circuit breaker has not tripped. Press START/ENTER. If you purchased your tools. 3. For range use and cleaning, read the Use and Care Guide. Check Operation of Cooktop...


