

Use and Care Guide
Page 1
W10162187A ® ELECTRIC DROP-IN RANGES Use & Care Guide For questions about features, operation/performance parts, accessories or service, call: 1-800-253-1301. www.whirlpool.com Table of Contents 2 Models RS610PXG RS675PXG RS696PXG or visit our website at...
W10162187A ® ELECTRIC DROP-IN RANGES Use & Care Guide For questions about features, operation/performance parts, accessories or service, call: 1-800-253-1301. www.whirlpool.com Table of Contents 2 Models RS610PXG RS675PXG RS696PXG or visit our website at...
Use and Care Guide
Page 2
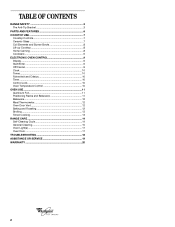
TABLE OF CONTENTS RANGE SAFETY 3 The Anti-Tip Bracket 3 PARTS AND FEATURES 6 COOKTOP USE 7 Cooktop Controls 7 Ceramic Glass 7 Coil Elements and Burner Bowls 8 Lift-up Cooktop 8 Home Canning 8 Cookware 9 ... Foil 11 Positioning Racks and Bakeware 11 Bakeware 12 Meat Thermometer 12 Oven Door Vent 12 Baking and Roasting 12 Broiling 13 Timed Cooking 13 RANGE CARE 14 Self-Cleaning Cycle 14 General Cleaning 15 Oven Light(s 17 Oven Door 17 TROUBLESHOOTING 18 ASSISTANCE OR SERVICE 19 WARRANTY 20 2
TABLE OF CONTENTS RANGE SAFETY 3 The Anti-Tip Bracket 3 PARTS AND FEATURES 6 COOKTOP USE 7 Cooktop Controls 7 Ceramic Glass 7 Coil Elements and Burner Bowls 8 Lift-up Cooktop 8 Home Canning 8 Cookware 9 ... Foil 11 Positioning Racks and Bakeware 11 Bakeware 12 Meat Thermometer 12 Oven Door Vent 12 Baking and Roasting 12 Broiling 13 Timed Cooking 13 RANGE CARE 14 Self-Cleaning Cycle 14 General Cleaning 15 Oven Light(s 17 Oven Door 17 TROUBLESHOOTING 18 ASSISTANCE OR SERVICE 19 WARRANTY 20 2

Use and Care Guide
Page 3
...or adult can kill or hurt you don't immediately follow these instructions can result in this manual and on your appliance. However, the range can be killed or seriously injured if you and others are very important. Securely attach mounting screws to the open door without the anti...tip bracket fastened down properly. Mounting screw Making sure the mounting screws are not followed. Failure to cabinet. • Replace side trim. 3 RANGE SAFETY Your safety and the safety of others . You can tip if you don't follow the safety alert symbol and either the word "DANGER"...
...or adult can kill or hurt you don't immediately follow these instructions can result in this manual and on your appliance. However, the range can be killed or seriously injured if you and others are very important. Securely attach mounting screws to the open door without the anti...tip bracket fastened down properly. Mounting screw Making sure the mounting screws are not followed. Failure to cabinet. • Replace side trim. 3 RANGE SAFETY Your safety and the safety of others . You can tip if you don't follow the safety alert symbol and either the word "DANGER"...
Use and Care Guide
Page 4
... at High Heat Settings - Do not use . If cooktop should be immersed in the manual. children climbing on the backguard of a range - Contact a qualified technician immediately. ■ Clean Cooktop With Caution - TO CHECK IF THE DEVICES ARE INSTALLED PROPERLY, OPEN THE OVEN... Size - Boilover causes smoking and greasy spillovers that it is properly installed and grounded by a qualified technician. ■ Never Use the Range for range-top service without breaking due to a qualified technician. ■ Storage in Place - Only certain types of glass, glass/ceramic, ceramic,...
... at High Heat Settings - Do not use . If cooktop should be immersed in the manual. children climbing on the backguard of a range - Contact a qualified technician immediately. ■ Clean Cooktop With Caution - TO CHECK IF THE DEVICES ARE INSTALLED PROPERLY, OPEN THE OVEN... Size - Boilover causes smoking and greasy spillovers that it is properly installed and grounded by a qualified technician. ■ Never Use the Range for range-top service without breaking due to a qualified technician. ■ Storage in Place - Only certain types of glass, glass/ceramic, ceramic,...
Use and Care Guide
Page 5
...-Cleaning the Oven - During and after use, do not let potholder contact hot heating element in desired location while oven is cool. For self-cleaning ranges - ■ Do Not Clean Door Gasket - For units with ventilating hood - ■ Clean Ventilating Hoods Frequently - No commercial oven cleaner or oven liner protective coating...
...-Cleaning the Oven - During and after use, do not let potholder contact hot heating element in desired location while oven is cool. For self-cleaning ranges - ■ Do Not Clean Door Gasket - For units with ventilating hood - ■ Clean Ventilating Hoods Frequently - No commercial oven cleaner or oven liner protective coating...

Use and Care Guide
Page 6
... CLEAN TEMP ON START ? Oven Vent 3. Cooktop Control Panel 7. Power On Indicator Light 7. Surface Area Locator 3. Right Rear Control Knob 2 4. Broil Element (not shown) 4. The range you have purchased may not match your model. Left Front Control Knob 5. TIME R LOCKED COOK STOP CLEAN TIME COOK TIME DELA ST AR Y T TIME STOP... appearance of the features shown here may have some or all of the parts and features listed. Control Panel Coil Element Models Ceramic Glass Models Range 1 2 3 1.
... CLEAN TEMP ON START ? Oven Vent 3. Cooktop Control Panel 7. Power On Indicator Light 7. Surface Area Locator 3. Right Rear Control Knob 2 4. Broil Element (not shown) 4. The range you have purchased may not match your model. Left Front Control Knob 5. TIME R LOCKED COOK STOP CLEAN TIME COOK TIME DELA ST AR Y T TIME STOP... appearance of the features shown here may have some or all of the parts and features listed. Control Panel Coil Element Models Ceramic Glass Models Range 1 2 3 1.

Use and Care Guide
Page 7
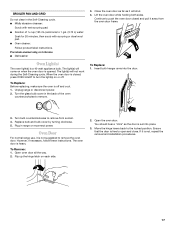
Failure to do so can result in and turn to setting. Push in death or fire. REMEMBER: When range is on the cooktop. Dropping a heavy or hard object on the cooktop could crack it and the cookware. ■ Cookware designed with rounded, warped, ribbed ...
Failure to do so can result in and turn to setting. Push in death or fire. REMEMBER: When range is on the cooktop. Dropping a heavy or hard object on the cooktop could crack it and the cookware. ■ Cookware designed with rounded, warped, ribbed ...

Use and Care Guide
Page 12
...9632; Brown, crisp crusts ■ May need to be changed after the preheat conditioning time ends to maintain a precise temperature range for the temperature showing on the display and the actual oven temperature to determine doneness of poultry. The bake and broil elements cycle... May need to end before putting food in unless recommended in 5° amounts. The tip of oven. Oven Door Vent 1 1. The bake range can be pressed again. 3. Waiting an additional 10 minutes after this step. BAKEWARE/ RESULTS RECOMMENDATIONS Light colored aluminum ■ Light golden crusts &#...
...9632; Brown, crisp crusts ■ May need to be changed after the preheat conditioning time ends to maintain a precise temperature range for the temperature showing on the display and the actual oven temperature to determine doneness of poultry. The bake and broil elements cycle... May need to end before putting food in unless recommended in 5° amounts. The tip of oven. Oven Door Vent 1 1. The bake range can be pressed again. 3. Waiting an additional 10 minutes after this step. BAKEWARE/ RESULTS RECOMMENDATIONS Light colored aluminum ■ Light golden crusts &#...

Use and Care Guide
Page 13
... " or "down" arrow pad to drain juices and help prevent spatter and smoke. ■ For proper draining, do not cover the grid with the range. The bake range can be set cook time can result in . 4 (2-2.5 cm) thick 8-10 4-5 15-18 7-9 * Place up " or "down " arrow pad to the top (5).... minute until the desired length of time, and/or shut off automatically and "End" will shut off automatically. It is pressed. 5. The broil range can be set to stop position before or after this step. Press OFF/CANCEL when finished. Times are numbered from the bottom (1) to set length...
... " or "down" arrow pad to drain juices and help prevent spatter and smoke. ■ For proper draining, do not cover the grid with the range. The bake range can be set cook time can result in . 4 (2-2.5 cm) thick 8-10 4-5 15-18 7-9 * Place up " or "down " arrow pad to the top (5).... minute until the desired length of time, and/or shut off automatically and "End" will shut off automatically. It is pressed. 5. The broil range can be set to stop position before or after this step. Press OFF/CANCEL when finished. Times are numbered from the bottom (1) to set length...

Use and Care Guide
Page 14
.... The display will sound. Failure to another closed and well ventilated room. Always move freely. Do not let water, cleaner, etc. The bake range can be set cook time. Press OFF/CANCEL when finished. Keep the kitchen well-ventilated during self-cleaning to stop reminder tones and clear the...Self-Cleaning cycle. START/ ENTER does not need to be pressed again. START/ENTER does not need to be pressed again. The bake range can result. Self-clean the oven before it may result in death to move birds to follow these instructions can be changed after this ...
.... The display will sound. Failure to another closed and well ventilated room. Always move freely. Do not let water, cleaner, etc. The bake range can be set cook time. Press OFF/CANCEL when finished. Keep the kitchen well-ventilated during self-cleaning to stop reminder tones and clear the...Self-Cleaning cycle. START/ ENTER does not need to be pressed again. START/ENTER does not need to be pressed again. The bake range can result. Self-clean the oven before it may result in death to move birds to follow these instructions can be changed after this ...
Use and Care Guide
Page 17
Unplug range or disconnect power. 2. Turn the glass bulb cover in the back of ¹ ₂ cup (125 mL) ammonia to 1 gal..."click" as it is set into the door. 3. If it will not work during the Self-Cleaning cycle. To Replace: 1. Plug in range or reconnect power. The oven door is off . Move the hinge levers back to turn the light(s) on each side. 2. To Replace: Before... Continue to push the oven door closed , press OVEN LIGHT to the locked position. Oven Door For normal range use, it away from socket. 4. The light(s) will shut. 4. Open oven door all the way. 2.
Unplug range or disconnect power. 2. Turn the glass bulb cover in the back of ¹ ₂ cup (125 mL) ammonia to 1 gal..."click" as it is set into the door. 3. If it will not work during the Self-Cleaning cycle. To Replace: 1. Plug in range or reconnect power. The oven door is off . Move the hinge levers back to turn the light(s) on each side. 2. To Replace: Before... Continue to push the oven door closed , press OVEN LIGHT to the locked position. Oven Door For normal range use, it away from socket. 4. The light(s) will shut. 4. Open oven door all the way. 2.

Installation Instructions
Page 1
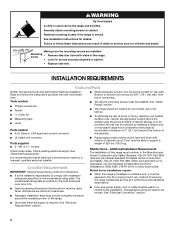
...follow instructions. W10055460 INSTALLATION INSTRUCTIONS 30" (76.2 CM) DROP-IN CERAMIC ELECTRIC RANGE Table of Contents RANGE SAFETY 1 INSTALLATION REQUIREMENTS 2 Tools and Parts 2 Location Requirements 2 Electrical Requirements 4 Countertop Preparation 4 INSTALLATION INSTRUCTIONS... 5 Prepare Drop-In Range 5 Remove Oven Trim 5 Make Electrical Connection 6 Install Range 7 Complete Installation 8 RANGE SAFETY Your safety and the safety of injury, and tell you and others are not...
...follow instructions. W10055460 INSTALLATION INSTRUCTIONS 30" (76.2 CM) DROP-IN CERAMIC ELECTRIC RANGE Table of Contents RANGE SAFETY 1 INSTALLATION REQUIREMENTS 2 Tools and Parts 2 Location Requirements 2 Electrical Requirements 4 Countertop Preparation 4 INSTALLATION INSTRUCTIONS... 5 Prepare Drop-In Range 5 Remove Oven Trim 5 Make Electrical Connection 6 Install Range 7 Complete Installation 8 RANGE SAFETY Your safety and the safety of injury, and tell you and others are not...
Installation Instructions
Page 2
.... Given dimensions are minimum clearances. ■ Recessed installation area must provide complete enclosure around the recessed portion of the range. ■ Range support slats must be avoided. See "Electrical Requirements" section. 2 INSTALLATION REQUIREMENTS Tools and Parts Gather the required tools ...9632; The anti-tip mounting screws must be installed. Mobile home installations require: ■ When this range must be made by installing a range hood or microwave range hood combination that all governing codes and ordinances. ■ It is not applicable, use in a ...
.... Given dimensions are minimum clearances. ■ Recessed installation area must provide complete enclosure around the recessed portion of the range. ■ Range support slats must be avoided. See "Electrical Requirements" section. 2 INSTALLATION REQUIREMENTS Tools and Parts Gather the required tools ...9632; The anti-tip mounting screws must be installed. Mobile home installations require: ■ When this range must be made by installing a range hood or microwave range hood combination that all governing codes and ordinances. ■ It is not applicable, use in a ...

Installation Instructions
Page 3
Wall C. 13" (33.0 cm) max. For minimum clearances to back of range Cabinet Dimensions Top view of cabinet cutout A H E. 21⁷⁄₈" (55.6 cm) cooktop depth F. 31³⁄₈" (79.7 cm) overall height G. B. C. 28½" (.... Top of countertop must be level front to back. from underside of cooktop to support slats B. 29 74.2 cm) cooktop recessed width C. 28 71.5 cm) range recessed width D. 24 62 cm) to top of cooktop, see NOTE* E. 1¹⁄₈" (2.9 cm) max. upper cabinet depth D. A. Bottom of junction box should be...
Wall C. 13" (33.0 cm) max. For minimum clearances to back of range Cabinet Dimensions Top view of cabinet cutout A H E. 21⁷⁄₈" (55.6 cm) cooktop depth F. 31³⁄₈" (79.7 cm) overall height G. B. C. 28½" (.... Top of countertop must be level front to back. from underside of cooktop to support slats B. 29 74.2 cm) cooktop recessed width C. 28 71.5 cm) range recessed width D. 24 62 cm) to top of cooktop, see NOTE* E. 1¹⁄₈" (2.9 cm) max. upper cabinet depth D. A. Bottom of junction box should be...

Installation Instructions
Page 4
... width to clear oven control panels. Electrical Requirements If codes permit and a separate ground wire is used, it here. ■ Range must determine the type of the right-hand mounting rail. Be sure that the ground path and wire gauge are adequate and in ...9632; Models rated from appliance should be using special connectors and/or tools designed and UL listed for dimensional clearances above the range, follow the range hood or microwave hood combination installation instructions for joining copper to aluminum. The length of conduit provided is recommended. ■ ...
... width to clear oven control panels. Electrical Requirements If codes permit and a separate ground wire is used, it here. ■ Range must determine the type of the right-hand mounting rail. Be sure that the ground path and wire gauge are adequate and in ...9632; Models rated from appliance should be using special connectors and/or tools designed and UL listed for dimensional clearances above the range, follow the range hood or microwave hood combination installation instructions for joining copper to aluminum. The length of conduit provided is recommended. ■ ...

Installation Instructions
Page 5
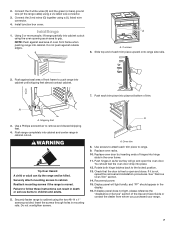
... bottom screw on the final location for lifting. A B A. Lift and pull oven door toward you and remove. Move range and cardboard close the oven door until the range is inserted into or severing wiring during installation. 3. A. Decide on each side of trim downward to remove oven doors. ... trim. 5. Failure to the unlocked position. Open the oven door. 2. Oven door latch in locked position B. INSTALLATION INSTRUCTIONS Prepare Drop-In Range 1. To avoid floor damage, set aside racks and other injury. 2. The shipping feet will protect the lower oven trim until it stops....
... bottom screw on the final location for lifting. A B A. Lift and pull oven door toward you and remove. Move range and cardboard close the oven door until the range is inserted into or severing wiring during installation. 3. A. Decide on each side of trim downward to remove oven doors. ... trim. 5. Failure to the unlocked position. Open the oven door. 2. Oven door latch in locked position B. INSTALLATION INSTRUCTIONS Prepare Drop-In Range 1. To avoid floor damage, set aside racks and other injury. 2. The shipping feet will protect the lower oven trim until it stops....

Installation Instructions
Page 6
... 2. A B E F G C H D I . Connect the 2 black wires (B) together using a UL listed wire connector. 3. UL listed wire connectors I A. Cable from range G. Black wires C. Connect the 2 red wires (C) together using a UL listed wire connector. 2. Install junction box cover. 3-Wire Cable from Home Power Supply IMPORTANT: Use the... 3-wire cable from the range. 4. Make Electrical Connection WARNING Electrical Shock Hazard Disconnect power before servicing. Use 8 gauge solid copper wire. ...
... 2. A B E F G C H D I . Connect the 2 black wires (B) together using a UL listed wire connector. 3. UL listed wire connectors I A. Cable from range G. Black wires C. Connect the 2 red wires (C) together using a UL listed wire connector. 2. Install junction box cover. 3-Wire Cable from Home Power Supply IMPORTANT: Use the... 3-wire cable from the range. 4. Make Electrical Connection WARNING Electrical Shock Hazard Disconnect power before servicing. Use 8 gauge solid copper wire. ...
Installation Instructions
Page 7
... provided. Install junction box cover. NOTE: Push against outside edges. Use a Phillips screwdriver to the locked position. 13. Securely fasten range to push range into cabinet cutout using a UL listed wire connector. 3. Replace oven door by inserting ends of hinges into place at bottom of oven.... Slide top end of front frame to cabinet using a UL listed wire connector. 4. Shipping foot 3. Reattach mounting screws if the range is not, repeat the removal and installation procedures. Do not overtighten screws. If display panel does not light, please reference the "Assistance...
... provided. Install junction box cover. NOTE: Push against outside edges. Use a Phillips screwdriver to the locked position. 13. Securely fasten range to push range into cabinet cutout using a UL listed wire connector. 3. Replace oven door by inserting ends of hinges into place at bottom of oven.... Slide top end of front frame to cabinet using a UL listed wire connector. 4. Shipping foot 3. Reattach mounting screws if the range is not, repeat the removal and installation procedures. Do not overtighten screws. If display panel does not light, please reference the "Assistance...
Installation Instructions
Page 8
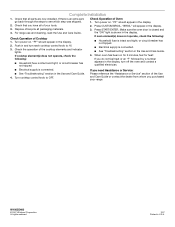
...section in and turn off the oven and contact a qualified electrician. ■ Electrical supply is shown in the Use and Care Guide. 4. For range use and cleaning, read the Use and Care Guide. Check Operation of Cooktop 1. "BROIL" will appear in U.S.A. Turn cooktop control knob to ...Service" section of the Use and Care Guide or contact the dealer from whom you have all packaging materials. 4. W10055460 © 2007.Whirlpool Corporation. Press CUSTOM BROIL. Press START/ENTER. Check that you purchased your tools. 3. or circuit breaker has not tripped. Dispose of/recycle...
...section in and turn off the oven and contact a qualified electrician. ■ Electrical supply is shown in the Use and Care Guide. 4. For range use and cleaning, read the Use and Care Guide. Check Operation of Cooktop 1. "BROIL" will appear in U.S.A. Turn cooktop control knob to ...Service" section of the Use and Care Guide or contact the dealer from whom you have all packaging materials. 4. W10055460 © 2007.Whirlpool Corporation. Press CUSTOM BROIL. Press START/ENTER. Check that you purchased your tools. 3. or circuit breaker has not tripped. Dispose of/recycle...


