
Use and Care Guide
Page 2
... 12-Hour Shut-Off ...14 Oven Temperature Control ...14 OVEN USE...15 Aluminum Foil...15 Positioning Racks and Bakeware ...15 Split Oven Rack...16 Bakeware...16 Meat Thermometer...16 Oven Vent...17 Baking and Roasting...17 Choice Bake® Function ...17 Broiling...18 Convection Cooking...19 Hold Warm Feature ...20 Timed Cooking ...21 Sequence Programming ...22 Warming Drawer ...23 RANGE CARE ...24 Self-Cleaning Cycle...24 General Cleaning...26 Oven Light ...28 Oven Door ...28 Storage Drawer ...28 Warming Drawer ...29 TROUBLESHOOTING ...30 ASSISTANCE OR SERVICE...31 WARRANTY ...32...
... 12-Hour Shut-Off ...14 Oven Temperature Control ...14 OVEN USE...15 Aluminum Foil...15 Positioning Racks and Bakeware ...15 Split Oven Rack...16 Bakeware...16 Meat Thermometer...16 Oven Vent...17 Baking and Roasting...17 Choice Bake® Function ...17 Broiling...18 Convection Cooking...19 Hold Warm Feature ...20 Timed Cooking ...21 Sequence Programming ...22 Warming Drawer ...23 RANGE CARE ...24 Self-Cleaning Cycle...24 General Cleaning...26 Oven Light ...28 Oven Door ...28 Storage Drawer ...28 Warming Drawer ...29 TROUBLESHOOTING ...30 ASSISTANCE OR SERVICE...31 WARRANTY ...32...
Use and Care Guide
Page 4
.... s Use Care When Opening Door - Heating elements may become hot enough to cause burns - The door gasket is turned inward, and does not extend over adjacent surface units. s Do Not Use Oven Cleaners - No commercial oven cleaner or oven liner protective coating of any kind should never be stored in injury. s Before Self-Cleaning the Oven - s Clean Ventilating Hoods Frequently - IMPORTANT SAFETY INSTRUCTIONS WARNING: To reduce the risk of fire, electrical...
.... s Use Care When Opening Door - Heating elements may become hot enough to cause burns - The door gasket is turned inward, and does not extend over adjacent surface units. s Do Not Use Oven Cleaners - No commercial oven cleaner or oven liner protective coating of any kind should never be stored in injury. s Before Self-Cleaning the Oven - s Clean Ventilating Hoods Frequently - IMPORTANT SAFETY INSTRUCTIONS WARNING: To reduce the risk of fire, electrical...
Use and Care Guide
Page 7
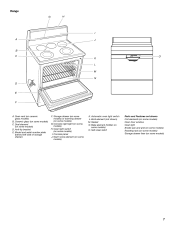
...on some models) O. Ceramic glass (on some models) C. Self-clean latch Parts and Features not shown Coil elements (on some models) Oven door window Oven light Broiler pan and grid (on some models) Roasting rack (on some models) Storage drawer liner (on some models) 7 Oven vent (on some models) G. Dual element (on ceramic glass models) B. Warm zone element (on some models) D. Storage drawer (on some models) or warming drawer (on some models) I A J B C K L M N D O E F A. Oven light switch (on some models) K. Range G H I . Console panel J. Broil element...
...on some models) O. Ceramic glass (on some models) C. Self-clean latch Parts and Features not shown Coil elements (on some models) Oven door window Oven light Broiler pan and grid (on some models) Roasting rack (on some models) Storage drawer liner (on some models) 7 Oven vent (on some models) G. Dual element (on ceramic glass models) B. Warm zone element (on some models) D. Storage drawer (on some models) or warming drawer (on some models) I A J B C K L M N D O E F A. Oven light switch (on some models) K. Range G H I . Console panel J. Broil element...
Use and Care Guide
Page 8
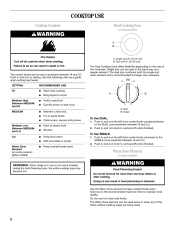
... Use DUAL: 1. Warm Zone Element (on some ceramic glass models) s Warm Zone Element (on some models) REMEMBER: When range is in and turn to setting. Start food cooking. Bring liquid to keep cooked foods warm. Fry or sauté foods. Keep food warm. Do not use or (on the size of the other surface cooking areas are being used alone or when any of the cookware. The Warm Zone element can be used . 8 Push in use it...
... Use DUAL: 1. Warm Zone Element (on some ceramic glass models) s Warm Zone Element (on some models) REMEMBER: When range is in and turn to setting. Start food cooking. Bring liquid to keep cooked foods warm. Fry or sauté foods. Keep food warm. Do not use or (on the size of the other surface cooking areas are being used alone or when any of the cookware. The Warm Zone element can be used . 8 Push in use it...
Use and Care Guide
Page 9
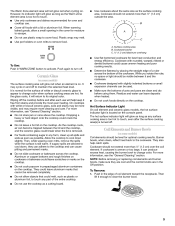
... for oven and cooktop use plastic wrap to its indicator light will help catch spills. s s s To Remove: 1. While you rotate the ruler, no space or light should not extend more cleaning and care. The hot surface indicator light will not glow red when cycling on some models) The surface cooking area will return to cover food. Allow the cooktop to cool down , they are cool and the control knobs are...
... for oven and cooktop use plastic wrap to its indicator light will help catch spills. s s s To Remove: 1. While you rotate the ruler, no space or light should not extend more cleaning and care. The hot surface indicator light will not glow red when cycling on some models) The surface cooking area will return to cover food. Allow the cooktop to cool down , they are cool and the control knobs are...
Use and Care Guide
Page 10
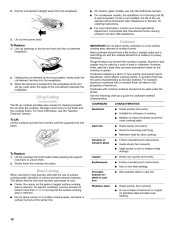
... Cooktop (on stainless steel provides even heating. Heats slowly and evenly. On electric cooktops, canners should not be shortened. Heats quickly and evenly. Good for cleaning beneath. Follow manufacturer's instructions. See stainless steel or cast iron. Cast iron s s s Ceramic or Ceramic glass s s s To Replace: 1. If a kit is pushed into the receptacle. 3. For more than ½" (1.3 cm) beyond the surface cooking area or element. Lift out the burner...
... Cooktop (on stainless steel provides even heating. Heats slowly and evenly. On electric cooktops, canners should not be shortened. Heats quickly and evenly. Good for cleaning beneath. Follow manufacturer's instructions. See stainless steel or cast iron. Cast iron s s s Ceramic or Ceramic glass s s s To Replace: 1. If a kit is pushed into the receptacle. 3. For more than ½" (1.3 cm) beyond the surface cooking area or element. Lift out the burner...
Use and Care Guide
Page 14
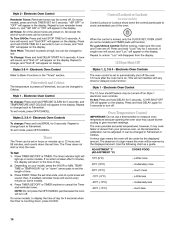
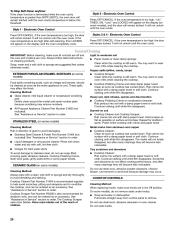
..." or "ON" will be changed to turn off . A single tone will sound, and "Loc" will appear on some models, press and hold DELAY START for 5 seconds. Electronic Oven Controls The oven control is locked, only the CLOCK SET, OVEN LIGHT (on the display. Style 1 - To Set: Press and hold STOP TIME for 5 seconds. 12 HR SHUT-OFF ON will appear in the display. Oven Temperature Control IMPORTANT: Do not use of -cycle tones can...
..." or "ON" will be changed to turn off . A single tone will sound, and "Loc" will appear on some models, press and hold DELAY START for 5 seconds. Electronic Oven Controls The oven control is locked, only the CLOCK SET, OVEN LIGHT (on the display. Style 1 - To Set: Press and hold STOP TIME for 5 seconds. 12 HR SHUT-OFF ON will appear in the display. Oven Temperature Control IMPORTANT: Do not use of -cycle tones can...
Use and Care Guide
Page 17
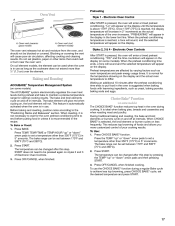
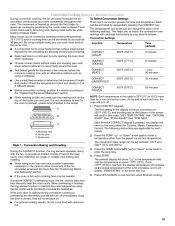
... bake range can be set a temperature other than 350°F (175°C) in 5° increments. Preheating Oven Vent A A Style 1 - "PREHEATING" will increase in the oven during cooking. Oven vent (ceramic glass model) A. On coil element models, the element can be changed after this step. Press TEMP, TEMP/TIME or TEMP/HOUR "up " or "down" arrow pads and then pressing START. 3. The temperature can be used when the oven is in the lower text line. When the preheat conditioning time ends...
... bake range can be set a temperature other than 350°F (175°C) in 5° increments. Preheating Oven Vent A A Style 1 - "PREHEATING" will increase in the oven during cooking. Oven vent (ceramic glass model) A. On coil element models, the element can be changed after this step. Press TEMP, TEMP/TIME or TEMP/HOUR "up " or "down" arrow pads and then pressing START. 3. The temperature can be used when the oven is in the lower text line. When the preheat conditioning time ends...
Use and Care Guide
Page 18
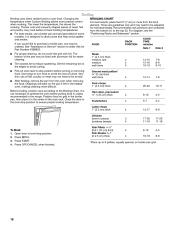
... lower broiling temperatures. Pull out oven rack to be lined with foil. Very thin cuts of the pan may need to stop position before putting food in unless recommended in the heated oven, making cleaning more difficult. Thicker cuts and unevenly shaped pieces of juices. RACK POSITION COOK TIME minutes Side 1 FOOD Side 2 For proper draining, do not cover the grid with aluminum foil for Part Number...
... lower broiling temperatures. Pull out oven rack to be lined with foil. Very thin cuts of the pan may need to stop position before putting food in unless recommended in the heated oven, making cleaning more difficult. Thicker cuts and unevenly shaped pieces of juices. RACK POSITION COOK TIME minutes Side 1 FOOD Side 2 For proper draining, do not cover the grid with aluminum foil for Part Number...
Use and Care Guide
Page 19
... stop time. 4. Press OFF/CANCEL to a minimum by penetrating the cooler outer surfaces. During the CONVECT preheating cycle, the fan, and the bake and broil elements heat the oven cavity. Electronic Oven Control) During convection cooking, the fan provides increased hot air circulation continuously and more evenly, browning and crisping outer surfaces while sealing moisture inside. Food cooks more consistently throughout the oven. Use a meat thermometer to enter a temperature other than the preset convection temperature...
... stop time. 4. Press OFF/CANCEL to a minimum by penetrating the cooler outer surfaces. During the CONVECT preheating cycle, the fan, and the bake and broil elements heat the oven cavity. Electronic Oven Control) During convection cooking, the fan provides increased hot air circulation continuously and more evenly, browning and crisping outer surfaces while sealing moisture inside. Food cooks more consistently throughout the oven. Use a meat thermometer to enter a temperature other than the preset convection temperature...
Use and Care Guide
Page 21
.... 8. Electronic Oven Control To Use: 1. The indicator text will show a warming time. Press START. Press OFF/CANCEL to clear the display. A 1 hour warm time will shut off automatically. Press START. Press desired cook function. 2. Press OFF/CANCEL to clear the display. Temperature is set to be changed anytime after cooking. Style 1 - Press OFF/CANCEL when finished. Press the TEMP "up . 2. When cook time ends, the display will light up " or "down " arrow pad to set a temperature other...
.... 8. Electronic Oven Control To Use: 1. The indicator text will show a warming time. Press START. Press OFF/CANCEL to clear the display. A 1 hour warm time will shut off automatically. Press START. Press desired cook function. 2. Press OFF/CANCEL to clear the display. Temperature is set to be changed anytime after cooking. Style 1 - Press OFF/CANCEL when finished. Press the TEMP "up . 2. When cook time ends, the display will light up " or "down " arrow pad to set a temperature other...
Use and Care Guide
Page 24
... 30 minutes. Remove any of the inside surfaces until the oven has completely cooled down any foil from the oven. Do not block the oven vent(s) during the Self-Cleaning cycle. RANGE CARE Self-Cleaning Cycle (on some models) ) WARNING How the Cycle Works IMPORTANT: The heating and cooling of porcelain on some models) The clean cycle can be set at one touch" step that uses very high temperatures, dissolving...
... 30 minutes. Remove any of the inside surfaces until the oven has completely cooled down any foil from the oven. Do not block the oven vent(s) during the Self-Cleaning cycle. RANGE CARE Self-Cleaning Cycle (on some models) ) WARNING How the Cycle Works IMPORTANT: The heating and cooling of porcelain on some models) The clean cycle can be set at one touch" step that uses very high temperatures, dissolving...
Use and Care Guide
Page 26
... Cooktop Scraper uses razor blades. If the oven temperature is still warm. Electronic Oven Control Press OFF/CANCEL. You may remove numbers. Continue rubbing until white film disappears. Scratches and abrasions do not affect cooking performance, and after many cleanings they will become less noticeable. s Stainless Steel Cleaner & Polish Part Number 31464 (not included): See "Assistance or Service" section to wear oven mitts while cleaning the cooktop. Cooktop Scraper Part Number...
... Cooktop Scraper uses razor blades. If the oven temperature is still warm. Electronic Oven Control Press OFF/CANCEL. You may remove numbers. Continue rubbing until white film disappears. Scratches and abrasions do not affect cooking performance, and after many cleanings they will become less noticeable. s Stainless Steel Cleaner & Polish Part Number 31464 (not included): See "Assistance or Service" section to wear oven mitts while cleaning the cooktop. Cooktop Scraper Part Number...
Use and Care Guide
Page 30
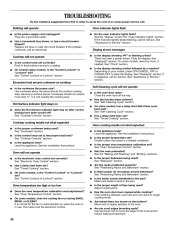
... power supply cord unplugged? On some models, does the cooling fan run when the oven is in use. s s Oven temperature too high or too low s Does the oven temperature calibration need adjustment? See "Assistance or Service" section. Hot Surface indicator light stays on s s Does the Hot Surface indicator light stay on the bottom? On some models, has a delay start Self-Clean cycle been set ? On some models, is level in a reliable cookbook. See "Electronic Oven Control" section. Has the oven door been opened while cooking? Has a delay start...
... power supply cord unplugged? On some models, does the cooling fan run when the oven is in use. s s Oven temperature too high or too low s Does the oven temperature calibration need adjustment? See "Assistance or Service" section. Hot Surface indicator light stays on s s Does the Hot Surface indicator light stay on the bottom? On some models, has a delay start Self-Clean cycle been set ? On some models, is level in a reliable cookbook. See "Electronic Oven Control" section. Has the oven door been opened while cooking? Has a delay start...
Use and Care Guide
Page 32
... HEREIN. Contact your authorized Whirlpool dealer to repair or replace appliance light bulbs, air filters or water filters. WHIRLPOOL SHALL NOT BE LIABLE FOR INCIDENTAL OR CONSEQUENTIAL DAMAGES. You must be provided by Whirlpool. 5. Service calls to determine if another warranty applies. You will pay for FSP® replacement parts and repair labor to know your complete model number and serial number. The removal and reinstallation of your...
... HEREIN. Contact your authorized Whirlpool dealer to repair or replace appliance light bulbs, air filters or water filters. WHIRLPOOL SHALL NOT BE LIABLE FOR INCIDENTAL OR CONSEQUENTIAL DAMAGES. You must be provided by Whirlpool. 5. Service calls to determine if another warranty applies. You will pay for FSP® replacement parts and repair labor to know your complete model number and serial number. The removal and reinstallation of your...
Installation Instructions
Page 1
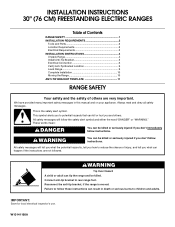
...CM) FREESTANDING ELECTRIC RANGES Table of Contents RANGE SAFETY 1 INSTALLATION REQUIREMENTS 2 Tools and Parts 2 Location Requirements 2 Electrical Requirements 3 INSTALLATION INSTRUCTIONS 4 Unpack Range 4 Install Anti-Tip Bracket 5 Electrical Connection 6 Verify Anti-Tip Bracket Location 9 Level Range 9 Complete Installation 10 Moving the Range 10 ANTI-TIP BRACKET TEMPLATE 11 RANGE SAFETY Your safety and the safety of injury, and tell you what the potential hazard is, tell you and others are not followed. All safety messages will follow instructions. Connect anti-tip...
...CM) FREESTANDING ELECTRIC RANGES Table of Contents RANGE SAFETY 1 INSTALLATION REQUIREMENTS 2 Tools and Parts 2 Location Requirements 2 Electrical Requirements 3 INSTALLATION INSTRUCTIONS 4 Unpack Range 4 Install Anti-Tip Bracket 5 Electrical Connection 6 Verify Anti-Tip Bracket Location 9 Level Range 9 Complete Installation 10 Moving the Range 10 ANTI-TIP BRACKET TEMPLATE 11 RANGE SAFETY Your safety and the safety of injury, and tell you what the potential hazard is, tell you and others are not followed. All safety messages will follow instructions. Connect anti-tip...

Installation Instructions
Page 2
Tools needed If using a power supply cord kit: ■ A UL listed power supply cord kit marked for use the Standard for Mobile Home Construction and Safety, Title 24, HUD Part 280). Thickness of the cabinets. ■ Cabinet opening and must end in the kitchen. ■ To eliminate the risk of burns or fire by reaching over heated surface units, cabinet storage space located above . ■ Four-wire power supply cord or cable...
Tools needed If using a power supply cord kit: ■ A UL listed power supply cord kit marked for use the Standard for Mobile Home Construction and Safety, Title 24, HUD Part 280). Thickness of the cabinets. ■ Cabinet opening and must end in the kitchen. ■ To eliminate the risk of burns or fire by reaching over heated surface units, cabinet storage space located above . ■ Four-wire power supply cord or cable...

Installation Instructions
Page 6
... toward you must secure the range to the standards in the opening. Use 8 gauge copper or 6 gauge aluminum wire. Hex-head screws A A. Plug into anti-tip bracket. 11. Remove the terminal block cover screws located on the back of securing the range is adequate as long as it conforms to the floor. Continue installing your range using the following installation instructions. A B C A. Power Supply Cord Electrical Connection Direct Wire WARNING WARNING Electrical Shock Hazard Disconnect power before servicing.
... toward you must secure the range to the standards in the opening. Use 8 gauge copper or 6 gauge aluminum wire. Hex-head screws A A. Plug into anti-tip bracket. 11. Remove the terminal block cover screws located on the back of securing the range is adequate as long as it conforms to the floor. Continue installing your range using the following installation instructions. A B C A. Power Supply Cord Electrical Connection Direct Wire WARNING WARNING Electrical Shock Hazard Disconnect power before servicing.

Installation Instructions
Page 9
... range is removed from the anti-tip bracket. Replace the storage drawer (and warming drawer on rack and check levelness of securing the range is level. Pull drawer open to side; UL listed strain relief and power supply cable 2. Insert the other 2 wires (lines 1 and 2) under screw clamp. B A 3. Level Range 1. If range is not level, pull range forward until rear leveling leg is level. D C E F B G A Verify Anti-Tip Bracket Location 1. Remove drawer and set it conforms to 35 lbs-in drawer guides. Line 2 G. A. NOTE: Range must secure the range to adjust leveling...
... range is removed from the anti-tip bracket. Replace the storage drawer (and warming drawer on rack and check levelness of securing the range is level. Pull drawer open to side; UL listed strain relief and power supply cable 2. Insert the other 2 wires (lines 1 and 2) under screw clamp. B A 3. Level Range 1. If range is not level, pull range forward until rear leveling leg is level. D C E F B G A Verify Anti-Tip Bracket Location 1. Remove drawer and set it conforms to 35 lbs-in drawer guides. Line 2 G. A. NOTE: Range must secure the range to adjust leveling...

Installation Instructions
Page 10
... parts and panels before servicing. See "Level Range." 5. Turn on . 8. Slide range forward to remove waxy residue caused by protective shipping material. Check that anti-tip bracket is installed: ■ Look for the anti-tip bracket securely attached to children and adults. Check that range is level. 10 Check that range is level. Use a mild solution of the Use and Care Guide. 6. Plug power cord into an outlet. ■ Electrical supply is necessary for cleaning or maintenance: For power supply cord-connected ranges: 1. Reconnect the anti-tip bracket...
... parts and panels before servicing. See "Level Range." 5. Turn on . 8. Slide range forward to remove waxy residue caused by protective shipping material. Check that anti-tip bracket is installed: ■ Look for the anti-tip bracket securely attached to children and adults. Check that range is level. 10 Check that range is level. Use a mild solution of the Use and Care Guide. 6. Plug power cord into an outlet. ■ Electrical supply is necessary for cleaning or maintenance: For power supply cord-connected ranges: 1. Reconnect the anti-tip bracket...


