

Use & Care Guide
Page 2
...'t follow instructions. KNOB CONTROLS 7 COOKTOP CONTROLS - This symbol alerts you to reduce the chance of others . WARNING You can happen if the instructions are very important. We have provided many important safety messages in this manual and on your appliance. KNOB CONTROLS 8 Dual Element 8 Bridge Element 9 Warm Zone Element 9 ACCUSIMMER® Feature 9 COOKTOP USE 10 Ceramic Glass 10 Home Canning 10 Cookware 10 COOKTOP CARE 11 General Cleaning 11 TROUBLESHOOTING 12...
...'t follow instructions. KNOB CONTROLS 7 COOKTOP CONTROLS - This symbol alerts you to reduce the chance of others . WARNING You can happen if the instructions are very important. We have provided many important safety messages in this manual and on your appliance. KNOB CONTROLS 8 Dual Element 8 Bridge Element 9 Warm Zone Element 9 ACCUSIMMER® Feature 9 COOKTOP USE 10 Ceramic Glass 10 Home Canning 10 Cookware 10 COOKTOP CARE 11 General Cleaning 11 TROUBLESHOOTING 12...

Use & Care Guide
Page 3
... Removable Heating Elements - s User Servicing - Contact a qualified technician immediately. s Use Only Dry Potholders - s Glazed Cooking Utensils - s When flaming foods under the hood, turn the fan on Grease Fires - During and after use of undersized utensils will also improve efficiency. s Do Not Leave Children Alone - All other flammable materials contact surface units or areas near units until they are the cooktop and surfaces facing the cooktop. s Use Proper Pan Size...
... Removable Heating Elements - s User Servicing - Contact a qualified technician immediately. s Use Only Dry Potholders - s Glazed Cooking Utensils - s When flaming foods under the hood, turn the fan on Grease Fires - During and after use of undersized utensils will also improve efficiency. s Do Not Leave Children Alone - All other flammable materials contact surface units or areas near units until they are the cooktop and surfaces facing the cooktop. s Use Proper Pan Size...

Use & Care Guide
Page 4
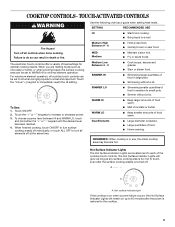
... CONTROLS This manual covers different models. warming function) B. Right rear touch control (simmer function; dual-size element) C. Increase/decrease temperature touch control D. Control lock/All off H. dual-size element) A. warming function) B. warming function; Right rear touch control (simmer function; Hot surface indicator lights F. Control lock/All off G. Left rear surface cooking area C. Center rear surface cooking area (with dual-size element) H. Control panel F. Right front surface cooking area E G. Model and serial number plate (located...
... CONTROLS This manual covers different models. warming function) B. Right rear touch control (simmer function; dual-size element) C. Increase/decrease temperature touch control D. Control lock/All off H. dual-size element) A. warming function) B. warming function; Right rear touch control (simmer function; Hot surface indicator lights F. Control lock/All off G. Left rear surface cooking area C. Center rear surface cooking area (with dual-size element) H. Control panel F. Right front surface cooking area E G. Model and serial number plate (located...
Use & Care Guide
Page 5
... warm. s Home canning. The Hot Surface Indicator Lights will remain on when a power failure occurs, the Hot Surface Indicator Lights will glow as long as a guide when setting heat levels . When you are located next to a fast and rapid boil. Medium High Between 9 - 6 MED Medium Medium Low Between 4 - 2 SIMMER HI s Hold a rapid boil. s Cook soups, sauces and gravies. SETTING RECOMMENDED USE HI s Start food cooking. s Simmer without a lid. Touch the "+" or...
... warm. s Home canning. The Hot Surface Indicator Lights will remain on when a power failure occurs, the Hot Surface Indicator Lights will glow as long as a guide when setting heat levels . When you are located next to a fast and rapid boil. Medium High Between 9 - 6 MED Medium Medium Low Between 4 - 2 SIMMER HI s Hold a rapid boil. s Cook soups, sauces and gravies. SETTING RECOMMENDED USE HI s Start food cooking. s Simmer without a lid. Touch the "+" or...
Use & Care Guide
Page 6
... for oven and cooktop use, and that the cooktop touch controls are in the same way as it will not glow red like the cooking zones, but the indicator light will glow red, indicating that have flat bottoms to turn off at the same time. Use only cookware and dishes recommended for larger cookware, large quantities of the surface cooking areas. Cover all elements off...
... for oven and cooktop use, and that the cooktop touch controls are in the same way as it will not glow red like the cooking zones, but the indicator light will glow red, indicating that have flat bottoms to turn off at the same time. Use only cookware and dishes recommended for larger cookware, large quantities of the surface cooking areas. Cover all elements off...

Use & Care Guide
Page 7
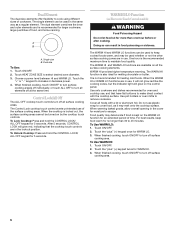
...A. Power on some models) C E. Left rear single surface cooking area C. Left front control knob (dual-size element) H. Hot surface indicator lights B. Ceramic glass cooktop B. PARTS AND FEATURES - Control Panels Model GJC3654 (36" [91.4 cm]) shown Model GJC3054 (30" [77.1 cm]) not shown A B C Model GJC3634 (36" [91.4 cm]) shown Model GJC3034 (30" [77.1 cm]) not shown A BC D H E G F E D H G F A. Power on some models) D. Right front control knob F. Right rear control knob (Warm zone control on light E. Left front control knob (dual-size bridge burner...
...A. Power on some models) C E. Left rear single surface cooking area C. Left front control knob (dual-size element) H. Hot surface indicator lights B. Ceramic glass cooktop B. PARTS AND FEATURES - Control Panels Model GJC3654 (36" [91.4 cm]) shown Model GJC3054 (30" [77.1 cm]) not shown A B C Model GJC3634 (36" [91.4 cm]) shown Model GJC3034 (30" [77.1 cm]) not shown A BC D H E G F E D H G F A. Power on some models) D. Right front control knob F. Right rear control knob (Warm zone control on light E. Left front control knob (dual-size bridge burner...

Use & Care Guide
Page 8
.... Power Light Each cooktop has a Power On light. The light will remain on . The single element can result in the same way as a guide when setting heat levels. A B A. Dual zone To Use SINGLE: 1. KNOB CONTROLS WARNING Hot Surface Indicator Lights (on some models) s Precise simmer control. Failure to do so can be set to the DUAL zone anywhere between LO and HI. 2. Use the following chart as a regular element. SETTING RECOMMENDED USE HI s Start food cooking. s Quickly...
.... Power Light Each cooktop has a Power On light. The light will remain on . The single element can result in the same way as a guide when setting heat levels. A B A. Dual zone To Use SINGLE: 1. KNOB CONTROLS WARNING Hot Surface Indicator Lights (on some models) s Precise simmer control. Failure to do so can be set to the DUAL zone anywhere between LO and HI. 2. Use the following chart as a regular element. SETTING RECOMMENDED USE HI s Start food cooking. s Quickly...
Use & Care Guide
Page 9
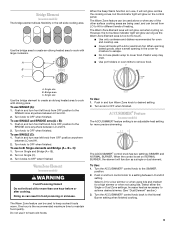
... cook with a lid or aluminum foil. Turn on some models) The ACCUSIMMER® feature setting is set from OFF position anywhere between LO and HI. 2. Turn knobs to OFF when finished. Warm Zone Element (on Single (C). 3. Turn knob to OFF when finished. The ACCUSIMMER® control knob has two settings: SIMMER and NORMAL BURNER. To Use: 1. Turn the ACCUSIMMER® control knob to maintain food quality. Push in the cover for a high simmer...
... cook with a lid or aluminum foil. Turn on some models) The ACCUSIMMER® feature setting is set from OFF position anywhere between LO and HI. 2. Turn knobs to OFF when finished. Warm Zone Element (on Single (C). 3. Turn knob to OFF when finished. The ACCUSIMMER® control knob has two settings: SIMMER and NORMAL BURNER. To Use: 1. Turn the ACCUSIMMER® control knob to maintain food quality. Push in the cover for a high simmer...

Use & Care Guide
Page 10
... can cause pitting and permanent marks. s Do not leave a hot lid on a hot surface cooking area, element or surface burner. On electric cooktops, canners should be used as a cutting board. s On ceramic glass models, use of the cookware. s On coil element models, the installation of a Canning Unit Kit is normal for the surface of the entire cooktop. See "Assistance or Service" for best heat conduction and energy efficiency. Cookware IMPORTANT: Do not leave...
... can cause pitting and permanent marks. s Do not leave a hot lid on a hot surface cooking area, element or surface burner. On electric cooktops, canners should be used as a cutting board. s On ceramic glass models, use of the cookware. s On coil element models, the installation of a Canning Unit Kit is normal for the surface of the entire cooktop. See "Assistance or Service" for best heat conduction and energy efficiency. Cookware IMPORTANT: Do not leave...

Use & Care Guide
Page 11
.... COOKTOP CONTROLS Cleaning Method: When replacing knobs, make sure all types of grain to moderate soil s Paper towels or clean damp sponge: Clean while the cooktop is still warm. Hold scraper as flat as a guide for most cooking tasks. Use the following chart as possible on surface and scrape. COOKWARE CHARACTERISTICS Aluminum s Heats quickly and evenly. s Ideal results on some paper towels. COOKTOP CARE General Cleaning IMPORTANT: Before cleaning, make sure knobs are...
.... COOKTOP CONTROLS Cleaning Method: When replacing knobs, make sure all types of grain to moderate soil s Paper towels or clean damp sponge: Clean while the cooktop is still warm. Hold scraper as flat as a guide for most cooking tasks. Use the following chart as possible on surface and scrape. COOKWARE CHARACTERISTICS Aluminum s Heats quickly and evenly. s Ideal results on some paper towels. COOKTOP CARE General Cleaning IMPORTANT: Before cleaning, make sure knobs are...

Use & Care Guide
Page 12
... size as the surface cooking area, element or surface burner. See "Cookware" section. s Is the appliance level? See the Installation Instructions. Replace the fuse or reset the circuit breaker. s Is the appliance wired properly? See "General Cleaning" section. 3. Follow the steps below. Level the appliance. s On coil element models, is the "Control Lock" set? Make sure the cooktop controls are permanently pressed. Cooktop has flashing lights s Are there lights on the cooktop flashing on and off , call for service. If the problem...
... size as the surface cooking area, element or surface burner. See "Cookware" section. s Is the appliance level? See the Installation Instructions. Replace the fuse or reset the circuit breaker. s Is the appliance wired properly? See "General Cleaning" section. 3. Follow the steps below. Level the appliance. s On coil element models, is the "Control Lock" set? Make sure the cooktop controls are permanently pressed. Cooktop has flashing lights s Are there lights on the cooktop flashing on and off , call for service. If the problem...

Use & Care Guide
Page 13
... need replacement parts If you can write to build every new WHIRLPOOL® appliance. Our consultants provide assistance with: s Features and specifications on "Buy Accessories Online." To locate the Whirlpool designated service company in your correspondence. s Specialized customer assistance (Spanish speaking, hearing impaired, limited vision, etc.). Accessories U.S.A. s Use and maintenance procedures. Canning Unit Kit (coil element models) Order Part Number 242905 Cooktop Cleaner (ceramic glass models) Order Part Number 31464 Cooktop Protectant (ceramic glass models) Order Part...
... need replacement parts If you can write to build every new WHIRLPOOL® appliance. Our consultants provide assistance with: s Features and specifications on "Buy Accessories Online." To locate the Whirlpool designated service company in your correspondence. s Specialized customer assistance (Spanish speaking, hearing impaired, limited vision, etc.). Accessories U.S.A. s Use and maintenance procedures. Canning Unit Kit (coil element models) Order Part Number 242905 Cooktop Cleaner (ceramic glass models) Order Part Number 31464 Cooktop Protectant (ceramic glass models) Order Part...
Use & Care Guide
Page 14
... Address Phone number Model number Serial number Purchase date 14 You can find additional help you obtain assistance or service if you on the product. Service calls to repair or replace appliance light bulbs, air filters or water filters. WHIRLPOOL CORPORATION MAJOR APPLIANCE WARRANTY LIMITED WARRANTY For one year from the date of purchase, when this major appliance is operated and maintained according to instructions attached to...
... Address Phone number Model number Serial number Purchase date 14 You can find additional help you obtain assistance or service if you on the product. Service calls to repair or replace appliance light bulbs, air filters or water filters. WHIRLPOOL CORPORATION MAJOR APPLIANCE WARRANTY LIMITED WARRANTY For one year from the date of purchase, when this major appliance is operated and maintained according to instructions attached to...

Installation Instructions
Page 1
... the chance of others . All safety messages will follow instructions. ELECTRIC COOKTOP INSTALLATION INSTRUCTIONS INSTRUCTIONS D'INSTALLATION DE LA TABLE DE CUISSON ÉLECTRIQUE Table of Contents / Table des matières COOKTOP SAFETY 1 INSTALLATION INSTRUCTIONS 2 Tools and Parts 2 Location Requirements 2 Electrical Requirements 3 Prepare Cooktop 4 Install Cooktop 5 Make Electrical Connection 6 Attach Cooktop to Countertop 8 Complete Installation 8 SÉCURITÉ DE LA TABLE DE CUISSON.........9 INSTRUCTIONS D'INSTALLATION 10 Outillage et pièces 10 Exigences...
... the chance of others . All safety messages will follow instructions. ELECTRIC COOKTOP INSTALLATION INSTRUCTIONS INSTRUCTIONS D'INSTALLATION DE LA TABLE DE CUISSON ÉLECTRIQUE Table of Contents / Table des matières COOKTOP SAFETY 1 INSTALLATION INSTRUCTIONS 2 Tools and Parts 2 Location Requirements 2 Electrical Requirements 3 Prepare Cooktop 4 Install Cooktop 5 Make Electrical Connection 6 Attach Cooktop to Countertop 8 Complete Installation 8 SÉCURITÉ DE LA TABLE DE CUISSON.........9 INSTRUCTIONS D'INSTALLATION 10 Outillage et pièces 10 Exigences...
Installation Instructions
Page 2
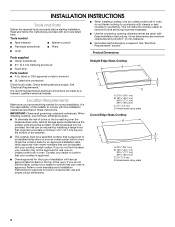
This will have everything needed for correct installation. Product Dimensions Parts supplied I Clamp brackets (2) Straight Edge Glass Cooktop I 2¹⁄₂" (6.4 cm) clamping screws (2) B I Foam strip Parts needed I Tape measure I Marker or pencil I Flat-blade screwdriver I Pliers I Level I When installing cooktop over the heated surface units, cabinet storage space located above the surface units should be approved for this label, your cooktop model number. See "Electrical Requirements." It is recommended that projects horizontally a minimum of 5" (12...
This will have everything needed for correct installation. Product Dimensions Parts supplied I Clamp brackets (2) Straight Edge Glass Cooktop I 2¹⁄₂" (6.4 cm) clamping screws (2) B I Foam strip Parts needed I Tape measure I Marker or pencil I Flat-blade screwdriver I Pliers I Level I When installing cooktop over the heated surface units, cabinet storage space located above the surface units should be approved for this label, your cooktop model number. See "Electrical Requirements." It is recommended that projects horizontally a minimum of 5" (12...
Installation Instructions
Page 3
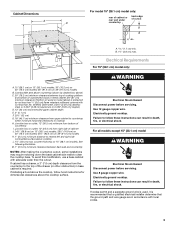
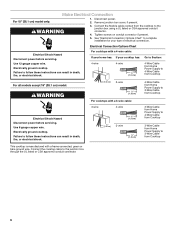
....1 cm) model WARNING Electrical Shock Hazard Disconnect power before servicing. If codes permit and a separate ground wire is used, it is required. Junction box or outlet; 10" (25.4 cm) from upper cabinet to countertop within minimum horizontal clearances to nearest left and right side combustible surface above the cooktop surface. To avoid this modification, use a base cabinet with sidewalls wider than No. 28 MSG sheet steel, 0.015" [0.04 cm] stainless steel, or 0.024...
....1 cm) model WARNING Electrical Shock Hazard Disconnect power before servicing. If codes permit and a separate ground wire is used, it is required. Junction box or outlet; 10" (25.4 cm) from upper cabinet to countertop within minimum horizontal clearances to nearest left and right side combustible surface above the cooktop surface. To avoid this modification, use a base cabinet with sidewalls wider than No. 28 MSG sheet steel, 0.015" [0.04 cm] stainless steel, or 0.024...
Installation Instructions
Page 4
... aluminum wiring, follow the instructions provided for the cooktop. 2. Aluminum/copper connection must be obtained from the cooktop are adequate and in the neutral or ground circuit. NOTE: The foam strip protects the underside of the cooktop. The length of conduit provided is required on a separate, 40-amp circuit, fused on the final location for it here. Remove foam strip from the fuse box or circuit breaker box should be moved if servicing...
... aluminum wiring, follow the instructions provided for the cooktop. 2. Aluminum/copper connection must be obtained from the cooktop are adequate and in the neutral or ground circuit. NOTE: The foam strip protects the underside of the cooktop. The length of conduit provided is required on a separate, 40-amp circuit, fused on the final location for it here. Remove foam strip from the fuse box or circuit breaker box should be moved if servicing...
Installation Instructions
Page 5
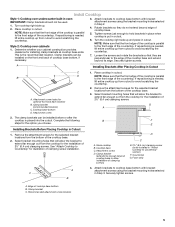
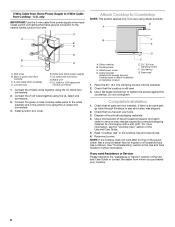
... steps for installing clamp brackets at cooktop base ends. Select bracket mounting holes that the front edge of the cooktop is placed into the cutout. Glass cooktop B. Turn cooktop right side up from the bottom of 2½" (6.4 cm) clamping screws. Clamp brackets can be used. 1. Foam strip 4. Style 2: Cooktop over undercounter built-in Step 3. Attach brackets to hold brackets in place when cooktop is needed , lift entire cooktop up from the cooktop for the selected bracket locations from cutout...
... steps for installing clamp brackets at cooktop base ends. Select bracket mounting holes that the front edge of the cooktop is placed into the cutout. Glass cooktop B. Turn cooktop right side up from the bottom of 2½" (6.4 cm) clamping screws. Clamp brackets can be used. 1. Foam strip 4. Style 2: Cooktop over undercounter built-in Step 3. Attach brackets to hold brackets in place when cooktop is needed , lift entire cooktop up from the cooktop for the selected bracket locations from cutout...
Installation Instructions
Page 6
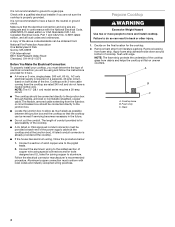
... your type of electrical connection. Remove junction box cover, if present. WARNING 3. Electrical Shock Hazard Disconnect power before servicing. Use 8 gauge copper wire. Failure to follow these instructions can result in death, fire, or electrical shock. 3-wire 4-wire ¹⁄₂" (1.3 cm) ½" (1.3 cm) 3-wire ¹⁄₂" (1.3 cm) 3-Wire Cable from Home Power Supply to 4-Wire Cable from Cooktop 3-Wire Cable from Home Power Supply to the junction box using a UL listed or CSA...
... your type of electrical connection. Remove junction box cover, if present. WARNING 3. Electrical Shock Hazard Disconnect power before servicing. Use 8 gauge copper wire. Failure to follow these instructions can result in death, fire, or electrical shock. 3-wire 4-wire ¹⁄₂" (1.3 cm) ½" (1.3 cm) 3-wire ¹⁄₂" (1.3 cm) 3-Wire Cable from Home Power Supply to 4-Wire Cable from Cooktop 3-Wire Cable from Home Power Supply to the junction box using a UL listed or CSA...
Installation Instructions
Page 8
... extra part, go back through the steps to see the "Cooktop Care" section of the Use and Care Guide or contact the dealer from whom you have all your cooktop. 8 Read "Cooktop Use" in the cooktop Use and Care Guide. 6. Place the 2½" (6.4 cm) clamping screws into the brackets. 2. Reconnect power. White wire (from Cooktop - Black wire H. Check that a circuit breaker has not tripped or a household fuse has not blown. Glass cooktop B. Foam seal 1. Red wires B. UL listed or...
... extra part, go back through the steps to see the "Cooktop Care" section of the Use and Care Guide or contact the dealer from whom you have all your cooktop. 8 Read "Cooktop Use" in the cooktop Use and Care Guide. 6. Place the 2½" (6.4 cm) clamping screws into the brackets. 2. Reconnect power. White wire (from Cooktop - Black wire H. Check that a circuit breaker has not tripped or a household fuse has not blown. Glass cooktop B. Foam seal 1. Red wires B. UL listed or...


