
Use & Care Guide
Page 4
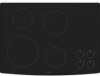
...function; Left rear surface cooking area C. warming function) F. Control lock/All off H. Increase/decrease temperature touch control Cooktops 36" (91.4 cm) Touch-Activated Electronic Control Model shown B C D E. TOUCH-ACTIVATED CONTROLS This manual ...function; dualsize element) C. Center rear surface cooking area (with dual-size element) H. Model and serial number plate (located underneath cooktop on metal cabinet) Control Panels Model GJC3055 (30" [77.1 cm]) Touch-Activated Electronic Controls Model GJC3655 (36" [91.4 cm]) Touch-Activated Electronic Controls A B A B...
...function; Left rear surface cooking area C. warming function) F. Control lock/All off H. Increase/decrease temperature touch control Cooktops 36" (91.4 cm) Touch-Activated Electronic Control Model shown B C D E. TOUCH-ACTIVATED CONTROLS This manual ...function; dualsize element) C. Center rear surface cooking area (with dual-size element) H. Model and serial number plate (located underneath cooktop on metal cabinet) Control Panels Model GJC3055 (30" [77.1 cm]) Touch-Activated Electronic Controls Model GJC3655 (36" [91.4 cm]) Touch-Activated Electronic Controls A B A B...
Use & Care Guide
Page 6
... direct contact with a lid or aluminum foil. WARM HI provides higher temperature warming. Use only cookware and dishes recommended for oven and cooktop use , it may deteriorate if food is recommended for larger cookware, large quantities of the surface cooking areas. Do not use of food... surface cooking area. 6 The Control Lock cooktop touch control averts unintended use plastic wrap to 45 minutes. To Lock Cooktop: Press and hold the CONTROL LOCK/ ALL OFF keypad for more than 30 to cover food, as a regular element. To Unlock Cooktop: Press and hold the CONTROL LOCK/ ALL...
... direct contact with a lid or aluminum foil. WARM HI provides higher temperature warming. Use only cookware and dishes recommended for oven and cooktop use , it may deteriorate if food is recommended for larger cookware, large quantities of the surface cooking areas. Do not use of food... surface cooking area. 6 The Control Lock cooktop touch control averts unintended use plastic wrap to 45 minutes. To Lock Cooktop: Press and hold the CONTROL LOCK/ ALL OFF keypad for more than 30 to cover food, as a regular element. To Unlock Cooktop: Press and hold the CONTROL LOCK/ ALL...

Use & Care Guide
Page 7
....1 cm]) not shown A B C Model GJC3634 (36" [91.4 cm]) shown Model GJC3034 (30" [77.1 cm]) not shown A BC D H E G F E D H G F A. Center rear control knob (dual-size element) F. Left rear control knob C. Model and serial number plate (located underneath cooktop on light G. Right front control knob H. Left front control knob (dual-size element) H. PARTS AND FEATURES...
....1 cm]) not shown A B C Model GJC3634 (36" [91.4 cm]) shown Model GJC3034 (30" [77.1 cm]) not shown A BC D H E G F E D H G F A. Center rear control knob (dual-size element) F. Left rear control knob C. Model and serial number plate (located underneath cooktop on light G. Right front control knob H. Left front control knob (dual-size element) H. PARTS AND FEATURES...

Use & Care Guide
Page 12
.... Nothing will stop. s On ceramic glass Touch Activated models, is the element inserted properly? Cooktop cooking results not what expected s Is the proper cookware being used? See the Installation Instructions. A. 30" (76.2 cm) models B. 36" (91.4 cm) models 12 Replace the fuse or ... to a setting. If the lights continue to avoid the cost of an unnecessary service call. A B A. 30" (76.2 cm) models B. 36" (91.4 cm) models s Let the cooktop cool down, and the blinking lights will operate s Has a household fuse blown, or has a circuit breaker tripped...
.... Nothing will stop. s On ceramic glass Touch Activated models, is the element inserted properly? Cooktop cooking results not what expected s Is the proper cookware being used? See the Installation Instructions. A. 30" (76.2 cm) models B. 36" (91.4 cm) models 12 Replace the fuse or ... to a setting. If the lights continue to avoid the cost of an unnecessary service call. A B A. 30" (76.2 cm) models B. 36" (91.4 cm) models s Let the cooktop cool down, and the blinking lights will operate s Has a household fuse blown, or has a circuit breaker tripped...
Use & Care Guide
Page 14
... appliance if it is used in the country in -warranty service. Service calls to correct the installation of your major appliance, to Whirlpool within 30 days from the date of purchase. 6. Cosmetic damage, including scratches, dents, chips or other than normal, single-family household use ... ON THE DURATION OF IMPLIED WARRANTIES OF MERCHANTABILITY OR FITNESS, SO THESE EXCLUSIONS OR LIMITATIONS MAY NOT APPLY TO YOU. Costs associated with electrical or plumbing codes, or use or when it is installed in -home service is contrary to the appliance. 9. Damage resulting from accident...
... appliance if it is used in the country in -warranty service. Service calls to correct the installation of your major appliance, to Whirlpool within 30 days from the date of purchase. 6. Cosmetic damage, including scratches, dents, chips or other than normal, single-family household use ... ON THE DURATION OF IMPLIED WARRANTIES OF MERCHANTABILITY OR FITNESS, SO THESE EXCLUSIONS OR LIMITATIONS MAY NOT APPLY TO YOU. Costs associated with electrical or plumbing codes, or use or when it is installed in -home service is contrary to the appliance. 9. Damage resulting from accident...
Installation Instructions
Page 2
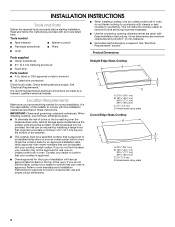
...the installation clearances specified in these Installation Instructions. See "Electrical Requirements." C D A. 21 54.1 cm) B. 16 42.1 cm) 30 77.1 cm) 36 92.3 cm) C. 2⁷⁄₈" (7.3 cm) D. When installing cooktop, use over an undercounter built-in undercounter use and proper... opening dimensions that all governing codes and ordinances. Location Requirements Make sure you do not find this label, your cooktop model number. It is approved. See "Electrical Requirements" section. I To eliminate the risk of the oven. B A C A. 22¹⁄₈" (...
...the installation clearances specified in these Installation Instructions. See "Electrical Requirements." C D A. 21 54.1 cm) B. 16 42.1 cm) 30 77.1 cm) 36 92.3 cm) C. 2⁷⁄₈" (7.3 cm) D. When installing cooktop, use over an undercounter built-in undercounter use and proper... opening dimensions that all governing codes and ordinances. Location Requirements Make sure you do not find this label, your cooktop model number. It is approved. See "Electrical Requirements" section. I To eliminate the risk of the oven. B A C A. 22¹⁄₈" (...
Installation Instructions
Page 3
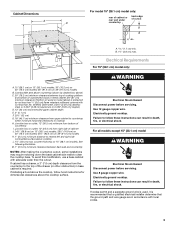
....7 cm) minimum clearance from the countertop to follow hood instructions for dimensional clearances above cooktop L. 1½" (3.8 cm) max. Electrical Requirements For 15" (38.1 cm) model only: WARNING A. 15" (38.1 cm) on 15" (38.1 cm) models; 30" (76.2 cm) on 30" (76.2 cm) models; 36" (91.4 cm) on 15" (38.1 cm) models. To avoid this...
....7 cm) minimum clearance from the countertop to follow hood instructions for dimensional clearances above cooktop L. 1½" (3.8 cm) max. Electrical Requirements For 15" (38.1 cm) model only: WARNING A. 15" (38.1 cm) on 15" (38.1 cm) models; 30" (76.2 cm) on 30" (76.2 cm) models; 36" (91.4 cm) on 15" (38.1 cm) models. To avoid this...