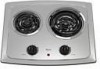
Whirlpool RCS2012RS - 21in Coil Electric Cooktop Support and Manuals
Get Help and Manuals for this Whirlpool item
View All Support Options Below
Free Whirlpool RCS2012RS manuals!
Problems with Whirlpool RCS2012RS?
Ask a Question
Free Whirlpool RCS2012RS manuals!
Problems with Whirlpool RCS2012RS?
Ask a Question
Popular Whirlpool RCS2012RS Manual Pages
Owners Manual - Page 2
TABLE OF CONTENTS
COOKTOP SAFETY 2 PARTS AND FEATURES 4 COOKTOP USE 4
Cooktop Controls 4 Coil Elements and Burner Bowls 5 Home Canning 5 Cookware 5 COOKTOP CARE 6 General Cleaning 6 TROUBLESHOOTING 6 ASSISTANCE OR SERVICE 7 In the U.S.A ... instructions. All safety messages will follow instructions. We have provided many important safety messages in this manual and on your appliance.
Owners Manual - Page 3
... technician.
SAVE THESE INSTRUCTIONS
3 s Never Use Your Cooktop for cooktop service without breaking due to the sudden change in temperature. s Never Leave Surface Units Unattended at High Heat Settings -
s Do Not Use Water on Cooktop - s Utensil Handles Should Be Turned Inward and Not Extend Over Adjacent Surface Units - Do not use . s Proper Installation - s Do Not Leave...
Owners Manual - Page 4
... LO.
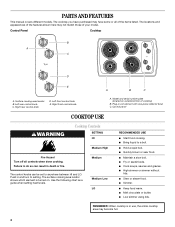
s Fry or sauté foods. s Stew or steam food. PARTS AND FEATURES
This manual covers different models.
Use the following chart as a guide when setting heat levels. s Cook soups, sauces and gravies.
s Low simmer using lids. Model and serial number plate (located on . Plug-in use, the entire cooktop area may become hot.
4 s Keep food warm.
Right front control...
Owners Manual - Page 5
... instructions. s A core or base of aluminum or copper on the grate or largest surface cooking
area or element. Cookware should not extend more than ½" (1.3 cm) beyond the surface cooking area or element. To Remove: 1. Lift out the burner bowl. On electric cooktops, canners should not extend more than ½" (1.3 cm) over the coil element. s On coil element models, the installation...
Owners Manual - Page 6
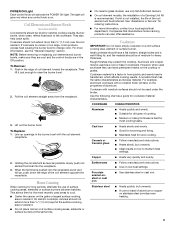
...For more information, see "Coil Elements and Burner Bowls." BURNER BOWLS
Do not use soap-filled scouring pads, abrasive cleaners, Cooktop Polishing Creme, steel-wool pads, gritty washcloths or some models)
EXTERIOR PORCELAIN ENAMEL SURFACES (on cleaning products.
Damage may affect the finish. s Is the appliance wired properly? See Installation Instructions.
STAINLESS STEEL (on some...
Owners Manual - Page 7
... cookware on our full line of appliances. See the Installation Instructions. ASSISTANCE OR SERVICE
Before calling for assistance or service, please check "Troubleshooting." To locate FSP® replacement parts in your correspondence. Call the Whirlpool Customer eXperience Center toll free: 1-800-253-1301.
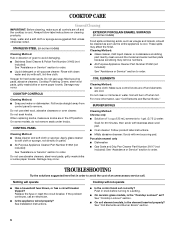
s Use and maintenance procedures. Cooktop cooking results not what expected
s Is...
Owners Manual - Page 8

...you obtain assistance or service if you need service, first see the "Troubleshooting" section of the Use & Care Guide. Dealer name Address Phone number Model number Serial number Purchase date
8 This limited warranty is valid only in the United States or Canada and applies only when the major appliance is used in accordance with published installation instructions.
11. Proof of original...
Dimension Guide - Page 1
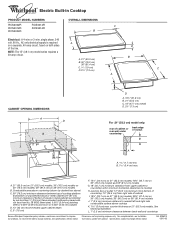
... countertop (shown by not less than ¹⁄₄" [0.6 cm] flame retardant millboard covered with product.
Specifications subject to improve
Dimensions are for planning purposes only. ®
Electric Built-in Cooktop
PRODUCT MODEL NUMBERS
RCS2002R RCS2012R RCS3004R
RCS3014R RCS3614R
OVERALL DIMENSIONS
C B
Electrical: A 4-wire or 3-wire, single phase, 240
volt, 60 Hz., AC only...
Installation Instructions - Page 2
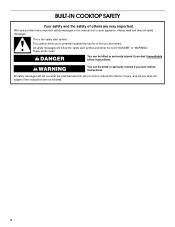
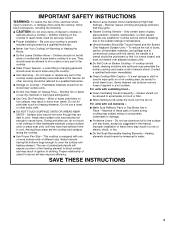
...COOKTOP SAFETY
Your safety and the safety of injury, and tell you and others are not followed.
2 All safety messages will follow instructions...instructions. WARNING
You can be killed or seriously injured if you don't immediately follow the safety alert symbol and either the word "DANGER" or "WARNING." We have provided many important safety messages in this manual and on your appliance...
Installation Instructions - Page 3

...8328;" (7.3 cm)
3 All electrical connections should be avoided.
INSTALLATION INSTRUCTIONS
Tools and Parts
Gather the required tools and parts before starting installation. If you have an approval label located on the top of the cabinets.
s Use the countertop opening dimensions that your dealer to remove if future servicing becomes necessary. s The cooktop should be made...
Installation Instructions - Page 4
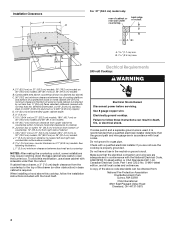
... C22.1-94, Canadian Electrical Code, Part 1 and C22.2 No. Installation Clearances A D
C
B
L
K
F
G
E
H H
J
I . 18⁵⁄₈" (33.7 cm) on 21" (53.3 cm) models; 28⁷⁄₈" (47.3 cm) on 30" (76.2 cm) models; 35" (90.2 cm) on 36" (91.4 cm) models
J. 1" (2.5 cm) minimum distance to nearest left and right side combustible surface above cooktop
K. 1 3.4 cm) max...
Installation Instructions - Page 5
...) model series requires a 20-amp circuit. s Locate the junction box to allow as much slack as to whether the appliance is properly grounded. Use the length of the line. A listed conduit connector is already provided at each end of electric shock. To minimize possible shock hazard, the cord must be plugged into the cutout. Install Cooktop
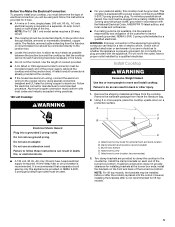
WARNING...
Installation Instructions - Page 6
...
selected from the envelope.
3. Use a screwdriver to prevent scratching the countertop.
6. Attachment screw E.
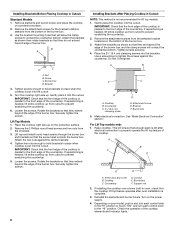
Lift Top Models
1. Make electrical connection. Support rod
2. Installing Brackets After Placing Cooktop in oven, check that they extend beyond edge of the burner box. 3. If installing the cooktop over a lower built-in Cutout:
NOTE: This method is put...
Installation Instructions - Page 7

...ground wire. Electrically ground cooktop. Failure to follow these instructions can result in death, fire, or electrical shock.
3-wire direct
3¹⁄₂" (8.9 cm)
A fused disconnect or circuit breaker box
3-Wire Cable from Power Supply to Section:
Electrical Shock Hazard Disconnect power before servicing. Use 8 gauge copper wire. Electrically ground cooktop. Use 12 gauge...
Warranty - Page 1

...WARRANTY
This limited warranty does not cover:
1. Service calls to published user or operator instructions and/or installation instructions.
4. Repairs when your major appliance is used for Factory Specified Parts and repair labor to Whirlpool within 30 days from the date of purchase.
6. DISCLAIMER OF IMPLIED WARRANTIES; THIS WARRANTY GIVES YOU SPECIFIC LEGAL RIGHTS, AND YOU MAY ALSO HAVE...
Whirlpool RCS2012RS Reviews
We have not received any reviews for Whirlpool yet.