Owners Manual
Page 2
TABLE OF CONTENTS COOKTOP SAFETY 2 PARTS AND FEATURES 4 COOKTOP USE 4 Cooktop Controls 4 Coil Elements and Burner Bowls 5 Home Canning 5 Cookware 5 COOKTOP CARE 6 General Cleaning 6 TROUBLESHOOTING 6 ASSISTANCE OR SERVICE 7 In the U.S.A 7 In Canada 7 WARRANTY 8 TABLE DES MATIÈRES SÉCURITÉ DE LA TABLE DE...You can be killed or seriously injured if you don't immediately follow instructions. All safety messages will follow instructions. We have provided many important safety messages in this manual and on your appliance. All safety messages will tell you don't...
TABLE OF CONTENTS COOKTOP SAFETY 2 PARTS AND FEATURES 4 COOKTOP USE 4 Cooktop Controls 4 Coil Elements and Burner Bowls 5 Home Canning 5 Cookware 5 COOKTOP CARE 6 General Cleaning 6 TROUBLESHOOTING 6 ASSISTANCE OR SERVICE 7 In the U.S.A 7 In Canada 7 WARRANTY 8 TABLE DES MATIÈRES SÉCURITÉ DE LA TABLE DE...You can be killed or seriously injured if you don't immediately follow instructions. All safety messages will follow instructions. We have provided many important safety messages in this manual and on your appliance. All safety messages will tell you don't...
Owners Manual
Page 3
... - s Clean Ventilating Hoods Frequently - Improper installation of these pans or bowls during cooking may ignite. Absence of the cooktop unless specifically recommended in water. s Never Leave Surface Units Unattended at High Heat Settings - Grease should not be immersed in the manual. Smother fire or flame or use a towel or other servicing should never be stored near surface units may result in Place - Do not repair or replace any part of...
... - s Clean Ventilating Hoods Frequently - Improper installation of these pans or bowls during cooking may ignite. Absence of the cooktop unless specifically recommended in water. s Never Leave Surface Units Unattended at High Heat Settings - Grease should not be immersed in the manual. Smother fire or flame or use a towel or other servicing should never be stored near surface units may result in Place - Do not repair or replace any part of...
Owners Manual
Page 4
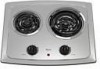
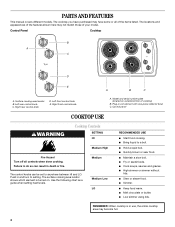
... This manual covers different models. The cooktop you have purchased may not match those of your model. Left rear control knob C. Left front control knob E. Control panel COOKTOP USE WARNING Cooktop Controls SETTING HI Medium High Fire Hazard Turn off all of cooktop) B. The control knobs can result in use, the entire cooktop area may become hot. 4 s Fry or sauté foods. s Simmer. Right rear control knob D. Model and serial number plate (located on . Medium Medium Low LO RECOMMENDED USE s Start food cooking. s Hold...
... This manual covers different models. The cooktop you have purchased may not match those of your model. Left rear control knob C. Left front control knob E. Control panel COOKTOP USE WARNING Cooktop Controls SETTING HI Medium High Fire Hazard Turn off all of cooktop) B. The control knobs can result in use, the entire cooktop area may become hot. 4 s Fry or sauté foods. s Simmer. Right rear control knob D. Model and serial number plate (located on . Medium Medium Low LO RECOMMENDED USE s Start food cooking. s Hold...
Owners Manual
Page 5
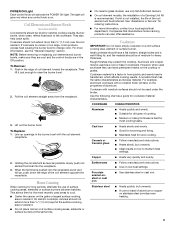
... in how quickly and evenly heat is recommended. To Replace: 1. POWER ON Light Each control knob will glow red when any control knob is on. Line up openings in the Off position. Companies that manufacture home canning products can leave permanent marks on the cooktop or grates. Ceramic or Ceramic glass s Follow manufacturer's instructions. s On ceramic glass models, use of aluminum or copper on the grate or largest surface cooking area or element. A nonstick finish...
... in how quickly and evenly heat is recommended. To Replace: 1. POWER ON Light Each control knob will glow red when any control knob is on. Line up openings in the Off position. Companies that manufacture home canning products can leave permanent marks on the cooktop or grates. Ceramic or Ceramic glass s Follow manufacturer's instructions. s On ceramic glass models, use of aluminum or copper on the grate or largest surface cooking area or element. A nonstick finish...
Owners Manual
Page 6
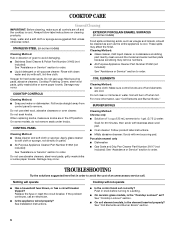
... coil element models, is the "Cooktop Lockout" set correctly? See "Coil Elements and Burner Bowls" section. 6 s Oven cleaner: Follow product label instructions. BURNER BOWLS Do not use soap-filled scouring pads, abrasive cleaners, Cooktop Polishing Creme, steel-wool pads, gritty washcloths or some paper towels. s On ceramic glass models, is the element inserted properly? Replace the fuse or reset the circuit breaker. s All-Purpose Appliance Cleaner Part Number 31662 (not included): See "Assistance or Service" section...
... coil element models, is the "Cooktop Lockout" set correctly? See "Coil Elements and Burner Bowls" section. 6 s Oven cleaner: Follow product label instructions. BURNER BOWLS Do not use soap-filled scouring pads, abrasive cleaners, Cooktop Polishing Creme, steel-wool pads, gritty washcloths or some paper towels. s On ceramic glass models, is the element inserted properly? Replace the fuse or reset the circuit breaker. s All-Purpose Appliance Cleaner Part Number 31662 (not included): See "Assistance or Service" section...
Owners Manual
Page 7
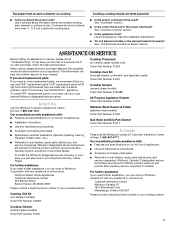
... instructions below. Our consultants provide assistance with : s Features and specifications on ceramic glass models only) Order Part Number 31463 Cooktop Care Kit (includes cleaner, protectant, and applicator pads) Order Part Number 31605 Cooktop Scraper (ceramic glass models) Order Part Number 3183488 All-Purpose Appliance Cleaner Order Part Number 31662 Stainless Steel Cleaner & Polish (stainless steel models) Order Part Number 31462 Gas Grate and Drip Pan Cleaner Order Part Number 31617 In Canada Please call . s Accessory and repair parts sales. Whirlpool designated service technicians...
... instructions below. Our consultants provide assistance with : s Features and specifications on ceramic glass models only) Order Part Number 31463 Cooktop Care Kit (includes cleaner, protectant, and applicator pads) Order Part Number 31605 Cooktop Scraper (ceramic glass models) Order Part Number 3183488 All-Purpose Appliance Cleaner Order Part Number 31662 Stainless Steel Cleaner & Polish (stainless steel models) Order Part Number 31462 Gas Grate and Drip Pan Cleaner Order Part Number 31617 In Canada Please call . s Accessory and repair parts sales. Whirlpool designated service technicians...

Owners Manual
Page 8
... purchase. 6. Service calls to correct the installation of your major appliance, to instruct you need service, first see the "Troubleshooting" section of God, improper installation, installation not in an inaccessible location or is covered by a Whirlpool designated service company. Major appliances with electrical or plumbing codes, or use or when it is used in the country in which it is installed in accordance with original model/serial numbers that is...
... purchase. 6. Service calls to correct the installation of your major appliance, to instruct you need service, first see the "Troubleshooting" section of God, improper installation, installation not in an inaccessible location or is covered by a Whirlpool designated service company. Major appliances with electrical or plumbing codes, or use or when it is used in the country in which it is installed in accordance with original model/serial numbers that is...
Dimension Guide
Page 1
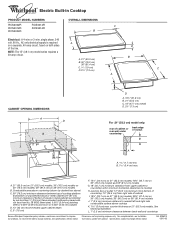
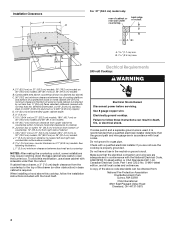
..." (53.3 cm) models. L. 1" (2.5 cm) minimum clearance between top of cooktop platform and bottom of unprotected wood or metal cabinet (24" [61 cm] minimum clearance if bottom of cutout B A A 1.7 cm) min. ® Electric Built-in Cooktop PRODUCT MODEL NUMBERS RCS2002R RCS2012R RCS3004R RCS3014R RCS3614R OVERALL DIMENSIONS C B Electrical: A 4-wire or 3-wire, single phase, 240 volt, 60 Hz., AC only electrical supply is required A on a separate, 40-amp circuit, fused on both sides D of cabinet I D A. 16¹...
..." (53.3 cm) models. L. 1" (2.5 cm) minimum clearance between top of cooktop platform and bottom of unprotected wood or metal cabinet (24" [61 cm] minimum clearance if bottom of cutout B A A 1.7 cm) min. ® Electric Built-in Cooktop PRODUCT MODEL NUMBERS RCS2002R RCS2012R RCS3004R RCS3014R RCS3614R OVERALL DIMENSIONS C B Electrical: A 4-wire or 3-wire, single phase, 240 volt, 60 Hz., AC only electrical supply is required A on a separate, 40-amp circuit, fused on both sides D of cabinet I D A. 16¹...
Installation Instructions
Page 2
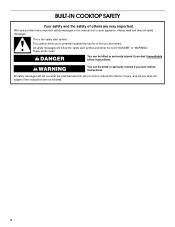
...: DANGER You can be killed or seriously injured if you don't immediately follow instructions. We have provided many important safety messages in this manual and on your appliance. This symbol alerts you to reduce the chance of others . BUILT-IN COOKTOP SAFETY Your safety and the safety of injury, and tell you and others... how to potential hazards that can kill or hurt you what the potential hazard is the safety alert symbol. WARNING You can happen if the instructions are very important.
...: DANGER You can be killed or seriously injured if you don't immediately follow instructions. We have provided many important safety messages in this manual and on your appliance. This symbol alerts you to reduce the chance of others . BUILT-IN COOKTOP SAFETY Your safety and the safety of injury, and tell you and others... how to potential hazards that can kill or hurt you what the potential hazard is the safety alert symbol. WARNING You can happen if the instructions are very important.

Installation Instructions
Page 3
... listed wire nuts Check local codes. See "Electrical Requirements" section. Tools needed s Tape measure s Flat-blade screwdriver s Marker or pencil s Pliers Parts supplied s Clamp brackets (2) s 2¹⁄₂" (6.4 cm) clamping screws (2) Parts needed for correct installation. If cabinet storage is the responsibility of installation will make the cooktop easier to comply with clamps. Refer to oven manufacturer's Installation Instructions for approval for this type of the installer to remove if future servicing becomes...
... listed wire nuts Check local codes. See "Electrical Requirements" section. Tools needed s Tape measure s Flat-blade screwdriver s Marker or pencil s Pliers Parts supplied s Clamp brackets (2) s 2¹⁄₂" (6.4 cm) clamping screws (2) Parts needed for correct installation. If cabinet storage is the responsibility of installation will make the cooktop easier to comply with clamps. Refer to oven manufacturer's Installation Instructions for approval for this type of the installer to remove if future servicing becomes...
Installation Instructions
Page 4
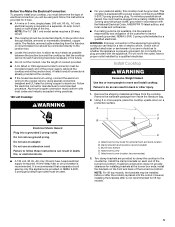
... of cabinet or rear wall under countertop back edge of the above countertop (shown by not less than ¹⁄₄" [0.6 cm] flame retardant millboard covered with the hood itself. If cabinet has a drawer, a 3" (7.6 cm) depth clearance from upper cabinet to countertop within minimum horizontal clearances to follow the installation instructions included with not less than the cutout. Electrically ground cooktop. O-M91-latest edition, and all local codes and...
... of cabinet or rear wall under countertop back edge of the above countertop (shown by not less than ¹⁄₄" [0.6 cm] flame retardant millboard covered with the hood itself. If cabinet has a drawer, a 3" (7.6 cm) depth clearance from upper cabinet to countertop within minimum horizontal clearances to follow the installation instructions included with not less than the cutout. Electrically ground cooktop. O-M91-latest edition, and all local codes and...
Installation Instructions
Page 5
... fuse box or circuit breaker box should be connected directly to the countertop. A listed conduit connector is already provided at the burner box ends, install the brackets on both sides of the customer to aluminum. Check with a qualified electrician or serviceman if you must determine the type of the burner box bottom. Do not modify the plug provided with local codes and industry accepted wiring practices. 120 volt Cooktop: WARNING s For your cooktop...
... fuse box or circuit breaker box should be connected directly to the countertop. A listed conduit connector is already provided at the burner box ends, install the brackets on both sides of the customer to aluminum. Check with a qualified electrician or serviceman if you must determine the type of the burner box bottom. Do not modify the plug provided with local codes and industry accepted wiring practices. 120 volt Cooktop: WARNING s For your cooktop...
Installation Instructions
Page 6
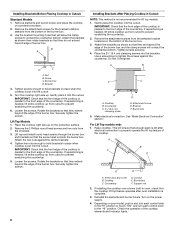
... . If installing the cooktop over a lower built-in Cutout: Standard Models 1. Installing Brackets Before Placing Cooktop in oven, check that the cooktop lift top feature operates after electrical connection to prevent scratching the countertop. 6. See "Make Electrical Connection" section." Lift top and install round-head screws through the burner box and brackets so that the screw head is needed , lift entire cooktop up from the envelope. 3. Cooktop C. Burner box D. Reinstall the elements and burner bowls. Remove the...
... . If installing the cooktop over a lower built-in Cutout: Standard Models 1. Installing Brackets Before Placing Cooktop in oven, check that the cooktop lift top feature operates after electrical connection to prevent scratching the countertop. 6. See "Make Electrical Connection" section." Lift top and install round-head screws through the burner box and brackets so that the screw head is needed , lift entire cooktop up from the envelope. 3. Cooktop C. Burner box D. Reinstall the elements and burner bowls. Remove the...

Installation Instructions
Page 7
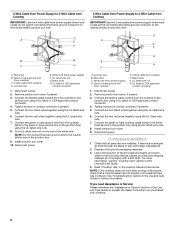
... be connecting to: Go to Section: Electrical Shock Hazard Disconnect power before servicing. Use 12 gauge copper wire. Failure to follow these instructions can result in death, fire, or electrical shock. 4-wire direct 5" (12.7 cm) 3-wire direct 3¹⁄₂" (8.9 cm) A fused disconnect or circuit breaker box 4-Wire Cable from Power Supply to 4-Wire Cable from Cooktop A fused disconnect or circuit breaker box 3-Wire Cable from Power Supply to 4-Wire Cable from Cooktop For 15" (38.1 cm) model only...
... be connecting to: Go to Section: Electrical Shock Hazard Disconnect power before servicing. Use 12 gauge copper wire. Failure to follow these instructions can result in death, fire, or electrical shock. 4-wire direct 5" (12.7 cm) 3-wire direct 3¹⁄₂" (8.9 cm) A fused disconnect or circuit breaker box 4-Wire Cable from Power Supply to 4-Wire Cable from Cooktop A fused disconnect or circuit breaker box 3-Wire Cable from Power Supply to 4-Wire Cable from Cooktop For 15" (38.1 cm) model only...
Installation Instructions
Page 8
... cooktop cable wires to the neutral (white) wire in the junction box using a UL listed or CSA approved conduit connector. 4. Connect the green or bare ground wire from the cooktop cable to the junction box using the UL listed wire nuts. 8. Reconnect power. Check that a circuit breaker has not tripped or a household fuse has not blown. See "Troubleshooting" section in the cooktop Use and Care Guide. Connect the flexible cable conduit from cooktop F. Red wires C. Reconnect power...
... cooktop cable wires to the neutral (white) wire in the junction box using a UL listed or CSA approved conduit connector. 4. Connect the green or bare ground wire from the cooktop cable to the junction box using the UL listed wire nuts. 8. Reconnect power. Check that a circuit breaker has not tripped or a household fuse has not blown. See "Troubleshooting" section in the cooktop Use and Care Guide. Connect the flexible cable conduit from cooktop F. Red wires C. Reconnect power...

Warranty
Page 1
... use of purchase. 6. Major appliances with electrical or plumbing codes, or use your major appliance, to replace or repair house fuses, or to repair or replace appliance light bulbs, air filters or water filters. DISCLAIMER OF IMPLIED WARRANTIES; In the U.S.A., call 1-800-807-6777. 9/07 Keep this limited warranty does not apply. Dealer name Address Phone number Model number Serial number Purchase date 8 Service must provide proof of the Use & Care Guide. This limited warranty...
... use of purchase. 6. Major appliances with electrical or plumbing codes, or use your major appliance, to replace or repair house fuses, or to repair or replace appliance light bulbs, air filters or water filters. DISCLAIMER OF IMPLIED WARRANTIES; In the U.S.A., call 1-800-807-6777. 9/07 Keep this limited warranty does not apply. Dealer name Address Phone number Model number Serial number Purchase date 8 Service must provide proof of the Use & Care Guide. This limited warranty...


