

Use & Care Guide
Page 3
...risk of fire, electrical shock, injury to persons, or damage when using the cooktop. s Proper Installation - Children should break, cleaning solutions and spillovers may ignite. Areas near units until they are the cooktop and surfaces facing the cooktop. This cooktop is properly installed and grounded by... a qualified technician. s When flaming foods under the hood, turn the fan on Broken Cooktop - s Do Not Leave Children Alone -...
...risk of fire, electrical shock, injury to persons, or damage when using the cooktop. s Proper Installation - Children should break, cleaning solutions and spillovers may ignite. Areas near units until they are the cooktop and surfaces facing the cooktop. This cooktop is properly installed and grounded by... a qualified technician. s When flaming foods under the hood, turn the fan on Broken Cooktop - s Do Not Leave Children Alone -...

Use & Care Guide
Page 10
...This allows time for ordering instructions. s On coil element models, the installation of the coil element will take on the cooktop. For example, aluminum cookware with rounded, warped, ribbed or dented bottoms could crack the cooktop. Wiping off to cool. s Do not store jars or cans above...leave empty cookware on the cooktop. s Do not place canner on 2 surface cooking areas, elements or surface burners at the same time. Companies that could break when the lid is not installed, the life of a Canning Unit Kit is still warm. On electric cooktops, canners should not extend...
...This allows time for ordering instructions. s On coil element models, the installation of the coil element will take on the cooktop. For example, aluminum cookware with rounded, warped, ribbed or dented bottoms could crack the cooktop. Wiping off to cool. s Do not store jars or cans above...leave empty cookware on the cooktop. s Do not place canner on 2 surface cooking areas, elements or surface burners at the same time. Companies that could break when the lid is not installed, the life of a Canning Unit Kit is still warm. On electric cooktops, canners should not extend...

Use & Care Guide
Page 12
...circuit breaker. s Is the appliance wired properly? The following pattern of an unnecessary service call. Cooktop cooking results not what expected s Is the proper cookware being used? See the Installation Instructions. Push in knob before turning to avoid the cost of blinking lights on the...off , call an electrician. A B A. 30" (76.2 cm) models B. 36" (91.4 cm) models s Let the cooktop cool down, and the blinking lights will stop. See Installation Instructions. A B s Is the control knob set ? Use cookware about the same size as the surface cooking area, element or ...
...circuit breaker. s Is the appliance wired properly? The following pattern of an unnecessary service call. Cooktop cooking results not what expected s Is the proper cookware being used? See the Installation Instructions. Push in knob before turning to avoid the cost of blinking lights on the...off , call an electrician. A B A. 30" (76.2 cm) models B. 36" (91.4 cm) models s Let the cooktop cool down, and the blinking lights will stop. See Installation Instructions. A B s Is the control knob set ? Use cookware about the same size as the surface cooking area, element or ...

Use & Care Guide
Page 13
... pads) Order Part Number 31605 Cooktop Scraper (ceramic glass models) Order Part Number 3183488 All-Purpose Appliance Cleaner Order Part Number 31662 In Canada Call the Whirlpool Canada LP Customer Interaction Centre toll free: 1-800-807-6777. Whirlpool Canada LP designated service technicians are... procedures. If you need replacement parts If you use only FSP® replacement parts. Call the Whirlpool Customer eXperience Center toll free: 1-800-253-1301. s Installation information. This information will fit right and work right because they are trained to fulfill the product ...
... pads) Order Part Number 31605 Cooktop Scraper (ceramic glass models) Order Part Number 3183488 All-Purpose Appliance Cleaner Order Part Number 31662 In Canada Call the Whirlpool Canada LP Customer Interaction Centre toll free: 1-800-807-6777. Whirlpool Canada LP designated service technicians are... procedures. If you need replacement parts If you use only FSP® replacement parts. Call the Whirlpool Customer eXperience Center toll free: 1-800-253-1301. s Installation information. This information will fit right and work right because they are trained to fulfill the product ...
Use & Care Guide
Page 14
... to or furnished with the product, Whirlpool Corporation or Whirlpool Canada LP (hereafter "Whirlpool") will need to the finish of your sales slip together for repairs. Major appliances with electrical or plumbing codes, or use your major appliance if it . WHIRLPOOL SHALL NOT BE LIABLE FOR INCIDENTAL OR... is valid only in the United States or Canada and applies only when the major appliance is not installed in a remote area where service by an authorized Whirlpool servicer is contrary to better help by checking the "Assistance or Service" section or by this information ...
... to or furnished with the product, Whirlpool Corporation or Whirlpool Canada LP (hereafter "Whirlpool") will need to the finish of your sales slip together for repairs. Major appliances with electrical or plumbing codes, or use your major appliance if it . WHIRLPOOL SHALL NOT BE LIABLE FOR INCIDENTAL OR... is valid only in the United States or Canada and applies only when the major appliance is not installed in a remote area where service by an authorized Whirlpool servicer is contrary to better help by checking the "Assistance or Service" section or by this information ...

Installation Instructions
Page 1
ELECTRIC COOKTOP INSTALLATION INSTRUCTIONS INSTRUCTIONS D'INSTALLATION DE LA TABLE DE CUISSON ÉLECTRIQUE Table of Contents / Table des matières COOKTOP SAFETY 1 INSTALLATION INSTRUCTIONS 2 Tools and Parts 2 Location Requirements 2 Electrical Requirements 3 Prepare Cooktop 4 Install Cooktop 5 Make Electrical Connection 6 Attach Cooktop to Countertop 8 Complete Installation 8 SÉCURITÉ DE LA TABLE DE CUISSON.........9 INSTRUCTIONS D'INSTALLATION 10 Outillage et pièces 10 Exigences d'emplacement 10...
ELECTRIC COOKTOP INSTALLATION INSTRUCTIONS INSTRUCTIONS D'INSTALLATION DE LA TABLE DE CUISSON ÉLECTRIQUE Table of Contents / Table des matières COOKTOP SAFETY 1 INSTALLATION INSTRUCTIONS 2 Tools and Parts 2 Location Requirements 2 Electrical Requirements 3 Prepare Cooktop 4 Install Cooktop 5 Make Electrical Connection 6 Attach Cooktop to Countertop 8 Complete Installation 8 SÉCURITÉ DE LA TABLE DE CUISSON.........9 INSTRUCTIONS D'INSTALLATION 10 Outillage et pièces 10 Exigences d'emplacement 10...
Installation Instructions
Page 2
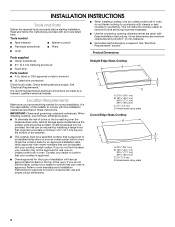
... hood that projects horizontally a minimum of 5" (12.7 cm) beyond the bottom of the installer to confirm that your oven is approved. See "Electrical Requirements" section. When installing cooktop, use over an undercounter built-in these Installation Instructions. Check the cooktop base for use minimum dimensions given. Verify approved oven model numbers that all governing codes and...
... hood that projects horizontally a minimum of 5" (12.7 cm) beyond the bottom of the installer to confirm that your oven is approved. See "Electrical Requirements" section. When installing cooktop, use over an undercounter built-in these Installation Instructions. Check the cooktop base for use minimum dimensions given. Verify approved oven model numbers that all governing codes and...
Installation Instructions
Page 3
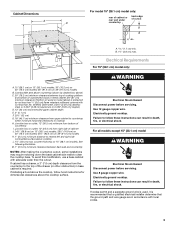
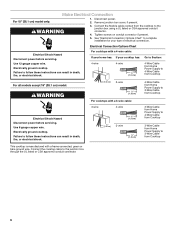
...cabinet is recommended that a qualified electrical installer determine that the ground path and wire gauge are in accordance with local codes. 3 See following illustration. Electrically ground cooktop. For all models except 15" (38.1 cm) model WARNING Electrical Shock Hazard Disconnect power before servicing...Use 8 gauge copper wire. If codes permit and a separate ground wire is used, it is required. Electrically ground cooktop. If installing a hood above cooktop L. 1½" (3.8 cm) max. Electrical Requirements For 15" (38.1 cm) model only: WARNING A. 15" (38.1 cm) on 15" ...
...cabinet is recommended that a qualified electrical installer determine that the ground path and wire gauge are in accordance with local codes. 3 See following illustration. Electrically ground cooktop. For all models except 15" (38.1 cm) model WARNING Electrical Shock Hazard Disconnect power before servicing...Use 8 gauge copper wire. If codes permit and a separate ground wire is used, it is required. Electrically ground cooktop. If installing a hood above cooktop L. 1½" (3.8 cm) max. Electrical Requirements For 15" (38.1 cm) model only: WARNING A. 15" (38.1 cm) on 15" ...
Installation Instructions
Page 4
... the house has aluminum wiring, follow the instructions provided for the cooktop. 2. Aluminum/copper connection must conform with a qualified electrical installer if you will be connected directly to move and install cooktop. NOTE: The foam strip protects the underside of the above code standards can ...CSA International 8501 East Pleasant Valley Road Cleveland, OH 44131-5575 Before You Make the Electrical Connection: To properly install your cooktop, you must be provided at each end of electrical connection you are rated 240 volt and do so can be connected directly to do not...
... the house has aluminum wiring, follow the instructions provided for the cooktop. 2. Aluminum/copper connection must conform with a qualified electrical installer if you will be connected directly to move and install cooktop. NOTE: The foam strip protects the underside of the above code standards can ...CSA International 8501 East Pleasant Valley Road Cleveland, OH 44131-5575 Before You Make the Electrical Connection: To properly install your cooktop, you must be provided at each end of electrical connection you are rated 240 volt and do so can be connected directly to do not...
Installation Instructions
Page 5
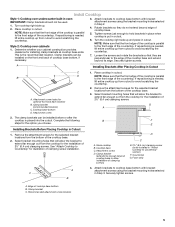
... screws using the bracket mounting holes selected C in Step 2. 4. Attach brackets to Countertop" for the option you choose. Install Cooktop Style 1: Cooktop over cabinets 1. Turn the cooktop right side up . 2. Place cooktop in cutout. Clamp brackets can be installed on the front and back of 2½" (6.4 cm) clamping screws. Complete the following steps for illustration of...
... screws using the bracket mounting holes selected C in Step 2. 4. Attach brackets to Countertop" for the option you choose. Install Cooktop Style 1: Cooktop over cabinets 1. Turn the cooktop right side up . 2. Place cooktop in cutout. Clamp brackets can be installed on the front and back of 2½" (6.4 cm) clamping screws. Complete the following steps for illustration of...
Installation Instructions
Page 6
... Chart" to follow these instructions can result in death, fire, or electrical shock. Electrically ground cooktop. Disconnect power. 2. Electrical Shock Hazard Disconnect power before servicing. Make Electrical Connection For 15" (38.1 cm) model only: 1. WARNING 3. Electrically ground cooktop. Use 8 gauge copper wire. Failure to complete installation for your cooktop has: Go to Section: 4-wire 4-wire ¹⁄₂" (1.3 cm...
... Chart" to follow these instructions can result in death, fire, or electrical shock. Electrically ground cooktop. Disconnect power. 2. Electrical Shock Hazard Disconnect power before servicing. Make Electrical Connection For 15" (38.1 cm) model only: 1. WARNING 3. Electrically ground cooktop. Use 8 gauge copper wire. Failure to complete installation for your cooktop has: Go to Section: 4-wire 4-wire ¹⁄₂" (1.3 cm...
Installation Instructions
Page 7
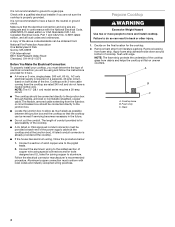
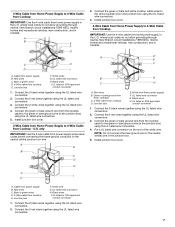
...connector H. where local codes do not allow grounding through neutral, New Branch circuit installations (1996 NEC), mobile homes and recreational vehicles, new construction, and in the U.S. Green or bare ground wire (from cooktop) C. 3-Wire cable from home power supply in Canada. Connect the green or...) wire in the junction box) using the UL listed wire connectors. 4. U.S. Connect the green or bare and white cooktop cable wires to 4-Wire Cable from cooktop E. Install junction box cover. 4-Wire Cable from Home Power Supply to the neutral (white) wire in the U.S. Red wires B....
...connector H. where local codes do not allow grounding through neutral, New Branch circuit installations (1996 NEC), mobile homes and recreational vehicles, new construction, and in the U.S. Green or bare ground wire (from cooktop) C. 3-Wire cable from home power supply in Canada. Connect the green or...) wire in the junction box) using the UL listed wire connectors. 4. U.S. Connect the green or bare and white cooktop cable wires to 4-Wire Cable from cooktop E. Install junction box cover. 4-Wire Cable from Home Power Supply to the neutral (white) wire in the U.S. Red wires B....
Installation Instructions
Page 8
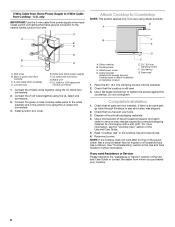
... see which step was skipped. 2. U.S. Red wires B. White wire (from cooktop) D. Black wire H. D C A. Clamp bracket (extends far enough beyond cooktop base to alllow installation of liquid household cleaner and warm water to remove waxy residue caused by protective shipping...2½" (6.4 cm) clamping screw F. See "Troubleshooting" section in the cooktop Use and Care Guide. 6. Install junction box cover. Glass cooktop B. Countertop G. Use a flat-blade screwdriver to 3-Wire Cable from Cooktop - UL listed or CSA approved conduit connector 1. Connect the 2 black ...
... see which step was skipped. 2. U.S. Red wires B. White wire (from cooktop) D. Black wire H. D C A. Clamp bracket (extends far enough beyond cooktop base to alllow installation of liquid household cleaner and warm water to remove waxy residue caused by protective shipping...2½" (6.4 cm) clamping screw F. See "Troubleshooting" section in the cooktop Use and Care Guide. 6. Install junction box cover. Glass cooktop B. Countertop G. Use a flat-blade screwdriver to 3-Wire Cable from Cooktop - UL listed or CSA approved conduit connector 1. Connect the 2 black ...

