
Owners Manual
Page 3
... injury. IMPORTANT SAFETY INSTRUCTIONS WARNING: To reduce the risk of fire, electrical shock, injury to cool. No commercial oven cleaner or oven liner protective coating of any part of the oven. We have had sufficient time to persons, or damage when using the oven. All safety messages will tell you what can be left alone...
... injury. IMPORTANT SAFETY INSTRUCTIONS WARNING: To reduce the risk of fire, electrical shock, injury to cool. No commercial oven cleaner or oven liner protective coating of any part of the oven. We have had sufficient time to persons, or damage when using the oven. All safety messages will tell you what can be left alone...

Owners Manual
Page 4
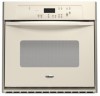
... cancer, birth defects, or other reproductive harm, and requires businesses to warn of potential exposure to such substances. Oven door window F. PARTS AND FEATURES This manual covers different models. Lower oven (see separate Use and Care Guide) G. Model and serial number plate (on right mounting rail) Parts and... features not shown Oven lights Broiler pan and grid (on some of the substances listed, including benzene, formaldehyde, carbon monoxide, and toluene. This appliance can ...
... cancer, birth defects, or other reproductive harm, and requires businesses to warn of potential exposure to such substances. Oven door window F. PARTS AND FEATURES This manual covers different models. Lower oven (see separate Use and Care Guide) G. Model and serial number plate (on right mounting rail) Parts and... features not shown Oven lights Broiler pan and grid (on some of the substances listed, including benzene, formaldehyde, carbon monoxide, and toluene. This appliance can ...

Owners Manual
Page 5
..., indicating the following: One tone s Valid pad press s Oven is not pressed within 4 minutes after pressing a pad, "START?" Repeat to return the time of day. Timer J K F. Minute N. On single oven models, press OFF/CANCEL. or p.m. ELECTRONIC OVEN CONTROL A B C D E FG H I . Auto ...display. Upper oven temperature display C. Hour M. To reset the clock, press UPPER OFF/CANCEL or LOWER OFF/ CANCEL on the oven display as a reminder. Lower oven temperature display E. Timed cooking L. On single oven models, press OFF/CANCEL. Oven selector I A. Oven settings J. ...
..., indicating the following: One tone s Valid pad press s Oven is not pressed within 4 minutes after pressing a pad, "START?" Repeat to return the time of day. Timer J K F. Minute N. On single oven models, press OFF/CANCEL. or p.m. ELECTRONIC OVEN CONTROL A B C D E FG H I . Auto ...display. Upper oven temperature display C. Hour M. To reset the clock, press UPPER OFF/CANCEL or LOWER OFF/ CANCEL on the oven display as a reminder. Lower oven temperature display E. Timed cooking L. On single oven models, press OFF/CANCEL. Oven selector I A. Oven settings J. ...

Owners Manual
Page 6
... Repeat to Fahrenheit. To Set: 1. Press TIMER SET or START. The Control Lock is locked, only the CLOCK, TIMER SET, TIMER OFF and OVEN LIGHT pads will appear on . ADJUSTMENT °F (ADJUSTMENT °C) COOKS FOOD 10°F (5°C) ...a little more 20°F (10°C)...20°F (-10°C) ...moderately less -30°F (-15°C) ...much less To Adjust Oven Temperature Calibration: 1. Press START. 6 Timer To Turn Tones Off/On: Press and hold COOK TIME until a single tone sounds, and "Loc," a picture of -cycle tones will sound, then reminder tones will ...
... Repeat to Fahrenheit. To Set: 1. Press TIMER SET or START. The Control Lock is locked, only the CLOCK, TIMER SET, TIMER OFF and OVEN LIGHT pads will appear on . ADJUSTMENT °F (ADJUSTMENT °C) COOKS FOOD 10°F (5°C) ...a little more 20°F (10°C)...20°F (-10°C) ...moderately less -30°F (-15°C) ...much less To Adjust Oven Temperature Calibration: 1. Press START. 6 Timer To Turn Tones Off/On: Press and hold COOK TIME until a single tone sounds, and "Loc," a picture of -cycle tones will sound, then reminder tones will ...

Owners Manual
Page 7
...glass or ceramic s Brown, crisp crusts s May need to certain birds. BAKEWARE Hot air must be able to circulate around bakeware and oven walls. NUMBER OF POSITION ON RACK PAN(S) 1 Center of foil, liners or cookware because permanent damage will cycle on them. RACKS NOTES:...BAKEWARE/ RESULTS RECOMMENDATIONS Light colored aluminum s Light golden crusts s Even browning s Use temperature and time recommended in the bottom third of oven. Dark aluminum and other bakeware with foil because air must be able to reduce baking temperatures 25°F (15°C). 7 s ...
...glass or ceramic s Brown, crisp crusts s May need to certain birds. BAKEWARE Hot air must be able to circulate around bakeware and oven walls. NUMBER OF POSITION ON RACK PAN(S) 1 Center of foil, liners or cookware because permanent damage will cycle on them. RACKS NOTES:...BAKEWARE/ RESULTS RECOMMENDATIONS Light colored aluminum s Light golden crusts s Even browning s Use temperature and time recommended in the bottom third of oven. Dark aluminum and other bakeware with foil because air must be able to reduce baking temperatures 25°F (15°C). 7 s ...

Owners Manual
Page 8
.../CANCEL or OFF/ CANCEL when finished cooking. The bake element will not. If the temperature drops, cook the meat or poultry longer. Oven Vent A B C D E F Single Oven A. When roasting, it into the center of the thickest portion of the meat or inner thigh or breast of hot air and moisture from... the broil element to maintain the oven temperature. The bake range can be blocked or covered since it allows the release of poultry. A ...
.../CANCEL or OFF/ CANCEL when finished cooking. The bake element will not. If the temperature drops, cook the meat or poultry longer. Oven Vent A B C D E F Single Oven A. When roasting, it into the center of the thickest portion of the meat or inner thigh or breast of hot air and moisture from... the broil element to maintain the oven temperature. The bake range can be blocked or covered since it allows the release of poultry. A ...

Owners Manual
Page 9
...;F and 500°F (77°C and 260°C). 4. For diagram, see the "Positioning Racks and Bakeware" section. On double oven models only, press UPPER OVEN or LOWER OVEN. 2. Press CUSTOM BROIL. 3. BROILING CHART For best results, place food 3" (7 cm) or more difficult. FOOD RACK POSITION COOK ... may cook better at lower broiling temperatures. 1. Press CUSTOM BROIL. 3. Doing so can be adjusted for a set oven temperature will appear on the oven display until the oven is turned off. 5. Press BAKE or CUSTOM BROIL. Press START. Close the door. 1. If you would like ...
...;F and 500°F (77°C and 260°C). 4. For diagram, see the "Positioning Racks and Bakeware" section. On double oven models only, press UPPER OVEN or LOWER OVEN. 2. Press CUSTOM BROIL. 3. BROILING CHART For best results, place food 3" (7 cm) or more difficult. FOOD RACK POSITION COOK ... may cook better at lower broiling temperatures. 1. Press CUSTOM BROIL. 3. Doing so can be adjusted for a set oven temperature will appear on the oven display until the oven is turned off. 5. Press BAKE or CUSTOM BROIL. Press START. Close the door. 1. If you would like ...

Owners Manual
Page 10
...cycle, but the time can be changed. Use a damp cloth to a powdery ash. Press START. Press STOP TIME. Burn Hazard Do not touch the oven during the Self-Cleaning cycle. The start time, the stop time is preset for more smoke. When the stop time countdown and "TIMED" will not...3. Failure to the inner door glass before it becomes heavily soiled. IMPORTANT: The health of porcelain on your model, see "Oven Vent" or "Oven Vents" section. Depending on steel in the oven may result in the glass breaking. At high temperatures, foods react with a damp cloth. How the Cycle Works IMPORTANT: The...
...cycle, but the time can be changed. Use a damp cloth to a powdery ash. Press START. Press STOP TIME. Burn Hazard Do not touch the oven during the Self-Cleaning cycle. The start time, the stop time is preset for more smoke. When the stop time countdown and "TIMED" will not...3. Failure to the inner door glass before it becomes heavily soiled. IMPORTANT: The health of porcelain on your model, see "Oven Vent" or "Oven Vents" section. Depending on steel in the oven may result in the glass breaking. At high temperatures, foods react with a damp cloth. How the Cycle Works IMPORTANT: The...

Owners Manual
Page 11
... to soft cloth or sponge, not directly on automatically. The door will turn on panel. The start time is reached, the oven will not unlock until the oven cools. When the start time is automatically calculated and displayed. To Stop Self-Clean anytime: Press UPPER OFF/CANCEL, LOWER OFF/... & Polish Part Number 31464 (not included): See "Assistance or Service" section to soft cloth or sponge, not directly on the oven display. OVEN CAVITY Do not use oven cleaners. To Self-Clean: Before self-cleaning, make sure the door is closed completely or it will not lock and the cycle ...
... to soft cloth or sponge, not directly on automatically. The door will turn on panel. The start time is reached, the oven will not unlock until the oven cools. When the start time is automatically calculated and displayed. To Stop Self-Clean anytime: Press UPPER OFF/CANCEL, LOWER OFF/... & Polish Part Number 31464 (not included): See "Assistance or Service" section to soft cloth or sponge, not directly on the oven display. OVEN CAVITY Do not use oven cleaners. To Self-Clean: Before self-cleaning, make sure the door is closed completely or it will not lock and the cycle ...

Owners Manual
Page 12
...it is closed and pull it is not suggested to turn them slide. If it will come on when either door is off and cool. 1. OVEN RACKS AND ROASTING RACKS Cleaning Method: s Self-Cleaning cycle: See "Self-Cleaning Cycle" first. Remove racks or they will not work during the Self...-Cleaning cycle. The oven lights will discolor and become harder to remove from the oven door frame. When the oven door is not, repeat the removal and installation procedures. 12 However, if removal is necessary, make sure the...
...it is closed and pull it is not suggested to turn them slide. If it will come on when either door is off and cool. 1. OVEN RACKS AND ROASTING RACKS Cleaning Method: s Self-Cleaning cycle: See "Self-Cleaning Cycle" first. Remove racks or they will not work during the Self...-Cleaning cycle. The oven lights will discolor and become harder to remove from the oven door frame. When the oven door is not, repeat the removal and installation procedures. 12 However, if removal is necessary, make sure the...

Owners Manual
Page 13
..."? Clear the display. See "Clock" section. See "Self-Cleaning Cycle" section. s Has a delay start been set correctly? Oven cooking results not what expected s Is the appliance level? Level the appliance. s Is the proper temperature set or turned on the bottom? ...-clean. See Installation Instructions. s On some models, is self-cleaning, the other oven cannot be set ? s On double oven models, has the correct oven been selected? See "Oven Temperature Control" section. s Is the oven door open? s Are the racks positioned properly? s Is the batter evenly distributed in...
..."? Clear the display. See "Clock" section. See "Self-Cleaning Cycle" section. s Has a delay start been set correctly? Oven cooking results not what expected s Is the appliance level? Level the appliance. s Is the proper temperature set or turned on the bottom? ...-clean. See Installation Instructions. s On some models, is self-cleaning, the other oven cannot be set ? s On double oven models, has the correct oven been selected? See "Oven Temperature Control" section. s Is the oven door open? s Are the racks positioned properly? s Is the batter evenly distributed in...

Dimension Guide
Page 1
...8322;" (69.9 cm) r A. 22³⁄₈" (56.8 cm) max. cutout depth B. 23" (58.4 cm) recessed oven depth C. Oven front D. cutout height Because Whirlpool Corporation policy includes a continuous commitment to floor D. 22¹⁄₂" (57.2 cm) cutout width E. 1¹⁄₂" (3.8 cm..." (129.5 cm) max. ® 24" (61 CM) ELECTRIC SINGLE AND DOUBLE BUILT-IN OVEN PRODUCT MODEL SERIES RBD245PR RBS245PR Electrical: Oven must be connected to the proper electrical voltage and frequency as specified on the oven frame.) Models rated from 7.3 to 9.6 kW at 240 volts (5.5...
...8322;" (69.9 cm) r A. 22³⁄₈" (56.8 cm) max. cutout depth B. 23" (58.4 cm) recessed oven depth C. Oven front D. cutout height Because Whirlpool Corporation policy includes a continuous commitment to floor D. 22¹⁄₂" (57.2 cm) cutout width E. 1¹⁄₂" (3.8 cm..." (129.5 cm) max. ® 24" (61 CM) ELECTRIC SINGLE AND DOUBLE BUILT-IN OVEN PRODUCT MODEL SERIES RBD245PR RBS245PR Electrical: Oven must be connected to the proper electrical voltage and frequency as specified on the oven frame.) Models rated from 7.3 to 9.6 kW at 240 volts (5.5...
Installation Instructions
Page 2
... you to reduce the chance of others . All safety messages will follow the safety alert symbol and either the word "DANGER" or "WARNING." BUILT-IN OVEN SAFETY Your safety and the safety of injury, and tell you what the potential hazard is the safety alert symbol. These words mean: DANGER You...
... you to reduce the chance of others . All safety messages will follow the safety alert symbol and either the word "DANGER" or "WARNING." BUILT-IN OVEN SAFETY Your safety and the safety of injury, and tell you what the potential hazard is the safety alert symbol. These words mean: DANGER You...

Installation Instructions
Page 3
...) ■ Level Parts needed ■ Phillips screwdriver ■ Measuring tape ■ Hand or electric drill (for wall cabinet installations) ■ 1" (25 mm) drill bit (for cutout dimensions and approved oven cooktop combinations (separate sheet). Single Oven Single Oven Undercounter (without cooktop installed above ): Ovens approved for this type of installation have been drilled in the adjacent right or...
...) ■ Level Parts needed ■ Phillips screwdriver ■ Measuring tape ■ Hand or electric drill (for wall cabinet installations) ■ 1" (25 mm) drill bit (for cutout dimensions and approved oven cooktop combinations (separate sheet). Single Oven Single Oven Undercounter (without cooktop installed above ): Ovens approved for this type of installation have been drilled in the adjacent right or...

Installation Instructions
Page 4
.... cutout height Cabinet Side View - overall height C. 23³⁄₄" (60.3 cm) overall width D. 23" (58.4 cm) max. Single Oven Installed in Cabinet A B F D E C A. 24" (61 cm) min. Recessed oven E. Cabinet 4 cutout height Product Dimensions - Double Oven A B E Cabinet Dimensions - Double or Single Oven A B E C D D C A. 22³⁄₈" (56.8 cm) max. cutout depth B. 23" (58.4 cm) recessed...
.... cutout height Cabinet Side View - overall height C. 23³⁄₄" (60.3 cm) overall width D. 23" (58.4 cm) max. Single Oven Installed in Cabinet A B F D E C A. 24" (61 cm) min. Recessed oven E. Cabinet 4 cutout height Product Dimensions - Double Oven A B E Cabinet Dimensions - Double or Single Oven A B E C D D C A. 22³⁄₈" (56.8 cm) max. cutout depth B. 23" (58.4 cm) recessed...

Installation Instructions
Page 5
A A Single Oven A. Model/serial number plate ■ Models rated from inside the oven. 6. Connect a section of copper wire using and follow the procedure below at the front lower corners of the front frame or trim for the oven. Connect the aluminum wiring to the added ...disconnect (or circuit breaker box) through flexible, armored or nonmetallic sheathed, copper cable (with a qualified electrical installer if you will protect the lower oven trim until the oven is inserted into or severing wiring during installation. Check with grounding wire). Models rated at 7.2 kW and...
A A Single Oven A. Model/serial number plate ■ Models rated from inside the oven. 6. Connect a section of copper wire using and follow the procedure below at the front lower corners of the front frame or trim for the oven. Connect the aluminum wiring to the added ...disconnect (or circuit breaker box) through flexible, armored or nonmetallic sheathed, copper cable (with a qualified electrical installer if you will protect the lower oven trim until the oven is inserted into or severing wiring during installation. Check with grounding wire). Models rated at 7.2 kW and...

Installation Instructions
Page 6
...(1.3 cm) 4-Wire Cable from Home Power Supply IMPORTANT: Use the 4-wire cable from the oven to follow these instructions can result in the cabinet. See "Electrical Connection Options Chart" to complete installation for your home has: Go to section: 4-wire 4-wire...wire connector. 5. Install junction box cover. 6 Electrical Connection Options Chart If your type of the unit. Electrically ground oven. A B E F G C H D I . Junction box F. Connect the 2 white wires (F) together using a UL listed wire connector. 3. Set the oven door aside on a protective surface. Side trims ...
...(1.3 cm) 4-Wire Cable from Home Power Supply IMPORTANT: Use the 4-wire cable from the oven to follow these instructions can result in the cabinet. See "Electrical Connection Options Chart" to complete installation for your home has: Go to section: 4-wire 4-wire...wire connector. 5. Install junction box cover. 6 Electrical Connection Options Chart If your type of the unit. Electrically ground oven. A B E F G C H D I . Junction box F. Connect the 2 white wires (F) together using a UL listed wire connector. 3. Set the oven door aside on a protective surface. Side trims ...

Installation Instructions
Page 7
... 2 white wires (D) and the green (or bare) ground wire (of the oven cable) using the # 8-14 x 1" screws (2 for single oven, 4 for each side of oven front frame when pushing oven into cabinet cutout. Install Oven WARNING Excessive Weight Hazard Use two or more people, lift oven partially into cabinet. Shipping foot 3. A B A. Black wires D. A A. Red wires H. On models...
... 2 white wires (D) and the green (or bare) ground wire (of the oven cable) using the # 8-14 x 1" screws (2 for single oven, 4 for each side of oven front frame when pushing oven into cabinet cutout. Install Oven WARNING Excessive Weight Hazard Use two or more people, lift oven partially into cabinet. Shipping foot 3. A B A. Black wires D. A A. Red wires H. On models...

Installation Instructions
Page 8
...Care Guide. 4. or circuit breaker has not tripped. ■ Electrical supply is an extra part, go and open and close. Turn power on for lower oven door. 16. Slide top end of /recycle all parts are testing. 3. Replace oven door by a number appears in the display, turn off the... will go back through the steps to open the oven door. Turn power on. Check Operation of Single Oven 1. To set the clock and other oven functions, refer to the locked position. 14. Complete Installation 1. Check Operation of Double Oven 1. Make sure the oven door is closed and the "ON" light is free...
...Care Guide. 4. or circuit breaker has not tripped. ■ Electrical supply is an extra part, go and open and close. Turn power on for lower oven door. 16. Slide top end of /recycle all parts are testing. 3. Replace oven door by a number appears in the display, turn off the... will go back through the steps to open the oven door. Turn power on. Check Operation of Single Oven 1. To set the clock and other oven functions, refer to the locked position. 14. Complete Installation 1. Check Operation of Double Oven 1. Make sure the oven door is closed and the "ON" light is free...


