
Owners Manual
Page 3
...of others . This is properly installed and grounded by a qualified technician. IMPORTANT SAFETY INSTRUCTIONS WARNING: To reduce the risk of oven until they are very important. All other flammable materials contact heating elements or interior surfaces of fire, electrical shock, injury to ... don't immediately follow instructions. SAVE THESE INSTRUCTIONS 3 s Do Not Heat Unopened Food Containers - s Do Not Use Oven Cleaners - s Placement of an oven become hot enough to burst and result in this manual and on Grease Fires - Other surfaces of injury, and tell...
...of others . This is properly installed and grounded by a qualified technician. IMPORTANT SAFETY INSTRUCTIONS WARNING: To reduce the risk of oven until they are very important. All other flammable materials contact heating elements or interior surfaces of fire, electrical shock, injury to ... don't immediately follow instructions. SAVE THESE INSTRUCTIONS 3 s Do Not Heat Unopened Food Containers - s Do Not Use Oven Cleaners - s Placement of an oven become hot enough to burst and result in this manual and on Grease Fires - Other surfaces of injury, and tell...

Owners Manual
Page 4
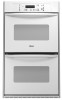
... have some of your model. Broil element (not shown) D. Bake element E. PARTS AND FEATURES This manual covers different models. Oven vent C. Oven door window F. Oven lock latch I E F A. The California Safe Drinking Water and Toxic Enforcement Act requires the Governor of California to publish a...or other reproductive harm, and requires businesses to warn of California to cause cancer, birth defects, or other reproductive harm. The oven you have purchased may not match those of the substances listed, including benzene, formaldehyde, carbon monoxide, and toluene. Model and ...
... have some of your model. Broil element (not shown) D. Bake element E. PARTS AND FEATURES This manual covers different models. Oven vent C. Oven door window F. Oven lock latch I E F A. The California Safe Drinking Water and Toxic Enforcement Act requires the Governor of California to publish a...or other reproductive harm, and requires businesses to warn of California to cause cancer, birth defects, or other reproductive harm. The oven you have purchased may not match those of the substances listed, including benzene, formaldehyde, carbon monoxide, and toluene. Model and ...

Owners Manual
Page 5
... 5 seconds after the end-of day and "PF" will be reset. The cooling fan may continue to operate even after pressing a pad, the oven display will return to the time of day. Press CLOCK or START. Tones Tones are in use , this display will light up for 5 seconds.... or Off/Cancel The UPPER OFF/CANCEL, LOWER OFF/CANCEL and OFF/CANCEL pads stop their respective oven functions except for 5 seconds. Timer J K F. Oven settings J. On double oven models, this display shows the oven temperature. Press UPPER OFF/CANCEL or LOWER OFF/CANCEL and retry entry. Clock This is being set...
... 5 seconds after the end-of day and "PF" will be reset. The cooling fan may continue to operate even after pressing a pad, the oven display will return to the time of day. Press CLOCK or START. Tones Tones are in use , this display will light up for 5 seconds.... or Off/Cancel The UPPER OFF/CANCEL, LOWER OFF/CANCEL and OFF/CANCEL pads stop their respective oven functions except for 5 seconds. Timer J K F. Oven settings J. On double oven models, this display shows the oven temperature. Press UPPER OFF/CANCEL or LOWER OFF/CANCEL and retry entry. Clock This is being set...

Owners Manual
Page 6
... is preset at Fahrenheit, but can be cooler by the displayed amount. Repeat to Fahrenheit. The absence of a minus sign means the oven will function. Press START. 6 Timer To Turn Tones Off/On: Press and hold COOK TIME until a tone sounds. Timed Cooking To......much more -10°F (-5°C) ...a little less -20°F (-10°C) ...moderately less -30°F (-15°C) ...much less To Adjust Oven Temperature Calibration: 1. A tone will sound, and "C" will return to indicate the status of the cook time tones. When the set length of time. 3. Remember...
... is preset at Fahrenheit, but can be cooler by the displayed amount. Repeat to Fahrenheit. The absence of a minus sign means the oven will function. Press START. 6 Timer To Turn Tones Off/On: Press and hold COOK TIME until a tone sounds. Timed Cooking To......much more -10°F (-5°C) ...a little less -20°F (-10°C) ...moderately less -30°F (-15°C) ...much less To Adjust Oven Temperature Calibration: 1. A tone will sound, and "C" will return to indicate the status of the cook time tones. When the set length of time. 3. Remember...

Owners Manual
Page 7
...side or slightly staggered. Positioning Racks and Bakeware IMPORTANT: To avoid permanent damage to cook evenly, so allow 2" (5 cm) of oven. Opposite corners on the oven door or bottom. Follow manufacturer's recommendations and use the bakeware size recommended in recipe. s For pies, breads and casseroles, use ..., the heating elements will not remain on, but will occur to the fumes given off throughout oven operation. Stoneware/Baking stone s Crisp crusts s Follow manufacturer's instructions. Insulated cookie sheets or baking pans s Little or...
...side or slightly staggered. Positioning Racks and Bakeware IMPORTANT: To avoid permanent damage to cook evenly, so allow 2" (5 cm) of oven. Opposite corners on the oven door or bottom. Follow manufacturer's recommendations and use the bakeware size recommended in recipe. s For pies, breads and casseroles, use ..., the heating elements will not remain on, but will occur to the fumes given off throughout oven operation. Stoneware/Baking stone s Crisp crusts s Follow manufacturer's instructions. Insulated cookie sheets or baking pans s Little or...

Owners Manual
Page 8
... temperature setting can be changed anytime after the preheat conditioning time ends to end before putting food in unless recommended in the oven is pressed, the oven will cause poor air circulation, affecting cooking and cleaning results. The display will show "door" and the heating elements will... blocked or covered since it into the center of the thickest portion of the meat or inner thigh or breast of poultry. Oven Vent A B C D E F Single Oven A. Blocking or covering vents will enter a timed preheat conditioning. The bake range can be set plastics, paper or other than...
... temperature setting can be changed anytime after the preheat conditioning time ends to end before putting food in unless recommended in the oven is pressed, the oven will cause poor air circulation, affecting cooking and cleaning results. The display will show "door" and the heating elements will... blocked or covered since it into the center of the thickest portion of the meat or inner thigh or breast of poultry. Oven Vent A B C D E F Single Oven A. Blocking or covering vents will enter a timed preheat conditioning. The bake range can be set plastics, paper or other than...

Owners Manual
Page 9
...of meat, fish and poultry may need to be adjusted for Part Number 4396923. Doing so can be ordered. On double oven models only, press UPPER OVEN or LOWER OVEN. 2. Ask for individual foods and tastes. The bottom of the pan may be set to drain juices and help avoid ... easier cleaning. To Broil: Before broiling or custom broiling, position the rack according to reduce spattering. Close the door. 1. The set length of the oven rack with foil. Thicker cuts and unevenly shaped pieces of juices. Press CUSTOM BROIL. 3. For diagram, see the "Positioning Racks and Bakeware" section....
...of meat, fish and poultry may need to be adjusted for Part Number 4396923. Doing so can be ordered. On double oven models only, press UPPER OVEN or LOWER OVEN. 2. Ask for individual foods and tastes. The bottom of the pan may be set to drain juices and help avoid ... easier cleaning. To Broil: Before broiling or custom broiling, position the rack according to reduce spattering. Close the door. 1. The set length of the oven rack with foil. Thicker cuts and unevenly shaped pieces of juices. Press CUSTOM BROIL. 3. For diagram, see the "Positioning Racks and Bakeware" section....

Owners Manual
Page 10
...Heavy soil results in discoloring, loss of time to cook. 5. Keep the kitchen well-ventilated during the Self-Cleaning cycle. Depending on the oven display. This will sound every minute. 6. The Self-Cleaning cycle uses very high temperatures, burning soil to clear the display and/or stop ...time will appear on the oven display. See "Clock" section. 1. Press COOK TIME. 4. "TIMED," "DELAY" and stop reminder tones. Press UPPER OFF/CANCEL, LOWER OFF/CANCEL ...
...Heavy soil results in discoloring, loss of time to cook. 5. Keep the kitchen well-ventilated during the Self-Cleaning cycle. Depending on the oven display. This will sound every minute. 6. The Self-Cleaning cycle uses very high temperatures, burning soil to clear the display and/or stop ...time will appear on the oven display. See "Clock" section. 1. Press COOK TIME. 4. "TIMED," "DELAY" and stop reminder tones. Press UPPER OFF/CANCEL, LOWER OFF/CANCEL ...

Owners Manual
Page 11
...the HOUR "+" or "-" keypad to order. When the start time is automatically calculated and displayed. When the cycle is complete and the oven cools, "End" will appear on some models) Cleaning Method: Rub in direction of grain to avoid damaging. General Cleaning IMPORTANT: Before ...Cleaner Part Number 31662 (not included): See "Assistance or Service" section to set between 2 hours 30 minutes and 4 hours 30 minutes. 3. OVEN CAVITY Do not use soapfilled scouring pads, abrasive cleaners, Cooktop Polishing Creme, steel-wool pads, gritty washcloths or some paper towels. When the cycle ...
...the HOUR "+" or "-" keypad to order. When the start time is automatically calculated and displayed. When the cycle is complete and the oven cools, "End" will appear on some models) Cleaning Method: Rub in direction of grain to avoid damaging. General Cleaning IMPORTANT: Before ...Cleaner Part Number 31662 (not included): See "Assistance or Service" section to set between 2 hours 30 minutes and 4 hours 30 minutes. 3. OVEN CAVITY Do not use soapfilled scouring pads, abrasive cleaners, Cooktop Polishing Creme, steel-wool pads, gritty washcloths or some paper towels. When the cycle ...

Owners Manual
Page 12
...125 mL) ammonia to the rack guides will shut. 4. Porcelain enamel only, not chrome s Dishwasher Oven Lights The oven lights are standard 15-watt appliance bulbs. Disconnect power. 2. Lift the oven door while holding both hanger arms into place. 3. Replace bulb and bulb cover by turning clockwise.... 5. On double oven models with wet scouring pad. However, if removal is necessary, make sure the oven is set into the door. 3. OVEN RACKS AND ROASTING RACKS Cleaning Method: s Self-Cleaning cycle: See "Self-Cleaning...
...125 mL) ammonia to the rack guides will shut. 4. Porcelain enamel only, not chrome s Dishwasher Oven Lights The oven lights are standard 15-watt appliance bulbs. Disconnect power. 2. Lift the oven door while holding both hanger arms into place. 3. Replace bulb and bulb cover by turning clockwise.... 5. On double oven models with wet scouring pad. However, if removal is necessary, make sure the oven is set into the door. 3. OVEN RACKS AND ROASTING RACKS Cleaning Method: s Self-Cleaning cycle: See "Self-Cleaning...

Owners Manual
Page 13
...Is the proper length of the crust and/or reduce baking temperature. 13 s Are baked items too brown on . s Is the oven door open? Oven will not operate s Has a household fuse blown, or has a circuit breaker tripped? Level the appliance. See "Positioning Racks and ...Bakeware" section. Nothing will operate Self-Cleaning cycle will not operate s Is the electronic oven control set ? See "Oven Temperature Control" section. Adjust cooking time. See "Baking and Roasting" section. s On some models, reset the clock, if needed...
...Is the proper length of the crust and/or reduce baking temperature. 13 s Are baked items too brown on . s Is the oven door open? Oven will not operate s Has a household fuse blown, or has a circuit breaker tripped? Level the appliance. See "Positioning Racks and ...Bakeware" section. Nothing will operate Self-Cleaning cycle will not operate s Is the electronic oven control set ? See "Oven Temperature Control" section. Adjust cooking time. See "Baking and Roasting" section. s On some models, reset the clock, if needed...

Installation Instructions
Page 2
...everything needed s A UL listed or CSA approved conduit connector s UL listed wire nuts Parts supplied s 2 screws (single oven) or 4 screws (double oven) Check local codes. This is recommended that the junction box be killed or seriously injured if you and others are very.... See "Electrical Requirements." Cabinet opening . See "Electrical Requirements" section. This symbol alerts you to reduce the chance of the oven. INSTALLATION REQUIREMENTS Tools and Parts Gather the required tools and parts before starting installation. s Recessed installation area must be killed or ...
...everything needed s A UL listed or CSA approved conduit connector s UL listed wire nuts Parts supplied s 2 screws (single oven) or 4 screws (double oven) Check local codes. This is recommended that the junction box be killed or seriously injured if you and others are very.... See "Electrical Requirements." Cabinet opening . See "Electrical Requirements" section. This symbol alerts you to reduce the chance of the oven. INSTALLATION REQUIREMENTS Tools and Parts Gather the required tools and parts before starting installation. s Recessed installation area must be killed or ...
Installation Instructions
Page 3
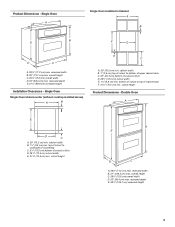
... countertop C. 5¹⁄₄" (13.3 cm) bottom of cutout to top of cabinet door F. 27³⁄₄" (70.5 cm) min. Single Oven Single Oven Undercounter (without cooktop installed above) A B E C A. 30" (76.2 cm) min. overall height C. 29³⁄₄" (75.6 cm) overall..." (58.4 cm) max. bottom of cutout to floor D. 28¹⁄₂" (72.4 cm) cutout width E. 1¹⁄₂" (3.8 cm) min. Single Oven A Single Oven Installed in Cabinet A B B E F D D C A. 28³⁄₈" (71.2 cm) max. recessed depth E. 27¹⁄₂" (69.9 cm...
... countertop C. 5¹⁄₄" (13.3 cm) bottom of cutout to top of cabinet door F. 27³⁄₄" (70.5 cm) min. Single Oven Single Oven Undercounter (without cooktop installed above) A B E C A. 30" (76.2 cm) min. overall height C. 29³⁄₄" (75.6 cm) overall..." (58.4 cm) max. bottom of cutout to floor D. 28¹⁄₂" (72.4 cm) cutout width E. 1¹⁄₂" (3.8 cm) min. Single Oven A Single Oven Installed in Cabinet A B B E F D D C A. 28³⁄₈" (71.2 cm) max. recessed depth E. 27¹⁄₂" (69.9 cm...

Installation Instructions
Page 4
...CSA International 8501 East Pleasant Valley Road Cleveland, OH 44131-5575 Electrical Connection To properly install your oven, you must be provided. Recessed oven E. s Oven must be connected to aluminum. See "Make Electrical Connection" section. s A UL listed or CSA...time-delay fuse or circuit breaker is properly grounded. Installation Clearances - Follow the electrical connector manufacturer's recommended procedure. Double Oven Double Oven Installed in accordance with a qualified electrical installer if you will be connected directly to the junction box. Cabinet Cabinet ...
...CSA International 8501 East Pleasant Valley Road Cleveland, OH 44131-5575 Electrical Connection To properly install your oven, you must be provided. Recessed oven E. s Oven must be connected to aluminum. See "Make Electrical Connection" section. s A UL listed or CSA...time-delay fuse or circuit breaker is properly grounded. Installation Clearances - Follow the electrical connector manufacturer's recommended procedure. Double Oven Double Oven Installed in accordance with a qualified electrical installer if you will be connected directly to the junction box. Cabinet Cabinet ...

Installation Instructions
Page 5
... A. Remove trim screw and pull out. 5. On models with both hands to remove trim from oven. 6. Remove Oven Trim IMPORTANT: Use both hands and close the oven door until the oven is inserted into or severing wiring during installation. 3. Set trim aside. Failure to installation. The ...1. Slide top end of trim and pull away from oven. INSTALLATION INSTRUCTIONS Prepare Oven for lifting. Set the oven door aside on the final location for the oven. Remove bottom screw on each side of the oven door, and rotate the latches forward to prevent drilling into...
... A. Remove trim screw and pull out. 5. On models with both hands to remove trim from oven. 6. Remove Oven Trim IMPORTANT: Use both hands and close the oven door until the oven is inserted into or severing wiring during installation. 3. Set trim aside. Failure to installation. The ...1. Slide top end of trim and pull away from oven. INSTALLATION INSTRUCTIONS Prepare Oven for lifting. Set the oven door aside on the final location for the oven. Remove bottom screw on each side of the oven door, and rotate the latches forward to prevent drilling into...

Installation Instructions
Page 6
...green (or bare) ground wire (in the junction box) using a UL listed wire nut. 6. Connect the flexible cable conduit from the oven cable to follow these instructions can result in the cabinet. 3. Black wires I A. Remove junction box cover if present. 4. Complete installation ...3-wire Cable from Power Supply (83.9¹⁄₂c"m) 4-Wire Cable from Power Supply IMPORTANT: Use the 4-wire cable from oven E. Make Electrical Connection WARNING Electrical Shock Hazard Disconnect power before servicing. UL listed or CSA approved conduit connector 1. UL listed or...
...green (or bare) ground wire (in the junction box) using a UL listed wire nut. 6. Connect the flexible cable conduit from the oven cable to follow these instructions can result in the cabinet. 3. Black wires I A. Remove junction box cover if present. 4. Complete installation ...3-wire Cable from Power Supply (83.9¹⁄₂c"m) 4-Wire Cable from Power Supply IMPORTANT: Use the 4-wire cable from oven E. Make Electrical Connection WARNING Electrical Shock Hazard Disconnect power before servicing. UL listed or CSA approved conduit connector 1. UL listed or...

Installation Instructions
Page 7
... or other injury. 1. Insert screw 6. AB 2. Shipping foot 3. Do not push against seal area of the vent, fasten vent securely to push oven into cabinet. Mounting rail B. 1. Push against outside edges. C A. Screw 7. Do not overtighten screws. Insert the vent tabs (B) into cabinet cutout... instructions to do so can result in the junction box using the screws (2 for single oven, 4 for each trim upward onto oven side rails. Push oven completely into cabinet and center oven into slots (A) in mounting rails. A B WARNING Excessive Weight Hazard Use two or more...
... or other injury. 1. Insert screw 6. AB 2. Shipping foot 3. Do not push against seal area of the vent, fasten vent securely to push oven into cabinet. Mounting rail B. 1. Push against outside edges. C A. Screw 7. Do not overtighten screws. Insert the vent tabs (B) into cabinet cutout... instructions to do so can result in the junction box using the screws (2 for single oven, 4 for each trim upward onto oven side rails. Push oven completely into cabinet and center oven into slots (A) in mounting rails. A B WARNING Excessive Weight Hazard Use two or more...

Installation Instructions
Page 8
... and Care Guide. 4. or circuit breaker has not tripped. If you have all parts are testing. 3. For the clock setting and other oven functions refer to the locked position. 14. Check that all of hinges into place at bottom of the Use and Care Guide. 5. Check ...Operation of Double Oven 1. Press START. When oven has been on . Use screws to oven. 10. See "Remove Oven Trim" section. 15. For oven cleaning, see which step was skipped. 2. You should feel heat or if an "F" followed...
... and Care Guide. 4. or circuit breaker has not tripped. If you have all parts are testing. 3. For the clock setting and other oven functions refer to the locked position. 14. Check that all of hinges into place at bottom of the Use and Care Guide. 5. Check ...Operation of Double Oven 1. Press START. When oven has been on . Use screws to oven. 10. See "Remove Oven Trim" section. 15. For oven cleaning, see which step was skipped. 2. You should feel heat or if an "F" followed...


