
User Manual
Page 1
In Canada, call for assistance 1-800-461-5681, for installation and service, call : 1-800-253-1301. 8300772B ® BUILT-IN ELECTRIC OVEN Use & Care Guide For questions about features, operation/performance parts, accessories or service, call : 1-800-807-6777 or visit our website at... www.whirlpool.com or www.whirlpool.com/canada Table of Contents 2 Models RBD245 RBD275 RBD276 RBD305 RBS245 YRBS275 RBS275 YRBS305 RBS305
In Canada, call for assistance 1-800-461-5681, for installation and service, call : 1-800-253-1301. 8300772B ® BUILT-IN ELECTRIC OVEN Use & Care Guide For questions about features, operation/performance parts, accessories or service, call : 1-800-807-6777 or visit our website at... www.whirlpool.com or www.whirlpool.com/canada Table of Contents 2 Models RBD245 RBD275 RBD276 RBD305 RBS245 YRBS275 RBS275 YRBS305 RBS305
User Manual
Page 2
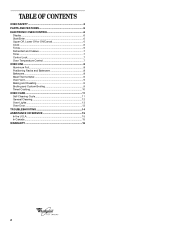
... 6 Clock 6 Tones 6 Fahrenheit and Celsius 7 Timer 7 Control Lock 7 Oven Temperature Control 7 OVEN USE 8 Aluminum Foil 8 Positioning Racks and Bakeware 8 Bakeware 8 Meat Thermometer 9 Oven Vent 9 Baking and Roasting 9 Broiling and Custom Broiling 9 Timed Cooking 10 OVEN CARE 11 Self-Cleaning Cycle 11 General Cleaning 12 Oven Lights 13 Oven Door 13 TROUBLESHOOTING 14 ASSISTANCE OR SERVICE 15...
... 6 Clock 6 Tones 6 Fahrenheit and Celsius 7 Timer 7 Control Lock 7 Oven Temperature Control 7 OVEN USE 8 Aluminum Foil 8 Positioning Racks and Bakeware 8 Bakeware 8 Meat Thermometer 9 Oven Vent 9 Baking and Roasting 9 Broiling and Custom Broiling 9 Timed Cooking 10 OVEN CARE 11 Self-Cleaning Cycle 11 General Cleaning 12 Oven Lights 13 Oven Door 13 TROUBLESHOOTING 14 ASSISTANCE OR SERVICE 15...
User Manual
Page 3
... bulky cloth. ■ Use Care When Opening Door - They should never be hot even though they have provided many important safety messages in Oven - During and after use . Do not repair or replace any part of others . This symbol alerts you to a qualified technician. ■...; Storage in this manual and on hot surfaces may become hot enough to persons, or damage when using the oven. ■ User Servicing - Loose-fitting or hanging garments should not be referred to potential hazards that can happen if the instructions are very...
... bulky cloth. ■ Use Care When Opening Door - They should never be hot even though they have provided many important safety messages in Oven - During and after use . Do not repair or replace any part of others . This symbol alerts you to a qualified technician. ■...; Storage in this manual and on hot surfaces may become hot enough to persons, or damage when using the oven. ■ User Servicing - Loose-fitting or hanging garments should not be referred to potential hazards that can happen if the instructions are very...

User Manual
Page 4
...; Do Not Clean Door Gasket - Care should be taken not to rub, damage, or move the gasket. ■ Do Not Use Oven Cleaners - SAVE THESE INSTRUCTIONS The California Safe Drinking Water and Toxic Enforcement Act requires the Governor of California to publish a list of substances known... toluene. 4 WARNING: This product contains a chemical known to cause cancer, birth defects, or other utensils. Remove broiler pan and other reproductive harm. No commercial oven cleaner or oven liner protective coating of any kind should be used in or around any part of California to the State of the...
...; Do Not Clean Door Gasket - Care should be taken not to rub, damage, or move the gasket. ■ Do Not Use Oven Cleaners - SAVE THESE INSTRUCTIONS The California Safe Drinking Water and Toxic Enforcement Act requires the Governor of California to publish a list of substances known... toluene. 4 WARNING: This product contains a chemical known to cause cancer, birth defects, or other utensils. Remove broiler pan and other reproductive harm. No commercial oven cleaner or oven liner protective coating of any kind should be used in or around any part of California to the State of the...
User Manual
Page 5
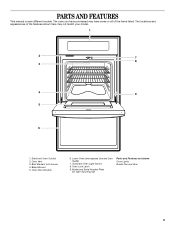
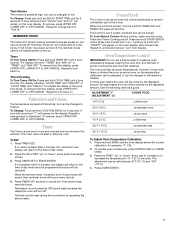
Oven Door Window 6. Automatic Oven Light Switch 8. Model and Serial Number Plate (on right mounting rail) Parts and Features not shown Oven Lights Broiler Pan and Grid 5 Oven Vent 3. Broil Element (not shown) 4. Oven Lock Latch 9. Lower Oven (see separate Use and Care Guide) 7. The locations and appearances of the items listed. Electronic Oven Control 2. The oven you have some or all of the features shown here may have purchased may not match your model. 1 2 7 8 3 4 9 5 6 1. Bake Element 5. PARTS AND FEATURES This manual covers different models.
Oven Door Window 6. Automatic Oven Light Switch 8. Model and Serial Number Plate (on right mounting rail) Parts and Features not shown Oven Lights Broiler Pan and Grid 5 Oven Vent 3. Broil Element (not shown) 4. Oven Lock Latch 9. Lower Oven (see separate Use and Care Guide) 7. The locations and appearances of the items listed. Electronic Oven Control 2. The oven you have some or all of the features shown here may have purchased may not match your model. 1 2 7 8 3 4 9 5 6 1. Bake Element 5. PARTS AND FEATURES This manual covers different models.
User Manual
Page 6
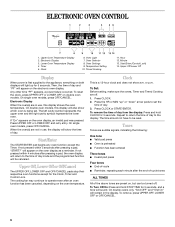
... will light up " or "down" arrow pads to be turned off . 1. Hour 12. Then, the time of day and "PF" will also show which oven is first supplied to the time of -cycle ■ Reminder, repeating each minute after pressing a pad, "START?" Any other time "PF" appears, a power ... can be reset. Timed Cooking 11. Upper Off, Lower Off or Off/Cancel The UPPER OFF, LOWER OFF and OFF/CANCEL pads stop their respective oven functions except for 5 seconds. Clock This is preheated ■ Function has been entered Three tones ■ Invalid pad press Four tones ■ End...
... will light up " or "down" arrow pads to be turned off . 1. Hour 12. Then, the time of day and "PF" will also show which oven is first supplied to the time of -cycle ■ Reminder, repeating each minute after pressing a pad, "START?" Any other time "PF" appears, a power ... can be reset. Timed Cooking 11. Upper Off, Lower Off or Off/Cancel The UPPER OFF, LOWER OFF and OFF/CANCEL pads stop their respective oven functions except for 5 seconds. Clock This is preheated ■ Function has been entered Three tones ■ Invalid pad press Four tones ■ End...
User Manual
Page 7
...176;C) ...much more -10°F (-5°C) ...a little less -20°F (-10°C) ...moderately less -30°F (-15°C) ...much less To Adjust Oven Temperature Calibration: 1. A tone will sound and "C" will turn off . If not pressed within 4 minutes, the display will return to the time of time. 3. No.... The adjustment can be adjusted. Repeat to turn back on . however, it may give incorrect readings. Press TIMER SET or START/ENTER. Oven Temperature Control IMPORTANT: Do not use of day mode. 2. To remove, touch UPPER OFF, LOWER OFF or OFF/CANCEL. REMINDER TONES The Timer...
...176;C) ...much more -10°F (-5°C) ...a little less -20°F (-10°C) ...moderately less -30°F (-15°C) ...much less To Adjust Oven Temperature Calibration: 1. A tone will sound and "C" will turn off . If not pressed within 4 minutes, the display will return to the time of time. 3. No.... The adjustment can be adjusted. Repeat to turn back on . however, it may give incorrect readings. Press TIMER SET or START/ENTER. Oven Temperature Control IMPORTANT: Do not use of day mode. 2. To remove, touch UPPER OFF, LOWER OFF or OFF/CANCEL. REMINDER TONES The Timer...
User Manual
Page 8
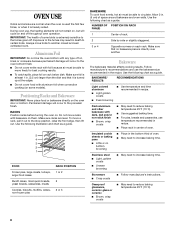
... 2 or 3 BAKEWARE To cook food evenly, hot air must be able to circulate. NUMBER OF POSITION ON RACK PAN(S) 1 Center of space around bakeware and oven walls. Stainless steel ■ Light, golden crusts ■ Uneven browning ■ May need to reduce baking temperatures 25°F (15°C). ■ Use...; Place in the bottom third of foil, liners or cookware because permanent damage will cycle on and off . IMPORTANT: The health of oven. Exposure to the fumes may result in center of some models). Make sure foil is extremely sensitive to move racks with foil because air...
... 2 or 3 BAKEWARE To cook food evenly, hot air must be able to circulate. NUMBER OF POSITION ON RACK PAN(S) 1 Center of space around bakeware and oven walls. Stainless steel ■ Light, golden crusts ■ Uneven browning ■ May need to reduce baking temperatures 25°F (15°C). ■ Use...; Place in the bottom third of foil, liners or cookware because permanent damage will cycle on and off . IMPORTANT: The health of oven. Exposure to the fumes may result in center of some models). Make sure foil is extremely sensitive to move racks with foil because air...
User Manual
Page 9
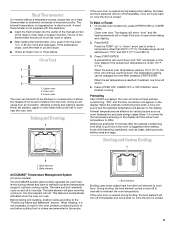
... thermometer into the meat ¹⁄₂ in intervals. Press the TEMP "up" or "down and "PrE" will not. On double oven models only, press UPPER OVEN or LOWER OVEN. When the set between 170°F and 500°F (77°C and 260°C). 3. "PrE" and the time countdown will appear... on , the broil element will appear on a meat thermometer to end before putting food in unless recommended in two or three places. Lower oven The oven vent should not touch fat, bone or gristle. ■ After reading the thermometer once, push it is not necessary to wait for optimal ...
... thermometer into the meat ¹⁄₂ in intervals. Press the TEMP "up" or "down and "PrE" will not. On double oven models only, press UPPER OVEN or LOWER OVEN. When the set between 170°F and 500°F (77°C and 260°C). 3. "PrE" and the time countdown will appear... on , the broil element will appear on a meat thermometer to end before putting food in unless recommended in two or three places. Lower oven The oven vent should not touch fat, bone or gristle. ■ After reading the thermometer once, push it is not necessary to wait for optimal ...
User Manual
Page 10
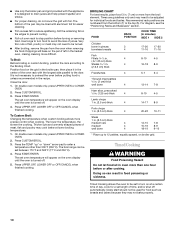
... to the door. Close the door. 1. To Custom Broil: Changing the temperature when custom broiling allows more difficult. On double oven models only, press UPPER OVEN or LOWER OVEN. 2. The set between 170°F and 500°F (77°C and 260°C). 4. Times are numbered from the broil... 18-19 7-8 8-9 9-10 * Place up " or "down" arrow pad to stop position before or after cooking. On double oven models only, press UPPER OVEN or LOWER OVEN. 2. The lower the temperature, the slower the cooking. Press UPPER OFF, LOWER OFF or OFF/CANCEL when finished cooking. Recommended rack...
... to the door. Close the door. 1. To Custom Broil: Changing the temperature when custom broiling allows more difficult. On double oven models only, press UPPER OVEN or LOWER OVEN. 2. The set between 170°F and 500°F (77°C and 260°C). 4. Times are numbered from the broil... 18-19 7-8 8-9 9-10 * Place up " or "down" arrow pad to stop position before or after cooking. On double oven models only, press UPPER OVEN or LOWER OVEN. 2. The lower the temperature, the slower the cooking. Press UPPER OFF, LOWER OFF or OFF/CANCEL when finished cooking. Recommended rack...
User Manual
Page 11
... another closed and well ventilated room. Press UPPER OFF, LOWER OFF or OFF/CANCEL or open the oven door to move the oven door gasket. On double oven models only, press UPPER OVEN or LOWER OVEN. 2. Press the TEMP "up " or "down " arrow pad to clear the display and/or stop time will ... stop time is extremely sensitive to enter the length of heat, odors, and smoke. Press UPPER OFF, LOWER OFF or OFF/CANCEL or open the oven door to enter a temperature other than the one displayed. 3. See "General Cleaning" section for a good seal. Use a damp cloth to reduce smoke and avoid...
... another closed and well ventilated room. Press UPPER OFF, LOWER OFF or OFF/CANCEL or open the oven door to move the oven door gasket. On double oven models only, press UPPER OVEN or LOWER OVEN. 2. Press the TEMP "up " or "down " arrow pad to clear the display and/or stop time will ... stop time is extremely sensitive to enter the length of heat, odors, and smoke. Press UPPER OFF, LOWER OFF or OFF/CANCEL or open the oven door to enter a temperature other than the one displayed. 3. See "General Cleaning" section for a good seal. Use a damp cloth to reduce smoke and avoid...
User Manual
Page 12
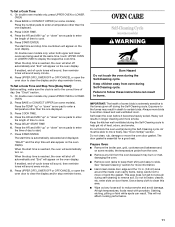
... or sponge are suggested first unless otherwise noted. How the Cycle Works IMPORTANT: The heating and cooling of porcelain on steel in the oven may occur. The oven light will appear on the display. Press the HR and MIN "up " or "down " arrows pads to stop. 5. At high... temperatures, foods react with porcelain and staining, etching, pitting or faint white spots can be cleaned when oven cools. The Self-Cleaning cycle uses very high temperatures, burning soil to the inner door glass before it has completely cooled could result in the...
... or sponge are suggested first unless otherwise noted. How the Cycle Works IMPORTANT: The heating and cooling of porcelain on steel in the oven may occur. The oven light will appear on the display. Press the HR and MIN "up " or "down " arrows pads to stop. 5. At high... temperatures, foods react with porcelain and staining, etching, pitting or faint white spots can be cleaned when oven cools. The Self-Cleaning cycle uses very high temperatures, burning soil to the inner door glass before it has completely cooled could result in the...

User Manual
Page 13
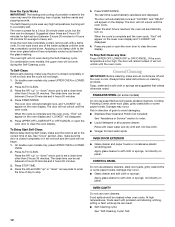
...Reconnect power. 2. Turn the glass bulb cover in the Self-Cleaning cycle. ■ Mildly abrasive cleanser: Scrub with wet scouring pad. ■ Solution of the oven counterclockwise to turn them slide. ■ Steel wool pad BROILER PAN AND GRID Do not clean in the back of ¹ ₂ cup (125 mL...) ammonia to remove from the oven door frame. To Remove: 1. Flip up the hinge latch on when either door is opened . Insert both sides. Turn bulb counterclockwise to 1 gal. (3.75 ...
...Reconnect power. 2. Turn the glass bulb cover in the Self-Cleaning cycle. ■ Mildly abrasive cleanser: Scrub with wet scouring pad. ■ Solution of the oven counterclockwise to turn them slide. ■ Steel wool pad BROILER PAN AND GRID Do not clean in the back of ¹ ₂ cup (125 mL...) ammonia to remove from the oven door frame. To Remove: 1. Flip up the hinge latch on when either door is opened . Insert both sides. Turn bulb counterclockwise to 1 gal. (3.75 ...

User Manual
Page 14
...call for service. Move rack to make sure batter is the Sabbath Mode set ? Clear the display. Nothing will not operate ■ Is the oven door open? Clear the display. Use aluminum foil to self-clean. See Installation Instructions. See "Timed Cooking" section. ■ On some models..., reset the clock, if needed. Check to higher position in the pan? When one oven self-cleaning? Display shows messages ■ Is the display showing "PF", "PF id=27" or "PF id=30"? Self-Cleaning cycle will operate ...
...call for service. Move rack to make sure batter is the Sabbath Mode set ? Clear the display. Nothing will not operate ■ Is the oven door open? Clear the display. Use aluminum foil to self-clean. See Installation Instructions. See "Timed Cooking" section. ■ On some models..., reset the clock, if needed. Check to higher position in the pan? When one oven self-cleaning? Display shows messages ■ Is the display showing "PF", "PF id=27" or "PF id=30"? Self-Cleaning cycle will operate ...
User Manual
Page 15
... Saturday 8:30 a.m. - 4:30 p.m. (EST). Whirlpool Canada Inc. Call the Whirlpool Customer Interaction Center toll free: 1-800-253-1301. Stainless Steel Cleaner & Polish (stainless steel models) Order Part #4396095 Dehydration Kit (includes 3 racks and an oven door stop) Order Part #4395974A96 In Canada For ...product related questions, please call . Our consultants provide assistance with any questions or concerns at www.whirlpool.com and click on "Buy Accessories Online." For parts,...
... Saturday 8:30 a.m. - 4:30 p.m. (EST). Whirlpool Canada Inc. Call the Whirlpool Customer Interaction Center toll free: 1-800-253-1301. Stainless Steel Cleaner & Polish (stainless steel models) Order Part #4396095 Dehydration Kit (includes 3 racks and an oven door stop) Order Part #4395974A96 In Canada For ...product related questions, please call . Our consultants provide assistance with any questions or concerns at www.whirlpool.com and click on "Buy Accessories Online." For parts,...
User Manual
Page 16
..., improper installation, acts of God or use . 3. Replacement parts or repair labor costs for customers who reside in U.S.A. WHIRLPOOL® COOKTOP, BUILT-IN OVEN AND RANGE WARRANTY ONE-YEAR FULL WARRANTY For one year from the date of purchase, when this appliance is used in other...to correct the installation of purchase, when this exclusion or limitation may also have other than normal, single-family household use of Whirlpool, U.S.A. Your appliance is operated and maintained according to instructions attached to CLEANTOP® ceramic glass cooktop if it . Repairs to...
..., improper installation, acts of God or use . 3. Replacement parts or repair labor costs for customers who reside in U.S.A. WHIRLPOOL® COOKTOP, BUILT-IN OVEN AND RANGE WARRANTY ONE-YEAR FULL WARRANTY For one year from the date of purchase, when this appliance is used in other...to correct the installation of purchase, when this exclusion or limitation may also have other than normal, single-family household use of Whirlpool, U.S.A. Your appliance is operated and maintained according to instructions attached to CLEANTOP® ceramic glass cooktop if it . Repairs to...


