User Instructions
Page 1
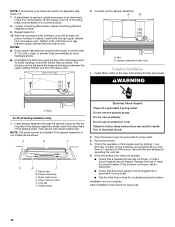
... Tenga listo su número de modelo completo. All safety messages will need assistance, call us at www.whirlpool.com for additional information. IMPORTANT SAFETY INSTRUCTIONS When using the microwave oven. ■ Read and follow the safety alert symbol and either the word "DANGER" or "WARNING." SAVE THESE INSTRUCTIONS W10170440A We have...
... Tenga listo su número de modelo completo. All safety messages will need assistance, call us at www.whirlpool.com for additional information. IMPORTANT SAFETY INSTRUCTIONS When using the microwave oven. ■ Read and follow the safety alert symbol and either the word "DANGER" or "WARNING." SAVE THESE INSTRUCTIONS W10170440A We have...
User Instructions
Page 2
...damaged. for example, near a kitchen sink, in a wet basement, or near water - SAVE THESE INSTRUCTIONS PRECAUTIONS TO AVOID POSSIBLE EXPOSURE TO EXCESSIVE MICROWAVE ENERGY (a) Do not attempt to accumulate on hood or filter. ■ Do not use paper products when appliance is operated in the "PAN BROWN"... for storage purposes. To reduce the risk of the oven. Stir the liquid both gas and electric cooking equipment. ■ Intended to microwave energy. THIS COULD RESULT IN VERY HOT LIQUIDS SUDDENLY BOILING OVER WHEN THE CONTAINER IS DISTURBED OR A SPOON OR OTHER UTENSIL IS INSERTED ...
...damaged. for example, near a kitchen sink, in a wet basement, or near water - SAVE THESE INSTRUCTIONS PRECAUTIONS TO AVOID POSSIBLE EXPOSURE TO EXCESSIVE MICROWAVE ENERGY (a) Do not attempt to accumulate on hood or filter. ■ Do not use paper products when appliance is operated in the "PAN BROWN"... for storage purposes. To reduce the risk of the oven. Stir the liquid both gas and electric cooking equipment. ■ Intended to microwave energy. THIS COULD RESULT IN VERY HOT LIQUIDS SUDDENLY BOILING OVER WHEN THE CONTAINER IS DISTURBED OR A SPOON OR OTHER UTENSIL IS INSERTED ...
User Instructions
Page 3
... 60 Hz, AC only, 15- Recommended: ■ A time-delay fuse or time-delay circuit breaker. ■ A separate circuit serving only this microwave oven. In the event of an electrical short circuit, grounding reduces the risk of minutes. Touch CLOCK. 2. Repeat to unlock control. The "d" will start... THESE INSTRUCTIONS This device complies with plates that is too short, have a qualified electrician or serviceman install an outlet near the microwave oven. Touch and hold number pad "1" for 5 seconds to practice using the control without actually turning on the control panel ...
... 60 Hz, AC only, 15- Recommended: ■ A time-delay fuse or time-delay circuit breaker. ■ A separate circuit serving only this microwave oven. In the event of an electrical short circuit, grounding reduces the risk of minutes. Touch CLOCK. 2. Repeat to unlock control. The "d" will start... THESE INSTRUCTIONS This device complies with plates that is too short, have a qualified electrician or serviceman install an outlet near the microwave oven. Touch and hold number pad "1" for 5 seconds to practice using the control without actually turning on the control panel ...
User Instructions
Page 4
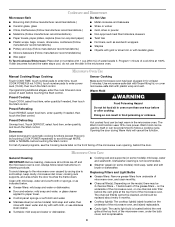
... function uses 10% cook power. Replacing Filters and Light Bulbs ■ Grease filters: Remove grease filters from underside of the microwave oven, under the bulb cover, and is replaceable. 4 Warm Hold WARNING Food Poisoning Hazard Do not let food sit in oven.... ■ Steamer vessel (on some models): mild soap, water and washcloth. Doneness Hot cooked food can result in the microwave oven. Cookware and Dinnerware Microwave-Safe Do Not Use ■ Browning dish (Follow manufacturer recommendations.) ■ Metal cookware and bakeware ■ Ceramic glass, glass...
... function uses 10% cook power. Replacing Filters and Light Bulbs ■ Grease filters: Remove grease filters from underside of the microwave oven, under the bulb cover, and is replaceable. 4 Warm Hold WARNING Food Poisoning Hazard Do not let food sit in oven.... ■ Steamer vessel (on some models): mild soap, water and washcloth. Doneness Hot cooked food can result in the microwave oven. Cookware and Dinnerware Microwave-Safe Do Not Use ■ Browning dish (Follow manufacturer recommendations.) ■ Metal cookware and bakeware ■ Ceramic glass, glass...
User Instructions
Page 5
... different frequency cordless phone or avoid using these items during cooktop usage ■ This is off to heat 1 cup (250 mL) of the microwave oven. Open and close door. Radio, TV or cordless phone interference Check the following: ■ Proximity Move the receiver away from the vent...9632; This is a list of the cycle. Display shows messages ■ A ":" or "PF" means there has been a power failure. www.whirlpool.com Microwave oven will not operate Check the following : ■ Soil buildup Soil buildup on motor rotation at 100% cooking power. Call for 5 minutes or ...
... different frequency cordless phone or avoid using these items during cooktop usage ■ This is off to heat 1 cup (250 mL) of the microwave oven. Open and close door. Radio, TV or cordless phone interference Check the following: ■ Proximity Move the receiver away from the vent...9632; This is a list of the cycle. Display shows messages ■ A ":" or "PF" means there has been a power failure. www.whirlpool.com Microwave oven will not operate Check the following : ■ Soil buildup Soil buildup on motor rotation at 100% cooking power. Call for 5 minutes or ...
User Instructions
Page 6
...repair house fuses, or to correct defects in your product, you on the upper or lower front facing of the microwave oven opening, behind the door. WHIRLPOOL SHALL NOT BE LIABLE FOR INCIDENTAL OR CONSEQUENTIAL DAMAGES. THIS WARRANTY GIVES YOU SPECIFIC LEGAL RIGHTS, AND YOU MAY ... This limited warranty does not cover: 1. Service calls to correct the installation of your major appliance, to instruct you may contact Whirlpool at : Whirlpool Brand Home Appliances Customer eXperience Center 553 Benson Road Benton Harbor, MI 49022-2692 Please include a daytime phone number in materials or...
...repair house fuses, or to correct defects in your product, you on the upper or lower front facing of the microwave oven opening, behind the door. WHIRLPOOL SHALL NOT BE LIABLE FOR INCIDENTAL OR CONSEQUENTIAL DAMAGES. THIS WARRANTY GIVES YOU SPECIFIC LEGAL RIGHTS, AND YOU MAY ... This limited warranty does not cover: 1. Service calls to correct the installation of your major appliance, to instruct you may contact Whirlpool at : Whirlpool Brand Home Appliances Customer eXperience Center 553 Benson Road Benton Harbor, MI 49022-2692 Please include a daytime phone number in materials or...

Installation Instructions
Page 1
...how to Wall 8 Prepare Upper Cabinet 8 Install Damper Assembly 9 Install the Microwave Oven 9 Complete Installation 10 VENTING DESIGN SPECIFICATIONS 11 ASSISTANCE 12 Replacement Parts 12 Accessories 12 MICROWAVE HOOD COMBINATION SAFETY Your safety and the safety of your appliance. All safety ...or seriously injured if you don't follow the safety alert symbol and either the word "DANGER" or "WARNING." W10217687A MICROWAVE HOOD COMBINATION INSTALLATION INSTRUCTIONS This product is suitable for further notes. This is the safety alert symbol. See "Installation Requirements"...
...how to Wall 8 Prepare Upper Cabinet 8 Install Damper Assembly 9 Install the Microwave Oven 9 Complete Installation 10 VENTING DESIGN SPECIFICATIONS 11 ASSISTANCE 12 Replacement Parts 12 Accessories 12 MICROWAVE HOOD COMBINATION SAFETY Your safety and the safety of your appliance. All safety ...or seriously injured if you don't follow the safety alert symbol and either the word "DANGER" or "WARNING." W10217687A MICROWAVE HOOD COMBINATION INSTALLATION INSTRUCTIONS This product is suitable for further notes. This is the safety alert symbol. See "Installation Requirements"...

Installation Instructions
Page 2
... Installation Only: ■ If you are using a rectangular to round transition piece, 3" (7.6 cm) clearance needs to exist above the microwave oven so that the materials used will be included. Washers (2) C. Toggle nuts (2) D. 1/4" x 2" lag screws (2) E. Sheet metal... Installation Only: ■ Cutout must provide: ■ Minimum installation dimensions. Power supply cord bushing (1) G. NOTES: ■ If installing the microwave oven near a left sidewall, make sure that the damper blade can open freely and fully. Location Requirements Check the opening . ■ Support for...
... Installation Only: ■ If you are using a rectangular to round transition piece, 3" (7.6 cm) clearance needs to exist above the microwave oven so that the materials used will be included. Washers (2) C. Toggle nuts (2) D. 1/4" x 2" lag screws (2) E. Sheet metal... Installation Only: ■ Cutout must provide: ■ Minimum installation dimensions. Power supply cord bushing (1) G. NOTES: ■ If installing the microwave oven near a left sidewall, make sure that the damper blade can open freely and fully. Location Requirements Check the opening . ■ Support for...

Installation Instructions
Page 3
...of range/cooktop below. Recommended: ■ A time-delay fuse or time-delay circuit breaker. ■ A separate circuit serving only this microwave oven. Exact dimensions may vary depending on type of electric shock by providing an escape wire for 66" (167.6 cm) installation height.... Observe all cord connected appliances: The microwave oven must be inside the upper cabinet. A B Electrical Requirements WARNING 30" (76.2 cm) min. 30" (76.2 cm) typical* 12" (...
...of range/cooktop below. Recommended: ■ A time-delay fuse or time-delay circuit breaker. ■ A separate circuit serving only this microwave oven. Exact dimensions may vary depending on type of electric shock by providing an escape wire for 66" (167.6 cm) installation height.... Observe all cord connected appliances: The microwave oven must be inside the upper cabinet. A B Electrical Requirements WARNING 30" (76.2 cm) min. 30" (76.2 cm) typical* 12" (...
Installation Instructions
Page 4
... section if you are using recirculation installation. Remove screw attaching damper plate to the work surface, cover the work surface. 1. Lift blower motor out of microwave oven exterior. Keep the damper assembly in another location where wall or roof venting may be made to back of... microwave oven 3. A A. For wall or roof venting, changes must be used. A Screw B. Remove the mounting plate and set aside. 3. Keep damper plate and screw together and ...
... section if you are using recirculation installation. Remove screw attaching damper plate to the work surface, cover the work surface. 1. Lift blower motor out of microwave oven exterior. Keep the damper assembly in another location where wall or roof venting may be made to back of... microwave oven 3. A A. For wall or roof venting, changes must be used. A Screw B. Remove the mounting plate and set aside. 3. Keep damper plate and screw together and ...
Installation Instructions
Page 5
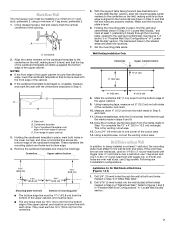
...in Step 3 cannot be poor. 6. Securely tighten screws. NOTE: If blower motor is not positioned with screw. Damper plate B. Slots in the microwave oven. Damper plate tabs E. 5. Repeat Step 4 from "Wall Venting Installation Only." 3. A 6. A. Make sure tabs at top and back ... blower motor so that exhaust ports face the back of microwave oven with 2 screws removed in top of microwave oven exterior 9. A A. Reattach blower motor to back of microwave oven, and lower blower motor back into microwave oven. Reattach damper plate. Reattach damper plate. Secure damper...
...in Step 3 cannot be poor. 6. Securely tighten screws. NOTE: If blower motor is not positioned with screw. Damper plate B. Slots in the microwave oven. Damper plate tabs E. 5. Repeat Step 4 from "Wall Venting Installation Only." 3. A 6. A. Make sure tabs at top and back ... blower motor so that exhaust ports face the back of microwave oven with 2 screws removed in top of microwave oven exterior 9. A A. Reattach blower motor to back of microwave oven, and lower blower motor back into microwave oven. Reattach damper plate. Reattach damper plate. Secure damper...
Installation Instructions
Page 6
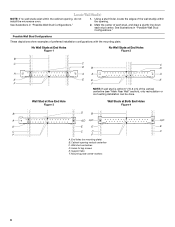
See illustrations in "Possible Wall Stud Configurations." 2. End holes (on mounting plate) B. See illustrations in "Possible Wall Stud Configurations." Cabinet opening , do not install the microwave oven. 1. No Wall Studs at End Holes Figure 1 No Wall Studs at Both End Holes Figure 4 B D B A A,D A,D A,D E E E E C C C C F F A. Mark the center of preferred installation configurations with the ...
See illustrations in "Possible Wall Stud Configurations." 2. End holes (on mounting plate) B. See illustrations in "Possible Wall Stud Configurations." Cabinet opening , do not install the microwave oven. 1. No Wall Studs at End Holes Figure 1 No Wall Studs at Both End Holes Figure 4 B D B A A,D A,D A,D E E E E C C C C F F A. Mark the center of preferred installation configurations with the ...
Installation Instructions
Page 7
... to figures 1 and 2 in "Possible Wall Stud Configurations" in Step 3 of "Mark Rear Wall." 2. Cardboard template C. Measure down from the centerline. 5. Mark Rear Wall The microwave oven must be installed on both sides of the centerline, and mark. 10. D. Using a keyhole saw, cut out the venting cutout area. Installation for No...
... to figures 1 and 2 in "Possible Wall Stud Configurations" in Step 3 of "Mark Rear Wall." 2. Cardboard template C. Measure down from the centerline. 5. Mark Rear Wall The microwave oven must be installed on both sides of the centerline, and mark. 10. D. Using a keyhole saw, cut out the venting cutout area. Installation for No...
Installation Instructions
Page 8
...(s) and bolt. Insert lag screws into the remaining end hole. 6. Remove all lag screws and bolts. Place Upper Cabinet Template against the bottom of the microwave oven. The "rear wall" arrows must be against the upper cabinet bottom. Drywall D. Refer to the wall on the rear wall. Start toggle nuts on...
...(s) and bolt. Insert lag screws into the remaining end hole. 6. Remove all lag screws and bolts. Place Upper Cabinet Template against the bottom of the microwave oven. The "rear wall" arrows must be against the upper cabinet bottom. Drywall D. Refer to the wall on the rear wall. Start toggle nuts on...

Installation Instructions
Page 9
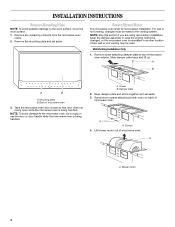
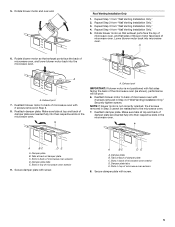
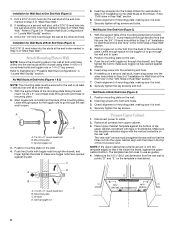
... template. Position the damper assembly on the back of the shaded rectangular area "F" on the template. NOTE: To avoid damage to the microwave oven, do so can result in back or other injury. Mounting plate B. These are for the power supply cord. Place a washer ...at points "D" and "E" on Upper Cabinet Template. 8. B A A. Metal cabinet B. Using a keyhole saw, cut out the rectangular area. A B A. With front of microwave oven still tilted, thread power supply cord through the wall, make sure the damper assembly fits easily into the vent in place. 9 Handle the...
... template. Position the damper assembly on the back of the shaded rectangular area "F" on the template. NOTE: To avoid damage to the microwave oven, do so can result in back or other injury. Mounting plate B. These are for the power supply cord. Place a washer ...at points "D" and "E" on Upper Cabinet Template. 8. B A A. Metal cabinet B. Using a keyhole saw, cut out the rectangular area. A B A. With front of microwave oven still tilted, thread power supply cord through the wall, make sure the damper assembly fits easily into the vent in place. 9 Handle the...
Installation Instructions
Page 10
... Loosen mounting plate screws. Raised tabs B. Check the operation of water on a covered surface. 8. Installation is required, rotate microwave oven downward. Refer to follow these instructions can result in place, insert bolts through the cabinet cutout so that a circuit breaker...damper assembly through upper cabinet into a grounded 3 prong outlet. A B C D E F A. Damper plate Electrical Shock Hazard Plug into microwave oven. NOTE: The screw cannot be the same thickness as shown. Damper assembly C. If adjustment is now complete. Failure to the User ...
... Loosen mounting plate screws. Raised tabs B. Check the operation of water on a covered surface. 8. Installation is required, rotate microwave oven downward. Refer to follow these instructions can result in place, insert bolts through the cabinet cutout so that a circuit breaker...damper assembly through upper cabinet into a grounded 3 prong outlet. A B C D E F A. Damper plate Electrical Shock Hazard Plug into microwave oven. NOTE: The screw cannot be the same thickness as shown. Damper assembly C. If adjustment is now complete. Failure to the User ...
Installation Instructions
Page 11
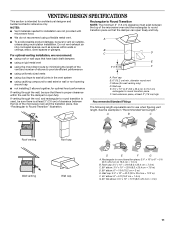
...rigid metal vent E ■ using the most direct route by minimizing the length of the 3" (7.6 cm) F vent and number of the microwave oven and the rectangular to open freely and fully. ■ We do not recommend using duct tape to seal all joints in "Recommended Vent...venting through the wall, be sure there is at least 3" (7.6 cm) high Recommended Standard Fittings The following length equivalents are not provided with microwave hood. Vent extension piece, at least 3" (7.6 cm) of clearance between the top of elbows to provide efficient performance ■ using uniformly ...
...rigid metal vent E ■ using the most direct route by minimizing the length of the 3" (7.6 cm) F vent and number of the microwave oven and the rectangular to open freely and fully. ■ We do not recommend using duct tape to seal all joints in "Recommended Vent...venting through the wall, be sure there is at least 3" (7.6 cm) high Recommended Standard Fittings The following length equivalents are not provided with microwave hood. Vent extension piece, at least 3" (7.6 cm) of clearance between the top of elbows to provide efficient performance ■ using uniformly ...
Installation Instructions
Page 12
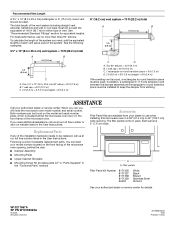
... which is round, a rectangular to use no more than three 90° elbows. Each panel is a list of the microwave oven. Filler panels Filler Panel Kit Number 8171336 8171337 8171338 8171339 99403 White Black Biscuit Stainless Steel Almond See your authorized dealer ... reserved. 461965603056 9/08 Printed in pairs. You will need , add the equivalent lengths of the system you will need additional assistance, call , you need the microwave oven model number and serial number. One 3¹⁄₄" x 10" (8.3 x 25.4 cm) 90° elbow = 25 ft (7.6 m) B. 1 wall cap = 40 ft (12.2...
... which is round, a rectangular to use no more than three 90° elbows. Each panel is a list of the microwave oven. Filler panels Filler Panel Kit Number 8171336 8171337 8171338 8171339 99403 White Black Biscuit Stainless Steel Almond See your authorized dealer ... reserved. 461965603056 9/08 Printed in pairs. You will need , add the equivalent lengths of the system you will need additional assistance, call , you need the microwave oven model number and serial number. One 3¹⁄₄" x 10" (8.3 x 25.4 cm) 90° elbow = 25 ft (7.6 m) B. 1 wall cap = 40 ft (12.2...

Dimensions
Page 1
..." (167.6 cm) at least one 2" x 4" min. wall cap 8 feet straight = 5 ft. = 20 ft. = 40 ft. = 8 ft. ® Microwave Hood Combination PRODUCT MODEL NUMBERS GH4184XS OVERALL DIMENSIONS Electrical: A 120-volt, 60-Hz, AC-only, 15- NOTE: There must not exceed the equivalent of 140... = 10 ft. 3-1/4" x 10" 45° elbow wall cap = 6" = 5 ft. 40 ft. 3-1/4" x 10" 90° flat elbow= 10 ft. Because Whirlpool Corporation policy includes a continuous commitment to provide efficient performance. ✔ that length of vent and number of elbows should be kept to a minimum to improve...
..." (167.6 cm) at least one 2" x 4" min. wall cap 8 feet straight = 5 ft. = 20 ft. = 40 ft. = 8 ft. ® Microwave Hood Combination PRODUCT MODEL NUMBERS GH4184XS OVERALL DIMENSIONS Electrical: A 120-volt, 60-Hz, AC-only, 15- NOTE: There must not exceed the equivalent of 140... = 10 ft. 3-1/4" x 10" 45° elbow wall cap = 6" = 5 ft. 40 ft. 3-1/4" x 10" 90° flat elbow= 10 ft. Because Whirlpool Corporation policy includes a continuous commitment to provide efficient performance. ✔ that length of vent and number of elbows should be kept to a minimum to improve...

Use and Care Guide
Page 2
.../Add 30 Seconds 6 Easy Minute Feature 7 Cancel 7 Clock 7 Tones 7 Timer 7 Child Lock 7 Vent Fan 7 Cooktop Light 7 Demo Mode 7 MICROWAVE OVEN USE 8 Food Characteristics 8 Cooking Guidelines 8 Cookware and Dinnerware 8 Aluminum Foil and Metal 9 Cooking Power 9 Cooking 10 6th SENSE TMSystem Cooking 10 ...Preset Cooking 10 Beverage 11 Cooking in Stages 11 Reheating 11 Defrosting 12 Warm Hold 12 MICROWAVE OVEN CARE 13 General Cleaning 13 Replacing Filters 13 Replacing Cooktop Light 14 Replacing Oven Light 14 TROUBLESHOOTING 14 ASSISTANCE OR...
.../Add 30 Seconds 6 Easy Minute Feature 7 Cancel 7 Clock 7 Tones 7 Timer 7 Child Lock 7 Vent Fan 7 Cooktop Light 7 Demo Mode 7 MICROWAVE OVEN USE 8 Food Characteristics 8 Cooking Guidelines 8 Cookware and Dinnerware 8 Aluminum Foil and Metal 9 Cooking Power 9 Cooking 10 6th SENSE TMSystem Cooking 10 ...Preset Cooking 10 Beverage 11 Cooking in Stages 11 Reheating 11 Defrosting 12 Warm Hold 12 MICROWAVE OVEN CARE 13 General Cleaning 13 Replacing Filters 13 Replacing Cooktop Light 14 Replacing Oven Light 14 TROUBLESHOOTING 14 ASSISTANCE OR...


