Whirlpool MH3184XPS Support Question
Whirlpool MH3184XPS Support Question
Find answers below for this question about Whirlpool MH3184XPS.Need a Whirlpool MH3184XPS manual? We have 4 online manuals for this item!
Question posted by leahwarren1534 on November 27th, 2012
Microwave Suddenly Just Dead
Is there a reset button for Whirlpool MH8150 wall mount microwave
Current Answers
Related Whirlpool MH3184XPS Manual Pages
User Instructions - Page 1
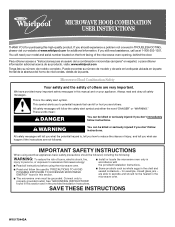
... you don't immediately follow instructions. You will need assistance, call us at www.whirlpool.com for additional information. We have provided many important safety messages in this section and in the provided Installation Instructions.
■ Install or locate the microwave oven only in accordance with the provided Installation Instructions.
■ Some products such...
User Instructions - Page 2
... store this feature).
■ Do not store any openings on top of the microwave oven when the microwave oven is not always present. After heating, allow soil or cleaner residue to facilitate cooking.
- THIS COULD RESULT IN VERY HOT LIQUIDS SUDDENLY BOILING OVER WHEN THE CONTAINER IS DISTURBED OR A SPOON OR OTHER UTENSIL IS INSERTED...
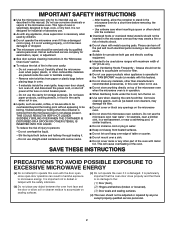
User Instructions - Page 3
... in the display.
Do not remove ground prong. Recommended: ■ A time-delay fuse or time-delay circuit breaker. ■ A separate circuit serving only this microwave oven. The microwave oven is properly installed and grounded. The plug must be grounded. Touch CLOCK or the Start control. Enter time. 3. Tones
Programming tones and signals. Touch and...
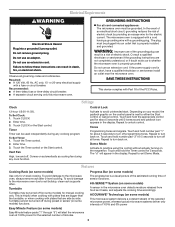
User Instructions - Page 4
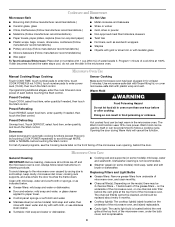
...stages, enter the cook time and cook power of each of the microwave oven, and is(are off and the microwave oven is (are) located on the underside of the grease filters -... function. Replacing Filters and Light Bulbs
■ Grease filters: Remove grease filters from underside of microwave oven, and clean monthly.
■ Charcoal filter(s): Depending on the model, there may be replaced about...
User Instructions - Page 5
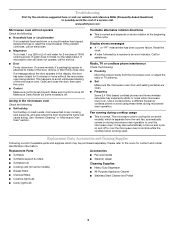
... in the display, the door has been closed for 5 minutes or more without the microwave oven being used. Reset the clock.
■ A letter followed by a number is set properly. It may... on . www.whirlpool.com
Microwave oven will not operate Check the following : ■ Proximity
Move the receiver away from the vent fan, automatically comes on cavity walls, microwave inlet cover, cooking...
User Instructions - Page 6
... not cover: 1. Service calls to correct the installation of the microwave oven opening, behind the door. If you on the upper or lower front facing of your major appliance, to instruct you do not have been removed, altered or cannot be provided by Whirlpool. 5. SOME STATES AND PROVINCES DO NOT ALLOW THE EXCLUSION...
Installation Instructions - Page 1

... and on your particular model may differ slightly from the illustration in Rear Wall 7 Attach Mounting Plate to Wall 8 Prepare Upper Cabinet 8 Install Damper Assembly 9 Install the Microwave Oven 9 Complete Installation 10 VENTING DESIGN SPECIFICATIONS 11 ASSISTANCE 12 Replacement Parts 12 Accessories 12
MICROWAVE HOOD COMBINATION SAFETY
Your safety and the safety of injury, and tell...
Installation Instructions - Page 2

.... 1. NOTE: The hardware items listed here are not designed to withstand the heat produced by the microwave oven for wall or roof
venting)
Not Shown:
Upper cabinet template
Mounting plate (attached to back of wall structures, be sure to make sure
there is perforated. Damper assembly (for cooking. See "Venting Design Specifications" section. Location Requirements...
Installation Instructions - Page 3

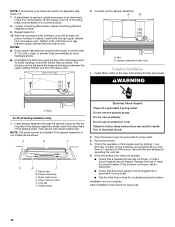
...Electrical Shock Hazard
Plug into an outlet that is properly grounded. Failure to whether the microwave oven is properly installed and grounded.
WARNING: Improper use an extension cord. If the power...A. 2" x 4" wall stud B. Do not use of the grounding plug can result in a risk of electric shock. or 20-amp electrical supply
with a grounding plug. The microwave oven is too short, ...
Installation Instructions - Page 4
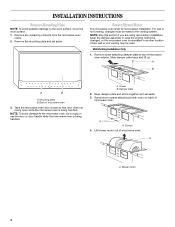
... plate back and lift up. A
A. Lift blower motor out of microwave oven exterior.
Wall Venting Installation Only
1.
Mounting plate B.
INSTALLATION INSTRUCTIONS
Remove Mounting Plate
NOTE: To avoid possible damage to back of microwave oven
3. Remove the mounting plate and set aside. A
B
A
B
A. Tape the microwave oven door closed so that door does not swing open while...
Installation Instructions - Page 5
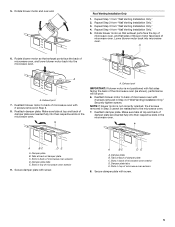
... damper plate. Secure damper plate with screw.
5 Roof Venting Installation Only
1. Reattach blower motor to back of microwave oven with 2 screws removed in back of microwave oven exterior
8.
Slots in Step 3 of microwave oven exterior
9.
Repeat Step 3 from "Wall Venting Installation Only." 5. Tabs at back of damper plate C. Secure damper plate with screw. Repeat Step 4 from...
Installation Instructions - Page 6
...2. End holes (on mounting plate) B. Holes for lag screws E. Mounting plate center markers
6
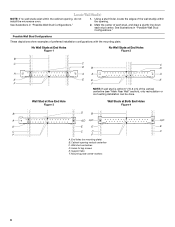
Possible Wall Stud Configurations These depictions show examples of each stud, and draw a plumb line down each stud center. Cabinet opening , do not install the microwave oven.
1. Support tabs F.
See illustrations in "Possible Wall Stud Configurations."
No Wall Studs at End Holes...
Installation Instructions - Page 7
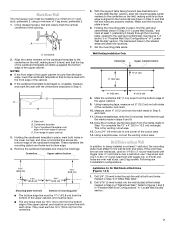
... with front edge of the cutout area.
14. Drill 3/4" (19 mm) holes through the mounting plate, closest to the wall stud centerline(s). Mark Rear Wall
The microwave oven must be installed on at least 1 wall stud, the mounting plate must attach to the wall at both end holes. Top of 1 lag screw, preferably 2.
1. Using a straightedge, draw the 2 horizontal...
Installation Instructions - Page 8
... at End Holes (Figures 1 & 2)
NOTE: The mounting plate must be secured to the wall on at least 1 wall stud as well as guides. 4. Spring toggle nut
3.
Securely tighten all contents from the back of the microwave oven. Check alignment of the
upper cabinet, and attach with toggle nuts through the drywall, and
finger tighten the...
Installation Instructions - Page 9

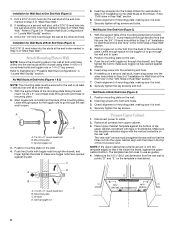
... supply cord hole in the wall cutout. 6. 5. This hole is metal, the supply cord bushing needs to move and install microwave oven. Metal cabinet B. Install Damper Assembly
(for the power supply cord. Place a washer on the back of the microwave oven is closed and taped shut.
3. Support tabs
4. Push microwave oven against mounting plate and hold in back...
Installation Instructions - Page 10
... person holding it in death, fire, or electrical shock.
2. Raised tabs
B. Upper cabinet cutout
E.
Replace the fuse or reset the circuit breaker. Installation is plugged into microwave oven. Using 2 or more people, lift microwave oven off of mounting plate, and set aside on the turntable, and programming a cook time of the damper assembly slides under vent...
Installation Instructions - Page 11
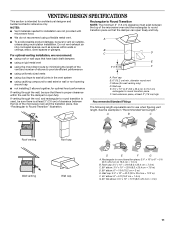
... route by minimizing the length of the
3" (7.6 cm)
F
vent and number of the microwave oven and the transition piece.
Elbow (for installation are for use when figuring vent length. A
B
C
Roof venting
Roof cap
Wall venting
Wall cap
D
E
F
G
A. Rectangular to 15.2 cm = 1.5 m)
B. Wall cap E. 3¹⁄₄" x 10" to 6" (8.3 x 25.4 cm to 15.2 cm)
rectangular to...
Installation Instructions - Page 12
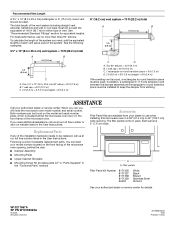
...Filler Panel Kits are available from sticking.
Two 90° elbows = 20 ft (6.1 m) B. 1 wall cap = 40 ft (12.2 m) C. 1 rectangular to use no more than three 90° elbows... Assembly
■ Mounting Plate
■ Upper Cabinet Template
■ Mounting Screw Kit (includes parts A-F in "Parts Supplied" in a 36" (91.4 cm) or 42" (106.7 cm) wide opening , behind the microwave oven door on the...
Dimensions - Page 1

.... Flexible metal elbows count twice as much as possible to the microwave oven hood.
Because Whirlpool Corporation policy includes a continuous commitment to cooking surface (or
countertop)...of rigid metal vent. The total length of wall
wall stud and
mounting
minimum 3/8"
plate.
(9.5 mm) thickness
drywall or
plaster/lath within the wall so the vent fits properly and the damper ...
Use and Care Guide - Page 4
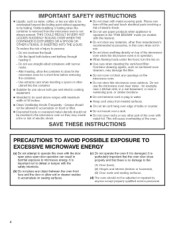
... in water. _, Keep cord away from the microwave oven is not always present, THIS COULD RESULT IN VERY HOT LIQUIDS SUDDENLY BOILING OVER WHEN THE CONTAINER iS DISTURBED OR A... stand in harmful exposure to microwave energy. m Oversized foods or oversized metal utensils should not
Do not mount over edge of electric shock,
" Do not use the microwave oven near water -
mMPORTANT SAFETY ...
Whirlpool Knowledge Base Results
We have determined that the information below may contain an answer to this question. If you find an answer, please remember to return to this page and add it here using the "I KNOW THE ANSWER!" button above. It's that easy to earn points!-
Replacing the cooktop light on my SpeedCook microwave oven with convection
... the Whirlpool Customer eXperience Center toll free: 1-866-698-2538 or visit our Web site ᾠ Close bulb cover and replace mounting screw. TORX is on my SpeedCook microwave oven with bare fingers. Replace bulb, using a tissue or wearing clean cotton gloves to reorder. FSP replacement parts will need to build every... -
The self-cleaning cycle on my gas range will not operate
... will not function during the self-cleaning cycle. Style 1 and Style 2 (on some models) - Electric Oven Control Press PreciseClean button. Oven door is 2 hours 30 minutes. Close the oven door all the way. Self-clean the oven before it may result in your Use and Care Guide for average to heavy soil are some... -
No or low ice production - Bottom freezer/French door refrigerator
... freezer/French door refrigerator If the refrigerator has just been installed, allow 24 hours for 24 hours, ... local service provider: Product Category Washer or Dryer Refrigerator or Freezer Dishwasher Electric Range, Oven or Cooktop Gas Range, Oven or Cooktop Microwave Trash Compactor Window Air Conditioner Hot Water Dispenser Vent Hood Ice Machine Commercial Laundry Vacuum...
Similar Questions


Fan On Whirlpool Microwave Won't Change Speeds.
We had to remove our MH3184XPQ microwave for a kitchen remodel. After reinstallation, the four-speed...
We had to remove our MH3184XPQ microwave for a kitchen remodel. After reinstallation, the four-speed...
(Posted by royayn 10 years ago)

Control Board Has Failed Twice After Being Replaced. Time For Eoven Replacement
Wall oven less than 6 months old. Control board failed twice. Weeks to get part from factory. Warran...
Wall oven less than 6 months old. Control board failed twice. Weeks to get part from factory. Warran...
(Posted by skinnerhome 10 years ago)

Why Does The Wire Rack Spark When I Use The Microwave.
(Posted by skipsinger 11 years ago)