Use and Care Manual
Page 11
..., followed by "SENSING." Place food on the turntable, off to the side (not centered). The cycle will start automatically. Doneness may be replaced by touching COOK TIME. When the cycle ends, "END" will appear in the display for a moment, and then will be adjusted during ...cm) apart. • Let potato(es) stand 5 minutes after cooking. Let stand 5 minutes after baking. For 10- Touch CANCEL OFF or open the door to clear the display and/or stop reminder tones. Touch START. "ENTER 1 OR 2 CUPS" will appear in the display. The display will appear briefly...
..., followed by "SENSING." Place food on the turntable, off to the side (not centered). The cycle will start automatically. Doneness may be replaced by touching COOK TIME. When the cycle ends, "END" will appear in the display for a moment, and then will be adjusted during ...cm) apart. • Let potato(es) stand 5 minutes after cooking. Let stand 5 minutes after baking. For 10- Touch CANCEL OFF or open the door to clear the display and/or stop reminder tones. Touch START. "ENTER 1 OR 2 CUPS" will appear in the display. The display will appear briefly...
Use and Care Manual
Page 14
... to dry. Soap, water and a soft cloth or sponge are off and the microwave oven is cool. The area where the microwave oven door and frame touch when closed should be kept clean. • Mild, nonabrasive soaps and detergents: Rinse with clean water and dry with soft,... • Do not use abrasive RACK SUPPORTS Odors • Lemon juice or vinegar: Clean often to 5 minutes in the dishwasher. Average soil Replace turntable immediately after cleaning them in microwave oven. Damage may lead to arcing and cause damage to avoid damaging. NOTE: Some discoloration of grain to...
... to dry. Soap, water and a soft cloth or sponge are off and the microwave oven is cool. The area where the microwave oven door and frame touch when closed should be kept clean. • Mild, nonabrasive soaps and detergents: Rinse with clean water and dry with soft,... • Do not use abrasive RACK SUPPORTS Odors • Lemon juice or vinegar: Clean often to 5 minutes in the dishwasher. Average soil Replace turntable immediately after cleaning them in microwave oven. Damage may lead to arcing and cause damage to avoid damaging. NOTE: Some discoloration of grain to...
Use and Care Manual
Page 16
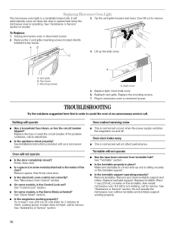
.... See Installation Instructions provided with your microwave oven. Remove spacer, then firmly close door. On some models, is operating. Turntable will operate Has a household fuse blown, or has the circuit breaker tripped? Remove and clean turntable support and rollers. Replace turntable support. See "Assistance or Service" section. The microwave oven light is...
.... See Installation Instructions provided with your microwave oven. Remove spacer, then firmly close door. On some models, is operating. Turntable will operate Has a household fuse blown, or has the circuit breaker tripped? Remove and clean turntable support and rollers. Replace turntable support. See "Assistance or Service" section. The microwave oven light is...
Installation Instructions
Page 2
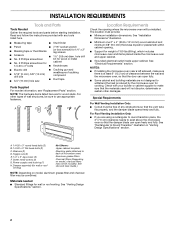
...drill bits ■ 3/4" (19 mm) hole saw ■ Caulking gun and weatherproof caulking compound ■ Duct tape Parts Supplied For reorder information, see "Replacement Parts" section. NOTE: The hardware items listed here are not designed to make sure there is at least 6" (15.2 cm) of microwave oven) Aluminum... produced by the microwave oven for cooking. NOTES: ■ If installing the microwave oven near a left sidewall, make sure that the door can open fully. ■ Some cabinet and building materials are for weight of 150 lbs (68 kg), which includes microwave oven and ...
...drill bits ■ 3/4" (19 mm) hole saw ■ Caulking gun and weatherproof caulking compound ■ Duct tape Parts Supplied For reorder information, see "Replacement Parts" section. NOTE: The hardware items listed here are not designed to make sure there is at least 6" (15.2 cm) of microwave oven) Aluminum... produced by the microwave oven for cooking. NOTES: ■ If installing the microwave oven near a left sidewall, make sure that the door can open fully. ■ Some cabinet and building materials are for weight of 150 lbs (68 kg), which includes microwave oven and ...
Installation Instructions
Page 12
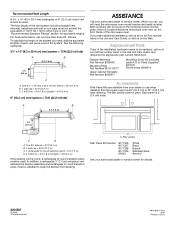
...sticking. Both numbers can be found on the model and serial number plate, which is located behind the microwave oven door on the Web. Damper Assembly Part Number 8206442 Mounting Plate Part Number W10110277 Upper Cabinet Template Part Number 8205871 Mounting ...20 ft (6.1 m) B. 1 wall cap = 40 ft (12.2 m) C. 1 rectangular to keep the damper from your authorized dealer or service center for details. 8206587 © 2006. Replacement Parts If any of 140 ft (42.7 m) for equivalent lengths. A B 6 ft (1.8 m) 2 ft (0.6 m) C D A. In addition, a rectangular 3" (7.6 cm) extension...
...sticking. Both numbers can be found on the model and serial number plate, which is located behind the microwave oven door on the Web. Damper Assembly Part Number 8206442 Mounting Plate Part Number W10110277 Upper Cabinet Template Part Number 8205871 Mounting ...20 ft (6.1 m) B. 1 wall cap = 40 ft (12.2 m) C. 1 rectangular to keep the damper from your authorized dealer or service center for details. 8206587 © 2006. Replacement Parts If any of 140 ft (42.7 m) for equivalent lengths. A B 6 ft (1.8 m) 2 ft (0.6 m) C D A. In addition, a rectangular 3" (7.6 cm) extension...


