
Installation Instructions
Page 1
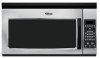
The appearance of your particular model may differ slightly from the illustration in these installation instructions. These installation instructions cover different models. MICROWAVE HOOD COMBINATION INSTALLATION INSTRUCTIONS This product is suitable for use above electric or gas cooking products up to 36" (91.4 cm) wide. NOTES:
The appearance of your particular model may differ slightly from the illustration in these installation instructions. These installation instructions cover different models. MICROWAVE HOOD COMBINATION INSTALLATION INSTRUCTIONS This product is suitable for use above electric or gas cooking products up to 36" (91.4 cm) wide. NOTES:
Installation Instructions
Page 2
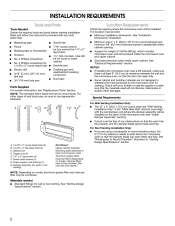
INSTALLATION REQUIREMENTS Tools and Parts Tools Needed Gather the required tools and parts before starting installation. Location Requirements Check the opening where the microwave oven will be installed. The location must provide: Read and follow the instructions provided with any tools listed here.
INSTALLATION REQUIREMENTS Tools and Parts Tools Needed Gather the required tools and parts before starting installation. Location Requirements Check the opening where the microwave oven will be installed. The location must provide: Read and follow the instructions provided with any tools listed here.
Installation Instructions
Page 3
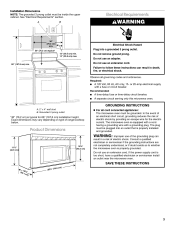
Do not use an extension cord. Required: Do not remove ground prong. Electrical Shock Hazard Plug into a grounded 3 prong outlet. See "Electrical Requirements" section. Failure to follow these instructions can result in death, fire, or electrical shock. Observe all governing codes and ordinances. Electrical Requirements A B WARNING 30" (76.2 cm) min. 30" (76.2 cm) typical* 12" (30.5 cm) min. 14" (35.6 cm) max. Do not use an adapter. 66" (167.6 cm) min. Installation Dimensions NOTE: The grounded 3 prong outlet must be inside the upper cabinet.
Do not use an extension cord. Required: Do not remove ground prong. Electrical Shock Hazard Plug into a grounded 3 prong outlet. See "Electrical Requirements" section. Failure to follow these instructions can result in death, fire, or electrical shock. Observe all governing codes and ordinances. Electrical Requirements A B WARNING 30" (76.2 cm) min. 30" (76.2 cm) typical* 12" (30.5 cm) min. 14" (35.6 cm) max. Do not use an adapter. 66" (167.6 cm) min. Installation Dimensions NOTE: The grounded 3 prong outlet must be inside the upper cabinet.

Installation Instructions
Page 4
INSTALLATION INSTRUCTIONS Remove Mounting Plate NOTE: To avoid possible damage to the venting system. NOTE: Skip this section if you are using ventless (recirculating) installation. Slide damper plate toward the front of microwave oven exterior. A B A B C A Screws B. NOTE: Do not grip or...oven is being handled. 2. Screws (in case the venting method is changed, or the microwave oven is set for ventless (recirculating) installation. Blower motor 4 Remove screws attaching damper plate to top of the microwave oven and lift up. A A. Remove 2 screws attaching ...
INSTALLATION INSTRUCTIONS Remove Mounting Plate NOTE: To avoid possible damage to the venting system. NOTE: Skip this section if you are using ventless (recirculating) installation. Slide damper plate toward the front of microwave oven exterior. A B A B C A Screws B. NOTE: Do not grip or...oven is being handled. 2. Screws (in case the venting method is changed, or the microwave oven is set for ventless (recirculating) installation. Blower motor 4 Remove screws attaching damper plate to top of the microwave oven and lift up. A A. Remove 2 screws attaching ...

Use and Care Guide
Page 15
... mounting screws. Mounting screw 3. Replace mounting screw. 4. Tip the vent grille forward and down until the filter drops out. 3. See "Assistance or Service" to reorder. Install new charcoal filter. 5. Replacing Filters The grease filters should be removed and cleaned at least once a month. A B C To Replace: 1. Slide filter back slightly, lift front.... See "Assistance or Service" section to reorder filters. A A. Pull tab down , then lift to 12 months. Vent grille B. Mounting screws A. See "General Cleaning" for cleaning instructions. A A.
... mounting screws. Mounting screw 3. Replace mounting screw. 4. Tip the vent grille forward and down until the filter drops out. 3. See "Assistance or Service" to reorder. Install new charcoal filter. 5. Replacing Filters The grease filters should be removed and cleaned at least once a month. A B C To Replace: 1. Slide filter back slightly, lift front.... See "Assistance or Service" section to reorder filters. A A. Pull tab down , then lift to 12 months. Vent grille B. Mounting screws A. See "General Cleaning" for cleaning instructions. A A.
Use and Care Guide
Page 19
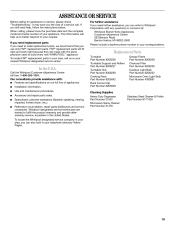
... parts will help , follow the instructions below. Installation information. Accessory and repair parts sales. To locate the Whirlpool designated service company in your area, you can write to Whirlpool Corporation with any questions or concerns at: Whirlpool Brand Home Appliances Customer eXperience Center 553...Number 8206232 Microwave Oven Light Bulb Part Number 4393681 In the U.S.A. Whirlpool designated service technicians are made with : Features and specifications on our full line of your nearest Whirlpool designated service center. When calling, please know the purchase date ...
... parts will help , follow the instructions below. Installation information. Accessory and repair parts sales. To locate the Whirlpool designated service company in your area, you can write to Whirlpool Corporation with any questions or concerns at: Whirlpool Brand Home Appliances Customer eXperience Center 553...Number 8206232 Microwave Oven Light Bulb Part Number 4393681 In the U.S.A. Whirlpool designated service technicians are made with : Features and specifications on our full line of your nearest Whirlpool designated service center. When calling, please know the purchase date ...

Use and Care Guide
Page 20
... and repair labor to correct defects in accordance with published installation instructions. Service calls to know your sales slip together for other than normal, single-family household use of products not approved by Whirlpool. 5. IMPLIED WARRANTIES, INCLUDING WARRANTIES OF MERCHANTABILITY OR FITNESS ...Phone number _____ Model number _____ Serial number _____ Purchase date _____ 8205884 © 2005 Whirlpool Corporation. Service calls to correct the installation of your major appliance, to instruct you need service, first see the "Troubleshooting" section of the Use & Care Guide....
... and repair labor to correct defects in accordance with published installation instructions. Service calls to know your sales slip together for other than normal, single-family household use of products not approved by Whirlpool. 5. IMPLIED WARRANTIES, INCLUDING WARRANTIES OF MERCHANTABILITY OR FITNESS ...Phone number _____ Model number _____ Serial number _____ Purchase date _____ 8205884 © 2005 Whirlpool Corporation. Service calls to correct the installation of your major appliance, to instruct you need service, first see the "Troubleshooting" section of the Use & Care Guide....
