Installation Instructions
Page 1
...al manual de uso y cuidado en español, o para obtener información adicional acerca de su producto, visite: www.whirlpool.com. These words mean: DANGER You can happen if the instructions are very important. WARNING You can be killed or seriously injured if... - DRYER SAFETY Your safety and the safety of Contents / Table des matières DRYER SAFETY 1 INSTALLATION INSTRUCTIONS 2 Tools and Parts 2 Location Requirements 2 Electrical Requirements - This is , tell you how to potential hazards that can kill or hurt you don't immediately follow instructions.
...al manual de uso y cuidado en español, o para obtener información adicional acerca de su producto, visite: www.whirlpool.com. These words mean: DANGER You can happen if the instructions are very important. WARNING You can be killed or seriously injured if... - DRYER SAFETY Your safety and the safety of Contents / Table des matières DRYER SAFETY 1 INSTALLATION INSTRUCTIONS 2 Tools and Parts 2 Location Requirements 2 Electrical Requirements - This is , tell you how to potential hazards that can kill or hurt you don't immediately follow instructions.
Installation Instructions
Page 2
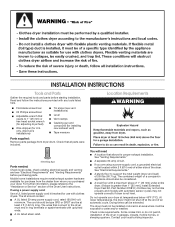
...) Tin snips (new vent installations) Level Vent clamps Caulking gun and compound (for installing new exhaust vent) Tape measure Parts supplied: Remove parts package from whom you are using a power supply cord: Use a UL listed power supply cord kit marked for purchase ... contain: A UL listed 30-amp power supply cord, rated 120/240 volt minimum. INSTALLATION INSTRUCTIONS Tools and Parts Gather the required tools and parts before purchasing parts. Some codes limit, or do not permit, installation of an automatic cycle. Flat-blade screwdriver #2 Phillips screwdriver...
...) Tin snips (new vent installations) Level Vent clamps Caulking gun and compound (for installing new exhaust vent) Tape measure Parts supplied: Remove parts package from whom you are using a power supply cord: Use a UL listed power supply cord kit marked for purchase ... contain: A UL listed 30-amp power supply cord, rated 120/240 volt minimum. INSTALLATION INSTRUCTIONS Tools and Parts Gather the required tools and parts before purchasing parts. Some codes limit, or do not permit, installation of an automatic cycle. Flat-blade screwdriver #2 Phillips screwdriver...

Installation Instructions
Page 3
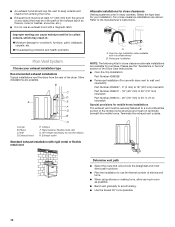
... mobile homes to introduce outside air into the dryer. This dryer has been tested for Mobile Home Construction and Safety, Title 24, HUD Part 280) or the Canadian Manufactured Home Standard, CAN/CSA-Z240 MH. Special provisions must be large enough to allow the dryer door to ...open fully. Connect to the Manufactured Home Construction and Safety Standard, Title 24 CFR, Part 3280 (formerly the Federal Standard for spacing of 0" (0 mm) clearance on both sides of the dryer to reduce noise transfer. Small opening hamper...
... mobile homes to introduce outside air into the dryer. This dryer has been tested for Mobile Home Construction and Safety, Title 24, HUD Part 280) or the Canadian Manufactured Home Standard, CAN/CSA-Z240 MH. Special provisions must be large enough to allow the dryer door to ...open fully. Connect to the Manufactured Home Construction and Safety Standard, Title 24 CFR, Part 3280 (formerly the Federal Standard for spacing of 0" (0 mm) clearance on both sides of the dryer to reduce noise transfer. Small opening hamper...
Installation Instructions
Page 5
.... Failure to do so can result in doubt as to an individual branch circuit. 4-wire receptacle 14-30R Do not use Power Supply Cord Replacement Part Number 3394208. Do not modify the plug provided with a qualified electrician or service representative or personnel if you use an extension cord. Electrical Requirements - Canada...
.... Failure to do so can result in doubt as to an individual branch circuit. 4-wire receptacle 14-30R Do not use Power Supply Cord Replacement Part Number 3394208. Do not modify the plug provided with a qualified electrician or service representative or personnel if you use an extension cord. Electrical Requirements - Canada...
Installation Instructions
Page 12
... with one offset elbow) B. Elbow C. Clamps F. Over-the-top installation (also available with a magnetic latch. Over-the-Top Installation: Part Number 4396028 Periscope Installation (For use the fewest number of elbows and turns. Exhaust outlet Standard exhaust installation with dryer vent to wall vent... mismatch): Part Number 4396037 - 0" (0 mm) to 18" (457 mm) mismatch Part Number 4396011 - 18" (457 mm) to 29" (737 mm) mismatch Part Number 4396014 - 29" (737 mm) to 50" (1.27 m) mismatch Special...
... with one offset elbow) B. Elbow C. Clamps F. Over-the-top installation (also available with a magnetic latch. Over-the-Top Installation: Part Number 4396028 Periscope Installation (For use the fewest number of elbows and turns. Exhaust outlet Standard exhaust installation with dryer vent to wall vent... mismatch): Part Number 4396037 - 0" (0 mm) to 18" (457 mm) mismatch Part Number 4396011 - 18" (457 mm) to 29" (737 mm) mismatch Part Number 4396014 - 29" (737 mm) to 50" (1.27 m) mismatch Special...

Installation Instructions
Page 14
... right within slot to inner door panel so handle is over towel on right side of hinges (C). Insert the door strike you removed in large part of door hinge slot is on top of cabinet. 5. Open dryer door. Reverse Door Swing (Optional) You can change your door swing from a...adjust alignment. Reversible Large Side-Swing Door 3. Tighten screws halfway. Position door so large end of hinge slot. Insert and tighten top screws in large part of door hinge slot is needed , slide door catch left -side opening to a left or right within slot to protect surface. 2. Remove door ...
... right within slot to inner door panel so handle is over towel on right side of hinges (C). Insert the door strike you removed in large part of door hinge slot is on top of cabinet. 5. Open dryer door. Reverse Door Swing (Optional) You can change your door swing from a...adjust alignment. Reversible Large Side-Swing Door 3. Tighten screws halfway. Position door so large end of hinge slot. Insert and tighten top screws in large part of door hinge slot is needed , slide door catch left -side opening to a left or right within slot to protect surface. 2. Remove door ...
Installation Instructions
Page 15
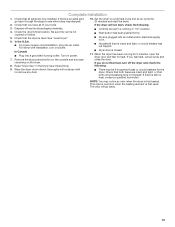
... start , check the following : 9. Household fuse is still no heat, contact a qualified technician. Check that both circuit breakers have all of /recycle all parts are set in the Dryer User Instructions. Check that both fuses are intact and tight, or that you have not tripped. Check that all packaging...to remove any tape remaining on the dryer. 8. Dispose of your tools. Dryer is plugged into an outlet and/or electrical supply is an extra part, go away. 15 When the dryer has been running or "On" position. Wipe the dryer drum interior thoroughly with a damp cloth to see ...
... start , check the following : 9. Household fuse is still no heat, contact a qualified technician. Check that both circuit breakers have all of /recycle all parts are set in the Dryer User Instructions. Check that both fuses are intact and tight, or that you have not tripped. Check that all packaging...to remove any tape remaining on the dryer. 8. Dispose of your tools. Dryer is plugged into an outlet and/or electrical supply is an extra part, go away. 15 When the dryer has been running or "On" position. Wipe the dryer drum interior thoroughly with a damp cloth to see ...
User Instructions
Page 6
... signal is included in the cycle selections. 5. (OPTIONAL) Your dryer may not have a Wrinkle Prevent feature selector. Drying Rack (Optional on some models, temperature is part of the cycles and features described. The drum turns, but the drying rack does not move. Place drying rack in use the drying rack 1. Items...
... signal is included in the cycle selections. 5. (OPTIONAL) Your dryer may not have a Wrinkle Prevent feature selector. Drying Rack (Optional on some models, temperature is part of the cycles and features described. The drum turns, but the drying rack does not move. Place drying rack in use the drying rack 1. Items...
User Instructions
Page 8
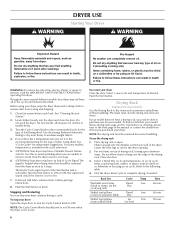
... reset the circuit breaker. Use masking tape to secure dryer door. For direct-wired dryers: WARNING 3. Use masking tape to secure dryer door. Replace all parts and panels before servicing. See the Installation Instructions. ■■ Is the clothing knotted or balled up , the load will not run ■■ For...
... reset the circuit breaker. Use masking tape to secure dryer door. For direct-wired dryers: WARNING 3. Use masking tape to secure dryer door. Replace all parts and panels before servicing. See the Installation Instructions. ■■ Is the clothing knotted or balled up , the load will not run ■■ For...

User Instructions
Page 10
... 1-800-901-2042, or visit us at www.applianceaccessories.com. Allow the Cool Down cycle to a partially dried load can tumble freely. This reduces overdrying. Part Number 3404351 3406839 3406910 Accessory Drying rack - ft. (0.20 cu. All cycles are wrinkled ■■ Was the load removed from the area, rewash, and...
... 1-800-901-2042, or visit us at www.applianceaccessories.com. Allow the Cool Down cycle to a partially dried load can tumble freely. This reduces overdrying. Part Number 3404351 3406839 3406910 Accessory Drying rack - ft. (0.20 cu. All cycles are wrinkled ■■ Was the load removed from the area, rewash, and...
User Instructions
Page 11
... for other rights that vary from state to state or province to province. Service calls to obtain service under this limited warranty. Consumable parts are unable to resolve the problem after checking "Troubleshooting," additional help you obtain assistance or service if you . Pick up and delivery....help can find this information on the model and serial number label located on major appliances with the product, Maytag brand of Whirlpool Corporation or Whirlpool Canada LP (hereafter "Maytag") will need it was purchased. This limited warranty is valid only in the United States or ...
... for other rights that vary from state to state or province to province. Service calls to obtain service under this limited warranty. Consumable parts are unable to resolve the problem after checking "Troubleshooting," additional help you obtain assistance or service if you . Pick up and delivery....help can find this information on the model and serial number label located on major appliances with the product, Maytag brand of Whirlpool Corporation or Whirlpool Canada LP (hereafter "Maytag") will need it was purchased. This limited warranty is valid only in the United States or ...
Parts Diagram
Page 1
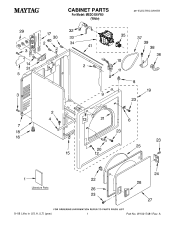
CABINET PARTS For Model: MEDC400VW0 (White) 29" ELECTRIC DRYER 8−08 Litho in U.S.A. (LT) (psw) 1 Part No. W10217481 Rev. A
CABINET PARTS For Model: MEDC400VW0 (White) 29" ELECTRIC DRYER 8−08 Litho in U.S.A. (LT) (psw) 1 Part No. W10217481 Rev. A

Parts Diagram
Page 2
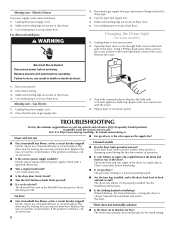
CABINET PARTS For Model: MEDC400VW0 (White) Illus. DESCRIPTION 27 3402335 Door, Front 28 8565970 Handle, Door 29 279393 ...Assembly 23 342055 Screw, 8−18 x 1/2 24 3405514 Hinge, Door 25 3405246 Seal−Door 26 3402341 Door, Rear Illus. Part No. Part No. DESCRIPTION 1 Literature Parts W10088780 Use & Care Guide 8576796 Wiring Diagram W10150612 Installation, Instruction W10089179 Sheet, Cycle Feature 2 343641 Screw, 10−16 x 1/2...Lock, Front Top (2) 9 98234 Clip, Ground 10 3406107 Door Switch Assembly 11 697773 Screw, 6−20 x 7/8 Illus. No. Part No.
CABINET PARTS For Model: MEDC400VW0 (White) Illus. DESCRIPTION 27 3402335 Door, Front 28 8565970 Handle, Door 29 279393 ...Assembly 23 342055 Screw, 8−18 x 1/2 24 3405514 Hinge, Door 25 3405246 Seal−Door 26 3402341 Door, Rear Illus. Part No. Part No. DESCRIPTION 1 Literature Parts W10088780 Use & Care Guide 8576796 Wiring Diagram W10150612 Installation, Instruction W10089179 Sheet, Cycle Feature 2 343641 Screw, 10−16 x 1/2...Lock, Front Top (2) 9 98234 Clip, Ground 10 3406107 Door Switch Assembly 11 697773 Screw, 6−20 x 7/8 Illus. No. Part No.

Parts Diagram
Page 3
TOP AND CONSOLE PARTS For Model: MEDC400VW0 (White) W10217481 3
TOP AND CONSOLE PARTS For Model: MEDC400VW0 (White) W10217481 3
Parts Diagram
Page 4
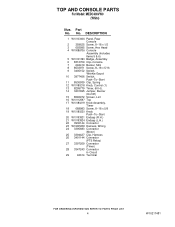
TOP AND CONSOLE PARTS For Model: MEDC400VW0 (White) Illus. DESCRIPTION 1 W10103406 Panel, Rear Console 2 359625 Screw, 8−18 x 1/2 3 693995 Screw, Hex Head 4 W10086736 Console Assembly (Includes Items 5 & 6) 5 W10101390 Badge, ... Connector (Motor) 25 3394427 Clip, Harness 26 3401144 Connector (PTS Relay) 27 3397269 Connector (Timer) 28 3347243 Connector 6−Circuit 29 94614 Terminal 4 W10217481 No. Part No.
TOP AND CONSOLE PARTS For Model: MEDC400VW0 (White) Illus. DESCRIPTION 1 W10103406 Panel, Rear Console 2 359625 Screw, 8−18 x 1/2 3 693995 Screw, Hex Head 4 W10086736 Console Assembly (Includes Items 5 & 6) 5 W10101390 Badge, ... Connector (Motor) 25 3394427 Clip, Harness 26 3401144 Connector (PTS Relay) 27 3397269 Connector (Timer) 28 3347243 Connector 6−Circuit 29 94614 Terminal 4 W10217481 No. Part No.

Parts Diagram
Page 5
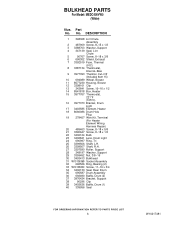
BULKHEAD PARTS For Model: MEDC400VW0 (White) W10217481 5
BULKHEAD PARTS For Model: MEDC400VW0 (White) W10217481 5
Parts Diagram
Page 6
... Drum 35 695587 Drum Assembly 36 692490 Baffle, Drum (2) 37 3976434 Bracket, Support 38 90296 Clip 39 3403636 Baffle, Drum (1) 40 339956 Seal 6 W10217481 No. Part No. BULKHEAD PARTS For Model: MEDC400VW0 (White) Illus.
... Drum 35 695587 Drum Assembly 36 692490 Baffle, Drum (2) 37 3976434 Bracket, Support 38 90296 Clip 39 3403636 Baffle, Drum (1) 40 339956 Seal 6 W10217481 No. Part No. BULKHEAD PARTS For Model: MEDC400VW0 (White) Illus.
Parts Diagram
Page 7
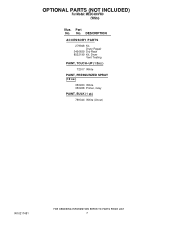
No. DESCRIPTION ACCESSORY PARTS 279948 Kit, Dryer Repair 3406839 Dry Rack 8522199 Kit, Dryer Vent Testing PAINT, TOUCH−UP (1/2oz.) 72017 White PAINT, PRESSURIZED SPRAY (12 oz.) 350930 White 350938 Primer, Gray PAINT, BULK (1 qt.) 799344 White (Uncut) W10217481 7 Part No. OPTIONAL PARTS (NOT INCLUDED) For Model: MEDC400VW0 (White) Illus.
No. DESCRIPTION ACCESSORY PARTS 279948 Kit, Dryer Repair 3406839 Dry Rack 8522199 Kit, Dryer Vent Testing PAINT, TOUCH−UP (1/2oz.) 72017 White PAINT, PRESSURIZED SPRAY (12 oz.) 350930 White 350938 Primer, Gray PAINT, BULK (1 qt.) 799344 White (Uncut) W10217481 7 Part No. OPTIONAL PARTS (NOT INCLUDED) For Model: MEDC400VW0 (White) Illus.


