Installation Instructions
Page 1
Only 6 Venting Requirements 11 Plan Vent System 12 Install Vent System 13 Install Leveling Legs 13 Level Dryer 13 Connect Vent 13 Reverse Door Swing (Optional 14 Complete Installation 15 SÉCURITÉ DE LA SÉCHEUSE 16 INSTRUCTIONS D'INSTALLATION 17 Outillage ...5 Electrical Connection - We have provided many important safety messages in this manual and on your appliance. DRYER SAFETY Your safety and the safety of Contents / Table des matières DRYER SAFETY 1 INSTALLATION INSTRUCTIONS 2 Tools and Parts 2 Location Requirements 2 Electrical Requirements -...
Only 6 Venting Requirements 11 Plan Vent System 12 Install Vent System 13 Install Leveling Legs 13 Level Dryer 13 Connect Vent 13 Reverse Door Swing (Optional 14 Complete Installation 15 SÉCURITÉ DE LA SÉCHEUSE 16 INSTRUCTIONS D'INSTALLATION 17 Outillage ...5 Electrical Connection - We have provided many important safety messages in this manual and on your appliance. DRYER SAFETY Your safety and the safety of Contents / Table des matières DRYER SAFETY 1 INSTALLATION INSTRUCTIONS 2 Tools and Parts 2 Location Requirements 2 Electrical Requirements -...
Installation Instructions
Page 2
... it will need A location that allows for installing new exhaust vent) Tape measure Parts supplied: Remove parts package from whom you are using a power supply cord: Use a UL listed power supply cord kit marked for purchase from the dealer from dryer drum. Check that opens to support the total weight (dryer and load) of 1" (25 mm) under entire dryer. (If slope is greater than 1" [25 mm], install Extended Dryer Feet Kit, Part Number 279810.) Clothes may not operate correctly if dryer is...
... it will need A location that allows for installing new exhaust vent) Tape measure Parts supplied: Remove parts package from whom you are using a power supply cord: Use a UL listed power supply cord kit marked for purchase from the dealer from dryer drum. Check that opens to support the total weight (dryer and load) of 1" (25 mm) under entire dryer. (If slope is greater than 1" [25 mm], install Extended Dryer Feet Kit, Part Number 279810.) Clothes may not operate correctly if dryer is...

Installation Instructions
Page 4
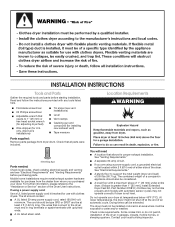
... spade terminals and UL listed strain relief. For a permanently connected dryer: This dryer must be connected to a grounded metal, permanent wiring system, or an equipment-grounding conductor must be using a power supply cord: Use a UL listed power supply cord kit marked for electric current. Grounding through the neutral conductors. If using and follow the instructions provided for (1) new branch-circuit installations, (2) mobile homes, (3) recreational vehicles, and (4) areas where local codes prohibit...
... spade terminals and UL listed strain relief. For a permanently connected dryer: This dryer must be connected to a grounded metal, permanent wiring system, or an equipment-grounding conductor must be using a power supply cord: Use a UL listed power supply cord kit marked for electric current. Grounding through the neutral conductors. If using and follow the instructions provided for (1) new branch-circuit installations, (2) mobile homes, (3) recreational vehicles, and (4) areas where local codes prohibit...
Installation Instructions
Page 5
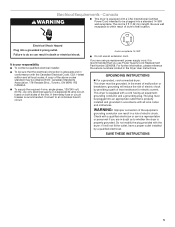
... circuit breaker is equipped with the Canadian Electrical Code, C22.1-latest edition and all local codes and ordinances. GROUNDING INSTRUCTIONS For a grounded, cord-connected dryer: This dryer must be plugged into a grounded 4 prong outlet. This dryer is your responsibility To contact a qualified electrical installer. It is equipped with the dryer: if it is adequate and in length. To be grounded. Electrical Shock Hazard Plug into an appropriate outlet that you are using a replacement power...
... circuit breaker is equipped with the Canadian Electrical Code, C22.1-latest edition and all local codes and ordinances. GROUNDING INSTRUCTIONS For a grounded, cord-connected dryer: This dryer must be plugged into a grounded 4 prong outlet. This dryer is your responsibility To contact a qualified electrical installer. It is equipped with the dryer: if it is adequate and in length. To be grounded. Electrical Shock Hazard Plug into an appropriate outlet that you are using a replacement power...

Installation Instructions
Page 8
Remove neutral ground wire from 3 remaining wires. B. Remove center silver-colored terminal block screw. 2. Squeeze hooked ends together. A B FE D A. Neutral wire (white or center wire) D. ¾" (19 mm) UL listed strain relief E. Connect the other wires to "Venting Requirements." Tighten strain relief screws. 6. Tighten screw. A B C E D A. Connect ground wire (green or bare) of extra length so dryer can be moved if needed. Direct wire cable must have completed your electrical connections. Strip insulation back 1" (25...
Remove neutral ground wire from 3 remaining wires. B. Remove center silver-colored terminal block screw. 2. Squeeze hooked ends together. A B FE D A. Neutral wire (white or center wire) D. ¾" (19 mm) UL listed strain relief E. Connect the other wires to "Venting Requirements." Tighten strain relief screws. 6. Tighten screw. A B C E D A. Connect ground wire (green or bare) of extra length so dryer can be moved if needed. Direct wire cable must have completed your electrical connections. Strip insulation back 1" (25...

Installation Instructions
Page 9
... A. 3-wire receptacle (NEMA type 10-30R) B. 3-wire plug C. Direct wire cable must have completed your electrical connections. Strip insulation back 1" (25 mm). Tighten screw. B C D FE D A. Ground wire (green or bare) of cable. Now go to "Venting Requirements." 3-wire connection: Power Supply Cord Use where local codes permit connecting cabinet-ground conductor to outer terminal block screws. Loosen or remove center silver-colored terminal block screw. 2. External ground conductor screw B. Place the hooked ends of dryer rear panel...
... A. 3-wire receptacle (NEMA type 10-30R) B. 3-wire plug C. Direct wire cable must have completed your electrical connections. Strip insulation back 1" (25 mm). Tighten screw. B C D FE D A. Ground wire (green or bare) of cable. Now go to "Venting Requirements." 3-wire connection: Power Supply Cord Use where local codes permit connecting cabinet-ground conductor to outer terminal block screws. Loosen or remove center silver-colored terminal block screw. 2. External ground conductor screw B. Place the hooked ends of dryer rear panel...

Installation Instructions
Page 10
... codes do not permit connecting cabinet-ground conductor to "Venting Requirements." A BC A E D A. Tighten strain relief screw. 5. You have completed your electrical connections. Now go to neutral wire. 1. A. Grounding path determined by a qualified electrician 3. Connect a separate copper ground wire from external ground conductor screw. Connect neutral ground wire and the neutral wire (white or center wire) of power supply cord/cable under the center screw of dryer rear panel...
... codes do not permit connecting cabinet-ground conductor to "Venting Requirements." A BC A E D A. Tighten strain relief screw. 5. You have completed your electrical connections. Now go to neutral wire. 1. A. Grounding path determined by a qualified electrician 3. Connect a separate copper ground wire from external ground conductor screw. Connect neutral ground wire and the neutral wire (white or center wire) of power supply cord/cable under the center screw of dryer rear panel...
Installation Instructions
Page 11
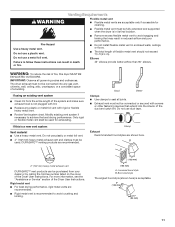
... vent system Clean lint from your dealer or by calling the toll-free number listed on the cover of the duct and catch lint. Box hood style The angled hood style (shown here) is in reduced airflow and poor performance. Rigid metal vent For best drying performance, rigid metal vents are recommended. Venting Requirements WARNING Flexible metal vent Flexible metal vents are acceptable only if accessible for exhausting...
... vent system Clean lint from your dealer or by calling the toll-free number listed on the cover of the duct and catch lint. Box hood style The angled hood style (shown here) is in reduced airflow and poor performance. Rigid metal vent For best drying performance, rigid metal vents are recommended. Venting Requirements WARNING Flexible metal vent Flexible metal vents are acceptable only if accessible for exhausting...
Installation Instructions
Page 13
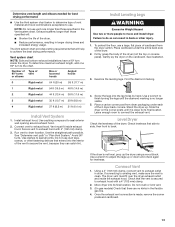
... the leveling legs. Check levelness first side to side, then front to existing vent, make sure the vent is clean. If connecting to back. Vent system chart NOTE: Side and bottom exhaust installations have a 90º turn to exhaust outlet in longer drying times and increased energy usage. Run vent to move and install dryer. Install Leveling Legs WARNING Excessive Weight Hazard Use two or more people to dryer location. Firmly grasp...
... the leveling legs. Check levelness first side to side, then front to existing vent, make sure the vent is clean. If connecting to back. Vent system chart NOTE: Side and bottom exhaust installations have a 90º turn to exhaust outlet in longer drying times and increased energy usage. Run vent to move and install dryer. Install Leveling Legs WARNING Excessive Weight Hazard Use two or more people to dryer location. Firmly grasp...
Installation Instructions
Page 15
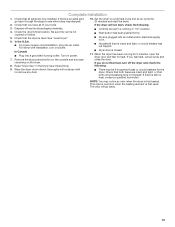
... the heating element is closed. 11. In the U.S.A. Turn on power. If you do not feel heat, cancel cycle and close the door. Dispose of your tools. Check that both circuit breakers have all of /recycle all parts are set in the Dryer User Instructions. The odor will not start the dryer. 2. If there is on a full heat cycle (not an air cycle) for the dryer. For power supply cord installation, plug into a grounded 4 prong outlet. Household fuse is...
... the heating element is closed. 11. In the U.S.A. Turn on power. If you do not feel heat, cancel cycle and close the door. Dispose of your tools. Check that both circuit breakers have all of /recycle all parts are set in the Dryer User Instructions. The odor will not start the dryer. 2. If there is on a full heat cycle (not an air cycle) for the dryer. For power supply cord installation, plug into a grounded 4 prong outlet. Household fuse is...
User Instructions
Page 1
... have provided many important safety messages in this book and your complete model number and serial number. DRYER USER INSTRUCTIONS INSTRUCTIONS POUR L'UTILISATEUR DE LA SÉCHEUSE Table of Contents DRYER SAFETY 1 CONTROL PANEL 4 CYCLE GUIDE 5 DRYER USE 6 DRYER CARE 7 TROUBLESHOOTING 8 WARRANTY 11 ASSISTANCE OR SERVICE Back Cover Keep this manual and on the model and serial number label, located at the top inside dryer door well. Vous devrez connaître le numéro de mod...
... have provided many important safety messages in this book and your complete model number and serial number. DRYER USER INSTRUCTIONS INSTRUCTIONS POUR L'UTILISATEUR DE LA SÉCHEUSE Table of Contents DRYER SAFETY 1 CONTROL PANEL 4 CYCLE GUIDE 5 DRYER USE 6 DRYER CARE 7 TROUBLESHOOTING 8 WARRANTY 11 ASSISTANCE OR SERVICE Back Cover Keep this manual and on the model and serial number label, located at the top inside dryer door well. Vous devrez connaître le numéro de mod...
User Instructions
Page 3
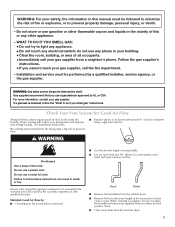
... gas supplier. each load. ■■ Use the shortest length of re or explosion, or to follow the Installation Instructions supplied with your dryer for Good Air Flow Along with 4" (102 mm) diameter heavy, rigid vent material. Follow the gas supplier's instructions. • If you smell gas" instructions. Service calls caused by improper venting are not covered by : ■■ Cleaning your lint screen before each bend and curve reduces air flow...
... gas supplier. each load. ■■ Use the shortest length of re or explosion, or to follow the Installation Instructions supplied with your dryer for Good Air Flow Along with 4" (102 mm) diameter heavy, rigid vent material. Follow the gas supplier's instructions. • If you smell gas" instructions. Service calls caused by improper venting are not covered by : ■■ Cleaning your lint screen before each bend and curve reduces air flow...

User Instructions
Page 4
... work clothes. ■■ A Low to the care label directions. The Cycle Selector (Timer) control may select a drying temperature based on the fabrics in the cycle selections. Timed Dry On some models) You may be used for drying lightweight items such as lingerie. ■■ Use a no heat (air) setting for drying heavyweight items such as you want, select a Timed cycle to complete drying and the next time you dry a similar load. ■■ If the load...
... work clothes. ■■ A Low to the care label directions. The Cycle Selector (Timer) control may select a drying temperature based on the fabrics in the cycle selections. Timed Dry On some models) You may be used for drying lightweight items such as lingerie. ■■ Use a no heat (air) setting for drying heavyweight items such as you want, select a Timed cycle to complete drying and the next time you dry a similar load. ■■ If the load...
User Instructions
Page 5
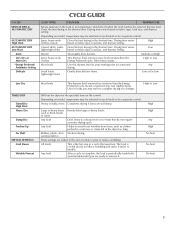
... your starting point for the specified time on a hanger. Use for items that uses heat. Any load Helps to reduce wrinkling. High Casual, shirts, pants, Gives the best drying in the dryer too long. Any load After a cycle is complete, the load is cooled slowly to handle. Denim Thoroughly dries denims. Medium or High Jeans, heavy work clothes, towels Gives the best drying in the load or air temperature and shuts off...
... your starting point for the specified time on a hanger. Use for items that uses heat. Any load Helps to reduce wrinkling. High Casual, shirts, pants, Gives the best drying in the dryer too long. Any load After a cycle is complete, the load is cooled slowly to handle. Denim Thoroughly dries denims. Medium or High Jeans, heavy work clothes, towels Gives the best drying in the load or air temperature and shuts off...
User Instructions
Page 6
... guide covers several different models. See "Cleaning the Lint Screen." 2. See "Cycle Guide" for information on drying rack) Stuffed toys/pillows (cotton or polyester filled) Stuffed toys/pillows (foam rubber filled) Cycle Timed Dry Timed Dry Air (no heat) Temp Low Low N/A Time 60 min. 60 min. 90 min. 6 Follow package instructions. 8. Push the Start button or knob. To restart your dryer, wipe the dryer drum with a damp cloth to remove dust from dryer. The drum turns, but the drying rack...
... guide covers several different models. See "Cleaning the Lint Screen." 2. See "Cycle Guide" for information on drying rack) Stuffed toys/pillows (cotton or polyester filled) Stuffed toys/pillows (foam rubber filled) Cycle Timed Dry Timed Dry Air (no heat) Temp Low Low N/A Time 60 min. 60 min. 90 min. 6 Follow package instructions. 8. Push the Start button or knob. To restart your dryer, wipe the dryer drum with a damp cloth to remove dust from dryer. The drum turns, but the drying rack...

User Instructions
Page 7
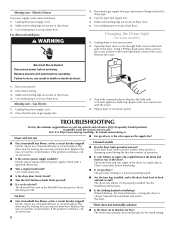
... dryer interior. Wet a nylon brush with hot water. 5. Dry these items inside out to remove. Vacation and Moving Care Vacation Care Operate your dryer only when you . Wet lint is located in gas supply line. 3. Do not rinse or wash screen to dry the drum. Tumble a load of lint screen with a damp cloth. 3. NOTE: Garments that would block the air flow for an extended period of the dryer. From Inside the Exhaust Vent Lint should be on dryer...
... dryer interior. Wet a nylon brush with hot water. 5. Dry these items inside out to remove. Vacation and Moving Care Vacation Care Operate your dryer only when you . Wet lint is located in gas supply line. 3. Do not rinse or wash screen to dry the drum. Tumble a load of lint screen with a damp cloth. 3. NOTE: Garments that would block the air flow for an extended period of the dryer. From Inside the Exhaust Vent Lint should be on dryer...
User Instructions
Page 8
... heat. Disconnect wiring. 3. Unplug the power supply cord. 2. Close shutoff valve in dryer base. 3. The drum may be turning, but you may not have heat. Check with the screw. 4. Clean out pockets before operating. Replace the fuse or reset the circuit breaker. Separate the load items and restart the dryer. Moving care - Make sure leveling legs are secure in dryer or reconnect power. Unplug dryer or disconnect power. 2. Use masking tape to secure dryer door. Electric dryers use ? Electric dryers require 240-volt power...
... heat. Disconnect wiring. 3. Unplug the power supply cord. 2. Close shutoff valve in dryer base. 3. The drum may be turning, but you may not have heat. Check with the screw. 4. Clean out pockets before operating. Replace the fuse or reset the circuit breaker. Separate the load items and restart the dryer. Moving care - Make sure leveling legs are secure in dryer or reconnect power. Unplug dryer or disconnect power. 2. Use masking tape to secure dryer door. Electric dryers use ? Electric dryers require 240-volt power...

User Instructions
Page 9
...; Has an air dry cycle been selected? Change the dryness level setting on load ■■ Is the lint screen clogged? ■■ Is the dryer set to dry quickly? Do not use a plastic vent. Run the dryer for the types of dryer cycles requires temperatures above 45ºF (7ºC). ■■ Is the dryer located in a cycle. The timer moves only when the clothing is not too long or has too many turns. See the Installation Instructions. ■...
...; Has an air dry cycle been selected? Change the dryness level setting on load ■■ Is the lint screen clogged? ■■ Is the dryer set to dry quickly? Do not use a plastic vent. Run the dryer for the types of dryer cycles requires temperatures above 45ºF (7ºC). ■■ Is the dryer located in a cycle. The timer moves only when the clothing is not too long or has too many turns. See the Installation Instructions. ■...
User Instructions
Page 11
..., flood, acts of God, improper installation, installation not in accordance with the product, Maytag brand of Whirlpool Corporation or Whirlpool Canada LP (hereafter "Maytag") will need to you also may not apply to repair or replace appliance light bulbs, air filters or water filters. Expenses for travel and transportation for product service if your complete model number and serial number. This warranty gives you specific legal rights, and you . Some states...
..., flood, acts of God, improper installation, installation not in accordance with the product, Maytag brand of Whirlpool Corporation or Whirlpool Canada LP (hereafter "Maytag") will need to you also may not apply to repair or replace appliance light bulbs, air filters or water filters. Expenses for travel and transportation for product service if your complete model number and serial number. This warranty gives you specific legal rights, and you . Some states...

dim
Page 1
...) C D *Most installations require a minimum 5" (12.7 cm) clearance behind the dryer for cleaning. Recessed area B. Side view - See the exhaust vent length chart that will need. In the column listing the type of metal vent you are acceptable only if accessible for exhaust vent with a door, minimum ventilation openings in the Vent Length Chart. or four-wire, 120/208-volt electrical supply, if specified on the serial/rating plate) on a separate 30-amp circuit, fused on...
...) C D *Most installations require a minimum 5" (12.7 cm) clearance behind the dryer for cleaning. Recessed area B. Side view - See the exhaust vent length chart that will need. In the column listing the type of metal vent you are acceptable only if accessible for exhaust vent with a door, minimum ventilation openings in the Vent Length Chart. or four-wire, 120/208-volt electrical supply, if specified on the serial/rating plate) on a separate 30-amp circuit, fused on...


