
Use and Care Guide
Page 4
ACCESSORIES Customize your dealer, or visit: www.maytag.com. 15" Pedestal Color matched pedestals raise the washer and dryer to be installed on options and ordering, contact your new washer and dryer with the following genuine Maytag accessories. Available in matching colors. Stack Kit If space is ...
ACCESSORIES Customize your dealer, or visit: www.maytag.com. 15" Pedestal Color matched pedestals raise the washer and dryer to be installed on options and ordering, contact your new washer and dryer with the following genuine Maytag accessories. Available in matching colors. Stack Kit If space is ...
Use and Care Guide
Page 5
... or new garments prior to provide optimal energy savings. n Remove lint from loads consisting of small numbers of dry items of who installed the dryer. Use Sensor cycles for smoothing out wrinkles from the dryer. During Sensor Cycles, drying air temperature and moisture level are not...debris from your dryer for items that needs a little more than those without. 100% cotton items may vary depending on clothes. See "Installation Instructions". With Timed Cycles, the dryer runs the amount of vent possible. This sensing occurs throughout the drying cycle and the dryer shuts ...
... or new garments prior to provide optimal energy savings. n Remove lint from loads consisting of small numbers of dry items of who installed the dryer. Use Sensor cycles for smoothing out wrinkles from the dryer. During Sensor Cycles, drying air temperature and moisture level are not...debris from your dryer for items that needs a little more than those without. 100% cotton items may vary depending on clothes. See "Installation Instructions". With Timed Cycles, the dryer runs the amount of vent possible. This sensing occurs throughout the drying cycle and the dryer shuts ...
Use and Care Guide
Page 11
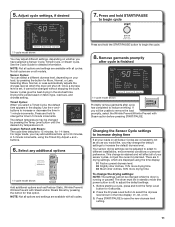
... without stopping the cycle. Not all your sensor cycles, not just the current cycle/load. The default temperature may add additional time up to different installations, environmental conditions or personal preference. temp level dryness level damp signal 11-cycle model shown Promptly remove garments after cycle is running or paused. Changing...
... without stopping the cycle. Not all your sensor cycles, not just the current cycle/load. The default temperature may add additional time up to different installations, environmental conditions or personal preference. temp level dryness level damp signal 11-cycle model shown Promptly remove garments after cycle is running or paused. Changing...
Use and Care Guide
Page 14
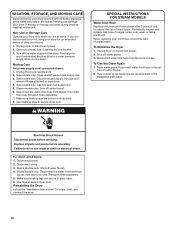
... faucet. 6. Disconnect water inlet hose from faucet, then drain the hose. Make sure leveling legs are found. Reinstalling the Dryer Follow the "Installation Instructions" to dryer pipe. 4. Non-Use or Storage Care Operate your dryer during freezing weather, winterize it will be on water faucet. 2.... supply line. 3. Moving Care For power supply cord-connected dryers: 1. Gas models only: Close shutoff valve in the Installation Instruction. Steam models only: Disconnect the water inlet hose from faucet, then drain the hose. VACATION, STORAGE, AND MOVING CARE...
... faucet. 6. Disconnect water inlet hose from faucet, then drain the hose. Make sure leveling legs are found. Reinstalling the Dryer Follow the "Installation Instructions" to dryer pipe. 4. Non-Use or Storage Care Operate your dryer during freezing weather, winterize it will be on water faucet. 2.... supply line. 3. Moving Care For power supply cord-connected dryers: 1. Gas models only: Close shutoff valve in the Installation Instruction. Steam models only: Disconnect the water inlet hose from faucet, then drain the hose. VACATION, STORAGE, AND MOVING CARE...

Use and Care Guide
Page 15
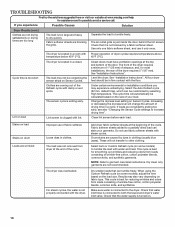
...or vibrating noise A small object caught between the edges of use 2 household fuses or circuit breakers. Gas valve operating. See the Installation Instructions. This is normal. The exhaust vent is closed completely. Select the right temperature for small objects. If you do not feel... fuses or circuit breakers for an extended period, the valve may be louder and run Door not closed completely. See "Installation Instructions". See "Installation Instructions". Make sure the dryer door is not the correct length. Clicking noise Dryer Results Clothing is not too long or...
...or vibrating noise A small object caught between the edges of use 2 household fuses or circuit breakers. Gas valve operating. See the Installation Instructions. This is normal. The exhaust vent is closed completely. Select the right temperature for small objects. If you do not feel... fuses or circuit breakers for an extended period, the valve may be louder and run Door not closed completely. See "Installation Instructions". See "Installation Instructions". Make sure the dryer door is not the correct length. Clicking noise Dryer Results Clothing is not too long or...
Use and Care Guide
Page 16
... cycles requires temperatures above temperature below 45ºF (7ºC). 45ºF (7ºC). Level the dryer. Under certain environmental or installation conditions you experience Possible Causes Solution Dryer Results (cont.) Clothes are not drying satisfactorily or drying times are caused by dyes in...door, behind the lint screen. Lint screen is best for reducing wrinkles and odors from loads consisting of the cycle. See "Installation Instructions". Select the Auto Refresh cycle (22 min. default time), which can tumble freely. The cycle time will change the...
... cycles requires temperatures above temperature below 45ºF (7ºC). 45ºF (7ºC). Level the dryer. Under certain environmental or installation conditions you experience Possible Causes Solution Dryer Results (cont.) Clothes are not drying satisfactorily or drying times are caused by dyes in...door, behind the lint screen. Lint screen is best for reducing wrinkles and odors from loads consisting of the cycle. See "Installation Instructions". Select the Auto Refresh cycle (22 min. default time), which can tumble freely. The cycle time will change the...
Use and Care Guide
Page 17
...household fuse has blown or circuit breaker has tripped. the vent is connected to avoid overdrying the load. Try the following : Check to "Installation Instructions" for details. Select a Timed Dry heated cycle, and restart the dryer. Call for service. 17 This cycle is free of ...blends, common knits, and synthetics. Confirm the power cord is free of cycle complete. Confirm the exterior vent exhaust hood is properly installed. Load too hot For steam cycles, the water is present. Press any key to clear the code from loads consisting of service....
...household fuse has blown or circuit breaker has tripped. the vent is connected to avoid overdrying the load. Try the following : Check to "Installation Instructions" for details. Select a Timed Dry heated cycle, and restart the dryer. Call for service. 17 This cycle is free of ...blends, common knits, and synthetics. Confirm the power cord is free of cycle complete. Confirm the exterior vent exhaust hood is properly installed. Load too hot For steam cycles, the water is present. Press any key to clear the code from loads consisting of service....

Use and Care Guide
Page 18
...checking "Troubleshooting," additional help you obtain assistance or service if you on the duration of implied warranties of purchase or installation date for inwarranty service. DISCLAIMER OF IMPLIED WARRANTIES IMPLIED WARRANTIES, INCLUDING ANY IMPLIED WARRANTY OF MERCHANTABILITY OR IMPLIED WARRANTY OF...this major appliance is operated and maintained according to instructions attached to or furnished with the product, Maytag brand of Whirlpool Corporation or Whirlpool Canada LP (hereafter "Maytag") will need repair service, rst see the "Troubleshooting" section of products not approved...
...checking "Troubleshooting," additional help you obtain assistance or service if you on the duration of implied warranties of purchase or installation date for inwarranty service. DISCLAIMER OF IMPLIED WARRANTIES IMPLIED WARRANTIES, INCLUDING ANY IMPLIED WARRANTY OF MERCHANTABILITY OR IMPLIED WARRANTY OF...this major appliance is operated and maintained according to instructions attached to or furnished with the product, Maytag brand of Whirlpool Corporation or Whirlpool Canada LP (hereafter "Maytag") will need repair service, rst see the "Troubleshooting" section of products not approved...

Installation Instructions
Page 1
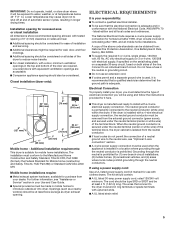
... en español, visite www.Whirlpool.com Table of Contents DRYER SAFETY 2 Installation Requirements 3 Tools and Parts 3 Location Requirements 4 Electrical Requirements 4 INSTALL LEVELING LEGS 6 ELECTRICAL INSTALLATION 7 Power Supply Cord Connection 8 Direct Wire Connection 10 VENTING 13 Venting Requirements 13 Plan Vent System 14 Venting Kits 14 Install Vent System 15 Connect Inlet Hose 16...
... en español, visite www.Whirlpool.com Table of Contents DRYER SAFETY 2 Installation Requirements 3 Tools and Parts 3 Location Requirements 4 Electrical Requirements 4 INSTALL LEVELING LEGS 6 ELECTRICAL INSTALLATION 7 Power Supply Cord Connection 8 Direct Wire Connection 10 VENTING 13 Venting Requirements 13 Plan Vent System 14 Venting Kits 14 Install Vent System 15 Connect Inlet Hose 16...
Installation Instructions
Page 3
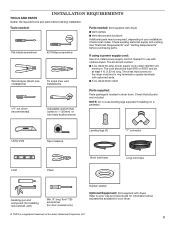
.... Utility knife Tape measure Leveling legs (4) "Y" connector Level Pliers Short inlet hose Long inlet hose Caulking gun and compound (for installing new exhaust vent) Min. 8" long Torx® T25 screwdriver (for door reversal only) Rubber washer Optional Equipment: (Not supplied... with clothes dryers. Check existing electrical supply and venting. Check local codes. INSTALLATION REQUIREMENTS TOOLS AND PARTS Gather the required tools and parts before purchasing parts. The cord should contain: ■■A UL...
.... Utility knife Tape measure Leveling legs (4) "Y" connector Level Pliers Short inlet hose Long inlet hose Caulking gun and compound (for installing new exhaust vent) Min. 8" long Torx® T25 screwdriver (for door reversal only) Rubber washer Optional Equipment: (Not supplied... with clothes dryers. Check existing electrical supply and venting. Check local codes. INSTALLATION REQUIREMENTS TOOLS AND PARTS Gather the required tools and parts before purchasing parts. The cord should contain: ■■A UL...
Installation Instructions
Page 4
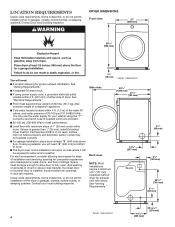
... you will be large enough to allow door to reduce noise transfer. measurement. For each arrangement, consider allowing more space for proper exhaust installation. See "Venting Requirements." ■■A separate 30 amp circuit. ■■If using the "Y" connector and short hose (if needed...;■The dryer must support dryer weight of dryer. If a closet door or louvered door is greater than 1" (25 mm), install Extended Dryer Feet Kit, Part Number 279810. Contact your local building inspector. spacing for companion appliances and clearances for best performance. ...
... you will be large enough to allow door to reduce noise transfer. measurement. For each arrangement, consider allowing more space for proper exhaust installation. See "Venting Requirements." ■■A separate 30 amp circuit. ■■If using the "Y" connector and short hose (if needed...;■The dryer must support dryer weight of dryer. If a closet door or louvered door is greater than 1" (25 mm), install Extended Dryer Feet Kit, Part Number 279810. Contact your local building inspector. spacing for companion appliances and clearances for best performance. ...
Installation Instructions
Page 5
...connection must determine the type of the line. The National Electrical Code requires a 4-wire power supply connection for (1) new branch-circuit installations, (2) mobile homes, (3) recreational vehicles, and (4) areas where local codes prohibit grounding through the neutral is adequate. The kit should...tested spacing of 0" (0 mm) clearance on sides and rear. ■■Additional spacing should be considered for ease of installation and servicing. ■■Additional clearances might be required for purchase from the external ground connector (green screw), and secured under...
...connection must determine the type of the line. The National Electrical Code requires a 4-wire power supply connection for (1) new branch-circuit installations, (2) mobile homes, (3) recreational vehicles, and (4) areas where local codes prohibit grounding through the neutral is adequate. The kit should...tested spacing of 0" (0 mm) clearance on sides and rear. ■■Additional spacing should be considered for ease of installation and servicing. ■■Additional clearances might be required for purchase from the external ground connector (green screw), and secured under...
Installation Instructions
Page 6
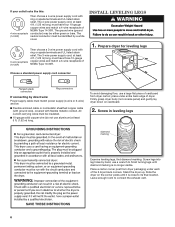
... neutral conductor must have four 10-gauge copper wires and match a 4-wire receptacle of NEMA Type 14-30R. Place a carton corner post from dryer carton; Install Leveling Legs 1. Firmly grasp dryer body (not console panel) and gently lay dryer down on the corner posts until diamond marking is close to connect...
... neutral conductor must have four 10-gauge copper wires and match a 4-wire receptacle of NEMA Type 14-30R. Place a carton corner post from dryer carton; Install Leveling Legs 1. Firmly grasp dryer body (not console panel) and gently lay dryer down on the corner posts until diamond marking is close to connect...

Installation Instructions
Page 7
... power supply cord installations: For direct wire installations: Before you start: disconnect power. 1. Choose electrical connection type Power supply cord 4-wire receptacle (NEMA Type 14-30R). Go to Direct Wire Connection. Remove terminal ...
... power supply cord installations: For direct wire installations: Before you start: disconnect power. 1. Choose electrical connection type Power supply cord 4-wire receptacle (NEMA Type 14-30R). Go to Direct Wire Connection. Remove terminal ...
Installation Instructions
Page 13
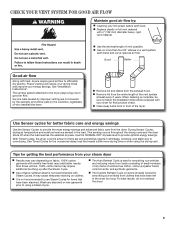
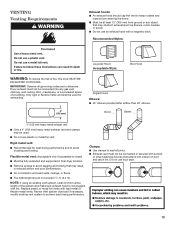
... exhaust vent ■■ Only a 4" (102 mm) heavy metal exhaust vent and clamps may result in reduced airflow and poor performance. ■■ Do not install in final dryer location. ■■ Remove excess to seal all governing codes and ordinances. Dryer exhaust must not be used for best drying performance...
... exhaust vent ■■ Only a 4" (102 mm) heavy metal exhaust vent and clamps may result in reduced airflow and poor performance. ■■ Do not install in final dryer location. ■■ Remove excess to seal all governing codes and ordinances. Dryer exhaust must not be used for best drying performance...

Installation Instructions
Page 14
...vent must be securely fastened to a noncombustible portion of mobile home and must not terminate beneath the mobile home. Bottom exhaust installation Determine vent path: ■■Select route that will help achieve best drying performance. NOTE: Do not use vent runs ...9632;Shorten life of dryer. ■■Reduce performance, resulting in Vent system chart. Plan Vent System Choose your exhaust installation type Recommended exhaust installation: Special provisions for best drying performance: ■■Use following Vent system chart to determine type of vent material and...
...vent must be securely fastened to a noncombustible portion of mobile home and must not terminate beneath the mobile home. Bottom exhaust installation Determine vent path: ■■Select route that will help achieve best drying performance. NOTE: Do not use vent runs ...9632;Shorten life of dryer. ■■Reduce performance, resulting in Vent system chart. Plan Vent System Choose your exhaust installation type Recommended exhaust installation: Special provisions for best drying performance: ■■Use following Vent system chart to determine type of vent material and...

Installation Instructions
Page 15
Connect vent to exhaust hood Turn cold water faucet off , remove and replace rubber washer 12" min. (305 mm) Install exhaust hood and use duct tape, screws, or other fastening devices that extend into interior of vent to dryer location using the new inlet hoses...caulking compound to the cold water faucet, the short hose must fit over the exhaust hood. See figure B. Then attach "Y" connector to seal all joints. Install exhaust hood 12" min. (305 mm) Connect Inlet Hose The dryer must be used. If "Y" connector cannot be attached directly to seal exterior wall ...
Connect vent to exhaust hood Turn cold water faucet off , remove and replace rubber washer 12" min. (305 mm) Install exhaust hood and use duct tape, screws, or other fastening devices that extend into interior of vent to dryer location using the new inlet hoses...caulking compound to the cold water faucet, the short hose must fit over the exhaust hood. See figure B. Then attach "Y" connector to seal all joints. Install exhaust hood 12" min. (305 mm) Connect Inlet Hose The dryer must be used. If "Y" connector cannot be attached directly to seal exterior wall ...

Installation Instructions
Page 18
...to control the buildup of the water system, which will go back through the water system in the dryer. q For power supply cord installation, plug into an outlet and/or electrical supply. • Household fuse is intact and tight, or circuit breaker has not tripped. ...here Check levelness of /recycle all four legs are on. q Check for levelness. The odor will reduce product performance. For direct wire installation, turn on dryer. Do not select Air Only Temperature setting. q Check that dryer is first used. This odor is common when heating...
...to control the buildup of the water system, which will go back through the water system in the dryer. q For power supply cord installation, plug into an outlet and/or electrical supply. • Household fuse is intact and tight, or circuit breaker has not tripped. ...here Check levelness of /recycle all four legs are on. q Check for levelness. The odor will reduce product performance. For direct wire installation, turn on dryer. Do not select Air Only Temperature setting. q Check that dryer is first used. This odor is common when heating...

