
Installation Instructions
Page 1
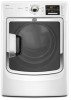
ELECTRIC DRYER INSTALLATION INSTRUCTIONS Para una version de estas instrucciones en español, visite www.Whirlpool.com Table of Contents DRYER SAFETY 2 Installation Requirements 3 Tools and Parts 3 Location Requirements 4 Electrical Requirements 4 INSTALL LEVELING LEGS 6 ELECTRICAL INSTALLATION 7 Power ... Kits 14 Install Vent System 15 Connect Inlet Hose 16 ConNect Vent 17 Level Dryer 18 Complete Installation Checklist 18 Door reversal (OPTIONAL 19 INSTALLATION NOTES Date of purchase Date of installation Installer Model number Serial number W10057363A W10310420A - SP 1
ELECTRIC DRYER INSTALLATION INSTRUCTIONS Para una version de estas instrucciones en español, visite www.Whirlpool.com Table of Contents DRYER SAFETY 2 Installation Requirements 3 Tools and Parts 3 Location Requirements 4 Electrical Requirements 4 INSTALL LEVELING LEGS 6 ELECTRICAL INSTALLATION 7 Power ... Kits 14 Install Vent System 15 Connect Inlet Hose 16 ConNect Vent 17 Level Dryer 18 Complete Installation Checklist 18 Door reversal (OPTIONAL 19 INSTALLATION NOTES Date of purchase Date of installation Installer Model number Serial number W10057363A W10310420A - SP 1
Installation Instructions
Page 3
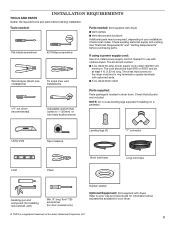
... and ductwork Additional parts may be at least 4 ft. (1.22 m) long. If using a power supply cord: Use a UL listed power supply cord kit marked for door reversal only) Rubber washer Optional Equipment: (Not supplied with upturned ends. ■■A UL listed strain relief. 1/4" nut driver (recommended) Adjustable wrench that opens to your...
... and ductwork Additional parts may be at least 4 ft. (1.22 m) long. If using a power supply cord: Use a UL listed power supply cord kit marked for door reversal only) Rubber washer Optional Equipment: (Not supplied with upturned ends. ■■A UL listed strain relief. 1/4" nut driver (recommended) Adjustable wrench that opens to your...
Installation Instructions
Page 19
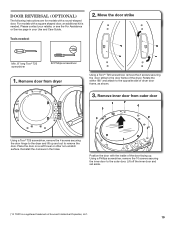
... is a registered trademark of Acument Intellectual Properties, LLC. 19 Remove inner door from dryer Using a Torx®† T25 screwdriver, remove the 2 screws securing the door strike to remove the door. Place the door on a soft towel or other non-scratch surface. Door Reversal (optional) The following instructions are for models with the inside of the...
... is a registered trademark of Acument Intellectual Properties, LLC. 19 Remove inner door from dryer Using a Torx®† T25 screwdriver, remove the 2 screws securing the door strike to remove the door. Place the door on a soft towel or other non-scratch surface. Door Reversal (optional) The following instructions are for models with the inside of the...

Installation Instructions
Page 20
...as shown in the figure A above. IMPORTANT: Do not overtighten. Rotate the outer window 180°. 20 Reverse outer window/handle B Align the notches on the outer door assembly with the tabs on the trim ring indicated with arrows in figure A. Then lift the outer window ...retainer up with 6 screws removed earlier. 4. Rotate and reassemble outer door and trim ring A A B Using a Phillips screwdriver, remove the 6 screws from outer window assembly 6. Using a Phillips screwdriver, secure with the 4...
...as shown in the figure A above. IMPORTANT: Do not overtighten. Rotate the outer window 180°. 20 Reverse outer window/handle B Align the notches on the outer door assembly with the tabs on the trim ring indicated with arrows in figure A. Then lift the outer window ...retainer up with 6 screws removed earlier. 4. Rotate and reassemble outer door and trim ring A A B Using a Phillips screwdriver, remove the 6 screws from outer window assembly 6. Using a Phillips screwdriver, secure with the 4...


