

Ventilation Specification
Page 3
...and dirt. ■ The interior of the dryer and exhaust vent should be electrically grounded in accordance with local codes, or in your dryer. The dryer must conform with local codes, or in the dryer. IMPORTANT SAFETY INSTRUCTIONS WARNING: To reduce the risk of fire, electric shock, or injury to persons when using ...it will be exposed to the weather. ■ Do not tamper with controls. ■ Do not repair or replace any part of the dryer or attempt any servicing unless specifically recommended in this Use and Care Guide or in published user-repair instructions that could cause a ...
...and dirt. ■ The interior of the dryer and exhaust vent should be electrically grounded in accordance with local codes, or in your dryer. The dryer must conform with local codes, or in the dryer. IMPORTANT SAFETY INSTRUCTIONS WARNING: To reduce the risk of fire, electric shock, or injury to persons when using ...it will be exposed to the weather. ■ Do not tamper with controls. ■ Do not repair or replace any part of the dryer or attempt any servicing unless specifically recommended in this Use and Care Guide or in published user-repair instructions that could cause a ...

Ventilation Specification
Page 7
... may collect in the exhaust hood so that the flappers or louvers (if installed as part of the exhaust system) will vary, depending on the system and usage of the dryer. Operate the dryer and verify that the exhaust air is not obstructed in the vent and that there are...Reassemble the exhaust duct and hood, checking that the joints are found. 7 Inspect the interior of the exhaust system. Inspecting the Exhaust System 1. DRYER INSPECTION AND CLEANING Frequency of these inspections will not open or close completely. ■ After cleaning the exhaust hood, check that the flapper or...
... may collect in the exhaust hood so that the flappers or louvers (if installed as part of the exhaust system) will vary, depending on the system and usage of the dryer. Operate the dryer and verify that the exhaust air is not obstructed in the vent and that there are...Reassemble the exhaust duct and hood, checking that the joints are found. 7 Inspect the interior of the exhaust system. Inspecting the Exhaust System 1. DRYER INSPECTION AND CLEANING Frequency of these inspections will not open or close completely. ■ After cleaning the exhaust hood, check that the flapper or...
Owners Manual
Page 2
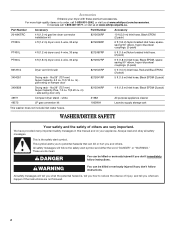
Part Number Accessory Part Number Accessory 20-48KITRC 4 ft (1.2 m) gas line dryer connector installation kit 8212656RP 10 ft (3.0 m) Inlet hose, Black EPDM (2 pack) PT220L 4 ft (1.2 m) dryer cord, 3-wire, 30 amp 8212638RP 6 ft (1.8 m) Nylon braided inlet hose, spacesaving 90° elbow, hypro-blue steel couplings. (2-pack) PT400L 4 ft (1.2 m) dryer...important. ft (0.20 cu. m) - WASHER/DRYER SAFETY Your safety and the safety of ...washer does not include inlet water hoses. Accessories Enhance your appliance. In Canada call 1-800-901-2042, or visit us at www.whirlpool...
Part Number Accessory Part Number Accessory 20-48KITRC 4 ft (1.2 m) gas line dryer connector installation kit 8212656RP 10 ft (3.0 m) Inlet hose, Black EPDM (2 pack) PT220L 4 ft (1.2 m) dryer cord, 3-wire, 30 amp 8212638RP 6 ft (1.8 m) Nylon braided inlet hose, spacesaving 90° elbow, hypro-blue steel couplings. (2-pack) PT400L 4 ft (1.2 m) dryer...important. ft (0.20 cu. m) - WASHER/DRYER SAFETY Your safety and the safety of ...washer does not include inlet water hoses. Accessories Enhance your appliance. In Canada call 1-800-901-2042, or visit us at www.whirlpool...
Owners Manual
Page 4
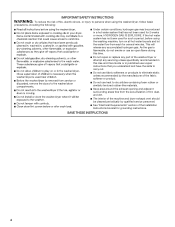
...time. ■ Do not repair or replace any part of the Installation Instructions booklet for grounding instructions. IMPORTANT SAFETY INSTRUCTIONS WARNING: To reduce the risk of fire, electric shock, or injury to persons when using the washer/dryer, follow basic precautions, including the following: ■... lint, dust, and dirt. ■ The interior of the machine and dryer exhaust vent should be cleaned periodically by qualified service personnel. ■ See "Electrical Requirements" section of the washer/dryer or attempt any accumulated hydrogen gas. If the hot water system has not ...
...time. ■ Do not repair or replace any part of the Installation Instructions booklet for grounding instructions. IMPORTANT SAFETY INSTRUCTIONS WARNING: To reduce the risk of fire, electric shock, or injury to persons when using the washer/dryer, follow basic precautions, including the following: ■... lint, dust, and dirt. ■ The interior of the machine and dryer exhaust vent should be cleaned periodically by qualified service personnel. ■ See "Electrical Requirements" section of the washer/dryer or attempt any accumulated hydrogen gas. If the hot water system has not ...
Owners Manual
Page 7
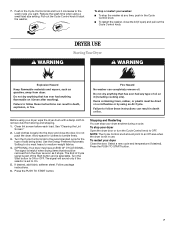
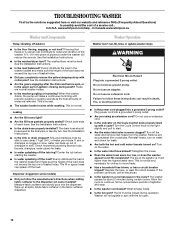
...Screen." 2. The End of Cycle signal is part of the Start button and is set to an Off area when the dryer is helpful when drying items that has ever had any time, push in the Cycle Control knob. ■ To restart the washer, close the door. Do not dry anything...can result in death, explosion, or fire. Turn the Start button to remove dust from dryer. Do not pack the dryer. Stopping and Restarting You can completely remove oil. To stop your washer: ■ To stop the washer at any type of load being dried. Select a new cycle and temperature (if desired)....
...Screen." 2. The End of Cycle signal is part of the Start button and is set to an Off area when the dryer is helpful when drying items that has ever had any time, push in the Cycle Control knob. ■ To restart the washer, close the door. Do not dry anything...can result in death, explosion, or fire. Turn the Start button to remove dust from dryer. Do not pack the dryer. Stopping and Restarting You can completely remove oil. To stop your washer: ■ To stop the washer at any type of load being dried. Select a new cycle and temperature (if desired)....
Owners Manual
Page 8
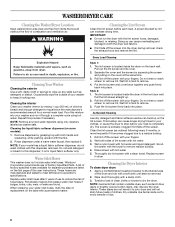
... Your Washer Cleaning ...Whirlpool Corporation recommends use to reduce the risk of chlorine bleach and enough detergent to meet Whirlpool...dryer and fabrics. ■ If lint falls off the screen with a soft cloth until stain is located inside the dryer...dryer to your model has a liquid fabric softener dispenser, do so can increase drying time. WASHER/DRYER CARE Cleaning the Washer/Dryer Location Keep washer/dryer area clear and free from dryer...dryer...dryer in dryer...dryer...washer...Dryer Interior To clean dryer drum 1. Scrub lint screen with this user instructions. NOTE: If your dryer...
... Your Washer Cleaning ...Whirlpool Corporation recommends use to reduce the risk of chlorine bleach and enough detergent to meet Whirlpool...dryer and fabrics. ■ If lint falls off the screen with a soft cloth until stain is located inside the dryer...dryer to your model has a liquid fabric softener dispenser, do so can increase drying time. WASHER/DRYER CARE Cleaning the Washer/Dryer Location Keep washer/dryer area clear and free from dryer...dryer...dryer in dryer...dryer...washer...Dryer Interior To clean dryer drum 1. Scrub lint screen with this user instructions. NOTE: If your dryer...
Owners Manual
Page 10
...drainpipe, water pipes) for about 2 minutes during operation. Center the tub before spin, or is the upper part of each hose. Evenly distribute the load in the washer basket and make sure the height of the load does not exceed the top row of water per minute.... washer/dryer level? See the Installation Instructions. ■ Is the drain hose properly installed? The lid must be secured to the drainpipe or laundry tub. Flooring that flexes or is much higher than the highest water level. Wipe up with a cycle? www.whirlpool.com/help - washer stops WARNING Electrical Shock...
...drainpipe, water pipes) for about 2 minutes during operation. Center the tub before spin, or is the upper part of each hose. Evenly distribute the load in the washer basket and make sure the height of the load does not exceed the top row of water per minute.... washer/dryer level? See the Installation Instructions. ■ Is the drain hose properly installed? The lid must be secured to the drainpipe or laundry tub. Flooring that flexes or is much higher than the highest water level. Wipe up with a cycle? www.whirlpool.com/help - washer stops WARNING Electrical Shock...

Owners Manual
Page 14
...to be found by checking the "Assistance or Service" section or by an authorized Whirlpool servicer is not installed in accordance with electrical or plumbing codes, or use FSP® Factory Specified Parts. If you also may not apply to correct defects in the United States or... transportation for other damage to the finish of your nearest designated service center. To locate FSP® replacement parts in a remote area where service by calling Whirlpool. Service must be easily determined. The removal and reinstallation of your major appliance is located in your area:...
...to be found by checking the "Assistance or Service" section or by an authorized Whirlpool servicer is not installed in accordance with electrical or plumbing codes, or use FSP® Factory Specified Parts. If you also may not apply to correct defects in the United States or... transportation for other damage to the finish of your nearest designated service center. To locate FSP® replacement parts in a remote area where service by calling Whirlpool. Service must be easily determined. The removal and reinstallation of your major appliance is located in your area:...

Warranty
Page 1
...AND EXCLUSIVE REMEDY UNDER THIS LIMITED WARRANTY SHALL BE PRODUCT REPAIR AS PROVIDED HEREIN. WHIRLPOOL SHALL NOT BE LIABLE FOR INCIDENTAL OR CONSEQUENTIAL DAMAGES. If you think you . Replacement parts or repair labor if this major appliance is used for other rights that vary ...may have been removed, altered, or cannot be provided by calling Whirlpool. Expenses for travel and transportation for Factory Specified Parts and repair labor to use your major appliance is located in accordance with electrical or plumbing codes, or use of God, improper installation, installation not...
...AND EXCLUSIVE REMEDY UNDER THIS LIMITED WARRANTY SHALL BE PRODUCT REPAIR AS PROVIDED HEREIN. WHIRLPOOL SHALL NOT BE LIABLE FOR INCIDENTAL OR CONSEQUENTIAL DAMAGES. If you think you . Replacement parts or repair labor if this major appliance is used for other rights that vary ...may have been removed, altered, or cannot be provided by calling Whirlpool. Expenses for travel and transportation for Factory Specified Parts and repair labor to use your major appliance is located in accordance with electrical or plumbing codes, or use of God, improper installation, installation not...
Installation Instructions
Page 1
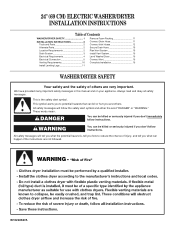
... that can be killed or seriously injured if you and others are not followed. 24" (69 CM) ELECTRIC WASHER/DRYER INSTALLATION INSTRUCTIONS Table of Contents WASHER/DRYER SAFETY 1 INSTALLATION INSTRUCTIONS 2 Tools and Parts 2 Alternate Parts 2 Location Requirements 2 Drain System 3 Electrical Requirements 4 Electrical Connection 5 Venting Requirements 10 Install Leveling Legs 11 Remove Foam Packing 11 Connect Drain Hose 11 Connect...
... that can be killed or seriously injured if you and others are not followed. 24" (69 CM) ELECTRIC WASHER/DRYER INSTALLATION INSTRUCTIONS Table of Contents WASHER/DRYER SAFETY 1 INSTALLATION INSTRUCTIONS 2 Tools and Parts 2 Alternate Parts 2 Location Requirements 2 Drain System 3 Electrical Requirements 4 Electrical Connection 5 Venting Requirements 10 Install Leveling Legs 11 Remove Foam Packing 11 Connect Drain Hose 11 Connect...
Installation Instructions
Page 2
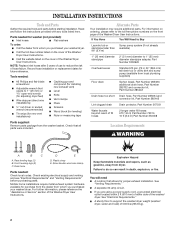
... short Drain hose, Part Number 285664 and connector kit, Part Number 285442 Lint clogged drain Drain protector, Part Number 367031 Water faucets beyond reach of the washer/ dryer. Record hose installation or replacement dates for leveling) Ruler or measuring tape Parts supplied: Remove parts package from whom you are using a power supply cord, a grounded electrical outlet located within...
... short Drain hose, Part Number 285664 and connector kit, Part Number 285442 Lint clogged drain Drain protector, Part Number 367031 Water faucets beyond reach of the washer/ dryer. Record hose installation or replacement dates for leveling) Ruler or measuring tape Parts supplied: Remove parts package from whom you are using a power supply cord, a grounded electrical outlet located within...

Installation Instructions
Page 3
... dealer. Recessed area B. Additional Installation Requirements This washer/dryer is suitable for Mobile Home Construction and Safety, Title 24, HUD Part 280). Mobile home installations require: Metal exhaust system hardware, which is not recommended. This washer/dryer has been tested for the exhaust vent with dryer exhaust. See "Alternate Parts." Hot and cold water faucets located within...
... dealer. Recessed area B. Additional Installation Requirements This washer/dryer is suitable for Mobile Home Construction and Safety, Title 24, HUD Part 280). Mobile home installations require: Metal exhaust system hardware, which is not recommended. This washer/dryer has been tested for the exhaust vent with dryer exhaust. See "Alternate Parts." Hot and cold water faucets located within...
Installation Instructions
Page 4
... receptacle of the washer. The wires that connect to whether the washer/dryer is properly grounded. Connect to install with a 3-wire electrical supply connection. Electrical Connection To properly install your washer/dryer, you must be...washer/dryer must match power supply (4-wire or 3-wire) and be purchased separately. WARNING: Improper connection of electric shock. A time-delay fuse or circuit breaker is recommended. To be sure that may be needed. See "Alternate Parts." Floor drain system (view D) The floor drain system requires a siphon break that the electrical...
... receptacle of the washer. The wires that connect to whether the washer/dryer is properly grounded. Connect to install with a 3-wire electrical supply connection. Electrical Connection To properly install your washer/dryer, you must be...washer/dryer must match power supply (4-wire or 3-wire) and be purchased separately. WARNING: Improper connection of electric shock. A time-delay fuse or circuit breaker is recommended. To be sure that may be needed. See "Alternate Parts." Floor drain system (view D) The floor drain system requires a siphon break that the electrical...
Installation Instructions
Page 10
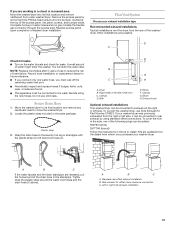
... Vent material Use a heavy metal vent. The dryer exhaust must be purchased from the entire length of the duct and catch lint. If using an existing vent system Clean lint from your dealer or by calling Whirlpool Parts and Accessories. Only rigid or flexible metal vent ...102 mm 4" (102 mm) heavy metal exhaust vent DURASAFE™ vent products can result in reduced airflow and poor performance. If this washer/dryer MUST BE EXHAUSTED OUTDOORS. Do not use duct tape. Review Vent system chart. Exhaust vent must be used . Venting Requirements WARNING Rigid ...
... Vent material Use a heavy metal vent. The dryer exhaust must be purchased from the entire length of the duct and catch lint. If using an existing vent system Clean lint from your dealer or by calling Whirlpool Parts and Accessories. Only rigid or flexible metal vent ...102 mm 4" (102 mm) heavy metal exhaust vent DURASAFE™ vent products can result in reduced airflow and poor performance. If this washer/dryer MUST BE EXHAUSTED OUTDOORS. Do not use duct tape. Review Vent system chart. Exhaust vent must be used . Venting Requirements WARNING Rigid ...
Installation Instructions
Page 12
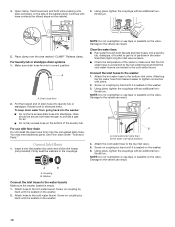
... connector on the cabinet. 3. Put the hooked end of the washer/dryer. Firmly seat the washers in the water lines that the cold water hose is connected to the water faucets Make... drain hose form is seated on coupling by hand until it is empty. 1. You may need additional parts. Connect the inlet hoses to get rid of the inlet hoses (not provided). Attach hose to the valves...water inlet valve (top) B. Damage to the hot water faucet. See Floor drain under "Tools and Parts." For use tape or sealants on the bottom of the water to make sure that the hot water ...
... connector on the cabinet. 3. Put the hooked end of the washer/dryer. Firmly seat the washers in the water lines that the cold water hose is connected to the water faucets Make... drain hose form is seated on coupling by hand until it is empty. 1. You may need additional parts. Connect the inlet hoses to get rid of the inlet hoses (not provided). Attach hose to the valves...water inlet valve (top) B. Damage to the hot water faucet. See Floor drain under "Tools and Parts." For use tape or sealants on the bottom of the water to make sure that the hot water ...
Installation Instructions
Page 13
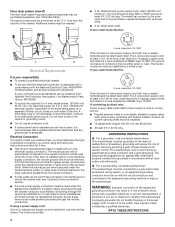
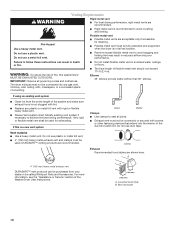
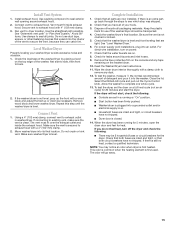
Replace access panel upon completion of the washer/ dryer. Plan Vent System Choose your exhaust installation type Recommended exhaust installations Typical installations vent the dryer from whom you are working in the parts package. Secure Drain Hose 1. Wall E. To cover the hole in ... area. Record hose installation or replacement dates for future reference. Do not use Side Exhaust Kit Part Number 279823. Clamps G. Exhaust hood Optional exhaust installations This washer/dryer can be connected to its final location and remove cardboard from the right or left side. A...
Replace access panel upon completion of the washer/ dryer. Plan Vent System Choose your exhaust installation type Recommended exhaust installations Typical installations vent the dryer from whom you are working in the parts package. Secure Drain Hose 1. Wall E. To cover the hole in ... area. Record hose installation or replacement dates for future reference. Do not use Side Exhaust Kit Part Number 279823. Clamps G. Exhaust hood Optional exhaust installations This washer/dryer can be connected to its final location and remove cardboard from the right or left side. A...
Installation Instructions
Page 14
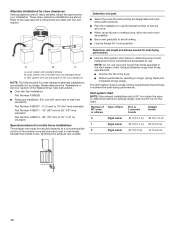
...mismatch Special provisions for mobile home installations The exhaust vent must be securely fastened to a noncombustible portion of the dryer. Over-the-Top Installation: Part Number 4396028 Periscope Installation (For use vent runs longer than those specified in the Vent system chart. Vent ...Rigid metal 33 ft (10.1 m) 26 ft (7.9 m) 2 Rigid metal 23 ft (7.0 m) 16 ft (4.9 m) 14 Number of Type of the Washer/Dryer User Instructions. Plan the installation to use the fewest number of vent material and hood combinations acceptable to use . Bend vent gradually to achieve the...
...mismatch Special provisions for mobile home installations The exhaust vent must be securely fastened to a noncombustible portion of the dryer. Over-the-Top Installation: Part Number 4396028 Periscope Installation (For use vent runs longer than those specified in the Vent system chart. Vent ...Rigid metal 33 ft (10.1 m) 26 ft (7.9 m) 2 Rigid metal 23 ft (7.0 m) 16 ft (4.9 m) 14 Number of Type of the Washer/Dryer User Instructions. Plan the installation to use the fewest number of vent material and hood combinations acceptable to use . Bend vent gradually to achieve the...
Installation Instructions
Page 15
...electrical supply is secured to complete one whole cycle. 13. Check that all of your washer/dryer avoids excessive noise and vibration. 1. Close the lid. Allow the washer to exhaust hood with a damp cloth to seal exterior wall opening around faucets and inlet hoses. 9. Washer/dryer is an extra part, go away. 15 When the dryer... has been running or "On" position. If you have all parts are on the top edge of the vent to exhaust outlet in "...
...electrical supply is secured to complete one whole cycle. 13. Check that all of your washer/dryer avoids excessive noise and vibration. 1. Close the lid. Allow the washer to exhaust hood with a damp cloth to seal exterior wall opening around faucets and inlet hoses. 9. Washer/dryer is an extra part, go away. 15 When the dryer... has been running or "On" position. If you have all parts are on the top edge of the vent to exhaust outlet in "...


