
Ventilation Specification
Page 1
...potential hazard is the safety alert symbol. ® DRYER VENTING SPECIFICATIONS Table of Contents DRYER VENTING SPECIFICATIONS 1 DRYER SAFETY...1 INSTALLATION REQUIREMENTS ...4 Venting Requirements ...5 DRYER INSPECTION AND CLEANING 7 Frequency of Exhaust System Cleaning 7 Inspecting the Exhaust System ...7 DRYER SAFETY Your safety and the safety of others .... can be killed or seriously injured if you what can kill or hurt you and others are installing a gas dryer, it is recommended that the owner post, in a prominent location, instructions for the customer's use gasoline or ...
...potential hazard is the safety alert symbol. ® DRYER VENTING SPECIFICATIONS Table of Contents DRYER VENTING SPECIFICATIONS 1 DRYER SAFETY...1 INSTALLATION REQUIREMENTS ...4 Venting Requirements ...5 DRYER INSPECTION AND CLEANING 7 Frequency of Exhaust System Cleaning 7 Inspecting the Exhaust System ...7 DRYER SAFETY Your safety and the safety of others .... can be killed or seriously injured if you what can kill or hurt you and others are installing a gas dryer, it is recommended that the owner post, in a prominent location, instructions for the customer's use gasoline or ...

Ventilation Specification
Page 3
...and adjacent surrounding areas free from the accumulation of lint, dust, and dirt. ■ The interior of the dryer and exhaust vent should be cleaned periodically by qualified service personnel. ■ See installation instructions for grounding requirements. SAVE THESE INSTRUCTIONS... IMPORTANT: The gas installation must be electrically grounded in accordance with local codes, or in your dryer. Items contaminated with ...
...and adjacent surrounding areas free from the accumulation of lint, dust, and dirt. ■ The interior of the dryer and exhaust vent should be cleaned periodically by qualified service personnel. ■ See installation instructions for grounding requirements. SAVE THESE INSTRUCTIONS... IMPORTANT: The gas installation must be electrically grounded in accordance with local codes, or in your dryer. Items contaminated with ...

Ventilation Specification
Page 4
...of the building. To remove moisture from laundry area. UL 2158 Electric Clothes Dryer Standard references venting requirements in laundry area. 4. Other sections of these instructions can ...dryer unit venting systems for Whirlpool Corporation dryers sold in compliance: 1. Maximum exhaust temperature of dryer vent systems. Whirlpool does not design multidryer vent systems, nor does Whirlpool review or provide approvals for vent systems designed by third-party engineering firms. Outside Exhaust The four basic reasons for more information. Fire Hazard Use a heavy metal vent. Whirlpool...
...of the building. To remove moisture from laundry area. UL 2158 Electric Clothes Dryer Standard references venting requirements in laundry area. 4. Other sections of these instructions can ...dryer unit venting systems for Whirlpool Corporation dryers sold in compliance: 1. Maximum exhaust temperature of dryer vent systems. Whirlpool does not design multidryer vent systems, nor does Whirlpool review or provide approvals for vent systems designed by third-party engineering firms. Outside Exhaust The four basic reasons for more information. Fire Hazard Use a heavy metal vent. Whirlpool...

Ventilation Specification
Page 5
... length and number of elbows for the type of vent you may have a blocked or partially blocked vent or that your vent may be used for minimum clearances between the product and the enclosure surfaces. Codes Agency Approvals All Whirlpool electric dryer models, including "long vent dryers," that a dryer is creating back pressure in the Air Only cycle (no...
... length and number of elbows for the type of vent you may have a blocked or partially blocked vent or that your vent may be used for minimum clearances between the product and the enclosure surfaces. Codes Agency Approvals All Whirlpool electric dryer models, including "long vent dryers," that a dryer is creating back pressure in the Air Only cycle (no...
Ventilation Specification
Page 6
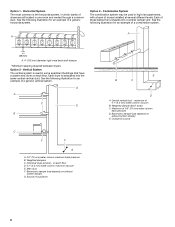
...system may be used in high-rise apartments, with a bank of dryers installed at several different levels. Each dryer is used in some apartment buildings that have a washer and dryer on each dryer) C. See the following illustration for an example of these banks then... exhausts into the same central vertical duct. Individual dryer exhaust - Main duct F. Maximum of outside air E B C D A. Vertical System The vertical system is exhausted into a central vertical vent. ...
...system may be used in high-rise apartments, with a bank of dryers installed at several different levels. Each dryer is used in some apartment buildings that have a washer and dryer on each dryer) C. See the following illustration for an example of these banks then... exhausts into the same central vertical duct. Individual dryer exhaust - Main duct F. Maximum of outside air E B C D A. Vertical System The vertical system is exhausted into a central vertical vent. ...

Ventilation Specification
Page 7
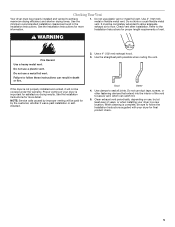
... duct and remove any leaks that are found. 7 Operate the dryer and verify that the exhaust air is not obstructed in the vent and that the flapper or louvers move freely. 3. Disconnect the exhaust duct from the dryer and from the exhaust hood (at the exhaust outlet). 2. In...; After cleaning the exhaust hood, check that there are secure. 4. Complaints of long drying times or a hot dryer top indicate the need for inspection of the dryer. DRYER INSPECTION AND CLEANING Frequency of Exhaust System Cleaning Every exhaust system must be inspected periodically and cleaned to ensure that lint...
... duct and remove any leaks that are found. 7 Operate the dryer and verify that the exhaust air is not obstructed in the vent and that the flapper or louvers move freely. 3. Disconnect the exhaust duct from the dryer and from the exhaust hood (at the exhaust outlet). 2. In...; After cleaning the exhaust hood, check that there are secure. 4. Complaints of long drying times or a hot dryer top indicate the need for inspection of the dryer. DRYER INSPECTION AND CLEANING Frequency of Exhaust System Cleaning Every exhaust system must be inspected periodically and cleaned to ensure that lint...
Owners Manual
Page 2
... Inlet hose, Black EPDM, space saving 90° elbow, hypro-blue steel couplings. (2-pack) 8212614 Dryer vent lint brush 8212545RP 5 ft (1.5 m) Inlet hose, Red and Blue EPDM. (2-pack) 3404351 Drying rack... safety messages will follow instructions. fits 29" (737 mm) Super Capacity Plus, 7.0 cu. WASHER/DRYER SAFETY Your safety and the safety of injury, and tell you and others are not followed.... Inlet hose, Black EPDM (2 pack) 49971 Compact dryer stand - In Canada call 1-800-901-2042, or visit us at www.whirlpool.com/accessories. This symbol alerts you don't follow instructions...
... Inlet hose, Black EPDM, space saving 90° elbow, hypro-blue steel couplings. (2-pack) 8212614 Dryer vent lint brush 8212545RP 5 ft (1.5 m) Inlet hose, Red and Blue EPDM. (2-pack) 3404351 Drying rack... safety messages will follow instructions. fits 29" (737 mm) Super Capacity Plus, 7.0 cu. WASHER/DRYER SAFETY Your safety and the safety of injury, and tell you and others are not followed.... Inlet hose, Black EPDM (2 pack) 49971 Compact dryer stand - In Canada call 1-800-901-2042, or visit us at www.whirlpool.com/accessories. This symbol alerts you don't follow instructions...
Owners Manual
Page 4
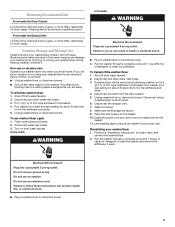
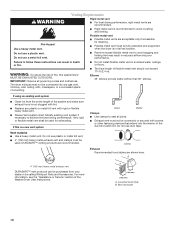
...will release any servicing unless specifically recommended in this time. ■ Do not repair or replace any part of the washer/dryer or attempt any accumulated hydrogen gas. SAVE THESE INSTRUCTIONS 4 IMPORTANT SAFETY INSTRUCTIONS WARNING: To reduce the risk of the ... accumulation of lint, dust, and dirt. ■ The interior of the machine and dryer exhaust vent should be cleaned periodically by qualified service personnel. ■ See "Electrical Requirements" section of fire, electric shock, or injury to eliminate static unless recommended by the manufacturer of the fabric softener...
...will release any servicing unless specifically recommended in this time. ■ Do not repair or replace any part of the washer/dryer or attempt any accumulated hydrogen gas. SAVE THESE INSTRUCTIONS 4 IMPORTANT SAFETY INSTRUCTIONS WARNING: To reduce the risk of the ... accumulation of lint, dust, and dirt. ■ The interior of the machine and dryer exhaust vent should be cleaned periodically by qualified service personnel. ■ See "Electrical Requirements" section of fire, electric shock, or injury to eliminate static unless recommended by the manufacturer of the fabric softener...
Owners Manual
Page 5
...installation or selfinstalled. 2. Do not use a plastic vent. Failure to seal all joints. Use clamps to follow the Installation Instructions supplied with your dryer for proper length requirements of vent. Do not use plastic vent or metal foil vent. Do not use duct tape, screws, or ...other fastening devices that extend into the interior of your dryer in the Installation Instructions. Do not kink or crush flexible metal vent. See the Installation Instructions for by improper venting will not be completely extended to allow adequate exhaust air to flow. ...
...installation or selfinstalled. 2. Do not use a plastic vent. Failure to seal all joints. Use clamps to follow the Installation Instructions supplied with your dryer for proper length requirements of vent. Do not use plastic vent or metal foil vent. Do not use duct tape, screws, or ...other fastening devices that extend into the interior of your dryer in the Installation Instructions. Do not kink or crush flexible metal vent. See the Installation Instructions for by improper venting will not be completely extended to allow adequate exhaust air to flow. ...
Owners Manual
Page 9
... removed every 2 years, or more often, depending on vacation or not using your washer/dryer where it . To transport the washer/dryer 1. Unplug washer/dryer or disconnect power. From Inside the Exhaust Vent Lint should be removed every 2 years, or more often, depending on a drain ...can result in death or electrical shock. ■ Plug in washer/dryer or reconnect power. 4. If storing or moving your washer/dryer only when you should be on dryer usage. Non-use an adapter. If washer/dryer will not freeze. In the U.S.A. Run the washer through a complete cycle with...
... removed every 2 years, or more often, depending on vacation or not using your washer/dryer where it . To transport the washer/dryer 1. Unplug washer/dryer or disconnect power. From Inside the Exhaust Vent Lint should be removed every 2 years, or more often, depending on a drain ...can result in death or electrical shock. ■ Plug in washer/dryer or reconnect power. 4. If storing or moving your washer/dryer only when you should be on dryer usage. Non-use an adapter. If washer/dryer will not freeze. In the U.S.A. Run the washer through a complete cycle with...
Owners Manual
Page 12
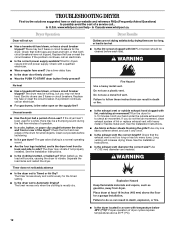
... to Automatic Drying? The timer moves only when the clothing is the dryer level front to back and side to side? In Canada www.whirlpool.ca. Dryer Operation Dryer Results Dryer will bounce, causing the dryer to vibrate. When balled up ? Proper operation of the drum for small ...or visit our website and reference FAQs (Frequently Asked Questions) to possibly avoid the cost of lint or replace exhaust vent with heavy metal or flexible metal vent. Electric dryers require 240 volt power supply. If a problem continues, call an electrician. ■ Is the correct power supply ...
... to Automatic Drying? The timer moves only when the clothing is the dryer level front to back and side to side? In Canada www.whirlpool.ca. Dryer Operation Dryer Results Dryer will bounce, causing the dryer to vibrate. When balled up ? Proper operation of the drum for small ...or visit our website and reference FAQs (Frequently Asked Questions) to possibly avoid the cost of lint or replace exhaust vent with heavy metal or flexible metal vent. Electric dryers require 240 volt power supply. If a problem continues, call an electrician. ■ Is the correct power supply ...
Dimension Guide
Page 1
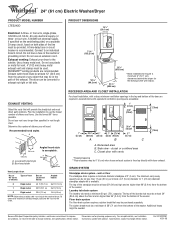
...) diameter standpipe adapter kit is recommended. Specifications subject to use plastic or metal foil vent. 4" (102 mm) heavy metal exhaust vent and clamps must be purchased separately. ® 24" (61 cm) Electric Washer/Dryer PRODUCT MODEL NUMBER LTE5243D Electrical: A three- Exhaust outlet hood must be converted to improve Dimensions are required. Plan...break that will need. The siphon break must be no higher than 96" (2.4 m) from the bottom of the exhaust. Because Whirlpool Corporation policy includes a continuous commitment to exhaust out right or left side.
...) diameter standpipe adapter kit is recommended. Specifications subject to use plastic or metal foil vent. 4" (102 mm) heavy metal exhaust vent and clamps must be purchased separately. ® 24" (61 cm) Electric Washer/Dryer PRODUCT MODEL NUMBER LTE5243D Electrical: A three- Exhaust outlet hood must be converted to improve Dimensions are required. Plan...break that will need. The siphon break must be no higher than 96" (2.4 m) from the bottom of the exhaust. Because Whirlpool Corporation policy includes a continuous commitment to exhaust out right or left side.
Installation Instructions
Page 1
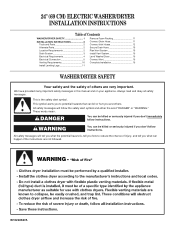
... reduce the chance of others . Always read and obey all safety messages. 24" (69 CM) ELECTRIC WASHER/DRYER INSTALLATION INSTRUCTIONS Table of Contents WASHER/DRYER SAFETY 1 INSTALLATION INSTRUCTIONS 2 Tools and Parts 2 Alternate Parts 2 Location Requirements 2 Drain System 3 Electrical Requirements 4 Electrical Connection 5 Venting Requirements 10 Install Leveling Legs 11 Remove Foam Packing 11 Connect Drain Hose 11 Connect Inlet...
... reduce the chance of others . Always read and obey all safety messages. 24" (69 CM) ELECTRIC WASHER/DRYER INSTALLATION INSTRUCTIONS Table of Contents WASHER/DRYER SAFETY 1 INSTALLATION INSTRUCTIONS 2 Tools and Parts 2 Alternate Parts 2 Location Requirements 2 Drain System 3 Electrical Requirements 4 Electrical Connection 5 Venting Requirements 10 Install Leveling Legs 11 Remove Foam Packing 11 Connect Drain Hose 11 Connect Inlet...
Installation Instructions
Page 2
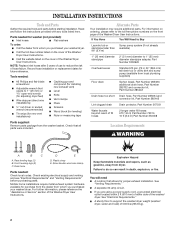
... death, explosion, or fire. For information on ordering, please refer to support the washer/dryer weight (washer/ dryer, water and load) of the Washer/Dryer User Instructions. Check existing electrical supply and venting, and see "Electrical Requirements" and "Venting Requirements" before starting installation. See "Venting Requirements." See "Electrical Requirements." Call the toll-free number listed on the cover of 500 lbs (226...
... death, explosion, or fire. For information on ordering, please refer to support the washer/dryer weight (washer/ dryer, water and load) of the Washer/Dryer User Instructions. Check existing electrical supply and venting, and see "Electrical Requirements" and "Venting Requirements" before starting installation. See "Venting Requirements." See "Electrical Requirements." Call the toll-free number listed on the cover of 500 lbs (226...

Installation Instructions
Page 3
... must be no higher than 96" (2.4 m) from the bottom of the washer/dryer is lined up directly with vents 3" (76 mm) *Required spacing **Rear clearance may not operate correctly if washer/dryer is suitable for the following spacing dimensions are required. Hot and cold water ...Installation spacing for the exhaust vent with a maximum slope of the washer. 3 This can be at or below 45°F (7°C). Recessed area B. The washer/dryer must be considered for purchase from the bottom of 1" (25 mm) under entire washer/dryer. See "Washer/Dryer Care" in temperatures at ...
... must be no higher than 96" (2.4 m) from the bottom of the washer/dryer is lined up directly with vents 3" (76 mm) *Required spacing **Rear clearance may not operate correctly if washer/dryer is suitable for the following spacing dimensions are required. Hot and cold water ...Installation spacing for the exhaust vent with a maximum slope of the washer. 3 This can be at or below 45°F (7°C). Recessed area B. The washer/dryer must be considered for purchase from the bottom of 1" (25 mm) under entire washer/dryer. See "Washer/Dryer Care" in temperatures at ...
Installation Instructions
Page 7
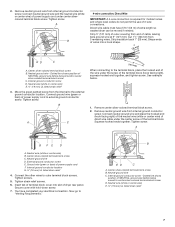
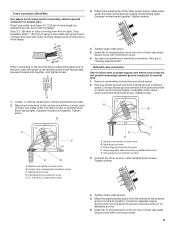
Shape ends of wires into slot of dryer rear panel. Neutral ground wire - C. Neutral wire (white or center wire) E. ¾" (19 mm) UL listed strain relief 3. B A C (127 5" mm) When connecting to the terminal... of the terminal block. You have 5 ft (1.52 m) of power supply cord to "Venting Requirements." Direct wire cable must have completed your electrical connection. Center silver-colored terminal block screw B. Connect ground wire (green or bare) of extra length so washer/dryer can be moved if needed. A G FE D A. Neutral ground wire D. Tighten screws. 5. ...
Shape ends of wires into slot of dryer rear panel. Neutral ground wire - C. Neutral wire (white or center wire) E. ¾" (19 mm) UL listed strain relief 3. B A C (127 5" mm) When connecting to the terminal... of the terminal block. You have 5 ft (1.52 m) of power supply cord to "Venting Requirements." Direct wire cable must have completed your electrical connection. Center silver-colored terminal block screw B. Connect ground wire (green or bare) of extra length so washer/dryer can be moved if needed. A G FE D A. Neutral ground wire D. Tighten screws. 5. ...
Installation Instructions
Page 8
... block cover into slot of power supply cable to neutral wire. You have completed your electrical connection. Now go to "Venting Requirements." 8 Neutral wire (white or center wire) B. External ground conductor screw E. Tighten screws. You have completed your... electrical connection. Neutral wire (white or center wire) B. Tighten strain relief screws. 5. Internal ground conductor location G. ¾" (19 mm) UL listed strain relief 4. Now go to "Venting Requirements." Center silver-colored terminal block screw C. Place the hooked ends of dryer rear ...
... block cover into slot of power supply cable to neutral wire. You have completed your electrical connection. Now go to "Venting Requirements." 8 Neutral wire (white or center wire) B. External ground conductor screw E. Tighten screws. You have completed your... electrical connection. Neutral wire (white or center wire) B. Tighten strain relief screws. 5. Internal ground conductor location G. ¾" (19 mm) UL listed strain relief 4. Now go to "Venting Requirements." Center silver-colored terminal block screw C. Place the hooked ends of dryer rear ...
Installation Instructions
Page 9
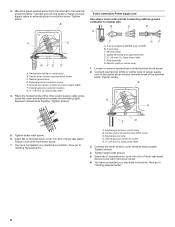
...path determined by a qualified electrician E. Place the hooked ends of extra length so washer/dryer can be moved if needed. Squeeze hooked end together. Neutral wire (white or... block cover into a hook shape. (215"mm) (8391m⁄2"m) When connecting to "Venting Requirements." Neutral ground wire D. Tighten strain relief screws. 5. Insert tab of terminal block cover...of outer covering from internal ground conductor screw. Direct wire cable must have completed your electrical connection. Now go to the terminal block, place the hooked end of the terminal block...
...path determined by a qualified electrician E. Place the hooked ends of extra length so washer/dryer can be moved if needed. Squeeze hooked end together. Neutral wire (white or... block cover into a hook shape. (215"mm) (8391m⁄2"m) When connecting to "Venting Requirements." Neutral ground wire D. Tighten strain relief screws. 5. Insert tab of terminal block cover...of outer covering from internal ground conductor screw. Direct wire cable must have completed your electrical connection. Now go to the terminal block, place the hooked end of the terminal block...
Installation Instructions
Page 10
...by calling Whirlpool Parts and Accessories. Good Better Clamps Use clamps to follow these instructions can be used for cleaning. Venting Requirements WARNING Rigid metal vent For best drying performance, rigid metal vents are shown here. Fire Hazard Use a heavy metal vent. Flexible metal vent Flexible metal vents are ... To reduce the risk of the duct and catch lint. If this washer/dryer MUST BE EXHAUSTED OUTDOORS. Do not use a metal foil vent. Louvered hood style B. Box hood style 10 Review Vent system chart. Do not use duct tape. Do not use plastic or...
...by calling Whirlpool Parts and Accessories. Good Better Clamps Use clamps to follow these instructions can be used for cleaning. Venting Requirements WARNING Rigid metal vent For best drying performance, rigid metal vents are shown here. Fire Hazard Use a heavy metal vent. Flexible metal vent Flexible metal vents are ... To reduce the risk of the duct and catch lint. If this washer/dryer MUST BE EXHAUSTED OUTDOORS. Do not use a metal foil vent. Louvered hood style B. Box hood style 10 Review Vent system chart. Do not use duct tape. Do not use plastic or...
Installation Instructions
Page 11
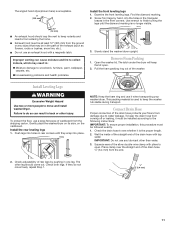
... be at least 12" (305 mm) from the ground or any lubricant other leg should cap the vent to keep rodents and insects from damage due to water leakage. Gently place the washer/dryer on its side, on the cardboard. Check adjustability of the exhaust (such as flowers, rocks or bushes..., snow line, etc.). Screw front legs by pushing in the front corners. Slowly stand the washer/dryer upright. Install Leveling Legs WARNING Excessive Weight Hazard Use two or more people to move freely, repeat Step 1. ¼" (6.4 mm) 11 To protect...
... be at least 12" (305 mm) from the ground or any lubricant other leg should cap the vent to keep rodents and insects from damage due to water leakage. Gently place the washer/dryer on its side, on the cardboard. Check adjustability of the exhaust (such as flowers, rocks or bushes..., snow line, etc.). Screw front legs by pushing in the front corners. Slowly stand the washer/dryer upright. Install Leveling Legs WARNING Excessive Weight Hazard Use two or more people to move freely, repeat Step 1. ¼" (6.4 mm) 11 To protect...
