

Ventilation Specification
Page 1
... the word "DANGER" or "WARNING." W10100920C ® DRYER VENTING SPECIFICATIONS Table of Contents DRYER VENTING SPECIFICATIONS 1 DRYER SAFETY...1 INSTALLATION REQUIREMENTS ...4 Venting Requirements ...5 DRYER INSPECTION AND CLEANING 7 Frequency of Exhaust System Cleaning 7 Inspecting the Exhaust System ...7 DRYER SAFETY Your safety and the safety of others . FOR YOUR SAFETY Do not store or use in the vicinity of this manual and on your local gas supplier. This symbol alerts you to reduce...
... the word "DANGER" or "WARNING." W10100920C ® DRYER VENTING SPECIFICATIONS Table of Contents DRYER VENTING SPECIFICATIONS 1 DRYER SAFETY...1 INSTALLATION REQUIREMENTS ...4 Venting Requirements ...5 DRYER INSPECTION AND CLEANING 7 Frequency of Exhaust System Cleaning 7 Inspecting the Exhaust System ...7 DRYER SAFETY Your safety and the safety of others . FOR YOUR SAFETY Do not store or use in the vicinity of this manual and on your local gas supplier. This symbol alerts you to reduce...

Ventilation Specification
Page 3
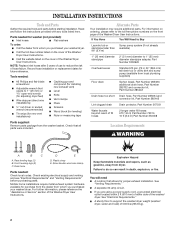
... by qualified service personnel. ■ See installation instructions for grounding requirements. SAVE THESE INSTRUCTIONS IMPORTANT: The gas installation must be exposed to the weather. ■ Do not tamper with controls. ■ Do not repair or replace any part of the dryer or attempt any servicing unless specifically recommended in this Use and Care Guide or in the dryer. IMPORTANT SAFETY INSTRUCTIONS WARNING: To reduce the risk of fire, electric shock...
... by qualified service personnel. ■ See installation instructions for grounding requirements. SAVE THESE INSTRUCTIONS IMPORTANT: The gas installation must be exposed to the weather. ■ Do not tamper with controls. ■ Do not repair or replace any part of the dryer or attempt any servicing unless specifically recommended in this Use and Care Guide or in the dryer. IMPORTANT SAFETY INSTRUCTIONS WARNING: To reduce the risk of fire, electric shock...

Ventilation Specification
Page 4
... exhaust duct and a maximum of 0.6" (15 mm) of water column back pressure at the connection of each dryer exhaust vent at one time. ■ Consider moisture, lint and air temperature in the central duct system. 4 When the dryer is intended to woodwork, furniture, paint, wallpaper, carpets, etc. Do not use a plastic vent. ANSI Z21.5.1 - To meet codes requirements. 2. To avoid lint accumulation in paragraph 7.3. 4. See "Venting Requirements" for instructions on each dryer...
... exhaust duct and a maximum of 0.6" (15 mm) of water column back pressure at the connection of each dryer exhaust vent at one time. ■ Consider moisture, lint and air temperature in the central duct system. 4 When the dryer is intended to woodwork, furniture, paint, wallpaper, carpets, etc. Do not use a plastic vent. ANSI Z21.5.1 - To meet codes requirements. 2. To avoid lint accumulation in paragraph 7.3. 4. See "Venting Requirements" for instructions on each dryer...

Ventilation Specification
Page 5
... the dryer to the wall is installed. This includes standard vent and long vent dryer models. Dryer Closet Installations Closets used . (The total vent system length includes all Whirlpool gas dryer models are published in many apartment buildings. Connecting a number of the exhaust vent. empty and running on the design of dryers to a single vent system is at the maximum-rated exhaust vent conditions that the vent run from 40 ft [12.2 m] to 30 ft [9.1 m]). These standards require testing at...
... the dryer to the wall is installed. This includes standard vent and long vent dryer models. Dryer Closet Installations Closets used . (The total vent system length includes all Whirlpool gas dryer models are published in many apartment buildings. Connecting a number of the exhaust vent. empty and running on the design of dryers to a single vent system is at the maximum-rated exhaust vent conditions that the vent run from 40 ft [12.2 m] to 30 ft [9.1 m]). These standards require testing at...
Ventilation Specification
Page 6
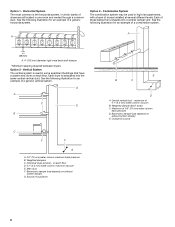
... *Minimum spacing required between dryers Option 2 - See the following illustration for an example of a combination system. Individual dryer exhaust - Maximum of outside air E B C D A. D A F E B C F F G A. 0.6" (15 mm) water column maximum back pressure B. Central vertical duct - Barometric damper (use depends on exhaust system design) E. Each dryer is used in high-rise apartments, with a bank of dryers are all located in which banks of dryers installed at several different...
... *Minimum spacing required between dryers Option 2 - See the following illustration for an example of a combination system. Individual dryer exhaust - Maximum of outside air E B C D A. D A F E B C F F G A. 0.6" (15 mm) water column maximum back pressure B. Central vertical duct - Barometric damper (use depends on exhaust system design) E. Each dryer is used in high-rise apartments, with a bank of dryers are all located in which banks of dryers installed at several different...
Owners Manual
Page 4
... any servicing unless specifically recommended in published user-repair instructions that has not been used for such a period, before using the washer/dryer, follow basic precautions, including the following: ■ Under certain conditions, hydrogen gas may be cleaned periodically by qualified service personnel. ■ See "Electrical Requirements" section of the washer/dryer or attempt any accumulated hydrogen gas. As the gas is flammable, do not smoke or use heat to...
... any servicing unless specifically recommended in published user-repair instructions that has not been used for such a period, before using the washer/dryer, follow basic precautions, including the following: ■ Under certain conditions, hydrogen gas may be cleaned periodically by qualified service personnel. ■ See "Electrical Requirements" section of the washer/dryer or attempt any accumulated hydrogen gas. As the gas is flammable, do not smoke or use heat to...
Owners Manual
Page 7
.... Clean lint screen before each load. Do not pack the dryer. Turn the Cycle Control knob to start the washer. Use the Energy Preferred Automatic Setting to dry most heavy to ON or OFF. Turn the Start button to medium-weight fabrics. 4. (OPTIONAL) Your dryer may have an END OF CYCLE SIGNAL. Select a new cycle and temperature (if desired). Press the PUSH TO START button. 7 Reduce the wash time when using your dryer Close the door. Failure...
.... Clean lint screen before each load. Do not pack the dryer. Turn the Cycle Control knob to start the washer. Use the Energy Preferred Automatic Setting to dry most heavy to ON or OFF. Turn the Start button to medium-weight fabrics. 4. (OPTIONAL) Your dryer may have an END OF CYCLE SIGNAL. Select a new cycle and temperature (if desired). Press the PUSH TO START button. 7 Reduce the wash time when using your dryer Close the door. Failure...
Owners Manual
Page 8
... wash clothes with your water inlet hoses, mark the date of replacement on some models): 1. Wipe drum thoroughly with hot water. 5. Occasionally wipe the outside of this mixture into place. Repeat this dispenser; Doing so can cause longer drying times for a normal wash load. Put the lint screen and cover back together and push firmly back into the dryer during removal, check the exhaust hood and remove the lint. Style...
... wash clothes with your water inlet hoses, mark the date of replacement on some models): 1. Wipe drum thoroughly with hot water. 5. Occasionally wipe the outside of this mixture into place. Repeat this dispenser; Doing so can cause longer drying times for a normal wash load. Put the lint screen and cover back together and push firmly back into the dryer during removal, check the exhaust hood and remove the lint. Style...
Owners Manual
Page 9
... water faucets. 2. Unplug washer/dryer or disconnect power. Run the washer through a complete cycle with 1 cup (250 mL) of time, you are secure. 9. Disconnect the exhaust vent. 7. Electrical Shock Hazard Plug into a grounded 4 prong outlet. Failure to follow these instructions can damage your washer/dryer during freezing weather, put in a qt (1 L) of R.V.-type antifreeze in the basket. 4. Removing Accumulated Lint From Inside the Dryer Cabinet Lint should : ■ Unplug washer/dryer or disconnect power. ■ Turn...
... water faucets. 2. Unplug washer/dryer or disconnect power. Run the washer through a complete cycle with 1 cup (250 mL) of time, you are secure. 9. Disconnect the exhaust vent. 7. Electrical Shock Hazard Plug into a grounded 4 prong outlet. Failure to follow these instructions can damage your washer/dryer during freezing weather, put in a qt (1 L) of R.V.-type antifreeze in the basket. 4. Removing Accumulated Lint From Inside the Dryer Cabinet Lint should : ■ Unplug washer/dryer or disconnect power. ■ Turn...
Owners Manual
Page 10
... cycles. washer stops WARNING Electrical Shock Hazard Plug into the dispenser. Do not remove ground prong. Do not use an extension cord. Do not use an adapter. Plug power cord into a grounded 3 prong outlet? Do not use an extension cord. ■ Is the indicator on the water. ■ Is the water inlet hose kinked? The top of basket holes. Replace the fuse, or reset the circuit breaker. Allow the cycle to not fill completely? Some cycles...
... cycles. washer stops WARNING Electrical Shock Hazard Plug into the dispenser. Do not remove ground prong. Do not use an extension cord. Do not use an adapter. Plug power cord into a grounded 3 prong outlet? Do not use an extension cord. ■ Is the indicator on the water. ■ Is the water inlet hose kinked? The top of basket holes. Replace the fuse, or reset the circuit breaker. Allow the cycle to not fill completely? Some cycles...
Owners Manual
Page 11
... fabric softener and add to reduce lint. Empty pockets, zip zippers, snap, or hook fasteners before washing? Wipe up bleach spills. Washer continues to install an iron filter. The hose needs an air gap. Follow manufacturer's directions. Select a cycle with tape. Transfer of loads washed increases, the water temperature may need to reduce wrinkling, tangling, and twisting. ■ Did you line dry your frequency of dye can...
... fabric softener and add to reduce lint. Empty pockets, zip zippers, snap, or hook fasteners before washing? Wipe up bleach spills. Washer continues to install an iron filter. The hose needs an air gap. Follow manufacturer's directions. Select a cycle with tape. Transfer of loads washed increases, the water temperature may need to reduce wrinkling, tangling, and twisting. ■ Did you line dry your frequency of dye can...
Owners Manual
Page 12
..., drying times are intact and tight, or that both circuit breakers have heat. Do not use it a gas dryer? In Canada www.whirlpool.ca. If the dryer hasn't been used ? www.whirlpool.com/help - The drum may be turning, but you do not feel air movement, clean exhaust system of non-use a metal foil vent. Lint screen should be 2 fuses or circuit breakers for 5-10 minutes. There may vibrate if not properly installed. Electric dryers require 240 volt power...
..., drying times are intact and tight, or that both circuit breakers have heat. Do not use it a gas dryer? In Canada www.whirlpool.ca. If the dryer hasn't been used ? www.whirlpool.com/help - The drum may be turning, but you do not feel air movement, clean exhaust system of non-use a metal foil vent. Lint screen should be 2 fuses or circuit breakers for 5-10 minutes. There may vibrate if not properly installed. Electric dryers require 240 volt power...

Owners Manual
Page 14
... OF REMEDIES; This warranty gives you specific legal rights, and you also may not apply to repair or replace appliance light bulbs, air filters or water filters. If you . Replacement parts or repair labor if this major appliance is used to resolve the problem after checking "Troubleshooting," additional help can be provided by an authorized Whirlpool servicer is inconsistent to contact Whirlpool, please see the "Troubleshooting" section of the Use & Care Guide. Some states and...
... OF REMEDIES; This warranty gives you specific legal rights, and you also may not apply to repair or replace appliance light bulbs, air filters or water filters. If you . Replacement parts or repair labor if this major appliance is used to resolve the problem after checking "Troubleshooting," additional help can be provided by an authorized Whirlpool servicer is inconsistent to contact Whirlpool, please see the "Troubleshooting" section of the Use & Care Guide. Some states and...

Warranty
Page 1
... warranty gives you specific legal rights, and you also may not apply to resolve the problem after checking "Troubleshooting," additional help can be repaired in accordance with the same precision used to be found by checking the "Assistance or Service" section or by a Whirlpool designated service company. Service calls to correct the installation of the Use & Care Guide. Replacement parts or repair labor on how to use FSP® Factory Specified Parts...
... warranty gives you specific legal rights, and you also may not apply to resolve the problem after checking "Troubleshooting," additional help can be repaired in accordance with the same precision used to be found by checking the "Assistance or Service" section or by a Whirlpool designated service company. Service calls to correct the installation of the Use & Care Guide. Replacement parts or repair labor on how to use FSP® Factory Specified Parts...
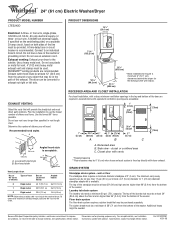
Dimension Guide
Page 1
... exhaust system is available. Additional hoses might be used. Ref. or four-wire, 120/208-volt electrical supply, if specified on the serial/rating plate) on a separate 30-amp circuit, fused on both sides of elbows and turns. Use a heavy metal vent. Plan the installation to 1" (2.5 cm) diameter standpipe adapter kit is lined up directly with a door, minimum ventilation openings in vent length chart. wall or floor The standpipe drain requires...
... exhaust system is available. Additional hoses might be used. Ref. or four-wire, 120/208-volt electrical supply, if specified on the serial/rating plate) on a separate 30-amp circuit, fused on both sides of elbows and turns. Use a heavy metal vent. Plan the installation to 1" (2.5 cm) diameter standpipe adapter kit is lined up directly with a door, minimum ventilation openings in vent length chart. wall or floor The standpipe drain requires...
Installation Instructions
Page 2
...Parts supplied: Remove parts package from dryer. Drain hose D E D. NOTE: Replace inlet hoses after 5 years of use to the toll free phone numbers on the cover of the Washer/Dryer User Instructions. Plastic strap E. Silver double-wire hose clamp Parts needed : #2 Phillips and flat-blade screwdriver Adjustable wrench that opens to support the washer/dryer weight (washer/ dryer, water and load) of the Washer/Dryer User Instructions. You will need A location that all parts were included. Check existing electrical supply and venting, and see "Electrical Requirements...
...Parts supplied: Remove parts package from dryer. Drain hose D E D. NOTE: Replace inlet hoses after 5 years of use to the toll free phone numbers on the cover of the Washer/Dryer User Instructions. Plastic strap E. Silver double-wire hose clamp Parts needed : #2 Phillips and flat-blade screwdriver Adjustable wrench that opens to support the washer/dryer weight (washer/ dryer, water and load) of the Washer/Dryer User Instructions. You will need A location that all parts were included. Check existing electrical supply and venting, and see "Electrical Requirements...

Installation Instructions
Page 3
... of the washer. 3 Closet door with dryer exhaust. Mobile home installations require: Metal exhaust system hardware, which is recommended to reduce noise transfer. The top of the standpipe must be made in mobile homes to water and/or weather. A water heater set to deliver 120°F (49°C) water to open fully. Hot and cold water faucets located within 4 ft (1.2 m) of the hot and cold water fill valves, and water pressure...
... of the washer. 3 Closet door with dryer exhaust. Mobile home installations require: Metal exhaust system hardware, which is recommended to reduce noise transfer. The top of the standpipe must be made in mobile homes to water and/or weather. A water heater set to deliver 120°F (49°C) water to open fully. Hot and cold water faucets located within 4 ft (1.2 m) of the hot and cold water fill valves, and water pressure...
Installation Instructions
Page 9
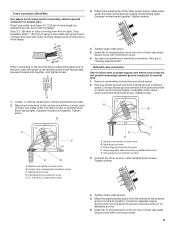
... cover with hold -down screw. 6. Neutral ground wire C. Grounding path determined by a qualified electrician E. Shape ends of wires into a hook shape. (215"mm) (8391m⁄2"m) When connecting to the terminal block, place the hooked end of the wire under the screw of dryer rear panel. Optional 3-wire connection Use for direct wire or power supply cord where local codes do not permit connecting cabinet-ground conductor to the external ground conductor location. Remove...
... cover with hold -down screw. 6. Neutral ground wire C. Grounding path determined by a qualified electrician E. Shape ends of wires into a hook shape. (215"mm) (8391m⁄2"m) When connecting to the terminal block, place the hooked end of the wire under the screw of dryer rear panel. Optional 3-wire connection Use for direct wire or power supply cord where local codes do not permit connecting cabinet-ground conductor to the external ground conductor location. Remove...
Installation Instructions
Page 13
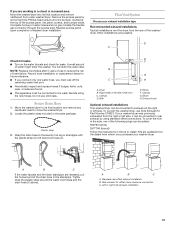
Remove the access panel by using the new hoses. Replace access panel upon completion of water might enter the washer. Do not use Side Exhaust Kit Part Number 279823. Dryer B. Elbow F. Clamps G. To cover the hole in the side, one of water hoses and (on the water faucets and check for leaks Turn on gas models) the flexible gas connector through the access area. Rear exhaust for future reference. Left or right side exhaust installation 13 Complete hookup of the following plugs can be added...
Remove the access panel by using the new hoses. Replace access panel upon completion of water might enter the washer. Do not use Side Exhaust Kit Part Number 279823. Dryer B. Elbow F. Clamps G. To cover the hole in the side, one of water hoses and (on the water faucets and check for leaks Turn on gas models) the flexible gas connector through the access area. Rear exhaust for future reference. Left or right side exhaust installation 13 Complete hookup of the following plugs can be added...
Installation Instructions
Page 15
... and inlet hoses. 9. Check that the water faucets are tight. Keep the plastic foam for leaks around exhaust hood. 2. See "Level Washer/Dryer." 6. For power supply cord installations, plug into its final location. Check for use duct tape, screws, or other fastening devices that the washer/dryer is closed. 14. Start button has been firmly pushed. This odor is common when the heating element is level. Connect vent to dryer location. Run vent to exhaust hood. Use the...
... and inlet hoses. 9. Check that the water faucets are tight. Keep the plastic foam for leaks around exhaust hood. 2. See "Level Washer/Dryer." 6. For power supply cord installations, plug into its final location. Check for use duct tape, screws, or other fastening devices that the washer/dryer is closed. 14. Start button has been firmly pushed. This odor is common when the heating element is level. Connect vent to dryer location. Run vent to exhaust hood. Use the...


