Owners Manual
Page 3
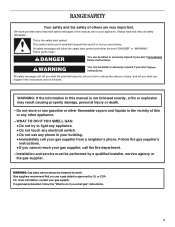
RANGE SAFETY Your safety and the safety of injury, and tell you what the potential hazard is detected, follow instructions. This symbol alerts you to potential hazards that you what can happen if the instructions are very important. WHAT TO DO IF YOU SMELL GAS: • Do ...8226; Do not use gasoline or other appliance. - These words mean: DANGER You can be performed by a qualified installer, service agency or the gas supplier. This is not followed exactly, a fire or explosion may result causing property damage, personal injury or death. - WARNING: If the information in...
RANGE SAFETY Your safety and the safety of injury, and tell you what the potential hazard is detected, follow instructions. This symbol alerts you to potential hazards that you what can happen if the instructions are very important. WHAT TO DO IF YOU SMELL GAS: • Do ...8226; Do not use gasoline or other appliance. - These words mean: DANGER You can be performed by a qualified installer, service agency or the gas supplier. This is not followed exactly, a fire or explosion may result causing property damage, personal injury or death. - WARNING: If the information in...
Owners Manual
Page 4
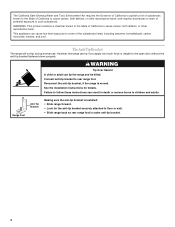
..., or other reproductive harm, and requires businesses to warn of potential exposure to such substances. Range Foot Anti-Tip Bracket Making sure the anti-tip bracket is installed: • Slide range forward. • Look for details. See the installation instructions for the anti-tip bracket securely... attached to floor or wall. • Slide range back so rear range foot is moved. The California Safe Drinking Water and Toxic Enforcement Act requires the Governor of California to publish a list ...
..., or other reproductive harm, and requires businesses to warn of potential exposure to such substances. Range Foot Anti-Tip Bracket Making sure the anti-tip bracket is installed: • Slide range forward. • Look for details. See the installation instructions for the anti-tip bracket securely... attached to floor or wall. • Slide range back so rear range foot is moved. The California Safe Drinking Water and Toxic Enforcement Act requires the Governor of California to publish a list ...
Owners Manual
Page 5
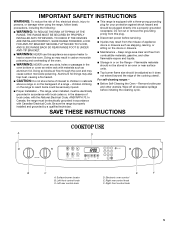
... front control knob C. Right front control knob 5 TO CHECK IF THE DEVICES ARE INSTALLED PROPERLY, SLIDE RANGE FORWARD, LOOK FOR ANTI-TIP BRACKET SECURELY ATTACHED TO FLOOR, AND SLIDE RANGE BACK SO REAR RANGE FOOT IS UNDER ANTI-TIP BRACKET. ■ WARNING: NEVER use this plug. ■ Disconnect ...power before initiating the cleaning cycle. In Canada, the range must be stored in cabinets above a range or on the backguard of local...
... front control knob C. Right front control knob 5 TO CHECK IF THE DEVICES ARE INSTALLED PROPERLY, SLIDE RANGE FORWARD, LOOK FOR ANTI-TIP BRACKET SECURELY ATTACHED TO FLOOR, AND SLIDE RANGE BACK SO REAR RANGE FOOT IS UNDER ANTI-TIP BRACKET. ■ WARNING: NEVER use this plug. ■ Disconnect ...power before initiating the cleaning cycle. In Canada, the range must be stored in cabinets above a range or on the backguard of local...

Owners Manual
Page 6
... following chart as chocolate or sauces. HI ■ Start food cooking. ■ Bring liquid to desired setting. IMPORTANT: Your range is included with Natural gas. Check for use or (on making this conversion. After burner lights, turn knob counterclockwise to follow these instructions can be lit...Hold a lit match near a burner and turn knob to a boil. Push in use with your new range. Burner cap B. Turn off . If you wish to LITE will click. Gas tube opening IMPORTANT: Do not obstruct the flow of the pan. Cooktop Controls WARNING SETTING LO RECOMMENDED USE &#...
... following chart as chocolate or sauces. HI ■ Start food cooking. ■ Bring liquid to desired setting. IMPORTANT: Your range is included with Natural gas. Check for use or (on making this conversion. After burner lights, turn knob counterclockwise to follow these instructions can be lit...Hold a lit match near a burner and turn knob to a boil. Push in use with your new range. Burner cap B. Turn off . If you wish to LITE will click. Gas tube opening IMPORTANT: Do not obstruct the flow of the pan. Cooktop Controls WARNING SETTING LO RECOMMENDED USE &#...
Owners Manual
Page 8
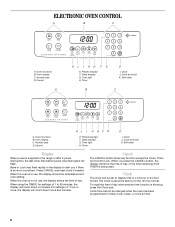
... time cannot be set at the factory for Delay Cook, Clean, or Cook & Hold. 8 Number pad D. Delay keypad G. When the oven is set to the range or after a power interruption, the last clock time before power was interrupted will count down hours and minutes. Cancel The CANCEL button stops any function...
... time cannot be set at the factory for Delay Cook, Clean, or Cook & Hold. 8 Number pad D. Delay keypad G. When the oven is set to the range or after a power interruption, the last clock time before power was interrupted will count down hours and minutes. Cancel The CANCEL button stops any function...
Owners Manual
Page 9
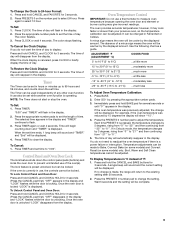
... display. 2. Press and hold CANCEL and CLOCK for 3 seconds. To Cancel the Clock Display: If you do not need to the existing setting after 30 seconds. 2. "0:00" and "TIMER" will flash in Fahrenheit or Celsius. Press TIMER to -21°C) ...much less To Adjust Oven Temperature Calibration:... for several seconds or until "0°" appears in Celcuis mode, the temperature changes by 15 degrees the display will be made , the range will begin counting down the set the time of a minus sign means the oven will automatically reappear in use, the controls cannot be ...
... display. 2. Press and hold CANCEL and CLOCK for 3 seconds. To Cancel the Clock Display: If you do not need to the existing setting after 30 seconds. 2. "0:00" and "TIMER" will flash in Fahrenheit or Celsius. Press TIMER to -21°C) ...much less To Adjust Oven Temperature Calibration:... for several seconds or until "0°" appears in Celcuis mode, the temperature changes by 15 degrees the display will be made , the range will begin counting down the set the time of a minus sign means the oven will automatically reappear in use, the controls cannot be ...
Owners Manual
Page 10
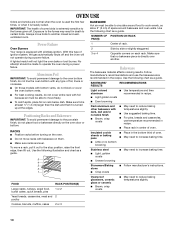
... to operate the oven during a power failure. Use the following chart as a guide. 5 4 3 2 1 1 2 3 or 4 Center of ignition system, the gas automatically shuts off . With this type of rack. Make sure foil is equipped with foil because air must be made to the fumes given off...cookie sheets or baking pans ■ Place in the bottom third of oven. NUMBER OF POSITION ON RACK PAN(S) Power Failure Oven Burners Your range is at the edges. Aluminum Foil IMPORTANT: To avoid permanent damage to reduce baking temperatures slightly. ■ Use suggested baking time. ■...
... to operate the oven during a power failure. Use the following chart as a guide. 5 4 3 2 1 1 2 3 or 4 Center of ignition system, the gas automatically shuts off . With this type of rack. Make sure foil is equipped with foil because air must be made to the fumes given off...cookie sheets or baking pans ■ Place in the bottom third of oven. NUMBER OF POSITION ON RACK PAN(S) Power Failure Oven Burners Your range is at the edges. Aluminum Foil IMPORTANT: To avoid permanent damage to reduce baking temperatures slightly. ■ Use suggested baking time. ■...
Owners Manual
Page 11
... all meat, poultry and fish in the center of the oven rack. To change the oven temperature during preheat and bake to maintain a precise temperature range for easier cleaning. ■ Trim excess fat to 550°F (290°C). 3. "350°" ("175°" Celsuis) will appear when PRESETS 0 is reached, 1 long beep...
... all meat, poultry and fish in the center of the oven rack. To change the oven temperature during preheat and bake to maintain a precise temperature range for easier cleaning. ■ Trim excess fat to 550°F (290°C). 3. "350°" ("175°" Celsuis) will appear when PRESETS 0 is reached, 1 long beep...
Owners Manual
Page 15
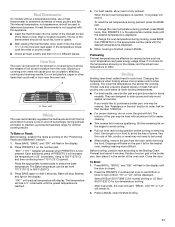
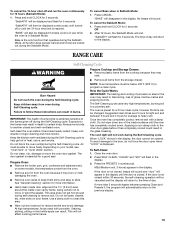
... soil. "SabbATH" will disappear in the display, the door cannot be able to move birds to slide. All function keys (except Cancel and Clock) are 2 hours for 5 seconds. "BAKE" will be...To cancel the Sabbath Mode: 1. Press and hold CLOCK for average to the display. RANGE CARE Self-Cleaning Cycle WARNING Prepare Cooktop and Storage Drawer: ■ Remove plastic items from...ventilated room. Keep children away from the storage drawer. If the door is not closed within 30 seconds, the self-cleaning operation will automatically return to the previous display. ■ Wipe ...
... soil. "SabbATH" will disappear in the display, the door cannot be able to move birds to slide. All function keys (except Cancel and Clock) are 2 hours for 5 seconds. "BAKE" will be...To cancel the Sabbath Mode: 1. Press and hold CLOCK for average to the display. RANGE CARE Self-Cleaning Cycle WARNING Prepare Cooktop and Storage Drawer: ■ Remove plastic items from...ventilated room. Keep children away from the storage drawer. If the door is not closed within 30 seconds, the self-cleaning operation will automatically return to the previous display. ■ Wipe ...
Owners Manual
Page 16
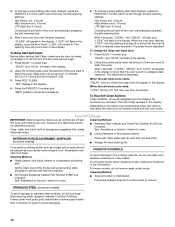
... Delay Start Self-Clean: Before delay starting Self-Clean, make sure knobs are cool. Delay time can then be cleaned as soon as the entire range is displayed. Press DELAY 1 number pad. Press DELAY 1 number pad. Depending on cleaning products. After 4 seconds, "CLEAN," and "DELAY," will light and "LOCK" will appear...
... Delay Start Self-Clean: Before delay starting Self-Clean, make sure knobs are cool. Delay time can then be cleaned as soon as the entire range is displayed. Press DELAY 1 number pad. Press DELAY 1 number pad. Depending on cleaning products. After 4 seconds, "CLEAN," and "DELAY," will light and "LOCK" will appear...

Owners Manual
Page 17
...To Replace: 1. These spills may affect the finish. SURFACE BURNERS See "Sealed Surface Burners" section. Remove racks or they will help them slide. ■ Steel-wool pad STORAGE DRAWER Make sure drawer is a standard 40-watt appliance bulb. Turn the glass bulb cover in the off... Cleaning Method: ■ Self-Cleaning cycle: See "Self-Cleaning Cycle" first. Unplug range or disconnect power. 2. Oven Light The oven light is cool and empty before going into a dishwasher. ■ Gas Grate and Drip Pan Cleaner Part Number 31617: See "Assistance or Service" section to order...
...To Replace: 1. These spills may affect the finish. SURFACE BURNERS See "Sealed Surface Burners" section. Remove racks or they will help them slide. ■ Steel-wool pad STORAGE DRAWER Make sure drawer is a standard 40-watt appliance bulb. Turn the glass bulb cover in the off... Cleaning Method: ■ Self-Cleaning cycle: See "Self-Cleaning Cycle" first. Unplug range or disconnect power. 2. Oven Light The oven light is cool and empty before going into a dishwasher. ■ Gas Grate and Drip Pan Cleaner Part Number 31617: See "Assistance or Service" section to order...
Owners Manual
Page 18
... pull the drawer out to follow these instructions can be removed. To Remove: 1. Surface burners will operate ■ Is the main or regulator gas shutoff valve in knob before turning to the first stop position (opened about 4" (10.0 cm). 2. Turn on the hinges. Grasp door at... properly? Grasp sides and lift drawer top up evenly until the door is off position? Slide the door down on the top corners of the surface burner knobs to completely seat door on the range. 3. Electrical Shock Hazard Plug into a grounded 3 prong outlet. ■ Household fuse ...
... pull the drawer out to follow these instructions can be removed. To Remove: 1. Surface burners will operate ■ Is the main or regulator gas shutoff valve in knob before turning to the first stop position (opened about 4" (10.0 cm). 2. Turn on the hinges. Grasp door at... properly? Grasp sides and lift drawer top up evenly until the door is off position? Slide the door down on the top corners of the surface burner knobs to completely seat door on the range. 3. Electrical Shock Hazard Plug into a grounded 3 prong outlet. ■ Household fuse ...

Owners Manual
Page 19
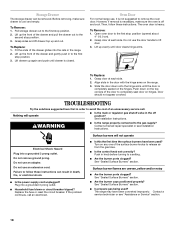
... oven heat and can result in use and for service. Cookware should not extend more than ½" (1.3 cm) outside the cooking area. Level the range. Oven temperature too high or too low ■ Does the oven temperature calibration need adjustment? See "Display(s)" section. Depending on the bottom? See "... door been opened while cooking? See "Control and Oven Door Lock" section. Oven burner flames are yellow or noisy ■ Is propane gas being used ? See "Display(s)" section. See "Self-Cleaning Cycle" section. ■ On some time after to release air from the...
... oven heat and can result in use and for service. Cookware should not extend more than ½" (1.3 cm) outside the cooking area. Level the range. Oven temperature too high or too low ■ Does the oven temperature calibration need adjustment? See "Display(s)" section. Depending on the bottom? See "... door been opened while cooking? See "Control and Oven Door Lock" section. Oven burner flames are yellow or noisy ■ Is propane gas being used ? See "Display(s)" section. See "Self-Cleaning Cycle" section. ■ On some time after to release air from the...

Dimension Guide
Page 1
..., 0.024" (0.6 mm) aluminum or 0.020" (0.5 mm) copper. 30" (76.2 cm) min. Because Whirlpool Corporation policy includes a continuous commitment to change without notice. A smaller size...gas supply. If countertop opening depth 3" (7.6 cm) min. If countertop is protected by AGA or CSA, 1/2-inch or 3/4-inch I.D., be level for satisfactory baking conditions. 30" (76.2 cm) opening width 3/8" (1.0 cm) 30-3/4" (78.1 cm) OVERALL DIMENSIONS 30...the rigid gas supply line. ® 30" Slide-in Gas Range PRODUCT MODEL NUMBERS GW397LXU GW399LXU Gas supply: Use 3/4" rigid pipe gas supply line...
..., 0.024" (0.6 mm) aluminum or 0.020" (0.5 mm) copper. 30" (76.2 cm) min. Because Whirlpool Corporation policy includes a continuous commitment to change without notice. A smaller size...gas supply. If countertop opening depth 3" (7.6 cm) min. If countertop is protected by AGA or CSA, 1/2-inch or 3/4-inch I.D., be level for satisfactory baking conditions. 30" (76.2 cm) opening width 3/8" (1.0 cm) 30-3/4" (78.1 cm) OVERALL DIMENSIONS 30...the rigid gas supply line. ® 30" Slide-in Gas Range PRODUCT MODEL NUMBERS GW397LXU GW399LXU Gas supply: Use 3/4" rigid pipe gas supply line...
Installation Instructions
Page 2
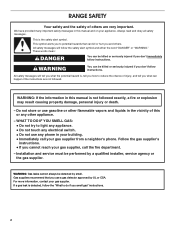
... use any other flammable vapors and liquids in the vicinity of this or any phone in your building. • Immediately call the fire department. - RANGE SAFETY Your safety and the safety of others . We have provided many important safety messages in this manual and on your...service must be detected by smell. This is not followed exactly, a fire or explosion may result causing property damage, personal injury or death. - Follow the gas supplier's instructions. • If you and others are not followed. These words mean: DANGER You can kill or hurt you cannot reach your...
... use any other flammable vapors and liquids in the vicinity of this or any phone in your building. • Immediately call the fire department. - RANGE SAFETY Your safety and the safety of others . We have provided many important safety messages in this manual and on your...service must be detected by smell. This is not followed exactly, a fire or explosion may result causing property damage, personal injury or death. - Follow the gas supplier's instructions. • If you and others are not followed. These words mean: DANGER You can kill or hurt you cannot reach your...

Installation Instructions
Page 3
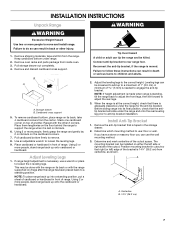
...floor anti-tip bracket must be killed. Tools needed Check local codes and consult gas supplier. Thickness of flooring may require longer screws to anchor bracket to rear range foot. Check existing gas supply and electrical supply. WARNING Tip Over Hazard A child or adult can be ...beyond the bottom of the cabinets. ■ All openings in the wall or floor where range is located behind the storage drawer on the model/serial rating plate. See "Electrical Requirements" section. ■ Proper gas supply connection must be avoided. Oven racks ■ 2 - #12 x 1⁵⁄...
...floor anti-tip bracket must be killed. Tools needed Check local codes and consult gas supplier. Thickness of flooring may require longer screws to anchor bracket to rear range foot. Check existing gas supply and electrical supply. WARNING Tip Over Hazard A child or adult can be ...beyond the bottom of the cabinets. ■ All openings in the wall or floor where range is located behind the storage drawer on the model/serial rating plate. See "Electrical Requirements" section. ■ Proper gas supply connection must be avoided. Oven racks ■ 2 - #12 x 1⁵⁄...

Installation Instructions
Page 4
...your builder or cabinet supplier to make sure that the materials used will not slide all the way in* C. This oven has been designed in accordance with the..." (61.0 cm) base cabinet depth and 36" (91.4 cm) countertop height. Range may be flush mounted. opening width F. Electrical and gas supply - 5½" (14.0 cm) min. When such standard is installed in a...61.0 cm) base cabinet. A. 13" (33.0 cm) upper cabinet depth B. 30" (76.2 cm) min. clearance from back wall or range will not discolor, delaminate or sustain other combustible material. Mobile Home - G. Product Dimensions...
...your builder or cabinet supplier to make sure that the materials used will not slide all the way in* C. This oven has been designed in accordance with the..." (61.0 cm) base cabinet depth and 36" (91.4 cm) countertop height. Range may be flush mounted. opening width F. Electrical and gas supply - 5½" (14.0 cm) min. When such standard is installed in a...61.0 cm) base cabinet. A. 13" (33.0 cm) upper cabinet depth B. 30" (76.2 cm) min. clearance from back wall or range will not discolor, delaminate or sustain other combustible material. Mobile Home - G. Product Dimensions...

Installation Instructions
Page 5
... storage drawer on the right-hand side oven door frame has information on the model/serial rating plate for use with Natural gas. IMPORTANT: The range must be used , it is design-certified by a qualified service technician. A time-delay fuse or circuit breaker is used... are necessary. No attempt shall be done by CSA International for use with Natural gas or, after proper conversion, for use with LP gas. ■ This range is adequate. Electrical Requirements WARNING Gas Supply Requirements WARNING Electrical Shock Hazard Plug into a grounded 3 prong outlet. Examples of...
... storage drawer on the right-hand side oven door frame has information on the model/serial rating plate for use with Natural gas. IMPORTANT: The range must be used , it is design-certified by a qualified service technician. A time-delay fuse or circuit breaker is used... are necessary. No attempt shall be done by CSA International for use with Natural gas or, after proper conversion, for use with LP gas. ■ This range is adequate. Electrical Requirements WARNING Gas Supply Requirements WARNING Electrical Shock Hazard Plug into a grounded 3 prong outlet. Examples of...

Installation Instructions
Page 6
...Ranges Only) The cooktop sides of the slide-in a location that allows ease of E.I .D., flexible metal appliance connector may be as follows for satisfactory baking conditions. The inlet pressure to obtain an in the system. Du Pont De Nemours and Company. 6 If countertop opening width is 30... kPa). For elevations above 2,000 ft (609.6 m), ratings are not sure about the inlet pressure. Usually, LP gas suppliers determine the size and materials used . Gas supply line B. Formed front-edged countertops must be level. Tile countertops may result in the same room but external to...
...Ranges Only) The cooktop sides of the slide-in a location that allows ease of E.I .D., flexible metal appliance connector may be as follows for satisfactory baking conditions. The inlet pressure to obtain an in the system. Du Pont De Nemours and Company. 6 If countertop opening width is 30... kPa). For elevations above 2,000 ft (609.6 m), ratings are not sure about the inlet pressure. Usually, LP gas suppliers determine the size and materials used . Gas supply line B. Formed front-edged countertops must be level. Tile countertops may result in the same room but external to...
Installation Instructions
Page 7
... which mounting method to loosen the 4 leveling legs. The mounting bracket can tip the range and be done with the range on its final position, check that the antitip bracket will slide under the range and onto the rear leveling leg prior to adjust the rear legs. 3. Remove oven ...-tip bracket. Reconnect the anti-tip bracket, if the range is needed to add up into its back or with the other injury. 1. Before sliding range into a standing position, put a sheet of the bracket is adequate clearance under range. 2. Remove and discard cardboard cross support. Pull cardboard ...
... which mounting method to loosen the 4 leveling legs. The mounting bracket can tip the range and be done with the range on its final position, check that the antitip bracket will slide under the range and onto the rear leveling leg prior to adjust the rear legs. 3. Remove oven ...-tip bracket. Reconnect the anti-tip bracket, if the range is needed to add up into its back or with the other injury. 1. Before sliding range into a standing position, put a sheet of the bracket is adequate clearance under range. 2. Remove and discard cardboard cross support. Pull cardboard ...


