Owners Manual
Page 1
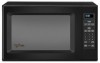
® MICROWAVE OVEN Use & Care Guide For questions about features, operation/performance, parts, accessories or service, call: 1-800-253-1301. www.whirlpool.com Table of Contents 2 W10178096A Model GT4175 or visit our website at...
® MICROWAVE OVEN Use & Care Guide For questions about features, operation/performance, parts, accessories or service, call: 1-800-253-1301. www.whirlpool.com Table of Contents 2 W10178096A Model GT4175 or visit our website at...
Owners Manual
Page 2
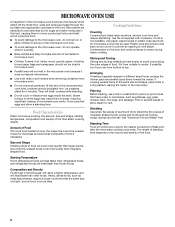
...Feature 7 Off 7 Clock 7 Tones 7 Timer 7 Control Lock 7 Demo Mode 7 Options 7 MICROWAVE OVEN USE 8 Food Characteristics 8 Cooking Guidelines 8 Cookware and Dinnerware 9 Aluminum Foil and Metal 9 Microwave Cooking Power 9 Manual Cooking 10 Cooking in Stages 10 Sensor Cooking 10 Sensor Popcorn 10 Sensor Cook ...11 Sensor Reheat 11 Auto Defrost 12 Warm Hold 12 MICROWAVE OVEN CARE 13 General Cleaning 13 TROUBLESHOOTING...
...Feature 7 Off 7 Clock 7 Tones 7 Timer 7 Control Lock 7 Demo Mode 7 Options 7 MICROWAVE OVEN USE 8 Food Characteristics 8 Cooking Guidelines 8 Cookware and Dinnerware 9 Aluminum Foil and Metal 9 Microwave Cooking Power 9 Manual Cooking 10 Cooking in Stages 10 Sensor Cooking 10 Sensor Popcorn 10 Sensor Cook ...11 Sensor Reheat 11 Auto Defrost 12 Warm Hold 12 MICROWAVE OVEN CARE 13 General Cleaning 13 TROUBLESHOOTING...
Owners Manual
Page 3
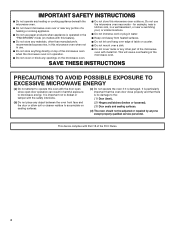
...that can kill or hurt you don't follow instructions. This symbol alerts you to stand in this manual. are able to excessive microwave energy: ■ Read all safety messages. Visible bubbling or boiling when the container is removed from paper or plastic bags before ...to properly grounded outlet. Use extreme care when inserting a spoon or other combustible materials are very important. IMPORTANT SAFETY INSTRUCTIONS When using the microwave oven. ■ Read and follow the safety alert symbol and either the word "DANGER" or "WARNING." Do not overheat the liquid...
...that can kill or hurt you don't follow instructions. This symbol alerts you to stand in this manual. are able to excessive microwave energy: ■ Read all safety messages. Visible bubbling or boiling when the container is removed from paper or plastic bags before ...to properly grounded outlet. Use extreme care when inserting a spoon or other combustible materials are very important. IMPORTANT SAFETY INSTRUCTIONS When using the microwave oven. ■ Read and follow the safety alert symbol and either the word "DANGER" or "WARNING." Do not overheat the liquid...
Owners Manual
Page 4
... accumulate on sealing surfaces. (c) Do not operate the oven if it is operated in the "PAN BROWN" mode (on top of the microwave oven when the microwave oven is no damage to the: (1) Door (bent), (2) Hinges and latches (broken or loosened), (3) Door seals and sealing surfaces. ... The oven should not be adjusted or repaired by anyone except properly qualified service personnel. SAVE THESE INSTRUCTIONS PRECAUTIONS TO AVOID POSSIBLE EXPOSURE TO EXCESSIVE MICROWAVE ENERGY (a) Do not attempt to operate this oven with metal foil. for example, near a kitchen sink, in a wet basement, or near...
... accumulate on sealing surfaces. (c) Do not operate the oven if it is operated in the "PAN BROWN" mode (on top of the microwave oven when the microwave oven is no damage to the: (1) Door (bent), (2) Hinges and latches (broken or loosened), (3) Door seals and sealing surfaces. ... The oven should not be adjusted or repaired by anyone except properly qualified service personnel. SAVE THESE INSTRUCTIONS PRECAUTIONS TO AVOID POSSIBLE EXPOSURE TO EXCESSIVE MICROWAVE ENERGY (a) Do not attempt to operate this oven with metal foil. for example, near a kitchen sink, in a wet basement, or near...
Owners Manual
Page 5
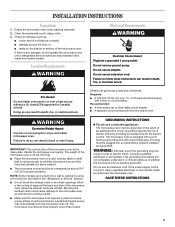
... ■ damage around the door, or ■ dents on a cart, counter, table or shelf that is 43 lbs (19.5 kg). ■ Place the microwave oven on the interior or exterior of electric shock by using one of space at a temperature above 50°F (10°C) for the electric current... the food and utensils you place inside with a fuse or circuit breaker. NOTE: Some models can result in death, fire, or electrical shock. The microwave oven should be plugged into a grounded 3 prong outlet. The plug must be built into a wall or cabinet by providing an escape wire for proper ...
... ■ damage around the door, or ■ dents on a cart, counter, table or shelf that is 43 lbs (19.5 kg). ■ Place the microwave oven on the interior or exterior of electric shock by using one of space at a temperature above 50°F (10°C) for the electric current... the food and utensils you place inside with a fuse or circuit breaker. NOTE: Some models can result in death, fire, or electrical shock. The microwave oven should be plugged into a grounded 3 prong outlet. The plug must be built into a wall or cabinet by providing an escape wire for proper ...
Owners Manual
Page 6
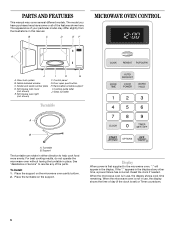
...the support. Metal shielded window C. Control panel G. Place the turntable on the microwave oven cavity bottom. 2. To Install: 1. If the ":" appears in the display at any of the features shown here. Microwave oven light (not shown) F. See "Assistance or Service" to reorder any ...different models. Support The turntable can rotate in either direction to the microwave oven, ":" will appear in the display. When the microwave oven is first supplied to help cook food more evenly. Microwave inlet cover (not shown) E. Turntable B. PARTS AND FEATURES This ...
...the support. Metal shielded window C. Control panel G. Place the turntable on the microwave oven cavity bottom. 2. To Install: 1. If the ":" appears in the display at any of the features shown here. Microwave oven light (not shown) F. See "Assistance or Service" to reorder any ...different models. Support The turntable can rotate in either direction to the microwave oven, ":" will appear in the display. When the microwave oven is first supplied to help cook food more evenly. Microwave inlet cover (not shown) E. Turntable B. PARTS AND FEATURES This ...
Owners Manual
Page 7
...Control Lock shuts down for learning how to cancel the Timer. Demo Mode The Demo Mode is active in the display to use of the microwave oven. When set, functions can be entered without actually turning on the magnetron. Options Settings can be selected, and displays can be changed... and seconds, up to lock and unlock the control panel. JET START™ Feature The JET START control (START pad) automatically starts the microwave oven at the current power level, by touching the JET START control during the countdown by using Options. NOTE: The Timer does not start ...
...Control Lock shuts down for learning how to cancel the Timer. Demo Mode The Demo Mode is active in the display to use of the microwave oven. When set, functions can be entered without actually turning on the magnetron. Options Settings can be selected, and displays can be changed... and seconds, up to lock and unlock the control panel. JET START™ Feature The JET START control (START pad) automatically starts the microwave oven at the current power level, by touching the JET START control during the countdown by using Options. NOTE: The Timer does not start ...
Owners Manual
Page 8
... removing containers from bottom to center. Let potatoes stand for doneness and add small increments of aluminum foil to vent. Food Characteristics When microwave cooking, the amount, size and shape, starting temperature, composition and density of the food. If a lid is not available, wax paper...back at once, the longer the cook time needed. If possible, turn food over from microwave oven. ■ Do not overcook potatoes. MICROWAVE OVEN USE A magnetron in the microwave oven produces microwaves which reflect off the metal floor, walls and ceiling and pass through the turntable and ...
... removing containers from bottom to center. Let potatoes stand for doneness and add small increments of aluminum foil to vent. Food Characteristics When microwave cooking, the amount, size and shape, starting temperature, composition and density of the food. If a lid is not available, wax paper...back at once, the longer the cook time needed. If possible, turn food over from microwave oven. ■ Do not overcook potatoes. MICROWAVE OVEN USE A magnetron in the microwave oven produces microwaves which reflect off the metal floor, walls and ceiling and pass through the turntable and ...
Owners Manual
Page 9
...ceiling or floor. ■ Always use . Follow manufacturer's recommendations. Silicone Bakeware Follow manufacturer's recommendations. If not used in the microwave oven. For example, 70%=7=Medium-High. Cooking and heating foods that need a cook power lower than high. Melamine Follow manufacturer's ...it . 2. Cook at least 3/16" (5 mm) above the turntable. Ceramic Glass, Glass Acceptable for use in microwave oven with the microwave oven (on the turntable. Heating cream soups. 80% 8 Heating rice, pasta or stirrable casseroles. Aluminum Foil and ...
...ceiling or floor. ■ Always use . Follow manufacturer's recommendations. Silicone Bakeware Follow manufacturer's recommendations. If not used in the microwave oven. For example, 70%=7=Medium-High. Cooking and heating foods that need a cook power lower than high. Melamine Follow manufacturer's ...it . 2. Cook at least 3/16" (5 mm) above the turntable. Ceramic Glass, Glass Acceptable for use in microwave oven with the microwave oven (on the turntable. Heating cream soups. 80% 8 Heating rice, pasta or stirrable casseroles. Aluminum Foil and ...
Owners Manual
Page 10
..., and the end-of the cooking container should be dry. ■ The room temperature should be set the desired cooking power. See "Microwave Cooking Power." 4. NOTE: During Popcorn function, as it heats, and adjusts the cook time accordingly. There are recommended. Place food on ... will appear in 30-second increments during the 1st stage. 3. Many sensor cycles require the covering of -cycle tones will appear in the microwave oven detects humidity released from the food as with 100% power, skip Step 3. 3. Touch POPCORN once for Regular, or twice for bag...
..., and the end-of the cooking container should be dry. ■ The room temperature should be set the desired cooking power. See "Microwave Cooking Power." 4. NOTE: During Popcorn function, as it heats, and adjusts the cook time accordingly. There are recommended. Place food on ... will appear in 30-second increments during the 1st stage. 3. Many sensor cycles require the covering of -cycle tones will appear in the microwave oven detects humidity released from the food as with 100% power, skip Step 3. 3. Touch POPCORN once for Regular, or twice for bag...
Owners Manual
Page 11
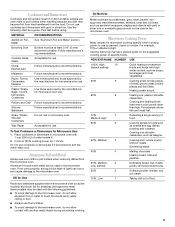
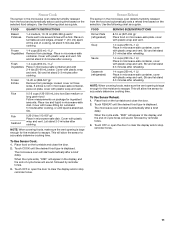
..., let stand 5 minutes after reheating. Cover with plastic wrap and vent. If entrée is displayed. Place rice and liquid in microwave-safe container. Stir and let stand 2-3 minutes after cooking. NOTE: When covering foods, make sure the vent opening is displayed. To ...the display and/or stop reminder tones. Touch REHEAT until liquid is large enough for ingredient amounts. Sensor Cook The sensor in the microwave oven detects humidity released from package. Use the following chart as a guide. FOOD QUANTITY/INSTRUCTIONS Baked Potatoes 1-4 medium, 10-13 ...
..., let stand 5 minutes after reheating. Cover with plastic wrap and vent. If entrée is displayed. Place rice and liquid in microwave-safe container. Stir and let stand 2-3 minutes after cooking. NOTE: When covering foods, make sure the vent opening is displayed. To ...the display and/or stop reminder tones. Touch REHEAT until liquid is large enough for ingredient amounts. Sensor Cook The sensor in the microwave oven detects humidity released from package. Use the following chart as a guide. FOOD QUANTITY/INSTRUCTIONS Baked Potatoes 1-4 medium, 10-13 ...
Owners Manual
Page 12
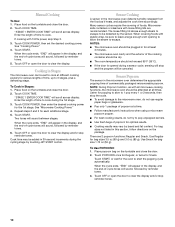
...than 1/4 lb (113 g) or two 4 oz (113 g) patties. Auto Defrost The Auto Defrost feature's preset programs can be used or the microwave oven can be manually set from fruit juice containers) before defrosting. ■ Shallow packages will defrost more quickly than deep blocks. ■ Separate ...the door during the entire cycle. Do not cover. Touch AUTO DEFROST. "WARM" will appear in food poisoning or sickness. Place all meats in microwave-safe baking dish. The display will cancel the function. ■ Cover plates of food such as a guide. To Use (for 3 categories: Meat...
...than 1/4 lb (113 g) or two 4 oz (113 g) patties. Auto Defrost The Auto Defrost feature's preset programs can be used or the microwave oven can be manually set from fruit juice containers) before defrosting. ■ Shallow packages will defrost more quickly than deep blocks. ■ Separate ...the door during the entire cycle. Do not cover. Touch AUTO DEFROST. "WARM" will appear in food poisoning or sickness. Place all meats in microwave-safe baking dish. The display will cancel the function. ■ Cover plates of food such as a guide. To Use (for 3 categories: Meat...
Owners Manual
Page 13
...to 5 minutes in direction of grain. ■ Stainless Steel Cleaner and Polish (not included): See "Assistance or Service" section to the microwave oven cavity, do not use chemical or abrasive cleansers. TURNTABLE Replace turntable immediately after cleaning. Heavy soil ■ Mild, nonabrasive soaps and detergents...: Heat 1 cup (250 mL) of water with soft cloth. ■ To avoid damage to microwave oven door and exterior, do not use soapfilled scouring pads, abrasive cleaners, steel-wool pads, gritty washcloths or some paper towels. Always...
...to 5 minutes in direction of grain. ■ Stainless Steel Cleaner and Polish (not included): See "Assistance or Service" section to the microwave oven cavity, do not use chemical or abrasive cleansers. TURNTABLE Replace turntable immediately after cleaning. Heavy soil ■ Mild, nonabrasive soaps and detergents...: Heat 1 cup (250 mL) of water with soft cloth. ■ To avoid damage to microwave oven door and exterior, do not use soapfilled scouring pads, abrasive cleaners, steel-wool pads, gritty washcloths or some paper towels. Always...
Owners Manual
Page 14
... ■ Is the magnetron working properly. Remove turntable. Remove and clean turntable support and rollers. Display shows time countdown, but the microwave oven is normal and occurs when the power supply switches the magnetron on and off ? Cooking times seem too long ■ Is the... phone frequency 2.4 GHz? See "Tones" section. Try a different outlet for the electronic device. ■ Is the radio or TV receiver near the microwave oven? See "Assistance or Service" section. ■ Is the door completely closed? See "Control Lock" section. ■ On some models, is the...
... ■ Is the magnetron working properly. Remove turntable. Remove and clean turntable support and rollers. Display shows time countdown, but the microwave oven is normal and occurs when the power supply switches the magnetron on and off ? Cooking times seem too long ■ Is the... phone frequency 2.4 GHz? See "Tones" section. Try a different outlet for the electronic device. ■ Is the radio or TV receiver near the microwave oven? See "Assistance or Service" section. ■ Is the door completely closed? See "Control Lock" section. ■ On some models, is the...
Owners Manual
Page 15
... by using one of your nearest Whirlpool designated service center. Cleaning Supplies Heavy Duty Degreaser Part Number 31552 All-Purpose Appliance Cleaner Part Number 31682 Stainless Steel Cleaner and Polish Part Number 31462 Built-In Kits This countertop microwave oven can also look in by kit... model number. These kits are made with the same precision used to Whirlpool Corporation with : ■ Features and specifications on our full line of ...
... by using one of your nearest Whirlpool designated service center. Cleaning Supplies Heavy Duty Degreaser Part Number 31552 All-Purpose Appliance Cleaner Part Number 31682 Stainless Steel Cleaner and Polish Part Number 31462 Built-In Kits This countertop microwave oven can also look in by kit... model number. These kits are made with the same precision used to Whirlpool Corporation with : ■ Features and specifications on our full line of ...
Dimension Guide
Page 1
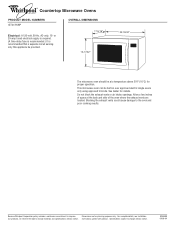
... be built-in over approved electric single ovens only using approved trim kits. Do not block the exhaust vents or air intake openings. Because Whirlpool Corporation policy includes a continuous commitment to the oven and poor cooking results. Specifications subject to change without notice. For complete details, see Installation...notice. 8205088 09-08-04 Allow a few inches of the oven where the exhaust vents are for details. Instructions packed with product. ® Countertop Microwave Ovens PRODUCT MODEL NUMBERS GT4175SP Electrical: A 120-volt, 60-Hz, AC-only, 15-
... be built-in over approved electric single ovens only using approved trim kits. Do not block the exhaust vents or air intake openings. Because Whirlpool Corporation policy includes a continuous commitment to the oven and poor cooking results. Specifications subject to change without notice. For complete details, see Installation...notice. 8205088 09-08-04 Allow a few inches of the oven where the exhaust vents are for details. Instructions packed with product. ® Countertop Microwave Ovens PRODUCT MODEL NUMBERS GT4175SP Electrical: A 120-volt, 60-Hz, AC-only, 15-
Installation Instructions
Page 2
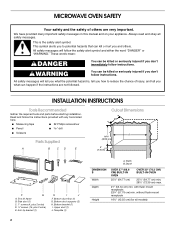
...;₂" (64.77 cm) 25¹⁄₂" (64.77 cm) min; 28¹⁄₂" (72.39 cm) max. 21" (53.34 cm) min. MICROWAVE OVEN SAFETY Your safety and the safety of injury, and tell you don't follow instructions. Always read and obey all models) All safety messages will...
...;₂" (64.77 cm) 25¹⁄₂" (64.77 cm) min; 28¹⁄₂" (72.39 cm) max. 21" (53.34 cm) min. MICROWAVE OVEN SAFETY Your safety and the safety of injury, and tell you don't follow instructions. Always read and obey all models) All safety messages will...
Installation Instructions
Page 3
... not use an extension cord. In the event of an electrical short circuit, grounding reduces the risk of upper duct B. SAVE THESE INSTRUCTIONS Microwave Oven Preparation 1. Connect side duct to bottom duct using two ¹⁄₂" screws. (Rear view of bottom duct floor, making sure...any loose items inside each support. If the power supply cord is too short, have a qualified electrician or serviceman install an outlet near the microwave oven. A 120-Volt, 60-Hz, AC-only, 15- WARNING: Improper use an extension cord. Remove existing screw from left side of ...
... not use an extension cord. In the event of an electrical short circuit, grounding reduces the risk of upper duct B. SAVE THESE INSTRUCTIONS Microwave Oven Preparation 1. Connect side duct to bottom duct using two ¹⁄₂" screws. (Rear view of bottom duct floor, making sure...any loose items inside each support. If the power supply cord is too short, have a qualified electrician or serviceman install an outlet near the microwave oven. A 120-Volt, 60-Hz, AC-only, 15- WARNING: Improper use an extension cord. Remove existing screw from left side of ...

Installation Instructions
Page 4
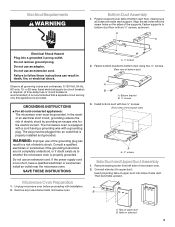
... ¹⁄₂" screws B. NOTE: Remove any dirt or oil on ducts. Peel off backing of bottom duct. Press down firmly on microwave oven surface before ducts are not to scale.) B C A. Existing screw Anti-Tip Bracket Installation 1. Plug in order to correctly engage with ... anti-tip bracket. Be sure to align the centerline of template to cabinet with anti-tip bracket. Anti-tip bracket C. Centerline F. Slide microwave oven partway into cutout opening and slide it into place, engaging anti-tip bracket. 4. Anti-tip bracket 4 Bottom bracket 2. Install anti...
... ¹⁄₂" screws B. NOTE: Remove any dirt or oil on ducts. Peel off backing of bottom duct. Press down firmly on microwave oven surface before ducts are not to scale.) B C A. Existing screw Anti-Tip Bracket Installation 1. Plug in order to correctly engage with ... anti-tip bracket. Be sure to align the centerline of template to cabinet with anti-tip bracket. Anti-tip bracket C. Centerline F. Slide microwave oven partway into cutout opening and slide it into place, engaging anti-tip bracket. 4. Anti-tip bracket 4 Bottom bracket 2. Install anti...


