Owners Manual
Page 2
...6 Turntable 6 MICROWAVE OVEN CONTROL 6 Display 6 Start 7 JET START™ Feature 7 Off 7 Clock 7 Tones 7 Timer 7 Control Lock 7 Demo Mode 7 Options 7 MICROWAVE OVEN USE 8 Food Characteristics 8 Cooking Guidelines 8 Cookware and Dinnerware 9 Aluminum Foil and Metal 9 Microwave Cooking Power 9 Manual Cooking 10 Cooking in Stages 10 Sensor Cooking 10 Sensor Popcorn 10 Sensor Cook 11 Sensor Reheat 11 Auto Defrost 12 Warm Hold 12 MICROWAVE OVEN CARE 13 General Cleaning 13 TROUBLESHOOTING 14 ASSISTANCE OR SERVICE 15 Replacement Parts 15 Built-In Kits 15 WARRANTY 16...
...6 Turntable 6 MICROWAVE OVEN CONTROL 6 Display 6 Start 7 JET START™ Feature 7 Off 7 Clock 7 Tones 7 Timer 7 Control Lock 7 Demo Mode 7 Options 7 MICROWAVE OVEN USE 8 Food Characteristics 8 Cooking Guidelines 8 Cookware and Dinnerware 9 Aluminum Foil and Metal 9 Microwave Cooking Power 9 Manual Cooking 10 Cooking in Stages 10 Sensor Cooking 10 Sensor Popcorn 10 Sensor Cook 11 Sensor Reheat 11 Auto Defrost 12 Warm Hold 12 MICROWAVE OVEN CARE 13 General Cleaning 13 TROUBLESHOOTING 14 ASSISTANCE OR SERVICE 15 Replacement Parts 15 Built-In Kits 15 WARRANTY 16...
Owners Manual
Page 3
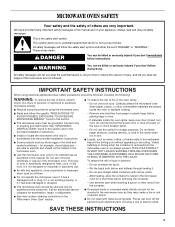
... this section and in the provided Installation Instructions. ■ Install or locate the microwave oven only in oven. - WARNING You can burn off power at the fuse or circuit breaker panel. - Stir the liquid both before removing the container. - Always read and obey all instructions before placing bags in accordance with metal scouring pads. IMPORTANT SAFETY INSTRUCTIONS When using electrical appliances basic safety precautions should be...
... this section and in the provided Installation Instructions. ■ Install or locate the microwave oven only in oven. - WARNING You can burn off power at the fuse or circuit breaker panel. - Stir the liquid both before removing the container. - Always read and obey all instructions before placing bags in accordance with metal scouring pads. IMPORTANT SAFETY INSTRUCTIONS When using electrical appliances basic safety precautions should be...
Owners Manual
Page 4
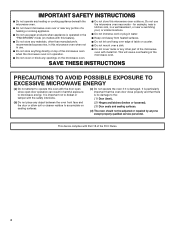
...: (1) Door (bent), (2) Hinges and latches (broken or loosened), (3) Door seals and sealing surfaces. (d) The oven should not be adjusted or repaired by anyone except properly qualified service personnel. Do not use . ■ Do not store anything directly on top of the microwave oven when the microwave oven is no damage to microwave energy. This device complies with Part 18 of the microwave oven with the door open since open-door operation...
...: (1) Door (bent), (2) Hinges and latches (broken or loosened), (3) Door seals and sealing surfaces. (d) The oven should not be adjusted or repaired by anyone except properly qualified service personnel. Do not use . ■ Do not store anything directly on top of the microwave oven when the microwave oven is no damage to microwave energy. This device complies with Part 18 of the microwave oven with the door open since open-door operation...
Owners Manual
Page 5
... the power supply cord is equipped with a cord having a grounding wire with a grounding plug. SAVE THESE INSTRUCTIONS 5 Failure to hold the microwave oven and the food and utensils you place inside with a fuse or circuit breaker. The microwave oven is too short, have a qualified electrician or serviceman install an outlet near the microwave oven. Required: ■ A 120 Volt, 60 Hz, AC only, 15- The weight of the trim kits listed...
... the power supply cord is equipped with a cord having a grounding wire with a grounding plug. SAVE THESE INSTRUCTIONS 5 Failure to hold the microwave oven and the food and utensils you place inside with a fuse or circuit breaker. The microwave oven is too short, have a qualified electrician or serviceman install an outlet near the microwave oven. Required: ■ A 120 Volt, 60 Hz, AC only, 15- The weight of the trim kits listed...
Owners Manual
Page 6
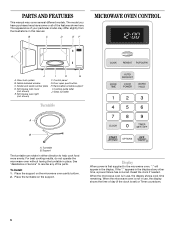
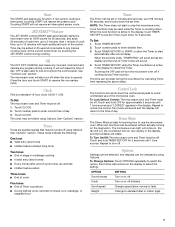
... clock is set) or Timer countdown. 6 Microwave oven light (not shown) F. For best cooking results, do not operate the microwave oven without having the turntable in this manual. Place the support on the support. If the ":" appears in use , the display shows cook time remaining. The appearance of the features shown here. Door lock system B. To Install: 1. Model and serial number plate D. Glass turntable Turntable A B A. See "Assistance or Service" to reorder any other time, a power failure has occurred. Reset the clock if needed. The model...
... clock is set) or Timer countdown. 6 Microwave oven light (not shown) F. For best cooking results, do not operate the microwave oven without having the turntable in this manual. Place the support on the support. If the ":" appears in use , the display shows cook time remaining. The appearance of the features shown here. Door lock system B. To Install: 1. Model and serial number plate D. Glass turntable Turntable A B A. See "Assistance or Service" to reorder any other time, a power failure has occurred. Reset the clock if needed. The model...
Owners Manual
Page 7
... unintended use the microwave oven. JET START™ Feature The JET START control (START pad) automatically starts the microwave oven at the current power level, by using Options. Touch CLOCK. 2. Control Lock The Control Lock shuts down the set time ends, "TIMER END" will scroll across the display and the end-of-Timer tones will come on the magnetron. To Change Options: Touch OPTIONS repeatedly to select the option, then follow instructions on or off using Options. If non-sensor cooking...
... unintended use the microwave oven. JET START™ Feature The JET START control (START pad) automatically starts the microwave oven at the current power level, by using Options. Touch CLOCK. 2. Control Lock The Control Lock shuts down the set time ends, "TIMER END" will scroll across the display and the end-of-Timer tones will come on the magnetron. To Change Options: Touch OPTIONS repeatedly to select the option, then follow instructions on or off using Options. If non-sensor cooking...
Owners Manual
Page 8
... heat which reflect off the metal floor, walls and ceiling and pass through the turntable and appropriate cookware to center. Cooking Guidelines Covering Covering food helps retain moisture, shorten cook time and reduce spattering. If cooking several places to vent steam. Size and Shape Smaller pieces of microwave oven cavity. Let potatoes stand for doneness and add small increments of standing time depends on the door...
... heat which reflect off the metal floor, walls and ceiling and pass through the turntable and appropriate cookware to center. Cooking Guidelines Covering Covering food helps retain moisture, shorten cook time and reduce spattering. If cooking several places to vent steam. Size and Shape Smaller pieces of microwave oven cavity. Let potatoes stand for doneness and add small increments of standing time depends on the door...
Owners Manual
Page 9
... Containers Do not use . Cook at least 3/16" (5 mm) above the turntable. Cooking and heating foods that need a cook power lower than high. Use the following chart as sandwich wrappers, staples and objects with the microwave oven (on the turntable. Ceramic Glass, Glass Acceptable for use the turntable. ■ To avoid damage to the microwave oven, do not allow contact with high water content, such as a general guide for microwave oven use cookware or...
... Containers Do not use . Cook at least 3/16" (5 mm) above the turntable. Cooking and heating foods that need a cook power lower than high. Use the following chart as sandwich wrappers, staples and objects with the microwave oven (on the turntable. Ceramic Glass, Glass Acceptable for use the turntable. ■ To avoid damage to the microwave oven, do not allow contact with high water content, such as a general guide for microwave oven use cookware or...
Owners Manual
Page 10
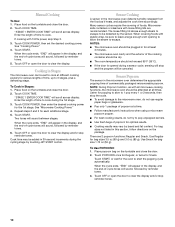
... cooking power. NOTE: During Popcorn function, as it heats, and adjusts the cook time accordingly. Use Snack for the 1st stage. To Use POPCORN: 1. When the cycle ends, "END" will appear in the microwave oven determines the appropriate popping time of foods. Manual Cooking To Use: 1. Enter the length of time, up to clear the display and/or stop and the program will sound, followed by touching JET START control. Touch COOK POWER, then set to cook at different cooking powers...
... cooking power. NOTE: During Popcorn function, as it heats, and adjusts the cook time accordingly. Use Snack for the 1st stage. To Use POPCORN: 1. When the cycle ends, "END" will appear in the microwave oven determines the appropriate popping time of foods. Manual Cooking To Use: 1. Enter the length of time, up to clear the display and/or stop and the program will sound, followed by touching JET START control. Touch COOK POWER, then set to cook at different cooking powers...
Owners Manual
Page 11
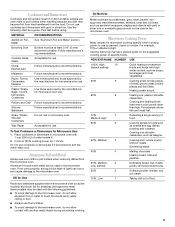
...-567 g)/ Remove from package. If entrée is displayed. Touch OFF or open the door to accurately determine cooking time. FOOD SERVING SIZE/INSTRUCTIONS Dinner Plate (refrigerated) 8-16 oz (227-454 g)/ Place food on the selection. When the cycle ends, "END" will appear in the microwave oven detects humidity released from the food and automatically sets a reheat time based on microwave-safe plate, cover with plastic wrap and vent. Fish Seafood...
...-567 g)/ Remove from package. If entrée is displayed. Touch OFF or open the door to accurately determine cooking time. FOOD SERVING SIZE/INSTRUCTIONS Dinner Plate (refrigerated) 8-16 oz (227-454 g)/ Place food on the selection. When the cycle ends, "END" will appear in the microwave oven detects humidity released from the food and automatically sets a reheat time based on microwave-safe plate, cover with plastic wrap and vent. Fish Seafood...
Owners Manual
Page 12
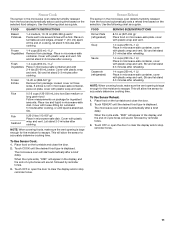
... hot cooked food on the turntable and close door, and touch START to clear the display and/or stop reminder tones. "WARM" will show the setting for the Fish setting. 3. POULTRY Chicken: whole and cut up . Open door, turn , rearrange, or separate food. The display will appear in microwave-safe baking dish. Opening the door during the entire cycle. Touch AUTO DEFROST a second time for the Poultry setting, and a third time for defrosting Meat. It should be manually set...
... hot cooked food on the turntable and close door, and touch START to clear the display and/or stop reminder tones. "WARM" will show the setting for the Fish setting. 3. POULTRY Chicken: whole and cut up . Open door, turn , rearrange, or separate food. The display will appear in microwave-safe baking dish. Opening the door during the entire cycle. Touch AUTO DEFROST a second time for the Poultry setting, and a third time for defrosting Meat. It should be manually set...
Owners Manual
Page 13
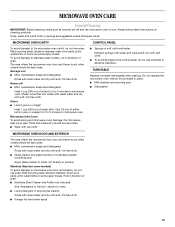
... and the microwave oven is cool. The area where the microwave oven door and frame touch when closed should be kept clean. ■ Mild, nonabrasive soaps and detergents: Rinse with clean water and dry with soft, lint-free cloth. ■ Glass cleaner and paper towels or nonabrasive plastic scrubbing pad: Apply glass cleaner to towel, not directly to the control panel, do not use soapfilled...
... and the microwave oven is cool. The area where the microwave oven door and frame touch when closed should be kept clean. ■ Mild, nonabrasive soaps and detergents: Rinse with clean water and dry with soft, lint-free cloth. ■ Glass cleaner and paper towels or nonabrasive plastic scrubbing pad: Apply glass cleaner to towel, not directly to the control panel, do not use soapfilled...
Owners Manual
Page 14
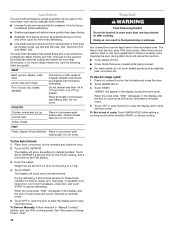
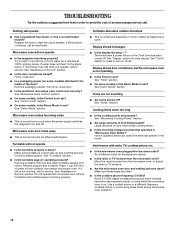
... some models) attached to avoid the cost of food need longer cooking times. ■ Is the incoming voltage less than that specified in use? Remove and clean turntable support and rollers. Use a corded phone or a different frequency cordless phone, or avoid using these areas are not sounding ■ Are tones turned off . Try a different outlet for service. Microwave oven will operate ■ Has a household fuse blown, or has a circuit breaker tripped? TROUBLESHOOTING Try...
... some models) attached to avoid the cost of food need longer cooking times. ■ Is the incoming voltage less than that specified in use? Remove and clean turntable support and rollers. Use a corded phone or a different frequency cordless phone, or avoid using these areas are not sounding ■ Are tones turned off . Try a different outlet for service. Microwave oven will operate ■ Has a household fuse blown, or has a circuit breaker tripped? TROUBLESHOOTING Try...
Owners Manual
Page 15
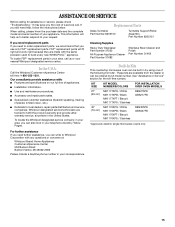
.... 15 Replacement Parts Glass Turntable Part Number 8205150 Turntable Support/Roller Assembly Part Number 8205151 If you need replacement parts If you the cost of the following trim kits*. These kits are trained to your nearest Whirlpool designated service center. It may save you need help us or your request. Cleaning Supplies Heavy Duty Degreaser Part Number 31552 All-Purpose Appliance Cleaner Part Number 31682 Stainless Steel Cleaner and Polish Part Number 31462 Built-In Kits This countertop microwave oven can also...
.... 15 Replacement Parts Glass Turntable Part Number 8205150 Turntable Support/Roller Assembly Part Number 8205151 If you need replacement parts If you the cost of the following trim kits*. These kits are trained to your nearest Whirlpool designated service center. It may save you need help us or your request. Cleaning Supplies Heavy Duty Degreaser Part Number 31552 All-Purpose Appliance Cleaner Part Number 31682 Stainless Steel Cleaner and Polish Part Number 31462 Built-In Kits This countertop microwave oven can also...

Owners Manual
Page 16
... operated and maintained according to instructions attached to or furnished with the product, Whirlpool Corporation or Whirlpool Canada LP (hereafter "Whirlpool") will need service, first see the "Troubleshooting" section of your major appliance to instruct you may find this limited warranty. Costs associated with electrical or plumbing codes, or use of your major appliance, to replace or repair house fuses, or to correct the installation of the Use & Care Guide. WHIRLPOOL...
... operated and maintained according to instructions attached to or furnished with the product, Whirlpool Corporation or Whirlpool Canada LP (hereafter "Whirlpool") will need service, first see the "Troubleshooting" section of your major appliance to instruct you may find this limited warranty. Costs associated with electrical or plumbing codes, or use of your major appliance, to replace or repair house fuses, or to correct the installation of the Use & Care Guide. WHIRLPOOL...
Dimension Guide
Page 1
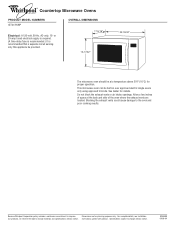
... improve Dimensions are located. or 20-amp fused electrical supply is required. (A time-delay fuse is recommended.) It is recommended that a separate circuit serving only this appliance be built-in over approved electric single ovens only using approved trim kits. Instructions packed with product. Do not block the exhaust vents or air intake openings. Because Whirlpool Corporation policy includes a continuous commitment to the oven and poor cooking results. ® Countertop Microwave Ovens PRODUCT MODEL NUMBERS GT4175SP Electrical...
... improve Dimensions are located. or 20-amp fused electrical supply is required. (A time-delay fuse is recommended.) It is recommended that a separate circuit serving only this appliance be built-in over approved electric single ovens only using approved trim kits. Instructions packed with product. Do not block the exhaust vents or air intake openings. Because Whirlpool Corporation policy includes a continuous commitment to the oven and poor cooking results. ® Countertop Microwave Ovens PRODUCT MODEL NUMBERS GT4175SP Electrical...
Installation Instructions
Page 2
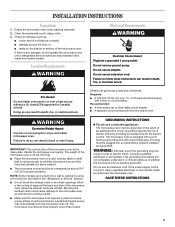
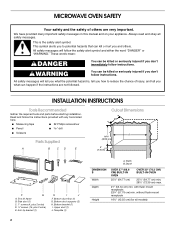
s Measuring tape s #2 Phillips screwdriver s Pencil s drill s Scissors Parts Supplied A B CD E Cutout Dimensions B A 16³⁄₄" (42.55 cm) 3" (7.6 cm) Width F G A. Template (1) 2 A. Always read and obey all models) INSTALLATION INSTRUCTIONS Tools Recommended Gather the required tools and parts before starting installation. Depth DIMENSION S Width Depth Height OVER 27" (68.6 CM) BUILT-IN OVEN OVER 30" (76.2 CM) BUILT-IN OVEN 25¹⁄₂" (64.77...
s Measuring tape s #2 Phillips screwdriver s Pencil s drill s Scissors Parts Supplied A B CD E Cutout Dimensions B A 16³⁄₄" (42.55 cm) 3" (7.6 cm) Width F G A. Template (1) 2 A. Always read and obey all models) INSTALLATION INSTRUCTIONS Tools Recommended Gather the required tools and parts before starting installation. Depth DIMENSION S Width Depth Height OVER 27" (68.6 CM) BUILT-IN OVEN OVER 30" (76.2 CM) BUILT-IN OVEN 25¹⁄₂" (64.77...
Installation Instructions
Page 3
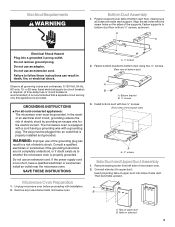
... duct B. or 20-amp fused electrical supply (or circuit breaker) is required. (A time-delay fuse or circuit breaker is recommended.) It is equipped with a cord having a grounding wire with a grounding plug. The microwave oven is recommended that is too short, have a qualified electrician or serviceman install an outlet near the microwave oven. Consult a qualified electrician or serviceman if the grounding instructions are inside microwave oven. A B A. Electrical Requirements WARNING Bottom Duct Assembly 1. Position supports...
... duct B. or 20-amp fused electrical supply (or circuit breaker) is required. (A time-delay fuse or circuit breaker is recommended.) It is equipped with a cord having a grounding wire with a grounding plug. The microwave oven is recommended that is too short, have a qualified electrician or serviceman install an outlet near the microwave oven. Consult a qualified electrician or serviceman if the grounding instructions are inside microwave oven. A B A. Electrical Requirements WARNING Bottom Duct Assembly 1. Position supports...

Installation Instructions
Page 4
... microwave oven is centered within cutout opening and slide it into cutout opening. Cutout opening B 2.06 cm) C. 3" (7.62 cm) EF D. 16³⁄₄" (42.55 cm) E. Anti-tip bracket 4 On cutout floor, use template to left side of double-sided tape. Bottom duct B. Install anti-tip bracket onto cutout floor using two ¹⁄₂" screws. NOTE: Remove any dirt or oil on ducts. Attach the side duct and upper duct assembly...
... microwave oven is centered within cutout opening and slide it into cutout opening. Cutout opening B 2.06 cm) C. 3" (7.62 cm) EF D. 16³⁄₄" (42.55 cm) E. Anti-tip bracket 4 On cutout floor, use template to left side of double-sided tape. Bottom duct B. Install anti-tip bracket onto cutout floor using two ¹⁄₂" screws. NOTE: Remove any dirt or oil on ducts. Attach the side duct and upper duct assembly...
Warranty
Page 1
... WARRANTY For one year from the date of purchase, when this major appliance is operated and maintained according to instructions attached to or furnished with the product, Whirlpool Corporation or Whirlpool Canada LP (hereafter "Whirlpool") will need service, first see the "Troubleshooting" section of the Use & Care Guide. Proof of your major appliance, to replace or repair house fuses, or to published user or operator instructions and/or installation instructions. 4. Repairs...
... WARRANTY For one year from the date of purchase, when this major appliance is operated and maintained according to instructions attached to or furnished with the product, Whirlpool Corporation or Whirlpool Canada LP (hereafter "Whirlpool") will need service, first see the "Troubleshooting" section of the Use & Care Guide. Proof of your major appliance, to replace or repair house fuses, or to published user or operator instructions and/or installation instructions. 4. Repairs...


