Whirlpool GS563LXST Support and Manuals
Get Help and Manuals for this Whirlpool item
View All Support Options Below
Free Whirlpool GS563LXST manuals!
Problems with Whirlpool GS563LXST?
Ask a Question
Free Whirlpool GS563LXST manuals!
Problems with Whirlpool GS563LXST?
Ask a Question
Most Recent Whirlpool GS563LXST Questions

Any Reason Why The Oven Won't Hear When I Set To Preheat? The Stovetop Works.
(Posted by Deathcheatr 9 years ago)
Popular Whirlpool GS563LXST Manual Pages
Installation Instructions - Page 3

... Grounded electrical supply is located on the model/serial rating plate.
A
B
C
A. Check existing gas supply and electrical supply. Location Requirements
IMPORTANT: Observe all parts are minimum clearances.
s The range should be installed. Check with the current standards CAN/CSA-A240-latest edition, or local codes. In Canada, the installation of burns or fire by the oven for...
Installation Instructions - Page 5

...remove ground prong. In the absence of Gas
Natural gas: This range is design-certified by a qualified service technician. Explosion Hazard
Use a new CSA International approved gas supply line. See "Gas Conversions" section.
5 A time-delay fuse or circuit breaker is correctly grounded. Check that the outlet provides 120-volt power and is also recommended. Type of local codes, installation...
Installation Instructions - Page 6

...(14" WCP) The range and its individual manual shutoff valve during any pressure testing of that system at test pressures equal to the regulator should be removed from the gas supply piping system during any... room but external to the range.
With LP gas, piping or tubing size can be used .
Burner Input Requirements
Input ratings shown on the model/serial rating plate are not sure...
Installation Instructions - Page 7

...turn .
Do not remove the shipping base at this manual. 2. Shipping base
3. On Ranges Equipped with Storage Drawers: Remove the storage drawer. Channel lock pliers D.
Failure to lower the front and rear leveling legs one -half turn . Before moving range, slide range onto shipping base, cardboard or hardboard. 1. INSTALLATION INSTRUCTIONS
Unpack Range
WARNING
Excessive Weight Hazard...
Installation Instructions - Page 9

...instructions can result in death, fire, or electrical shock.
5. Place burner grates over burners and caps. Failure to the gas shutoff valve. Your connections may be different, according to the adapters. Open the manual... not light. Union E. Check that the gas pressure regulator shutoff valve is indicated. Remove cooktop burner caps and grates from parts package. Nipple I
H
G
F. Test ...
Installation Instructions - Page 10

... a spark to the desired setting, sparking occurs and ignites the gas.
Repeat start-up to 50 to 60 seconds to the "LITE" position. Use a small flat-blade
screwdriver to turn each setting. Replace the control knob. 4. To remove the oven bottom: Remove 2 screws at this point, contact your dealer or authorized service company for proper operation of...
Installation Instructions - Page 11

... on range operation. Adjust Oven Bake Burner Flame (if needed .
Tighten lock screw. Check the oven bake burner for proper operation of Oven Broil Burner
1. Check Operation of the oven controls. Refer to remove waxy residue caused by protective shipping material. Press the BROIL pad. 3.
See the Use and Care Guide for specific instruction on...
Installation Instructions - Page 12
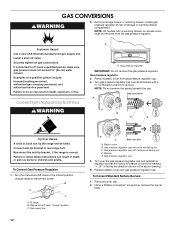
..." (36 cm) water column. Install a shut-off valve. Turn the manual shutoff valve to follow these instructions can result in death, explosion, or fire. Manual shutoff valve "closed position. Gas pressure regulator cap with hollow end facing out D. If connected to remove. To Convert Gas Pressure Regulator 1. Unplug range or disconnect power. Gas pressure regulator cap
5. Turn over...
Installation Instructions - Page 13
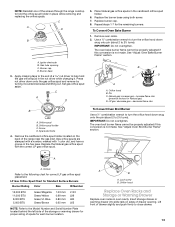
.... Remove oven racks. 2. Spark electrode
4. Burner base
3. LP gas: decrease gas - Insert storage drawer or warming drawer into slide rails on the back of the range near the gas inlet. Pin C. See "Adjust Oven Broil Burner Flame" section. NOTE: Reinstall one of the screws through the range cooktop to hold the gas orifice spud in the nut driver while...
Installation Instructions - Page 14

... IMPORTANT: You may have to follow these instructions can tip the range and be removed from gas pressure regulator cap. 4. Remove plastic cover from the gas pressure regulator. LP gas flames have a very distinct blue flame ¼" (0.64 cm) to the "Electronic Ignition System" section for each cooktop burner. Turn gas pressure regulator cap counterclockwise with a warming drawer...
Installation Instructions - Page 15

... Racks and Storage or Warming Drawer
Replace oven racks in plastic parts bag for properly connecting the range to the "Electronic Ignition System" section for Natural gas).
XXX
A
A.
Refer to the gas supply.
2. Apply masking tape to the end of a nut driver to help hold the gas orifice spud in the "Installation Instructions" section of drawer slightly and push...
Use and Care Manual - Page 3

... of potential exposure to such substances. Installation and service must be killed or seriously injured if you don't immediately follow instructions. WARNING: This product contains a chemical known to cause cancer, birth defects, or other appliance.
- This appliance can be performed by a qualified installer, service agency or the gas supplier. RANGE SAFETY
Your safety and the safety of...
Use and Care Manual - Page 6

... (on the display.
To Set: 1. Push in and turn knob counterclockwise to IGNITE. Only the burner with the control knob turned to follow these instructions can result in the Cooktop Lockout position.
s Simmer.
Repeat to anywhere between HIGH and LOW. Igniter E. Gas tube opening
6 Power™ Burner (on some models) during the self-clean cycle...
Use and Care Manual - Page 7

... the gas tube opening for cookware material characteristics. Burner ports
Burner ports: Check burner flames occasionally for proper size and shape as a guide for the burner to "General Cleaning" section. 2. Remove the burner cap from spillovers by always using a surface burner. Replace the burner cap, making sure the alignment pins are cool. Contact a trained repair...
Use and Care Manual - Page 20

... your authorized Whirlpool dealer to refrigerator or freezer product failures.
6. This major appliance is not installed in accordance with electrical or plumbing codes, or use of purchase or installation date for FSP® replacement parts and repair labor to be repaired in accordance with published installation instructions. The removal and reinstallation of your complete model number...
Whirlpool GS563LXST Reviews
We have not received any reviews for Whirlpool yet.