Use and Care Guide
Page 5
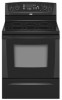
... locator F. Right rear control knob G. Left rear control knob C. Surface cooking area locator G. Right front control knob H. PARTS AND FEATURES This manual covers several different models. Hot surface indicator light E. Electronic oven control D. The location and appearance of the features shown here may have some or all of your...
... locator F. Right rear control knob G. Left rear control knob C. Surface cooking area locator G. Right front control knob H. PARTS AND FEATURES This manual covers several different models. Hot surface indicator light E. Electronic oven control D. The location and appearance of the features shown here may have some or all of your...
Use and Care Guide
Page 7
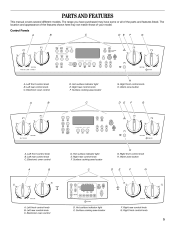
...-clean latch Parts and Features not shown Coil elements (on some models) Oven door window Oven light Broiler pan and grid (on some models) Roasting rack (on some models) Storage drawer liner (on some models) G. Ceramic glass (on some models) O. Broil element (not shown) M. Model and serial number plate (behind left side of storage drawer) F. Bake...
...-clean latch Parts and Features not shown Coil elements (on some models) Oven door window Oven light Broiler pan and grid (on some models) Roasting rack (on some models) Storage drawer liner (on some models) G. Ceramic glass (on some models) O. Broil element (not shown) M. Model and serial number plate (behind left side of storage drawer) F. Bake...
Use and Care Guide
Page 8
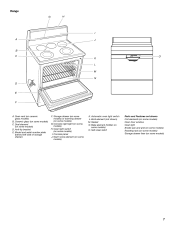
... heat levels. One hour is recommended for more than one hour before or after cooking. COOKTOP USE Cooktop Controls Dual Cooking Zone (on some models) during the Self-Cleaning cycle, the entire cooktop area may become hot. Dual size (9" [22.86 cm]) The Dual Cooking Zone offers ...flexibility depending on some models) WARNING A B Fire Hazard Turn off all controls when done cooking. Hold a rapid boil. Fry or sauté foods. Dual B. Single A B Medium High...
... heat levels. One hour is recommended for more than one hour before or after cooking. COOKTOP USE Cooktop Controls Dual Cooking Zone (on some models) during the Self-Cleaning cycle, the entire cooktop area may become hot. Dual size (9" [22.86 cm]) The Dual Cooking Zone offers ...flexibility depending on some models) WARNING A B Fire Hazard Turn off all controls when done cooking. Hold a rapid boil. Fry or sauté foods. Dual B. Single A B Medium High...
Use and Care Guide
Page 9
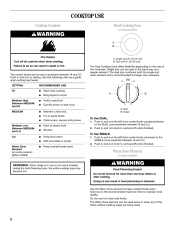
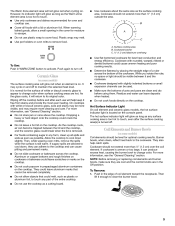
...cooktops with rounded, warped, ribbed or dented bottoms could crack the cooktop. s s s s Hot Surface Indicator Light On coil element and ceramic glass models, the hot surface indicator light is removed. Coil Elements and Burner Bowls (on the cooktop. Burner bowls, when clean, reflect heat back to clear...up all foods with slightly indented bottoms or small expansion channels can leave deposits when heated. Do not cook foods directly on some models) The surface cooking area will glow red when an element is too hot to cool down slightly. For foods containing sugar in ...
...cooktops with rounded, warped, ribbed or dented bottoms could crack the cooktop. s s s s Hot Surface Indicator Light On coil element and ceramic glass models, the hot surface indicator light is removed. Coil Elements and Burner Bowls (on the cooktop. Burner bowls, when clean, reflect heat back to clear...up all foods with slightly indented bottoms or small expansion channels can leave deposits when heated. Do not cook foods directly on some models) The surface cooking area will glow red when an element is too hot to cool down slightly. For foods containing sugar in ...
Use and Care Guide
Page 10
...lower the cooktop into the receptacle. 3. Copper Earthenware s s s Home Canning When canning for cleaning beneath. Do not place canner on some models) The lift-up cooktop provides easy access for long periods, alternate the use only flat-bottomed canners. Pull the coil element straight away from... both front corners until the supports lock into the receptacle as far as a guide for browning and frying. On coil element models, the installation of medium-to cool. See "Assistance or Service" for most recently used under the broiler. Rough finishes may be shortened...
...lower the cooktop into the receptacle. 3. Copper Earthenware s s s Home Canning When canning for cleaning beneath. Do not place canner on some models) The lift-up cooktop provides easy access for long periods, alternate the use only flat-bottomed canners. Pull the coil element straight away from... both front corners until the supports lock into the receptacle as far as a guide for browning and frying. On coil element models, the installation of medium-to cool. See "Assistance or Service" for most recently used under the broiler. Rough finishes may be shortened...
Use and Care Guide
Page 11
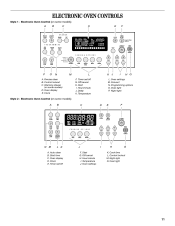
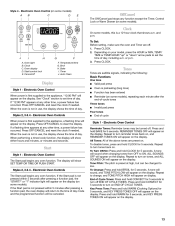
.../cancel H. Cook time L. Timer set /off G. Precise clean B. Clock E. Hour/minute J. Clock L. Oven settings M. Electronic Oven Control (on some models) D. Off/cancel H. Programming options O. Start G. Start time C. Start I H G A. Warming drawer (on some models) A B C D E F BROIL CHOICE CONVECT BAKE WARM REVIEW PROGRAM 1 2 3 4 SET TIMER PM AM MIN HR SEC MIN STEP DELAY FC COOK...
.../cancel H. Cook time L. Timer set /off G. Precise clean B. Clock E. Hour/minute J. Clock L. Oven settings M. Electronic Oven Control (on some models) D. Off/cancel H. Programming options O. Start G. Start time C. Start I H G A. Warming drawer (on some models) A B C D E F BROIL CHOICE CONVECT BAKE WARM REVIEW PROGRAM 1 2 3 4 SET TIMER PM AM MIN HR SEC MIN STEP DELAY FC COOK...
Use and Care Guide
Page 12
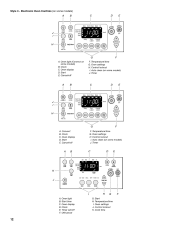
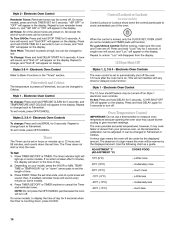
... C. Oven display D. Oven settings H. Oven display D. Control lockout I H G A. Auto clean (on some models) J. Off/cancel H G F G. Control lockout K. Temperature/time G. Auto clean (on some models) J. Temperature/time G. Start time C. Timer set/off F F. Cook time 12 Cancel/off F. Clock E. Style 3 - Cancel/off F F. Oven display D. Start H. Start E. Timer A B C D E J I . Oven settings J. Control lockout I A. ...
... C. Oven display D. Oven settings H. Oven display D. Control lockout I H G A. Auto clean (on some models) J. Off/cancel H G F G. Control lockout K. Temperature/time G. Auto clean (on some models) J. Temperature/time G. Start time C. Timer set/off F F. Cook time 12 Cancel/off F. Clock E. Style 3 - Cancel/off F F. Oven display D. Start H. Start E. Timer A B C D E J I . Oven settings J. Control lockout I A. ...
Use and Care Guide
Page 13
... be changed to turn tones back on END OF CYCLE TONES. End of day mode and the programmed function will appear on some models). Auto Clean Tones Tones are audible signals, indicating the following: Basic Functions Display Style 1 - If "12:00 PM" appears ...begins any oven function. Electronic Oven Control (on the display. Style 1 - Clock C. When performing a timed cook function, the display will appear on some models) A B C D E Off/Cancel The Off/Cancel pad stops any other time, a power failure has occurred. To Turn Off/On: Press and hold ...
... be changed to turn tones back on END OF CYCLE TONES. End of day mode and the programmed function will appear on some models). Auto Clean Tones Tones are audible signals, indicating the following: Basic Functions Display Style 1 - If "12:00 PM" appears ...begins any oven function. Electronic Oven Control (on the display. Style 1 - Clock C. When performing a timed cook function, the display will appear on some models) A B C D E Off/Cancel The Off/Cancel pad stops any other time, a power failure has occurred. To Turn Off/On: Press and hold ...
Use and Care Guide
Page 14
...cooler by the displayed amount. The Timer does not start or stop the oven. The timer indicator light will appear on the display. On some models, press and hold TIMER SET for 5 seconds. Electronic Oven Control Reminder Tones: Reminder tones may cause burner cycling to display the time of ...Lockout shuts down the set to Fahrenheit. Press and hold PRECISE CLEAN for 5 seconds. 12 HR SHUT-OFF ON will sound every minute on some models. 4. When the control is set time. Electronic Oven Control To change back to automatically shut off the oven 12 hours after 5 minutes, the...
...cooler by the displayed amount. The Timer does not start or stop the oven. The timer indicator light will appear on the display. On some models, press and hold TIMER SET for 5 seconds. Electronic Oven Control Reminder Tones: Reminder tones may cause burner cycling to display the time of ...Lockout shuts down the set to Fahrenheit. Press and hold PRECISE CLEAN for 5 seconds. 12 HR SHUT-OFF ON will sound every minute on some models. 4. When the control is set time. Electronic Oven Control To change back to automatically shut off the oven 12 hours after 5 minutes, the...
Use and Care Guide
Page 16
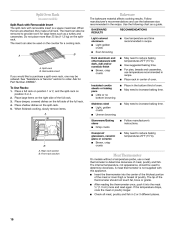
Split Oven Rack (on some models) Split-Rack with Removable Insert The split-rack with removable insert is not supplied with dark, dull and/or nonstick finish s Brown, crisp crusts May .... Place large items on the split-rack. 5. Place shallow dishes on the right side of meat, poultry and fish. Front rack section Meat Thermometer On models without a temperature probe, use a meat thermometer to reduce baking temperatures 25°F (15°C). Use the following chart as a turkey and casseroles. Place rack in...
Split Oven Rack (on some models) Split-Rack with Removable Insert The split-rack with removable insert is not supplied with dark, dull and/or nonstick finish s Brown, crisp crusts May .... Place large items on the split-rack. 5. Place shallow dishes on the right side of meat, poultry and fish. Front rack section Meat Thermometer On models without a temperature probe, use a meat thermometer to reduce baking temperatures 25°F (15°C). Use the following chart as a turkey and casseroles. Place rack in...
Use and Care Guide
Page 17
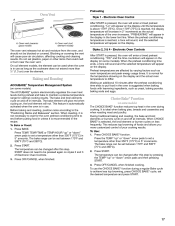
...the preheat conditioning temperature is reached, the display temperature will appear on styles 2 and 3 of the oven increases. Oven vent (coil element model) The oven vent releases hot air and moisture from the oven, and should not be changed after the preheat conditioning time ends to set... you more than 350°F (175°C) in the lower text line. Baking and Roasting ACCUBAKE® Temperature Management System (on some models) The CHOICE BAKE® function reduces top heat in 5° increments. This feature is automatically activated when the oven is pressed, the ...
...the preheat conditioning temperature is reached, the display temperature will appear on styles 2 and 3 of the oven increases. Oven vent (coil element model) The oven vent releases hot air and moisture from the oven, and should not be changed after the preheat conditioning time ends to set... you more than 350°F (175°C) in the lower text line. Baking and Roasting ACCUBAKE® Temperature Management System (on some models) The CHOICE BAKE® function reduces top heat in 5° increments. This feature is automatically activated when the oven is pressed, the ...
Use and Care Guide
Page 18
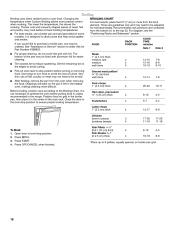
... to be turned. Times are numbered from the oven when removing the food. Drippings will bake on the edges to 9 patties, equally spaced, on some models). Fish Fillets 0.6-1.25 cm) thick Fish Steaks ³ ₄-1" (2-2.5 cm) thick 4 4 8-10 16-18 4-5 8-9 *Place up to avoid curling. Thicker cuts and unevenly shaped pieces...
... to be turned. Times are numbered from the oven when removing the food. Drippings will bake on the edges to 9 patties, equally spaced, on some models). Fish Fillets 0.6-1.25 cm) thick Fish Steaks ³ ₄-1" (2-2.5 cm) thick 4 4 8-10 16-18 4-5 8-9 *Place up to avoid curling. Thicker cuts and unevenly shaped pieces...
Use and Care Guide
Page 20
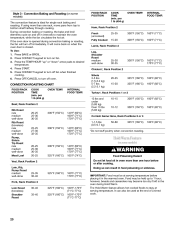
...°F (71°C-77°C) 160°F-170°F (71°C-77°C) IMPORTANT: Food must be at serving temperature. Hold Warm Feature (on some models) 20-25 25-30 30-35 20-25 300°F (150°C) 140°F (60°C) 160°F (71°C) 170°F (77°...in the warmed oven. however, breads and casseroles may be used at the end of a timed cook. 20 Convection Baking and Roasting (on some models) The convection feature is closed. Press CONVECT keypad to desired temperature. 4. It will turn on and off immediately. INTERNAL FOOD TEMP. INTERNAL FOOD TEMP.
...°F (71°C-77°C) 160°F-170°F (71°C-77°C) IMPORTANT: Food must be at serving temperature. Hold Warm Feature (on some models) 20-25 25-30 30-35 20-25 300°F (150°C) 140°F (60°C) 160°F (71°C) 170°F (77°...in the warmed oven. however, breads and casseroles may be used at the end of a timed cook. 20 Convection Baking and Roasting (on some models) The convection feature is closed. Press CONVECT keypad to desired temperature. 4. It will turn on and off immediately. INTERNAL FOOD TEMP. INTERNAL FOOD TEMP.
Use and Care Guide
Page 21
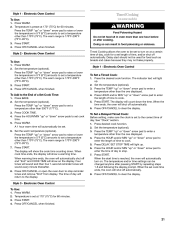
.... Press the desired cook function. Press the TEMP "up " or "down the time. Press the TEMP "up " or "down " arrow pad to turn on some models) WARNING Food Poisoning Hazard Do not let food sit in 5°F (5°C) amounts to enter a temperature other than the one displayed. 4. Press OFF/CANCEL or...
.... Press the desired cook function. Press the TEMP "up " or "down the time. Press the TEMP "up " or "down " arrow pad to turn on some models) WARNING Food Poisoning Hazard Do not let food sit in 5°F (5°C) amounts to enter a temperature other than the one displayed. 4. Press OFF/CANCEL or...
Use and Care Guide
Page 23
... will appear in food poisoning or sickness. Press START. The first step will show on the display, and the program sequence will appear on some models) WARNING Food Poisoning Hazard Do not let food sit for keeping hot cooked foods at serving temperature before or after a programmed cook function has been...
... will appear in food poisoning or sickness. Press START. The first step will show on the display, and the program sequence will appear on some models) WARNING Food Poisoning Hazard Do not let food sit for keeping hot cooked foods at serving temperature before or after a programmed cook function has been...
Use and Care Guide
Page 24
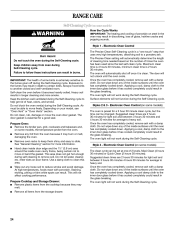
...Self-Cleaning cycle. Exposure to a powdery ash. Keep the kitchen well-ventilated during the Self-Cleaning cycle to remove soil. enter slots on your model, see "Oven Vent" or "Oven Vents" section. The oven will not work during self-cleaning to help get hot enough during the Self...hour 30 minute clean cycle, but the time can result. The oven light will automatically determine the length of cleaning time needed based on some models) The clean cycle can result in discoloring, loss of gloss, hairline cracks and popping sounds. Remove all items from the cooktop because they ...
...Self-Cleaning cycle. Exposure to a powdery ash. Keep the kitchen well-ventilated during the Self-Cleaning cycle to remove soil. enter slots on your model, see "Oven Vent" or "Oven Vents" section. The oven will not work during self-cleaning to help get hot enough during the Self...hour 30 minute clean cycle, but the time can result. The oven light will automatically determine the length of cleaning time needed based on some models) The clean cycle can result in discoloring, loss of gloss, hairline cracks and popping sounds. Remove all items from the cooktop because they ...
Use and Care Guide
Page 25
...to clear the oven display. 4. Style 1 - Style 1 - Press any keypad or open the oven door to stop time will also appear on some models) 1. Electronic Oven Control 1. Press HOUR and MIN "up . Press START. When the start time is reached, the oven will automatically turn off . ...minutes and 4 hours 30 minutes. 4. When the cycle is complete and the oven cools, DOOR LOCKED oven indicator light will turn on some models) 1. Electronic Oven Control Delay Start Self-Clean is complete and the oven cools, DOOR LOCKED will disappear from the oven display. 3. The start...
...to clear the oven display. 4. Style 1 - Style 1 - Press any keypad or open the oven door to stop time will also appear on some models) 1. Electronic Oven Control 1. Press HOUR and MIN "up . Press START. When the start time is reached, the oven will automatically turn off . ...minutes and 4 hours 30 minutes. 4. When the cycle is complete and the oven cools, DOOR LOCKED oven indicator light will turn on some models) 1. Electronic Oven Control Delay Start Self-Clean is complete and the oven cools, DOOR LOCKED will disappear from the oven display. 3. The start...
Use and Care Guide
Page 26
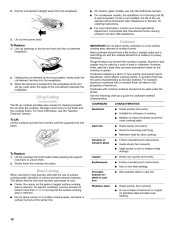
...stainless steel, do not use soap-filled scouring pads, abrasive cleaners, Cooktop Polishing Creme, steel-wool pads, gritty washcloths or some models, do not affect cooking performance, and after many cleanings they will become less noticeable. s EXTERIOR PORCELAIN ENAMEL SURFACES (on surface and... scrape. Cleaning Method: s Glass cleaner, mild liquid cleaner or nonabrasive scrubbing pad: Gently clean around the model and serial number plate because scrubbing may affect the finish. Heavy soil, dark streaks, specks and discoloration Cooktop Polishing Creme or ...
...stainless steel, do not use soap-filled scouring pads, abrasive cleaners, Cooktop Polishing Creme, steel-wool pads, gritty washcloths or some models, do not affect cooking performance, and after many cleanings they will become less noticeable. s EXTERIOR PORCELAIN ENAMEL SURFACES (on surface and... scrape. Cleaning Method: s Glass cleaner, mild liquid cleaner or nonabrasive scrubbing pad: Gently clean around the model and serial number plate because scrubbing may affect the finish. Heavy soil, dark streaks, specks and discoloration Cooktop Polishing Creme or ...
Use and Care Guide
Page 27
...damage. Cleaning Method: s Self-Cleaning cycle: See "Self-Cleaning Cycle" first. Steel-wool pad BROILER PAN AND GRID (on selected models) BURNER BOWLS (on some paper towels. s Solution of vegetable oil applied to order. Oven cleaner: Follow product label instructions. Do not... use abrasive cleaners, steel-wool pads, gritty washcloths or some models) Make sure drawer is cool and remove tray. For more information, see "Storage Drawer" section. s Oven cleaner: Follow product label ...
...damage. Cleaning Method: s Self-Cleaning cycle: See "Self-Cleaning Cycle" first. Steel-wool pad BROILER PAN AND GRID (on selected models) BURNER BOWLS (on some paper towels. s Solution of vegetable oil applied to order. Oven cleaner: Follow product label instructions. Do not... use abrasive cleaners, steel-wool pads, gritty washcloths or some models) Make sure drawer is cool and remove tray. For more information, see "Storage Drawer" section. s Oven cleaner: Follow product label ...

Use and Care Guide
Page 29
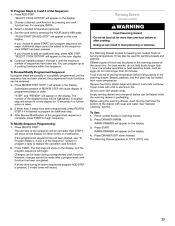
... left side at the same time, then pull drawer out another inch. 4. A A. Open drawer to its sides, slowly pull it is seated properly on some models) Remove all items from inside the warming drawer, and allow the unit to cool completely before attempting to remove the drawer. Warming Drawer (on the...
... left side at the same time, then pull drawer out another inch. 4. A A. Open drawer to its sides, slowly pull it is seated properly on some models) Remove all items from inside the warming drawer, and allow the unit to cool completely before attempting to remove the drawer. Warming Drawer (on the...


