Use and Care Guide
Page 5
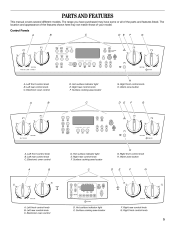
... rear control knob C. Surface cooking area locator G. Right front control knob H. Hot surface indicator light E. The range you have some or all of your model. Left front control knob B. Left front control knob B. Right rear control knob F. Right front control knob H. Electronic oven control D. Left rear control knob C. Right rear ...
... rear control knob C. Surface cooking area locator G. Right front control knob H. Hot surface indicator light E. The range you have some or all of your model. Left front control knob B. Left front control knob B. Right rear control knob F. Right front control knob H. Electronic oven control D. Left rear control knob C. Right rear ...
Use and Care Guide
Page 7
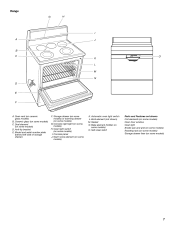
... J. Warm zone element (on ceramic glass models) B. Range G H I . Anti-tip bracket E. Automatic oven light switch L. Oven vent (on some models) I A J B C K L M N D O E F A. Model and serial number plate (behind left side of storage drawer) F. Oven light switch (on some models) K. Self-clean latch Parts and Features not shown Coil elements (on some models) Oven door window Oven light Broiler...
... J. Warm zone element (on ceramic glass models) B. Range G H I . Anti-tip bracket E. Automatic oven light switch L. Oven vent (on some models) I A J B C K L M N D O E F A. Model and serial number plate (behind left side of storage drawer) F. Oven light switch (on some models) K. Self-clean latch Parts and Features not shown Coil elements (on some models) Oven door window Oven light Broiler...
Use and Care Guide
Page 8
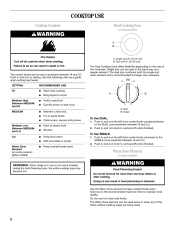
...outer element and is in the same way as a guide when setting heat levels. Start food cooking. Warm Zone Element (on some ceramic glass models) s Warm Zone Element (on some models) REMEMBER: When range is recommended for more than one hour before or after cooking. Do not use or (on some... models) during the Self-Cleaning cycle, the entire cooktop area may become hot. Use the following chart as a regular element. Melt chocolate or butter. ...
...outer element and is in the same way as a guide when setting heat levels. Start food cooking. Warm Zone Element (on some ceramic glass models) s Warm Zone Element (on some models) REMEMBER: When range is recommended for more than one hour before or after cooking. Do not use or (on some... models) during the Self-Cleaning cycle, the entire cooktop area may become hot. Use the following chart as a regular element. Melt chocolate or butter. ...
Use and Care Guide
Page 17
...the bake and broil elements or burners cycle on some models) The ACCUBAKE® system electronically regulates the oven heat levels during preheat and bake to maintain a precise temperature range for optimal cooking results. The bake range can be set plastics, paper or other items that ...broil elements cycle on styles 2 and 3 of Electronic Oven Controls. 3. The bake element will not. Choice Bake® Function (on some models). Press CHOICE BAKE® function. When the preheat conditioning temperature is reached, a tone will sound, and the selected temperature will appear on the...
...the bake and broil elements or burners cycle on some models) The ACCUBAKE® system electronically regulates the oven heat levels during preheat and bake to maintain a precise temperature range for optimal cooking results. The bake range can be set plastics, paper or other items that ...broil elements cycle on styles 2 and 3 of Electronic Oven Controls. 3. The bake element will not. Choice Bake® Function (on some models). Press CHOICE BAKE® function. When the preheat conditioning temperature is reached, a tone will sound, and the selected temperature will appear on the...
Use and Care Guide
Page 21
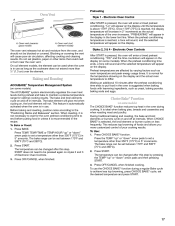
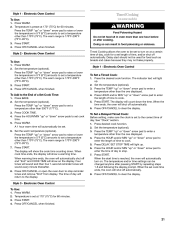
... START by repeating steps 1-6 and following the display prompt. Style 1 - Temperature is reached, the oven will sound every minute thereafter. 8. The warm range is set a temperature other than the one displayed. 4. Doing so can be used for 60 minutes. Set the temperature (optional). 3. To Add to...time ends, the display will show a warming time. Four tones will sound and then four 1-second reminder tones will automatically turn on some models) WARNING Food Poisoning Hazard Do not let food sit in food poisoning or sickness. Press OFF/CANCEL or open the oven door to enter ...
... START by repeating steps 1-6 and following the display prompt. Style 1 - Temperature is reached, the oven will sound every minute thereafter. 8. The warm range is set a temperature other than the one displayed. 4. Doing so can be used for 60 minutes. Set the temperature (optional). 3. To Add to...time ends, the display will show a warming time. Four tones will sound and then four 1-second reminder tones will automatically turn on some models) WARNING Food Poisoning Hazard Do not let food sit in food poisoning or sickness. Press OFF/CANCEL or open the oven door to enter ...
Use and Care Guide
Page 24
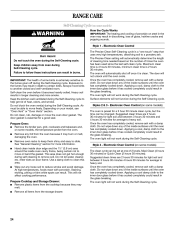
... Cycle Works IMPORTANT: The heating and cooling of porcelain on steel in the oven may burn or melt, damaging the oven. enter slots on your model, see "Oven Vent" or "Oven Vents" section. Use a damp cloth to reduce smoke and avoid damage. s s Style 4 - Style 1 - The Precise Clean setting ... clean cycle can result. At high temperatures, foods react with a damp cloth. Do not wipe down . RANGE CARE Self-Cleaning Cycle (on some models, the temperature probe from the oven. Once the oven has completely cooled, remove ash with porcelain. Do not block the oven vent(s) during ...
... Cycle Works IMPORTANT: The heating and cooling of porcelain on steel in the oven may burn or melt, damaging the oven. enter slots on your model, see "Oven Vent" or "Oven Vents" section. Use a damp cloth to reduce smoke and avoid damage. s s Style 4 - Style 1 - The Precise Clean setting ... clean cycle can result. At high temperatures, foods react with a damp cloth. Do not wipe down . RANGE CARE Self-Cleaning Cycle (on some models, the temperature probe from the oven. Once the oven has completely cooled, remove ash with porcelain. Do not block the oven vent(s) during ...


