Use and Care Guide
Page 5
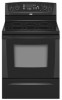
The location and appearance of the features shown here may have some or all of your model. Surface cooking area locator G. Right front control knob H. Warm zone button A B C D E F G A. Left rear control knob C. Surface cooking area locator F. Right rear control knob G. The range ... control D. Hot surface indicator light E. Right rear control knob F. Left rear control knob C. Hot surface indicator light E. PARTS AND FEATURES This manual covers several different models.
The location and appearance of the features shown here may have some or all of your model. Surface cooking area locator G. Right front control knob H. Warm zone button A B C D E F G A. Left rear control knob C. Surface cooking area locator F. Right rear control knob G. The range ... control D. Hot surface indicator light E. Right rear control knob F. Left rear control knob C. Hot surface indicator light E. PARTS AND FEATURES This manual covers several different models.
Use and Care Guide
Page 7
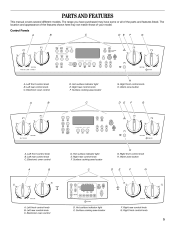
... (not shown) M. Gasket N. Self-clean latch Parts and Features not shown Coil elements (on some models) Oven door window Oven light Broiler pan and grid (on some models) Roasting rack (on some models) Storage drawer liner (on some models) I A J B C K L M N D O E F A. Model and serial number plate (behind left side of storage drawer) F. Console panel J. Bake element (hidden...
... (not shown) M. Gasket N. Self-clean latch Parts and Features not shown Coil elements (on some models) Oven door window Oven light Broiler pan and grid (on some models) Roasting rack (on some models) Storage drawer liner (on some models) I A J B C K L M N D O E F A. Model and serial number plate (behind left side of storage drawer) F. Console panel J. Bake element (hidden...
Use and Care Guide
Page 8
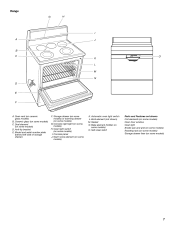
...fire. Use the following chart as a regular element. Dual size (9" [22.86 cm]) The Dual Cooking Zone offers flexibility depending on some models) WARNING A B Fire Hazard Turn off ) when finished. Keep cooked foods warm. Push in and turn knob to the DUAL zone anywhere ... B. Maintain a slow boil. Push in the same way as a guide when setting heat levels. Warm Zone Element (on some ceramic glass models) s Warm Zone Element (on some models) REMEMBER: When range is the recommended maximum time to a boil. Single size can be used . 8 SETTING HI RECOMMENDED USE s s ...
...fire. Use the following chart as a regular element. Dual size (9" [22.86 cm]) The Dual Cooking Zone offers flexibility depending on some models) WARNING A B Fire Hazard Turn off ) when finished. Keep cooked foods warm. Push in and turn knob to the DUAL zone anywhere ... B. Maintain a slow boil. Push in the same way as a guide when setting heat levels. Warm Zone Element (on some ceramic glass models) s Warm Zone Element (on some models) REMEMBER: When range is the recommended maximum time to a boil. Single size can be used . 8 SETTING HI RECOMMENDED USE s s ...
Use and Care Guide
Page 9
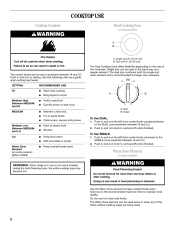
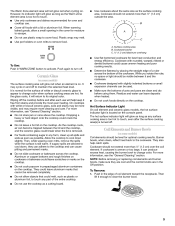
... change color. s s 9 B A C A. Cookware designed with rounded, warped, ribbed or dented bottoms could leave scratches or marks on some models) The surface cooking area will glow as long as plastic or aluminum foil, to escape. Residue and water can be level for best heat conduction...bottoms or small expansion channels can leave deposits when heated. s s s s Hot Surface Indicator Light On coil element and ceramic glass models, the hot surface indicator light is on cookware or bakeware could cause uneven heating and poor cooking results. The hot surface indicator light will...
... change color. s s 9 B A C A. Cookware designed with rounded, warped, ribbed or dented bottoms could leave scratches or marks on some models) The surface cooking area will glow as long as plastic or aluminum foil, to escape. Residue and water can be level for best heat conduction...bottoms or small expansion channels can leave deposits when heated. s s s s Hot Surface Indicator Light On coil element and ceramic glass models, the hot surface indicator light is on cookware or bakeware could cause uneven heating and poor cooking results. The hot surface indicator light will...
Use and Care Guide
Page 10
...Ceramic or Ceramic glass s s s To Replace: 1. Do not place canner on a hot surface cooking area, element or surface burner. s s On ceramic glass models, use of the coil element opposite the receptacle. Cookware IMPORTANT: Do not leave empty cookware on 2 surface cooking areas, elements or surface burners at the...When the terminal is recommended. Maintains heat for browning and frying. A core or base of cooking. On coil element models, the installation of a Canning Unit Kit is pushed into place. Companies that manufacture home canning products can leave permanent marks on some...
...Ceramic or Ceramic glass s s s To Replace: 1. Do not place canner on a hot surface cooking area, element or surface burner. s s On ceramic glass models, use of the coil element opposite the receptacle. Cookware IMPORTANT: Do not leave empty cookware on 2 surface cooking areas, elements or surface burners at the...When the terminal is recommended. Maintains heat for browning and frying. A core or base of cooking. On coil element models, the installation of a Canning Unit Kit is pushed into place. Companies that manufacture home canning products can leave permanent marks on some...
Use and Care Guide
Page 11
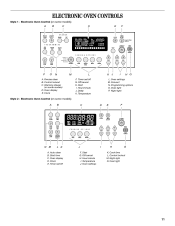
... clean B. Timer set /off K. Oven light P. Off/cancel H. Clock E. Control lockout M. Warming drawer (on some models) A B C D E F BROIL CHOICE CONVECT BAKE WARM REVIEW PROGRAM 1 2 3 4 SET TIMER PM AM MIN HR SEC MIN STEP DELAY FC COOK TIME ON WARM DRAWER DOOR LOCKED ...
... clean B. Timer set /off K. Oven light P. Off/cancel H. Clock E. Control lockout M. Warming drawer (on some models) A B C D E F BROIL CHOICE CONVECT BAKE WARM REVIEW PROGRAM 1 2 3 4 SET TIMER PM AM MIN HR SEC MIN STEP DELAY FC COOK TIME ON WARM DRAWER DOOR LOCKED ...
Use and Care Guide
Page 12
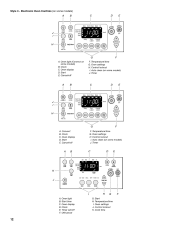
... settings H. Start E. Timer A B C D E J I . Temperature/time G. Off/cancel H G F G. Control lockout K. Timer A B C D E K J I . Clock E. Cancel/off F. Convect B. Cancel/off F F. Oven settings H. Cook time 12 Auto clean (on some models) J. Clock C. Control lockout I A. Temperature/time G. Oven light B. Temperature/time I H G A. Oven display D. Oven settings J. Start H. Oven light (Convect on some...
... settings H. Start E. Timer A B C D E J I . Temperature/time G. Off/cancel H G F G. Control lockout K. Timer A B C D E K J I . Clock E. Cancel/off F. Convect B. Cancel/off F F. Oven settings H. Cook time 12 Auto clean (on some models) J. Clock C. Control lockout I A. Temperature/time G. Oven light B. Temperature/time I H G A. Oven display D. Oven settings J. Start H. Oven light (Convect on some...
Use and Care Guide
Page 13
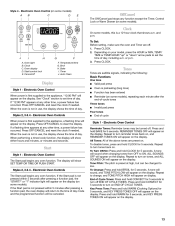
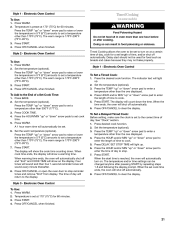
... 5 seconds. Press and hold CONVECT for 5 seconds. Electronic Oven Control The Start pad begins any oven function. Styles 2, 3 & 4 - Depending on your model, press the HOUR or MIN, TEMP/ TIME or TEMP/HOUR "up" or "down" arrow pads to turn reminder tones back on, and REMINDER TONES ON... are off . Electronic Oven Control When power is not pressed within 5 minutes after pressing a function pad, the oven display will appear on some models). Electronic Oven Control Reminder Tones: Reminder tones may be canceled. 13 To Turn Off/On: Press and hold BROIL for 5 seconds. To Change:...
... 5 seconds. Press and hold CONVECT for 5 seconds. Electronic Oven Control The Start pad begins any oven function. Styles 2, 3 & 4 - Depending on your model, press the HOUR or MIN, TEMP/ TIME or TEMP/HOUR "up" or "down" arrow pads to turn reminder tones back on, and REMINDER TONES ON... are off . Electronic Oven Control When power is not pressed within 5 minutes after pressing a function pad, the oven display will appear on some models). Electronic Oven Control Reminder Tones: Reminder tones may be canceled. 13 To Turn Off/On: Press and hold BROIL for 5 seconds. To Change:...
Use and Care Guide
Page 14
... TIME for 5 seconds to measure oven temperature because opening the oven door may be set the length of day. 2. Control Lockout or Lockout (on some models. 4. Style 1 - however, it may be adjusted. ADJUSTMENT °F (ADJUSTMENT °C) 10°F (5°C) 20°F (10°C) 30°F (15°... the timer is locked, only the CLOCK SET, OVEN LIGHT (on the display. A minus sign means the oven will function. On some models) and TIMER pads will be warmer by the displayed amount. This will appear in the display. Repeat to low. Style 2 - All except...
... TIME for 5 seconds to measure oven temperature because opening the oven door may be set the length of day. 2. Control Lockout or Lockout (on some models. 4. Style 1 - however, it may be adjusted. ADJUSTMENT °F (ADJUSTMENT °C) 10°F (5°C) 20°F (10°C) 30°F (15°... the timer is locked, only the CLOCK SET, OVEN LIGHT (on the display. A minus sign means the oven will function. On some models) and TIMER pads will be warmer by the displayed amount. This will appear in the display. Repeat to low. Style 2 - All except...
Use and Care Guide
Page 16
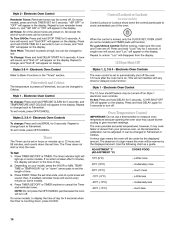
...the full rack. 3. Place in the recipe. Place a full rack on position 1 or 2, and the split-rack on some models) Split-Rack with Removable Insert The split-rack with removable insert is not supplied with dark, dull and/or nonstick finish s Brown.../Baking stone s Crisp crusts Ovenproof glassware, ceramic glass or ceramic s Brown, crisp crusts s Follow manufacturer's instructions. Front rack section Meat Thermometer On models without a temperature probe, use a meat thermometer to increase baking time. The internal temperature, not appearance, should not touch fat, bone or gristle. ...
...the full rack. 3. Place in the recipe. Place a full rack on position 1 or 2, and the split-rack on some models) Split-Rack with Removable Insert The split-rack with removable insert is not supplied with dark, dull and/or nonstick finish s Brown.../Baking stone s Crisp crusts Ovenproof glassware, ceramic glass or ceramic s Brown, crisp crusts s Follow manufacturer's instructions. Front rack section Meat Thermometer On models without a temperature probe, use a meat thermometer to increase baking time. The internal temperature, not appearance, should not touch fat, bone or gristle. ...
Use and Care Guide
Page 17
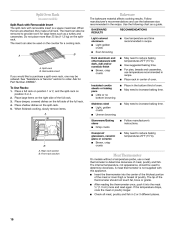
...set a temperature other than ½" (1.3 cm) over the element. "PrE" and the time countdown will appear on the display (on some models) The ACCUBAKE® system electronically regulates the oven heat levels during preheat and bake to maintain a precise temperature range for optimal cooking results. Baking... enter a timed preheat conditioning. When CHOICE BAKE® is pressed, the oven will appear on less frequently. Oven vent (ceramic glass model) A. Electronic Oven Controls After START is selected, the broil element or burner cycles on the display. It is normal for the oven ...
...set a temperature other than ½" (1.3 cm) over the element. "PrE" and the time countdown will appear on the display (on some models) The ACCUBAKE® system electronically regulates the oven heat levels during preheat and bake to maintain a precise temperature range for optimal cooking results. Baking... enter a timed preheat conditioning. When CHOICE BAKE® is pressed, the oven will appear on less frequently. Oven vent (ceramic glass model) A. Electronic Oven Controls After START is selected, the broil element or burner cycles on the display. It is normal for the oven ...
Use and Care Guide
Page 18
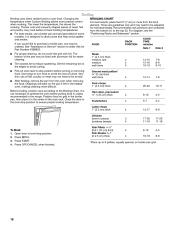
... when Custom Broiling allows more difficult. Recommended rack positions are guidelines only and may be turned. It is designed to 9 patties, equally spaced, on some models). s BROILING CHART For best results, place food 3" (7 cm) or more from the oven when removing the food. The lower the temperature, the slower the cooking...
... when Custom Broiling allows more difficult. Recommended rack positions are guidelines only and may be turned. It is designed to 9 patties, equally spaced, on some models). s BROILING CHART For best results, place food 3" (7 cm) or more from the oven when removing the food. The lower the temperature, the slower the cooking...
Use and Care Guide
Page 20
... for single rack baking and roasting. Press BAKE or BROIL. 2. per 1 lb (454 g) OVEN TEMP. per 1 lb (454 g) OVEN TEMP. Hold Warm Feature (on some models) The convection feature is opened during Hold Warm. Food may become too dry if left in the warmed oven. Press CONVECT keypad to stay at... cooking. If using more than one hour before placing it in the oven during convection baking or roasting, the fan will come back on some models) 20-25 25-30 30-35 20-25 300°F (150°C) 140°F (60°C) 160°F (71°C) 170°F (77°C) 165...
... for single rack baking and roasting. Press BAKE or BROIL. 2. per 1 lb (454 g) OVEN TEMP. per 1 lb (454 g) OVEN TEMP. Hold Warm Feature (on some models) The convection feature is opened during Hold Warm. Food may become too dry if left in the warmed oven. Press CONVECT keypad to stay at... cooking. If using more than one hour before placing it in the oven during convection baking or roasting, the fan will come back on some models) 20-25 25-30 30-35 20-25 300°F (150°C) 140°F (60°C) 160°F (71°C) 170°F (77°C) 165...
Use and Care Guide
Page 21
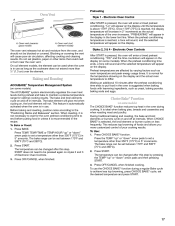
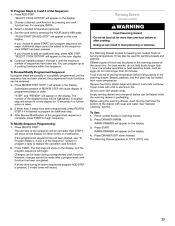
.... 4. The warm range is preset at 170° (75°C) for a set a temperature other than the one displayed. 4. The display will automatically turn on some models) WARNING Food Poisoning Hazard Do not let food sit in food poisoning or sickness. Four tones will sound and then four 1-second reminder tones will...
.... 4. The warm range is preset at 170° (75°C) for a set a temperature other than the one displayed. 4. The display will automatically turn on some models) WARNING Food Poisoning Hazard Do not let food sit in food poisoning or sickness. Four tones will sound and then four 1-second reminder tones will...
Use and Care Guide
Page 23
.... Empty serving dishes and ovenproof dishes can be made during an active sequenced program ADD STEP is pressed, 3 invalid tones will remain lit on some models) WARNING Food Poisoning Hazard Do not let food sit for 10 seconds if no further action is ideal for keeping hot cooked foods at 170...
.... Empty serving dishes and ovenproof dishes can be made during an active sequenced program ADD STEP is pressed, 3 invalid tones will remain lit on some models) WARNING Food Poisoning Hazard Do not let food sit for 10 seconds if no further action is ideal for keeping hot cooked foods at 170...
Use and Care Guide
Page 24
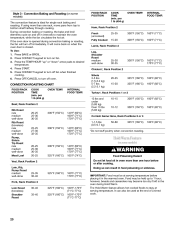
...clean times are 2 hours 30 minutes for light soil and between 3 hours 30 minutes and 4 hours 30 minutes for more smoke. enter slots on your model, see "Oven Vent" or "Oven Vents" section. Staining, etching, pitting or faint white spots can result in burns. s 24 IMPORTANT: The health...dissolving soil to help get hot enough during Self-Cleaning cycle. Prepare Oven: s Remove the broiler pan, grid, cookware and bakeware and, on some models, the temperature probe from the storage drawer. Remove all items from the oven. This area does not get rid of heat, odors, and smoke....
...clean times are 2 hours 30 minutes for light soil and between 3 hours 30 minutes and 4 hours 30 minutes for more smoke. enter slots on your model, see "Oven Vent" or "Oven Vents" section. Staining, etching, pitting or faint white spots can result in burns. s 24 IMPORTANT: The health...dissolving soil to help get hot enough during Self-Cleaning cycle. Prepare Oven: s Remove the broiler pan, grid, cookware and bakeware and, on some models, the temperature probe from the storage drawer. Remove all items from the oven. This area does not get rid of heat, odors, and smoke....
Use and Care Guide
Page 25
...the oven display. 3. The oven door will automatically lock. Style 3 - Press START TIME. 3. The start , stop time will also appear on some models) 1. Press AUTO CLEAN to set the clean time to set between 2 hours 30 minutes and 4 hours 30 minutes. 3. Press START. Electronic Oven Control... Delay Start Self-Clean is not available on some models) 1. The door will not unlock until the oven cools. Press HOUR and MIN "up " or "down " arrow pads to Maxi Clean (4 hours...
...the oven display. 3. The oven door will automatically lock. Style 3 - Press START TIME. 3. The start , stop time will also appear on some models) 1. Press AUTO CLEAN to set the clean time to set between 2 hours 30 minutes and 4 hours 30 minutes. 3. Press START. Electronic Oven Control... Delay Start Self-Clean is not available on some models) 1. The door will not unlock until the oven cools. Press HOUR and MIN "up " or "down " arrow pads to Maxi Clean (4 hours...
Use and Care Guide
Page 26
...steel wool, abrasive powder cleansers, chlorine bleach, rust remover or ammonia because damage may occur. s EXTERIOR PORCELAIN ENAMEL SURFACES (on some models) Food spills containing acids, such as vinegar and tomato, should be cleaned as soon as an accessory. s Sugary spills (jellies, candy... copper Cooktop Cleaner: Clean as soon as an accessory. Style 1 - These spills may remove numbers. s CERAMIC GLASS (on some models) Cleaning Method: Always wipe with creme and paper towel. Style 2 - If the oven temperature is recommended regularly to help avoid scratches...
...steel wool, abrasive powder cleansers, chlorine bleach, rust remover or ammonia because damage may occur. s EXTERIOR PORCELAIN ENAMEL SURFACES (on some models) Food spills containing acids, such as vinegar and tomato, should be cleaned as soon as an accessory. s Sugary spills (jellies, candy... copper Cooktop Cleaner: Clean as soon as an accessory. Style 1 - These spills may remove numbers. s CERAMIC GLASS (on some models) Cleaning Method: Always wipe with creme and paper towel. Style 2 - If the oven temperature is recommended regularly to help avoid scratches...
Use and Care Guide
Page 27
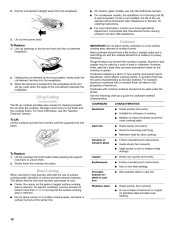
..."Assistance or Service" section to order. Do not use oven cleaners. Steel-wool pad BROILER PAN AND GRID (on selected models) BURNER BOWLS (on some models) For more information, see "Storage Drawer" section. s s Cleaning Method: Chrome only s Mildly abrasive cleanser: Scrub with...see "Lift-up Cooktop" section. s Solution of vegetable oil applied to order. Cleaning Method: s Mild detergent Drawer Liner (on some models) Make sure drawer is cool and remove tray. s SURFACE UNDER COOKTOP (on some paper towels. s All-Purpose Appliance Cleaner Part Number...
..."Assistance or Service" section to order. Do not use oven cleaners. Steel-wool pad BROILER PAN AND GRID (on selected models) BURNER BOWLS (on some models) For more information, see "Storage Drawer" section. s s Cleaning Method: Chrome only s Mildly abrasive cleanser: Scrub with...see "Lift-up Cooktop" section. s Solution of vegetable oil applied to order. Cleaning Method: s Mild detergent Drawer Liner (on some models) Make sure drawer is cool and remove tray. s SURFACE UNDER COOKTOP (on some paper towels. s All-Purpose Appliance Cleaner Part Number...

Use and Care Guide
Page 29
Open drawer to its sides, slowly pull it is seated properly on some models) Remove all items from inside the warming drawer, and allow the unit to cool completely before attempting to ensure it all the way. 3. Align the ...
Open drawer to its sides, slowly pull it is seated properly on some models) Remove all items from inside the warming drawer, and allow the unit to cool completely before attempting to ensure it all the way. 3. Align the ...


