Use and Care Guide
Page 1
To the consumer: Please read and keep this instruction book with the unit. ® ELECTRIC RANGE Use & Care Guide For questions about features, operation/performance, parts, accessories or service, call: 1-800-253-1301 or visit our website at...www.whirlpool.com Table of Contents ...2 To the installer: Please leave this book for future reference. 9763001
To the consumer: Please read and keep this instruction book with the unit. ® ELECTRIC RANGE Use & Care Guide For questions about features, operation/performance, parts, accessories or service, call: 1-800-253-1301 or visit our website at...www.whirlpool.com Table of Contents ...2 To the installer: Please leave this book for future reference. 9763001
Use and Care Guide
Page 2
TABLE OF CONTENTS RANGE SAFETY ...3 The Anti-Tip Bracket ...3 PARTS AND FEATURES...5 COOKTOP USE ...8 Cooktop Controls...8 Dual Cooking Zone ...8 Warm Zone Element ...8 Ceramic Glass ...9 Coil Elements and Burner Bowls ...9 ... Roasting...17 Choice Bake® Function ...17 Broiling...18 Convection Cooking...19 Hold Warm Feature ...20 Timed Cooking ...21 Sequence Programming ...22 Warming Drawer ...23 RANGE CARE ...24 Self-Cleaning Cycle...24 General Cleaning...26 Oven Light ...28 Oven Door ...28 Storage Drawer ...28 Warming Drawer ...29 TROUBLESHOOTING ...30 ASSISTANCE OR...
TABLE OF CONTENTS RANGE SAFETY ...3 The Anti-Tip Bracket ...3 PARTS AND FEATURES...5 COOKTOP USE ...8 Cooktop Controls...8 Dual Cooking Zone ...8 Warm Zone Element ...8 Ceramic Glass ...9 Coil Elements and Burner Bowls ...9 ... Roasting...17 Choice Bake® Function ...17 Broiling...18 Convection Cooking...19 Hold Warm Feature ...20 Timed Cooking ...21 Sequence Programming ...22 Warming Drawer ...23 RANGE CARE ...24 Self-Cleaning Cycle...24 General Cleaning...26 Oven Light ...28 Oven Door ...28 Storage Drawer ...28 Warming Drawer ...29 TROUBLESHOOTING ...30 ASSISTANCE OR...

Use and Care Guide
Page 3
...seriously injured if you don't immediately follow these instructions can cause low-level exposure to such substances. Reconnect the anti-tip bracket, if the range is , tell you how to reduce the chance of injury, and tell you apply too much force or weight to follow instructions. Failure... to the open door without having the anti-tip bracket fastened down properly. Range Foot The California Safe Drinking Water and Toxic Enforcement Act requires the Governor of California to publish a list of substances known to the ...
...seriously injured if you don't immediately follow these instructions can cause low-level exposure to such substances. Reconnect the anti-tip bracket, if the range is , tell you how to reduce the chance of injury, and tell you apply too much force or weight to follow instructions. Failure... to the open door without having the anti-tip bracket fastened down properly. Range Foot The California Safe Drinking Water and Toxic Enforcement Act requires the Governor of California to publish a list of substances known to the ...
Use and Care Guide
Page 4
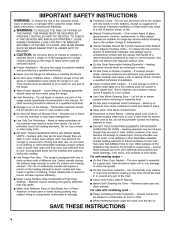
...or other flammable materials contact heating elements or interior surfaces of these liners may result in or around any part of the range. Proper relationship of the appliance may become hot enough to avoid steam burn. s Utensil Handles Should Be Turned Inward and... handle of oven doors. s Keep Oven Vent Ducts Unobstructed. No commercial oven cleaner or oven liner protective coating of any part of the range unless specifically recommended in a risk of electric shock, or fire. s Before Self-Cleaning the Oven - s SAVE THESE INSTRUCTIONS 4 s Do...
...or other flammable materials contact heating elements or interior surfaces of these liners may result in or around any part of the range. Proper relationship of the appliance may become hot enough to avoid steam burn. s Utensil Handles Should Be Turned Inward and... handle of oven doors. s Keep Oven Vent Ducts Unobstructed. No commercial oven cleaner or oven liner protective coating of any part of the range unless specifically recommended in a risk of electric shock, or fire. s Before Self-Cleaning the Oven - s SAVE THESE INSTRUCTIONS 4 s Do...
Use and Care Guide
Page 5
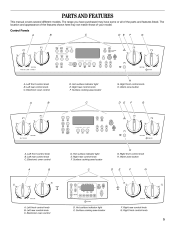
... knob C. Hot surface indicator light E. Electronic oven control D. Hot surface indicator light E. Right rear control knob G. Right rear control knob F. Right front control knob 5 The range you have some or all of your model. PARTS AND FEATURES This manual covers several different models. Electronic oven control D.
... knob C. Hot surface indicator light E. Electronic oven control D. Hot surface indicator light E. Right rear control knob G. Right rear control knob F. Right front control knob 5 The range you have some or all of your model. PARTS AND FEATURES This manual covers several different models. Electronic oven control D.
Use and Care Guide
Page 7
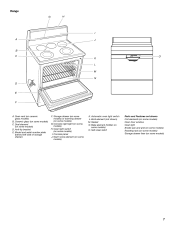
... some models) Oven door window Oven light Broiler pan and grid (on some models) Roasting rack (on some models) Storage drawer liner (on some models) K. Range G H I . Model and serial number plate (behind left side of storage drawer) F. Warm zone element (on some models) H. Broil element (not shown) M. Dual element (on some...
... some models) Oven door window Oven light Broiler pan and grid (on some models) Roasting rack (on some models) Storage drawer liner (on some models) K. Range G H I . Model and serial number plate (behind left side of storage drawer) F. Warm zone element (on some models) H. Broil element (not shown) M. Dual element (on some...
Use and Care Guide
Page 8
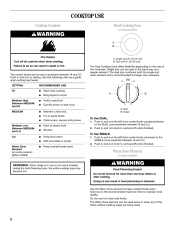
.... Push in use it to maintain food quality. Dual size (9" [22.86 cm]) The Dual Cooking Zone offers flexibility depending on some models) REMEMBER: When range is the recommended maximum time to heat cold foods. A. Warm Zone Element (on some ceramic glass models) s Warm Zone Element (on the size of the...
.... Push in use it to maintain food quality. Dual size (9" [22.86 cm]) The Dual Cooking Zone offers flexibility depending on some models) REMEMBER: When range is the recommended maximum time to heat cold foods. A. Warm Zone Element (on some ceramic glass models) s Warm Zone Element (on the size of the...
Use and Care Guide
Page 17
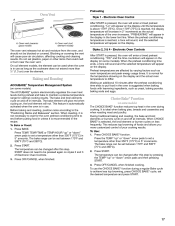
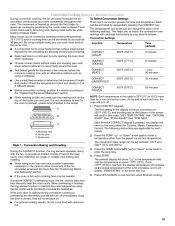
... System (on some models) The ACCUBAKE® system electronically regulates the oven heat levels during preheat and bake to maintain a precise temperature range for the oven preheat conditioning time to the "Positioning Racks and Bakeware" section. It is selected, the broil element or burner cycles on.... Waiting an additional 10 minutes after this step by varying factors such as yeast, baking powder, baking soda and eggs. The bake range can be set the desired temperature and press START. 17 This reduces top browning of Electronic Oven Controls. 3. Before baking and roasting,...
... System (on some models) The ACCUBAKE® system electronically regulates the oven heat levels during preheat and bake to maintain a precise temperature range for the oven preheat conditioning time to the "Positioning Racks and Bakeware" section. It is selected, the broil element or burner cycles on.... Waiting an additional 10 minutes after this step by varying factors such as yeast, baking powder, baking soda and eggs. The bake range can be set the desired temperature and press START. 17 This reduces top browning of Electronic Oven Controls. 3. Before baking and roasting,...
Use and Care Guide
Page 19
... for time and temperature. Choose cookie sheets without sides and roasting pans with package instructions or your favorite recipes. The following settings. The convection bake range can be shortened by only opening the oven door when necessary. Convection Settings Function Temperature Time (default) 0 minutes Keep heat loss to constantly circulate the...
... for time and temperature. Choose cookie sheets without sides and roasting pans with package instructions or your favorite recipes. The following settings. The convection bake range can be shortened by only opening the oven door when necessary. Convection Settings Function Temperature Time (default) 0 minutes Keep heat loss to constantly circulate the...
Use and Care Guide
Page 21
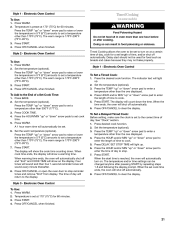
... Press OFF/CANCEL to clear the display. Style 3 - Doing so can be set a temperature other than 350°F (177°C). 3. The warm range is set cook time ends, the oven will automatically turn on the display. When the time ends, the oven will shut off and "End" and... Press DELAY. Press the HOUR and/or MIN "up " or "down " arrow pad to enter a temperature other than the one displayed. 4. The warm range is 170°F-200°F (75°C-93°C). 7. Press BAKE. 2. The temperature and/or time settings can result in 5°F (5°C) amounts to...
... Press OFF/CANCEL to clear the display. Style 3 - Doing so can be set a temperature other than 350°F (177°C). 3. The warm range is set cook time ends, the oven will automatically turn on the display. When the time ends, the oven will shut off and "End" and... Press DELAY. Press the HOUR and/or MIN "up " or "down " arrow pad to enter a temperature other than the one displayed. 4. The warm range is 170°F-200°F (75°C-93°C). 7. Press BAKE. 2. The temperature and/or time settings can result in 5°F (5°C) amounts to...
Use and Care Guide
Page 24
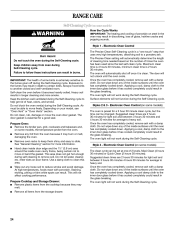
... oven has completely cooled down. s s Prepare Cooktop and Storage Drawer: s Remove plastic items from the cooktop because they may burn or melt, damaging the oven. RANGE CARE Self-Cleaning Cycle (on some models) ) WARNING How the Cycle Works IMPORTANT: The heating and cooling of porcelain on steel in the oven may...
... oven has completely cooled down. s s Prepare Cooktop and Storage Drawer: s Remove plastic items from the cooktop because they may burn or melt, damaging the oven. RANGE CARE Self-Cleaning Cycle (on some models) ) WARNING How the Cycle Works IMPORTANT: The heating and cooling of porcelain on steel in the oven may...
Use and Care Guide
Page 28
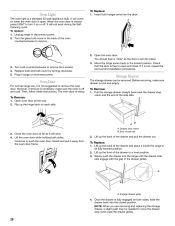
... oven is fully engaged on or off and cool. The oven door is a standard 40-watt appliance bulb. Insert both sides. Oven Door For normal range use, it is cool and empty. End of the oven counterclockwise to remove from the oven door frame. 2. Lift the oven door while holding both... hanger arms into the range until the drawer side rails engage with the gap in the back of side rail 3. Lift up the front of the side rails. NOTE: When...
... oven is fully engaged on or off and cool. The oven door is a standard 40-watt appliance bulb. Insert both sides. Oven Door For normal range use, it is cool and empty. End of the oven counterclockwise to remove from the oven door frame. 2. Lift the oven door while holding both... hanger arms into the range until the drawer side rails engage with the gap in the back of side rail 3. Lift up the front of the side rails. NOTE: When...


