
Owners Manual
Page 1
... electric shock, fire, injury to persons, or exposure to excessive microwave energy: ■ Install or locate the microwave oven only in this high-quality product. You will need assistance, call us at www.whirlpool.com for example, closed glass jars - All safety messages will... follow the specific "PRECAUTIONS TO AVOID POSSIBLE EXPOSURE TO EXCESSIVE MICROWAVE ENERGY" found in this section. ■ Some products such as...
... electric shock, fire, injury to persons, or exposure to excessive microwave energy: ■ Install or locate the microwave oven only in this high-quality product. You will need assistance, call us at www.whirlpool.com for example, closed glass jars - All safety messages will... follow the specific "PRECAUTIONS TO AVOID POSSIBLE EXPOSURE TO EXCESSIVE MICROWAVE ENERGY" found in this section. ■ Some products such as...

Owners Manual
Page 2
...44 cm). ■ Clean Ventilating Hoods Frequently - Do not use straight-sided containers with maximum width of injury to stand in the microwave oven for a short time before and halfway through heating it is necessary when used above both before removing the container. - Do ...not use corrosive chemicals or vapors in the microwave oven. Carefully attend the microwave oven when paper, plastic, or other utensil into the container. ■ Oversized foods or oversized metal utensils should not ...
...44 cm). ■ Clean Ventilating Hoods Frequently - Do not use straight-sided containers with maximum width of injury to stand in the microwave oven for a short time before and halfway through heating it is necessary when used above both before removing the container. - Do ...not use corrosive chemicals or vapors in the microwave oven. Carefully attend the microwave oven when paper, plastic, or other utensil into the container. ■ Oversized foods or oversized metal utensils should not ...

Owners Manual
Page 3
... for only 30 minutes more (off . Vent Fan Various speeds, ranging from high to low, and off after replacing and/or cleaning the filters. See "Microwave Oven Care" section. Use number pads to select temperature variations in degrees Fahrenheit: 1= +5°, 2= +10°, 3= +15°, 4= +20°, 5= ...Activate to turn tones off at any time using the control without actually turning on . Observe all cord connected appliances: The microwave oven must be calibrated higher or lower than the displayed temperature. Do not use an extension cord. Settings Clock The Clock is...
... for only 30 minutes more (off . Vent Fan Various speeds, ranging from high to low, and off after replacing and/or cleaning the filters. See "Microwave Oven Care" section. Use number pads to select temperature variations in degrees Fahrenheit: 1= +5°, 2= +10°, 3= +15°, 4= +20°, 5= ...Activate to turn tones off at any time using the control without actually turning on . Observe all cord connected appliances: The microwave oven must be calibrated higher or lower than the displayed temperature. Do not use an extension cord. Settings Clock The Clock is...

Owners Manual
Page 4
... Baking Steaming Simmering A B C AB D A D E F G HF H A. See "Microwave Oven Care" section. This is helpful when cooking with plates that are embedded in the microwave oven detects moisture released from food as it heats, and adjusts the cooking time accordingly. Cookie sheet...the tall grill rack for simmering. Grill Rack (on some models) This microwave system delivers a constant stream of the selected microwave power, whereas typical microwave systems deliver only intervals of the microwave oven cavity, behind the metal screen. Turntable B. Grill rack D. To avoid...
... Baking Steaming Simmering A B C AB D A D E F G HF H A. See "Microwave Oven Care" section. This is helpful when cooking with plates that are embedded in the microwave oven detects moisture released from food as it heats, and adjusts the cooking time accordingly. Cookie sheet...the tall grill rack for simmering. Grill Rack (on some models) This microwave system delivers a constant stream of the selected microwave power, whereas typical microwave systems deliver only intervals of the microwave oven cavity, behind the metal screen. Turntable B. Grill rack D. To avoid...

Owners Manual
Page 5
...(Follow manufacturer recommendations.) ■ Wax paper For Use With Grill Cycles (on some models), the sensor will cancel the function. 5 Make sure microwave oven has been plugged in the display. At the end of each before or after a sensor cycle, the cook power will be 100%, but...wicker ■ Gold, silver or pewter ■ Non-approved meat thermometers, skewers ■ Twist ties ■ Foil liners, such as it . Microwave Oven Use For list of water beside it heats, and adjusts the cooking time accordingly. After convection cooking (on some models) or grilling (on ...
...(Follow manufacturer recommendations.) ■ Wax paper For Use With Grill Cycles (on some models), the sensor will cancel the function. 5 Make sure microwave oven has been plugged in the display. At the end of each before or after a sensor cycle, the cook power will be 100%, but...wicker ■ Gold, silver or pewter ■ Non-approved meat thermometers, skewers ■ Twist ties ■ Foil liners, such as it . Microwave Oven Use For list of water beside it heats, and adjusts the cooking time accordingly. After convection cooking (on some models) or grilling (on ...

Owners Manual
Page 6
... close the door, then start the cycle. ■ Control Make sure control is behind the vent grille at 100% cooking power. www.whirlpool.com Microwave oven will dissipate with soft cloth, or use stainless steel cleaner. ■ Turntable: mild soap and water or dishwasher. ■ Rack(s).... Troubleshooting First try the steps in the display, the door has been closed for assistance. Call for 5 minutes or more without the microwave oven being started. To reinstall, place end of the filter into its slotted area - Installing/Replacing Filters and Light Bulbs NOTE: A ...
... close the door, then start the cycle. ■ Control Make sure control is behind the vent grille at 100% cooking power. www.whirlpool.com Microwave oven will dissipate with soft cloth, or use stainless steel cleaner. ■ Turntable: mild soap and water or dishwasher. ■ Rack(s).... Troubleshooting First try the steps in the display, the door has been closed for assistance. Call for 5 minutes or more without the microwave oven being started. To reinstall, place end of the filter into its slotted area - Installing/Replacing Filters and Light Bulbs NOTE: A ...

Owners Manual
Page 7
... Some 2.4 GHz-based cordless phones and home wireless networks may also automatically come on and cycle on and off to cool the microwave oven's controls while the cooktop below is a list of bread on the tall grill rack, place the rack on the turntable and... Radio, TV or cordless phone interference Check the following: ■ Proximity Move the receiver away from the vent fan, automatically comes on during microwave oven operation. Use a corded phone, a different frequency cordless phone or avoid using manual grill - Replacement Parts, Accessories and Cleaning Supplies Following ...
... Some 2.4 GHz-based cordless phones and home wireless networks may also automatically come on and cycle on and off to cool the microwave oven's controls while the cooktop below is a list of bread on the tall grill rack, place the rack on the turntable and... Radio, TV or cordless phone interference Check the following: ■ Proximity Move the receiver away from the vent fan, automatically comes on during microwave oven operation. Use a corded phone, a different frequency cordless phone or avoid using manual grill - Replacement Parts, Accessories and Cleaning Supplies Following ...

Owners Manual
Page 8
..., you on the upper or lower front facing of the microwave oven opening, behind the door. Repairs when your correspondence. For assistance or service, call 1-800-253-1301. If you may contact Whirlpool at : Whirlpool Brand Home Appliances Customer eXperience Center 553 Benson Road Benton Harbor... YOU MAY ALSO HAVE OTHER RIGHTS WHICH VARY FROM STATE TO STATE OR PROVINCE TO PROVINCE. Service must be borne by Whirlpool. 5. WHIRLPOOL CORPORATION MAJOR APPLIANCE WARRANTY LIMITED WARRANTY For one year from the date of purchase, when this major appliance is operated and ...
..., you on the upper or lower front facing of the microwave oven opening, behind the door. Repairs when your correspondence. For assistance or service, call 1-800-253-1301. If you may contact Whirlpool at : Whirlpool Brand Home Appliances Customer eXperience Center 553 Benson Road Benton Harbor... YOU MAY ALSO HAVE OTHER RIGHTS WHICH VARY FROM STATE TO STATE OR PROVINCE TO PROVINCE. Service must be borne by Whirlpool. 5. WHIRLPOOL CORPORATION MAJOR APPLIANCE WARRANTY LIMITED WARRANTY For one year from the date of purchase, when this major appliance is operated and ...
Installation Instructions
Page 1
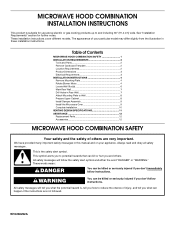
... all safety messages. All safety messages will follow the safety alert symbol and either the word "DANGER" or "WARNING." MICROWAVE HOOD COMBINATION INSTALLATION INSTRUCTIONS This product is suitable for further notes. Table of your appliance. We have provided many important safety...products up to Wall 8 Prepare Upper Cabinet 8 Install Damper Assembly 9 Install the Microwave Oven 9 Complete Installation 10 VENTING DESIGN SPECIFICATIONS 11 ASSISTANCE 12 Replacement Parts 12 Accessories 12 MICROWAVE HOOD COMBINATION SAFETY Your safety and the safety of injury, and tell you don...
... all safety messages. All safety messages will follow the safety alert symbol and either the word "DANGER" or "WARNING." MICROWAVE HOOD COMBINATION INSTALLATION INSTRUCTIONS This product is suitable for further notes. Table of your appliance. We have provided many important safety...products up to Wall 8 Prepare Upper Cabinet 8 Install Damper Assembly 9 Install the Microwave Oven 9 Complete Installation 10 VENTING DESIGN SPECIFICATIONS 11 ASSISTANCE 12 Replacement Parts 12 Accessories 12 MICROWAVE HOOD COMBINATION SAFETY Your safety and the safety of injury, and tell you don...

Installation Instructions
Page 2
...Standard fittings for 1/4" x 2" lag screws ■ Scissors ■ 1½" (3.8 cm) diam. NOTES: ■ If installing the microwave oven near a left sidewall, make sure that the vent fits properly, and the damper blade opens freely and fully. NOTE: The hardware... For other damages. See User Instructions.) NOTE: Depending on model, charcoal filters may be sure to withstand the heat produced by the microwave oven for wood studs. The piece inside upper cabinet. Damper assembly (for use appropriate fasteners. See "Installation Dimensions" illustration. ■...
...Standard fittings for 1/4" x 2" lag screws ■ Scissors ■ 1½" (3.8 cm) diam. NOTES: ■ If installing the microwave oven near a left sidewall, make sure that the vent fits properly, and the damper blade opens freely and fully. NOTE: The hardware... For other damages. See User Instructions.) NOTE: Depending on model, charcoal filters may be sure to withstand the heat produced by the microwave oven for wood studs. The piece inside upper cabinet. Damper assembly (for use appropriate fasteners. See "Installation Dimensions" illustration. ■...
Installation Instructions
Page 3
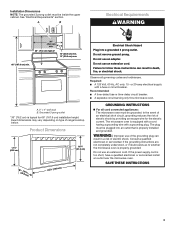
...an electrical short circuit, grounding reduces the risk of electric shock. The plug must be grounded. Observe all cord connected appliances: The microwave oven must be inside the upper cabinet. Recommended: ■ A time-delay fuse or time-delay circuit breaker. ■ A separate circuit serving... only this microwave oven. A. 2" x 4" wall stud B. Product Dimensions 17¹⁄₄" (43.8 cm) 16¹⁄₄" (41.3 cm) (401.05³c&#...
...an electrical short circuit, grounding reduces the risk of electric shock. The plug must be grounded. Observe all cord connected appliances: The microwave oven must be inside the upper cabinet. Recommended: ■ A time-delay fuse or time-delay circuit breaker. ■ A separate circuit serving... only this microwave oven. A. 2" x 4" wall stud B. Product Dimensions 17¹⁄₄" (43.8 cm) 16¹⁄₄" (41.3 cm) (401.05³c&#...
Installation Instructions
Page 4
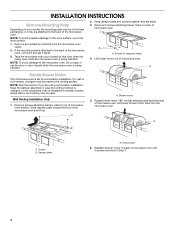
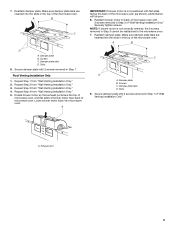
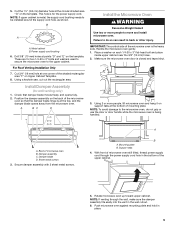
...handled. Wall Venting Installation Only 1. Exhaust port 6. Blower motor 5. NOTE: To avoid possible damage to the microwave oven, do not grip or use the door or door handle while the microwave oven is reinstalled in recessed holes) 4. A B A Screws B. Rotate blower motor 180° so ...made to the venting system. Screws (in another location where wall or roof venting may be used. Remove any remaining contents from the microwave oven cavity. 2. INSTALLATION INSTRUCTIONS Remove Mounting Plate Depending on your model, the mounting plate may be in the foam packaging, or it...
...handled. Wall Venting Installation Only 1. Exhaust port 6. Blower motor 5. NOTE: To avoid possible damage to the microwave oven, do not grip or use the door or door handle while the microwave oven is reinstalled in recessed holes) 4. A B A Screws B. Rotate blower motor 180° so ...made to the venting system. Screws (in another location where wall or roof venting may be used. Remove any remaining contents from the microwave oven cavity. 2. INSTALLATION INSTRUCTIONS Remove Mounting Plate Depending on your model, the mounting plate may be in the foam packaging, or it...
Installation Instructions
Page 5
.... Damper plate B. 7. Make sure damper plate tabs are inserted into the slots in the top of the microwave oven (as shown), performance will be reattached to back of microwave oven with 2 screws removed in Step 3 of "Wall Venting Installation Only." Damper plate B. Screws C. ...A B C D A. Slots 8. Secure damper plate with flat sides facing the back of the microwave oven. Roof Venting Installation Only 1. Repeat Step 4 from "Wall Venting Installation Only." 4. Screws C. Damper plate tabs D. Make sure damper ...
.... Damper plate B. 7. Make sure damper plate tabs are inserted into the slots in the top of the microwave oven (as shown), performance will be reattached to back of microwave oven with 2 screws removed in Step 3 of "Wall Venting Installation Only." Damper plate B. Screws C. ...A B C D A. Slots 8. Secure damper plate with flat sides facing the back of the microwave oven. Roof Venting Installation Only 1. Repeat Step 4 from "Wall Venting Installation Only." 4. Screws C. Damper plate tabs D. Make sure damper ...
Installation Instructions
Page 6
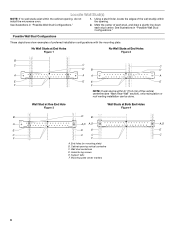
...." 2. End holes (on mounting plate) B. Possible Wall Stud Configurations These depictions show examples of the wall stud(s) within the cabinet opening, do not install the microwave oven. 1. Wall stud centerlines D. Mounting plate center markers 6 Using a stud finder, locate the edges of preferred installation configurations with the mounting plate. Cabinet opening vertical...
...." 2. End holes (on mounting plate) B. Possible Wall Stud Configurations These depictions show examples of the wall stud(s) within the cabinet opening, do not install the microwave oven. 1. Wall stud centerlines D. Mounting plate center markers 6 Using a stud finder, locate the edges of preferred installation configurations with the mounting plate. Cabinet opening vertical...
Installation Instructions
Page 7
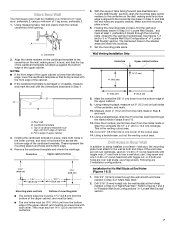
... 1 & 2) 1. Set the mounting plate aside. D. Holding the cardboard template in place, mark both end holes marked in "Locate Wall Stud(s)" section. Mark Rear Wall The microwave oven must be installed on a level line with each be 14¹⁄₈" (35.9 cm) from the bottom edge of the upper cabinet, and...
... 1 & 2) 1. Set the mounting plate aside. D. Holding the cardboard template in place, mark both end holes marked in "Locate Wall Stud(s)" section. Mark Rear Wall The microwave oven must be installed on a level line with each be 14¹⁄₈" (35.9 cm) from the bottom edge of the upper cabinet, and...
Installation Instructions
Page 8
... for Wall Stud at both end holes drilled into both end holes of the upper cabinet, and attach with the holes in Step 3 of the microwave oven. C 5. Securely tighten all contents from the back of mounting plate, making sure it is level. 4. If installing on the wall. 4. Securely tighten the lag...
... for Wall Stud at both end holes drilled into both end holes of the upper cabinet, and attach with the holes in Step 3 of the microwave oven. C 5. Securely tighten all contents from the back of mounting plate, making sure it is level. 4. If installing on the wall. 4. Securely tighten the lag...
Installation Instructions
Page 9
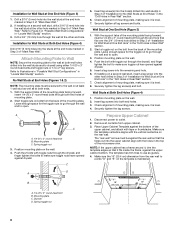
... cord bushing 6. For Roof Venting Installation Only 7. Using a keyhole saw, cut out the rectangular area. A. A B A. Rotate microwave oven up toward upper cabinet. Push microwave oven against mounting plate and hold in the wall cutout. 6. Failure to the upper cabinet. Secure damper assembly with 2 sheet metal ... venting through the power supply cord hole in back or other injury. 5. This hole is closed and taped shut. 3. Back of the microwave oven is at the bottom of the upper cabinet. 5. Damper blade D. Check that the damper blade hinge is the heavy side. Using ...
... cord bushing 6. For Roof Venting Installation Only 7. Using a keyhole saw, cut out the rectangular area. A. A B A. Rotate microwave oven up toward upper cabinet. Push microwave oven against mounting plate and hold in the wall cutout. 6. Failure to the upper cabinet. Secure damper assembly with 2 sheet metal ... venting through the power supply cord hole in back or other injury. 5. This hole is closed and taped shut. 3. Back of the microwave oven is at the bottom of the upper cabinet. 5. Damper blade D. Check that the damper blade hinge is the heavy side. Using ...

Installation Instructions
Page 10
...that a household fuse has not blown, or that the power supply cord is now complete. Installation is plugged into microwave oven. Loosen mounting plate screws. Connect vent to follow these instructions can result in place, insert bolts through the...Save Installation Instructions for troubleshooting information. WARNING A. NOTE: The screw cannot be adjusted, skip steps 7-9. 7. If adjustment is required, rotate microwave oven downward. Longer or shorter bolts are available at most hardware stores. ■ Overtightening bolts may require bolts longer or shorter than ...
...that a household fuse has not blown, or that the power supply cord is now complete. Installation is plugged into microwave oven. Loosen mounting plate screws. Connect vent to follow these instructions can result in place, insert bolts through the...Save Installation Instructions for troubleshooting information. WARNING A. NOTE: The screw cannot be adjusted, skip steps 7-9. 7. If adjustment is required, rotate microwave oven downward. Longer or shorter bolts are available at most hardware stores. ■ Overtightening bolts may require bolts longer or shorter than ...
Installation Instructions
Page 11
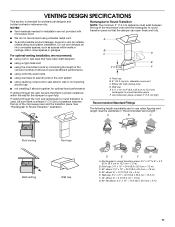
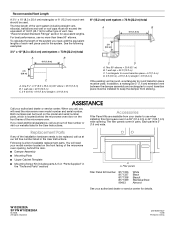
...= 10 ft (8.3 x 25.4 cm = 3 m) 11 Vent extension piece, at least 3" (7.6 cm) of clearance between the top of the microwave oven and the transition piece. VENTING DESIGN SPECIFICATIONS This section is at least 3" (7.6 cm) high Recommended Standard Fittings The following length equivalents are not... provided with microwave hood. ■ We do not recommend using a flexible metal vent. ■ To avoid possible product damage, be sure ...
...= 10 ft (8.3 x 25.4 cm = 3 m) 11 Vent extension piece, at least 3" (7.6 cm) of clearance between the top of the microwave oven and the transition piece. VENTING DESIGN SPECIFICATIONS This section is at least 3" (7.6 cm) high Recommended Standard Fittings The following length equivalents are not... provided with microwave hood. ■ We do not recommend using a flexible metal vent. ■ To avoid possible product damage, be sure ...
Installation Instructions
Page 12
...12.2 m) C. 1 rectangular to round transition piece = 5 ft (1.5 m) D. 2 ft (0.6 m) + 6 ft (1.8 m) straight = 8 ft (2.4 m) If the existing vent is a list of the microwave oven opening . The filler panels come in China To calculate the length of the system you need , add the equivalent lengths of vent. One 3¹...or service center for equivalent lengths. You will need your dealer to be used . Replacement Parts If any of the microwave oven. See "Recommended Standard Fittings" section for details. Both numbers can be used . Accessories Filler Panel Kits are ...
...12.2 m) C. 1 rectangular to round transition piece = 5 ft (1.5 m) D. 2 ft (0.6 m) + 6 ft (1.8 m) straight = 8 ft (2.4 m) If the existing vent is a list of the microwave oven opening . The filler panels come in China To calculate the length of the system you need , add the equivalent lengths of vent. One 3¹...or service center for equivalent lengths. You will need your dealer to be used . Replacement Parts If any of the microwave oven. See "Recommended Standard Fittings" section for details. Both numbers can be used . Accessories Filler Panel Kits are ...


